Retired - Electric Imp Breakout Hookup Guide
This Tutorial is Retired!
An electric imp hug! Provides an overview of the imp card and breakout. Both hardware and firmware subjects are covered.
View the updated tutorial: Retired - Electric Imp Breakout Hookup Guide v2
 jimblom
Example 2: Web Control
Some of the most fun you can have with the electric imp is connecting it to the Internet, and interfacing it with web pages. In this example, we'll use a simple HTML/Javascript web page to control some LEDs connected to the imp.
The Circuit
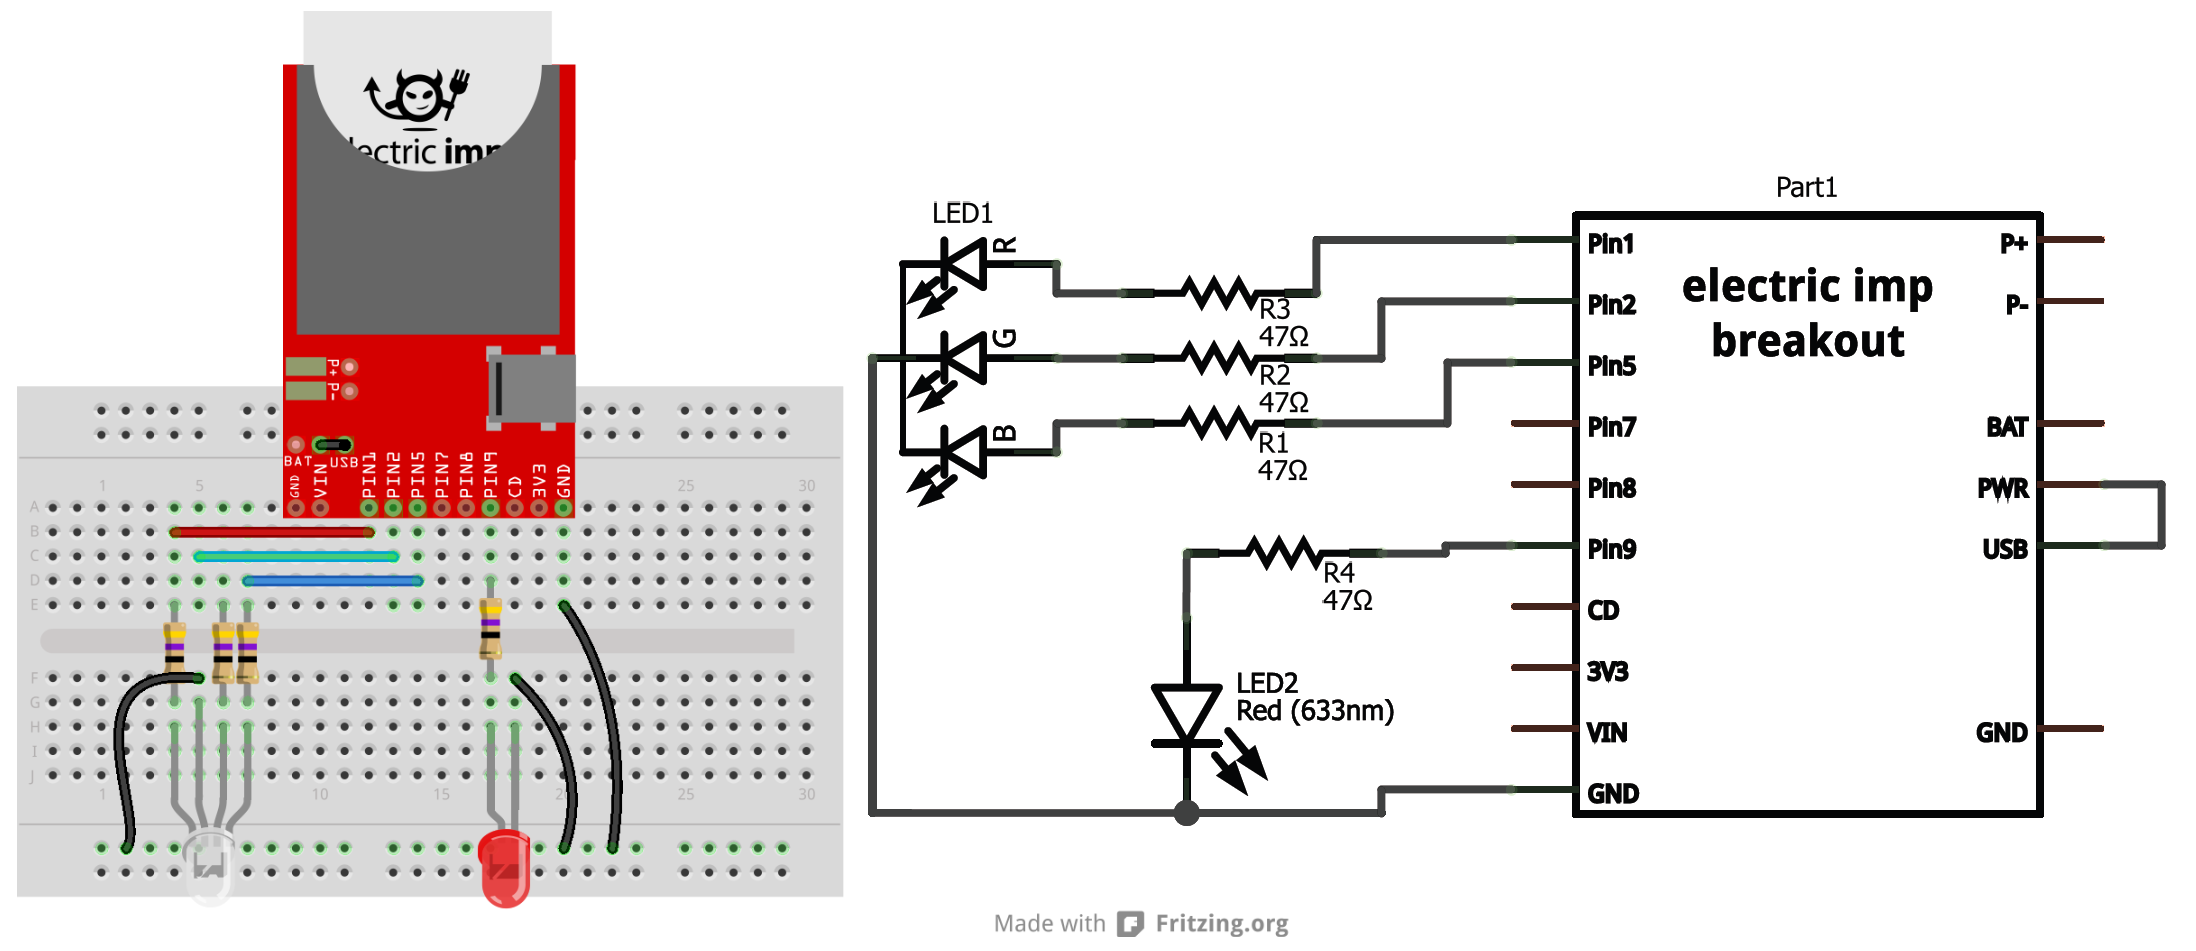
The circuit for this example is very simple. A common-cathode RGB LED is connected to the imp's pins 1, 2, and 5 (red, green, and blue anodes respectively). Then, another basic red LED is connected to pin 9 of the imp. Don't forget to add some current limiting resistors (in the range of 50-100Ω).
The imp Code
Create a new piece of code in the imp planner, and copy/paste the code below.
language:javascript
/* Electric Imp Web-controlled LEDs
    by: Jim Lindblom
    SparkFun Electronics
    date: July 16, 2013
    license: Beerware. Please use, reuse, and modify this code.
    If you find it useful, buy me a beer some day!

    This is a simple electric imp example, which shows how to interface
    the imp with a web page. This example code goes hand-in-hand with an
    HTML webpage. Check out this page for more information:
    https://learn.sparkfun.com/tutorials/electric-imp-breakout-hookup-guide/example-2-web-control
    This will show how you can use html range, text, and radio form inputs
    to control turn LEDs on/off, PWM them, and set a timer to turn them off.

    Circuit:
    A common cathode RGB LED is connected to the imp's pins 1, 2, and 5.
    The red anode connects to 1 through a 47 Ohm resistor, green 2, and blue 5.
    The cathode of the LED connects to ground.
    Another simple, red LED is connected to the imp to imp pin 9, through
    another 47 Ohm resistor. The cathode of the LED is grounded.
*/

// This function just turns all LEDs off.
function ledsOff()
{
    hardware.pin1.write(0);
    hardware.pin2.write(0);
    hardware.pin5.write(0);
    hardware.pin9.write(0);
}

// This function is accessed every time an HTML POST is received. It will parse the post
// and turn the LEDs on/off accordingly.
// The InputPort class encapsulates incoming data from the server to the imp. In order to act on the data,
// imp programs should derive a new class from InputPort and override the set() method.
// In order to use this function, an HTTP IN vimp must be connected to this
// imp's input in the planner.
class LedInput extends InputPort
{
    // Use received brightness in HTML to set the LED
    // the name "set" is required for this function
    function set(input)
    {
        // Get each of the form values and store them into a
        // variable. The name of these values "pin1", "pin2", "suspect", etc.
        // must be set exactly in the HTML page.
        local pin1Value = input.pin1;
        local pin2Value = input.pin2;
        local pin5Value = input.pin5;
        local pin9Value = input.pin9;
        local suspect = input.suspect;
        local duration = input.duration;

        // Next we'll PWM the RGB LEDs
        hardware.pin1.write(pin1Value);
        hardware.pin2.write(pin2Value);
        hardware.pin5.write(pin5Value);

        // Then turn the lone LED on or off, depending on the radio input
        if (pin9Value == "1")
            hardware.pin9.write(1);
        else
            hardware.pin9.write(0);

        // Print a message to the server log.
        server.log(suspect + " set the LED to " + pin9Value + " for " + duration + " seconds");

        // Finally, set a timer to eventually turn the LEDs off
        imp.wakeup(duration, ledsOff);  // Call ledsOff() in "duration" seconds
    }

}


// Setup stuff -- Runs when the imp starts up.
hardware.pin1.configure(PWM_OUT, 0.01, 0.0); // PWM 0.01 period, 0% on
hardware.pin2.configure(PWM_OUT, 0.01, 0.0); // PWM 0.01 period, 0% on
hardware.pin5.configure(PWM_OUT, 0.01, 0.0); // PWM 0.01 period, 0% on
hardware.pin9.configure(DIGITAL_OUT);   // Set as digital out
hardware.pin9.write(0); // Write low

// This sets up the info in the planner. This will name the imp
// "LED Web Controller", and give it an input. An HTTP IN vimp's output
// must be connected to the input of this imp.
imp.configure("LED Web Controller", [ LedInput() ], []);
Don't forget to upload the new code by clicking the "slider" icon of your imp in the planner and selecting the name of the saved code.
Again, check the comments for a line-by-line discussion of what the code is doing. This time, most of the action happens in the InputPort-extending LedInput class definition. Because we're using the InputPort class, we'll need to do a little extra setup in the imp planner (see the next section).
Setting Up the imp Planner
This imp code makes use of the imp's InputPort class. When using either that or the OutputPort class, a bit of extra setup is required in the imp planner. These classes take action on data coming in or out of the imp.
In this example, to get data into the imp, we need to add a virtual imp (vimp) block to the planner. To do so, first click the add node button, in the top left corner of the planner. And select the HTTP in block. This should add a green rectangle to your planner named "HTTP In". Click on the small tab on that block with a "+" on it. That will allow you to connect the output of the HTTP IN block to the input of our LED Web Controller block.
Making an HTML Page
Now, the last step is making a simple web page to control the imp. No servers are required for this bit of magic, just a computer with a web browser. Copy this HTML code and save it into a new file with an ".html" or ".htm" extension (or click here to download a copy of your own).
<html>
<head>
<script>
// This function is accessed when our form is submitted.
// It should read all values from the form, and construct a JSON string
// which our Electric Imp will later parse.
function sendForm(form)
{
    // Get values from the form, store into variables
    var redValue = form.redIn.value;
    var greenValue = form.greenIn.value;
    var blueValue = form.blueIn.value;
    var pin9Value = form.pin9[0].checked? 0 : 1;    // Equals 0 of Off checked, else 1 if On
    var time = parseInt(form.timeIn.value); // Turn this value from string to integer
    var suspect = form.suspect.value;

    // Construct the JSON string in form.value
    form.value.value = "{ \"pin1\": " + redValue +
                    ", \"pin2\": " + greenValue +
                    ", \"pin5\": " + blueValue +
                    ", \"pin9\": \"" + pin9Value + "\"" +  // Must add quotes (escaped with \) to make value a string
                    ", \"suspect\": \"" + suspect + "\"" +
                    ", \"duration\": " + time +
                    " }"
    form.submit();  // Submit our JSON-constructed form
}
</script>
</head>

<body>

<form name="leds" action="https://api.electricimp.com/YOUR_URL_HERE" method="post">
<input type="hidden" name="value"> <!-- All imp inputs must have a form input named "value" -->
Red (0-1): <input type="range" name="redIn" min="0" max="1" step="0.01"><br>
Green (0-1): <input type="range" name="greenIn" min="0" max="1" step="0.01"><br>
Blue (0-1): <input type="range" name="blueIn" min="0" max="1" step="0.01"><br>
Lonely Red LED: <input type="radio" name="pin9" value="0" checked>Off
                <input type="radio" name="pin9" value="1">On<br>
How long should the LEDs stay on? <input type="text" name="timeIn" value="10">seconds<br>
Your name? So we know who to blame! <input type="text" name="suspect" placeholder="Your name here"><br>
<br>
<input type="button" value="Update!" onClick="sendForm(this.form);">
</form>

</body>

</html>
Before opening your new HTML file in a web browser, you'll need to edit one piece of it, so open it up with a text editor (it could be as simple as Notepad or TextEdit). Towards the end of that file is this line:
<form name="leds" action="https://api.electricimp.com/YOUR_URL_HERE" method="post"> You need to replace the URL in the "action" option with the URL of your "HTTP In" vimp. To find that, click the "slider" of your "HTTP IN" vimp and look at the window that pops up.

In that, there should be a long, funky URL. Copy that into your HTML file and save.
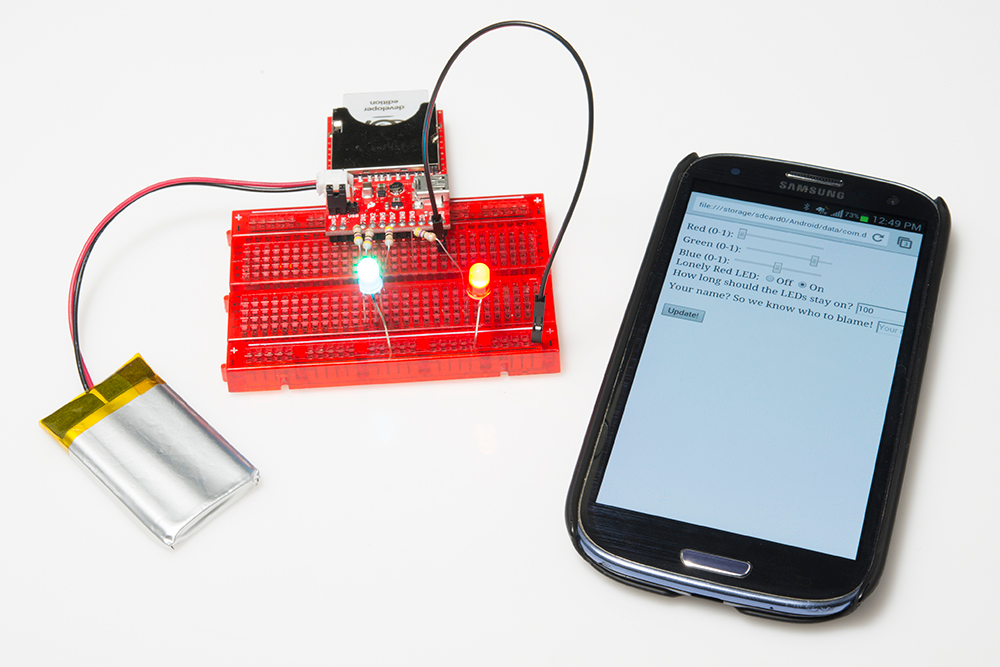
Now you can open the HTML file in your favorite web browser. From there, you can adjust the top three sliders to change the color of the RGB LED. The On/Off radio buttons turn the lone red LED on or off. The duration text box will turn all LEDs off after a set number of seconds. And the name textbox will print your name in your imp's server log. Try it out!
This example provides a nice selection of some of the form inputs you can send to the imp. The code in the HTML file isn't as simplistic as we'd like (the form calls a javascript function, which assembles a JSON string for the electric imp to parse), but it works! And stuff should be pretty copy/paste-able if you want to try modifying it to make it your own.