RP2040 Thing Plus Hookup Guide
 Nick Poole, santaimpersonator
 Software Overview
The Raspberry Pi foundation provides excellent documentation for the RP2040 on their website. This includes information for users to program the RP204 with MicroPython and C/C++ through the Pico SDK. Arduino, has also announced the release of their Mbed RP2040 Arduino core. The instructions below, are meant to help users setup and utilize the following programming environments on Windows 10 computers:
- Arduino IDE
- Pico SDK (C/C++)
- MicroPython
- REPL
rshell
For utilizing the Pico SDK (C/C++) and MicroPython on Mac OSX and Linux based computers, users can follow the instructions provided by the Raspberry Pi Foundation documentation:
- Getting Started with Raspberry Pi Pico (PDF)
- Raspberry Pi Pico C/C++ SDK User Manual (PDF)
- Raspberry Pi Pico Python SDK User Manual (PDF)
Arduino IDE
Most users will be familiar with the Arduino IDE and it's use. As a point of reference for professional developers who aren't aware, the Arduino IDE is an open-source development environment, written in Java, that makes it easy to write code and upload it to a supported board. For more details, feel free to check out the Arduino website.
To get started with the Arduino IDE, check out the following tutorials:
Installing an Arduino Library
What is an Arduino?
Installing Arduino IDE
Installing Board Definitions in the Arduino IDE
Installing the RP2040 Board Definition
Install the latest Arduino Mbed OS RP2040 board definitions in the Arduino IDE. Users unfamiliar with the board definition installation process can reference our tutorial below.
Installing Board Definitions in the Arduino IDE
September 9, 2020
Installation Instructions:
- Search for
RP2040in the Boards Manager.
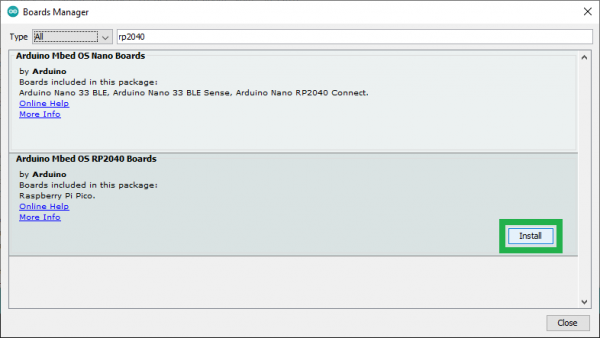 Arduino Mbed OS RP2040 listed in the Boards Manager. (Click to enlarge)
 - To complete the installation process, selected the Arduino Mbed OS RP2040 core and click on the INSTALL button that appears in the lower, right-hand corner. The board definition and upload tools will be installed automatically; users will notice that this may take a while.
Note: Users may need to disable their anti-virus software when installing the Arduino Mbed OS RP2040 board definition. We ran into issues, where the installation of the upload tools for the Arduino core were blocked by the anti-virus software. Arduino is already aware of the issue, they are working to get their files white-listed. For more information, users can reference this GitHub issue. Programming Tip:
The board may not show up on a COM port, if users who have already programmed their board through a different method. A simple solution is to:
- Download the
picoprobe.uf2file from the Raspberry Pi foundation's Pico board documentation page - Copy the
picoprobe.uf2firmware file to the board (while it is inBOOTSELmode) - If the board isn't automatically listed on a COM port users should reset (or unplug and re-plug in the board to the computer)
Note: If users have the Arduino IDE's Tools drop down menu open looking for a new COM port to be added, the Arduino IDE doesn't automatically repopulate and update the listed COM ports. To update the available COM ports list, users should close and then re-open the Tools drop down menu and navigate to the available COM ports.- Download the

Note: Users trying to access the SD card slot will need to modify the pins_arduino.h file to reconfigure the SPI bus pins. However, this will make the SPI bus inaccessible through the breakout pins (when utilizing the SPI library).
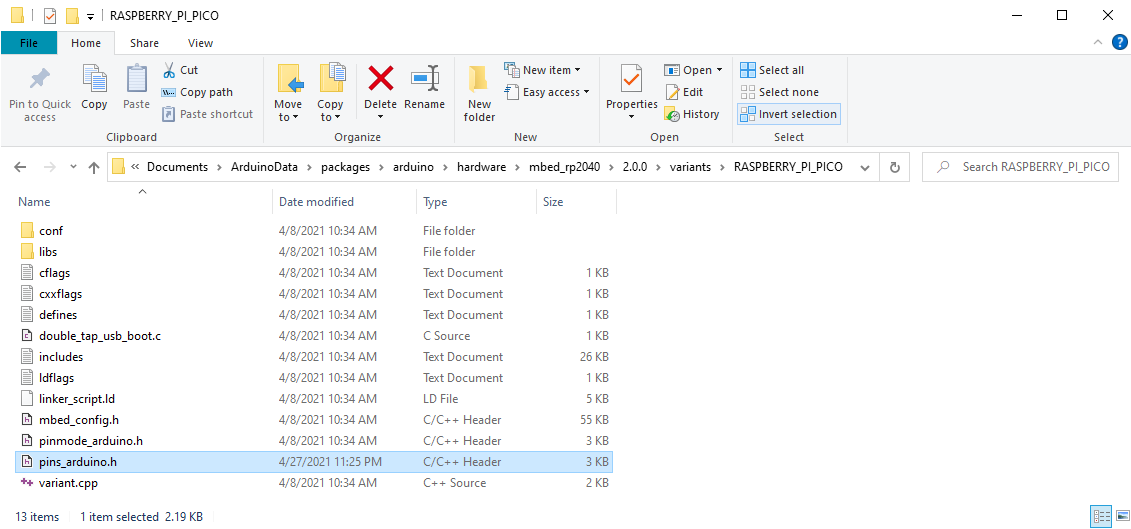
On a Windows 10 computer, with the Arduino IDE installed through the App store, the location of the
pins_arduino.hfile is:C:\Users\<username>\Documents\ArduinoData\packages\arduino\hardware\mbed_rp2040\<package_version>\variants\RASPBERRY_PI_PICO
pins_arduino.hfile in theRASPBERRY_PI_PICOfolder. (Click to enlarge)Users will need to modify lines 45 - 47 of the
pins_arduino.hfile to the following:// SPI #define PIN_SPI_MISO (12u) //(4u) #define PIN_SPI_MOSI (15u) //(3u) #define PIN_SPI_SCK (14u) //(2u)
Line modifications to thepins_arduino.hfile. (Click to enlarge)

earlephilhower has ported an unofficial Arduino core for the RP2040, which is based on the Pico SDK. This is useful for customers who want the functionality of the Pico SDK in the Arduino IDE. Installation instructions are available in the GitHub repository.
Pico SDK
In order to program the RP2040 with C/C++, users will use the Pico SDK (software development kit) provided by the Raspberry Pi Foundation. Additionally, the Raspberry Pi Foundation has written a user manual, which includes software documentation and examples to accompany the Pico SDK. The foundation has also provided online documentation that can be used as a reference manual.
Getting Started: For novice programmers, we recommend starting off with the Getting Started with Raspberry Pi Pico guide, from the Raspberry Pi Foundation. While the guide is intended for their RP2040 microcontroller board, it contains useful information for getting started with the Pico SDK, building and uploading a program, debugging, and adapting the SDK to a third-party IDE.
Installation: The Raspberry Pi Foundation also provides an installation script to download and setup the Pico SDK on a Raspberry Pi (SBC) single board computer, which can be downloaded from their GitHub repository.
.uf2 file, which the SDK generates. The .uf2 firmware file is then copied to the board, when it is in BOOTSEL mode to upload the program.
As documented in the user manual, the Pico C/C++ SDK can be used with various integrated development environments (IDEs). In order to utilize the SDK, users will also need to install a few dependencies. The Raspberry Pi Foundation also provides examples for the basic functionality of the RP2040 in their pico-examples GitHub repository.
Pico SDK on Windows 10
Note: The information for below has been compiled based on the information from the following resources:
On Windows 10 computers, the simplest way to get started with the Pico SDK is to use the installation script from the pico-setup-windows GitHub repository.
Users will need to download and use the installation executable files from the releases section:
- For 32-bit systems, users will want to use the executable ending in
x86.exe - For 64-bit systems, users will want to use the executable ending in
x64.exe
Installation Instructions:
- Use the setup script from the
pico-setup-windowsGitHub repo- Download release executable for your system architecture:
- Run the downloaded executable
- Utilize the default configurations
- Feel free to customize the installation for your computer system
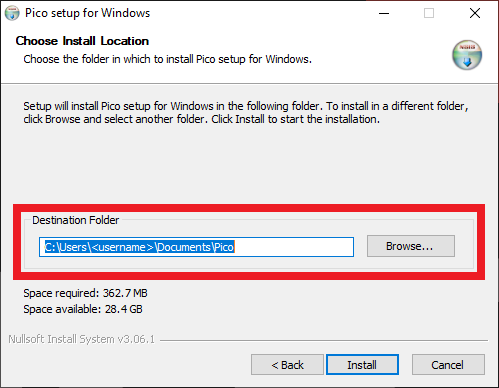
- Note the file path to the installed
Picofolder Installation file path. (Click to enlarge)
- Un-select the
Clone and build Pico repocompletion option before clicking Finish button- By selecting this option, the executable will automatically build the Pico SDK for the Raspberry Pi Pico board and not the RP2040 Thing Plus.
- Additionally, users who haven't configured their computer system's
PATHvariable for the installed dependencies will run into various errors.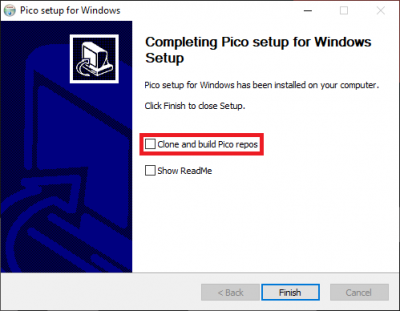 Installation completion options. (Click to enlarge)
Configure the computer system's
PATHvariables for the installed dependencies:User Variables:
Variable Value PICO_SDK_PATHC:\<path to installed Pico folder>\pico-sdk
Note: Users will need to modify this variable if thePicofolder is moved.PathC:\Users\<username>\AppData\Local\Programs\Microsoft VS Code\binSystem Variables:
Variable Value PathC:\Program Files\CMake\binPathC:\Program Files (x86)\GNU Arm Embedded Toolchain\10 2020-q4-major\bin
Note: The release value10 2020-q4-majorwill likely change over time.PathC:\Program Files\Git\cmdPathC:\Program Files (x86)\GnuWin32\binPathC:\Users\<username>\AppData\Local\Programs\Microsoft VS Code\binPathC:\Program Files (x86)\Microsoft Visual Studio\2019\BuildTools\VC\Tools\MSVC\14.28.29910\bin\Hostx86\x86
Note: The version/release values2019and14.28.29910will likely change over time.PathC:\Program Files\<PythonXx>\
Note: The version/release value for the Python program will likely change over time.
Note: The file path may also vary. For the Python 3.6, our file path was:
C:\Users\<username>\AppData\Local\Programs\Python\Python36-32\PathC:\Program Files\<PythonXx>\Scripts\
Note: The version/release value for the Python program will likely change over time.
Note: The file path may also vary. For the Python 3.6, our file path was:
C:\Users\<username>\AppData\Local\Programs\Python\Python36-32\Scripts\For more information on configuring the PATH variable, check out the tutorial below:
Configuring the PATH System Variable
March 23, 2021
A simple guide for configuring the PATH variable on Win 10, Mac OSX, and Linux systems.

Build Instructions:
Executing the pico-setup.cmd script will download all the relevant RP2040 GitHub repositories, update all the submodules, and build the examples for the Pico SDK. (Users will need to modify the pico-setup.cmd script to build the examples for the RP2040 Thing Plus and not the Raspberry Pi Pico board.)
- Navigate to the installation location of the
Picofolder - Modify the
pico-setup.cmdscript on line 62, replacecmake -G "NMake Makefiles" ..with:cmake -G "NMake Makefiles" .. -DPICO_BOARD=sparkfun_thingpluscmake -G "NMake Makefiles".. -DCMAKE_BUILD_TYPE=Debug -DPICO_BOARD=sparkfun_thingplus(for debugging)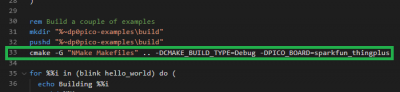 Modification for the Pico SDK build configuration. (Click to enlarge)
- Execute
pico-setup.cmd- If users run into errors, they may need to call
pico-env.cmdfrom the terminal/command prompt and then callpico-setup.cmd
- If users run into errors, they may need to call
- Users will find the builds for the example code in the
pico-examples\buildfolder. In each of the built example folders, users will find the.uf2file associated with the individual example. - Once the board is in
BOOTSELmode, user can copy the.uf2file over to program their board.

MicroPython
The Raspberry Pi Foundation has provided support for the RP2040 microcontroller with MicroPython. Additionally, the Raspberry Pi Foundation has written a user manual, which includes documentation and some basic MicroPython examples.
Getting Started: For novice programmers, we recommend starting off with the Get Started with MicroPython on Raspberry Pi Pico book, writtten by the Raspberry Pi Foundation. While the book is intended for their Raspberry Pi Pico board, it contains useful information for getting started with MircoPython, utilizing the REPL (Read–Eval–Print Loop), and several projects.
Note: Users will only need to download MicroPython, if they want to rebuild the .uf2 file or inlude a Python package in their custom build. For more information on MicroPython check out their online documentation and the README.md for the RP2040 port.
Basic Operation: Before users can begin programming with MicroPython, they will need to copy the .uf2 firmware file to the board (while it is in BOOTSEL mode). The latest MicroPython firmware can be downloaded from the RP2040 documentation on the Raspberry Pi Foundation website.
*.uf2 firmware file can be download from the MicroPython website.
Once copied, the RP2040 should automatically reset. Then users can utilize the REPL (Read–Eval–Print Loop) to interface with the microcontroller directly or use rshell to upload and save their code to the flash memory of the RP2040.
As documented in the user manual, the MicroPython can be used with various integrated development environments (IDEs). In order to utilize the SDK, users will also need to install a few dependencies. The Raspberry Pi Foundation also provides MicroPython examples to accompany the book (noted above), which can be downloaded from their GitHub repository.
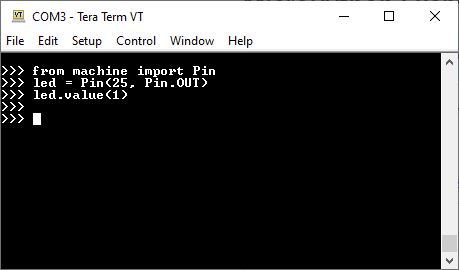
Read–Eval–Print Loop (REPL)
Note: The RP2040 Thing Plus must be running MicroPython to access and utilize the REPL.
- Users need to copy the
.uf2MicroPython firmware file to the board (while it is inBOOTSELmode). - The latest MicroPython firmware can be downloaded from from the RP2040 documentation on the Raspberry Pi Foundation website.
Users can access the REPL with their favorite serial terminal to instantly program the RP2040 microcontroller. After the MicroPython firmware is copied to the board, it will reset and show up on the computer's serial (or COM) port. Make sure to configure the serial terminal emulator for a baudrate of 115200 bps.
Remote MicroPython Shell on Windows 10
Note: The RP2040 Thing Plus must be running MicroPython to utilize rshell and upload your program.
- Users need to copy the
.uf2MicroPython firmware file to the board (while it is inBOOTSELmode). - The latest MicroPython firmware can be downloaded from from the RP2040 documentation on the Raspberry Pi Foundation website.
- If users upload another
.uf2file on to the board, the RP2040 will execute the new code. However, any saved Python files may still remain in flash (instead of getting overwritten by the new code). Therefore, when users upload the.uf2MicroPython firmware file back onto the board, the previously saved python files may:- Execute on reboot
- Run on a soft-reboot in the REPL
Installation Instructions:
- Install prerequisites
- Install Remote MicroPython Shell (
rshell)- In PowerShell (run as admin), type
pip3 install rshell
- In PowerShell (run as admin), type
Programming Instructions:
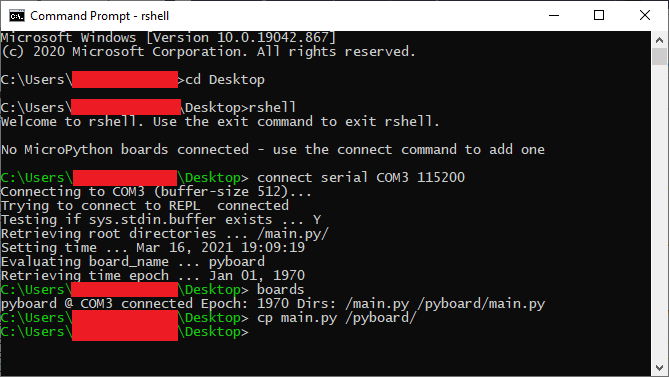
Below is an example of how to upload a program to the board using rshell on Windows 10.
- Change the working directory to the location of the program file
- Open
rshell- In PowerShell or the Command Prompt (run as admin), type
rshell
- In PowerShell or the Command Prompt (run as admin), type
- In the remote shell, connect to the COM port for the RP2040 Thing Plus
- Type
connect serial COM[#] [baudrate]- To connect to
COM3:connect serial COM3 115200 - *Use the device manager to find the COM port for the RP2040 Thing Plus
- To connect to
- Type
- In the remote shell, copy your program file to the RP2040 Thing Plus
- Type
cp [file name] /[board name]- By default MicroPython executes two files on restart or power up:
boot.py– this script is executed when the pyboard boots up. It sets up various configuration options for the pyboardmain.py– this is the main script that will contain your Python program. It is executed afterboot.py
- By default
rshellwill name a boardpyboardwhen connecting to the COM port (unless otherwise specified)- *The command
boards, inrshell, will list the boards that it is connected to, their names, and the connection
- *The command
- By default MicroPython executes two files on restart or power up:
- Type
- Once the user presses the
RESETbutton, the board will disconnect fromrshelland the RP2040 microcontroller will execute theboot.pyandmain.pyfiles stored in its flash.
rshell. (Click to enlarge)