Simblee Concepts
This Tutorial is Retired!
This tutorial covers concepts or technologies that are no longer current. It's still here for you to read and enjoy, but may not be as useful as our newest tutorials.
 SFUptownMaker
 Introduction
The Simblee module by RFDigital is intended to make embedded devices using Bluetooth Low Energy connections easier for everyone: hardware hackers, app developers, students, makers, engineers, and anyone else who wants to leverage their smartphone via BLE.
Historically, using a smartphone with an embedded project has meant learning to develop applications for smartphones, a daunting requirement. RFDigital has made this easier by moving the application development into the Arduino environment. When you write your sketch defining the behavior of the embedded portion of the Simblee, you'll also add a couple of functions below the old familiar setup() and loop() calls that tell the Simblee app running on your mobile device what the custom front end for this particular situation should look like.
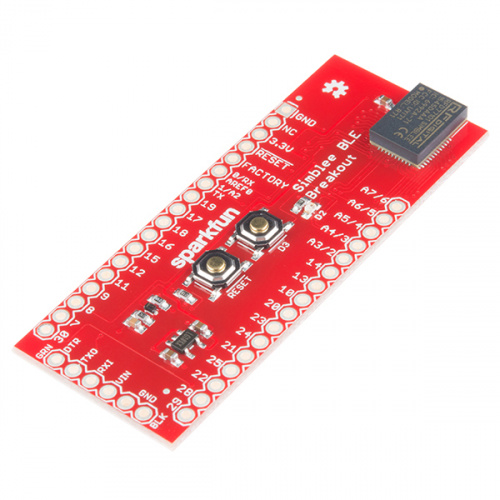
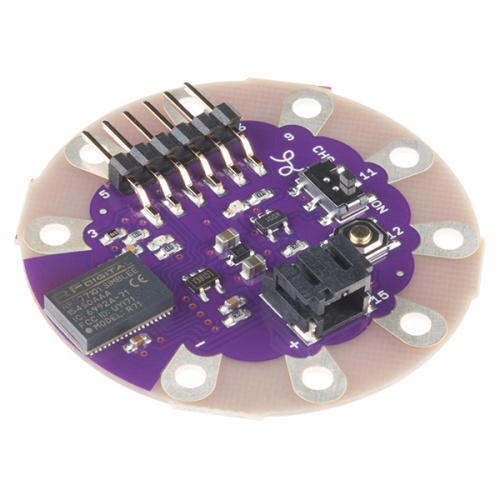
SparkFun has made two boards using the Simblee: a LilyPad board for sewable applications and a standard breakout board for general use. We also sell the official RFduino Simblee breakout, the RFduino Simblee starter kit, and a number of RFDuino shield products which are compatible with both the official Simblee breakout and our breakout.
This tutorial will introduce you to some of the generic principles involved in developing a project with the Simblee module.
Required Materials
- Buttons -- We'll be wanting to send signals into the application from hardware, so you'll definitely want buttons. This assortment is nice because it's breadboard compatible and the buttons have a nice, big, color-coded surface.
- LEDs -- We'll also be sending signals out to the outside world, and if you can light an LED, you can use that signal to do anything. This assortment includes several types of LED, including the common cathode RGB LED we'll be using later, as well as the resistors you'll need to limit the drive current.
- Jumper Wires -- Of course, you'll need some jumper wires to hook everything up.
- Breadboard -- And, a breadboard. I suggest this one, since its length will make it easier to insert a Simblee board as well as build a circuit with which to interface.
- Header pins -- If you've bought a Sparkfun Simblee Breakout board, you'll need to add some header pins so you can insert it into your breadboard.
- Alligator clips -- If you're using a LilyPad Simblee Board, alligator clips are the way to attach them to the circuit you're building up on the breadboard.
Suggested Reading
Obviously, we're going to have to make some assumptions about prior knowledge during these lessons. If you aren't sure you're comfortable with any of the topics below, here's your chance to review them before continuing on with the tutorial.
- LEDs -- Obviously, you'll want to understand how LEDs work, since we'll be using LED as a stand-in for other devices during our tutorials.
- Resistors -- This segment of our resistor tutorial has good coverage on using an LED to limit the current through an LED. This is more important for the Simblee than for most other boards, as the drive current capability out of the Simblee pins is lower than on most similar development boards.
- Breadboards -- We're going to assume you're building your circuit up on a breadboard. That's the easiest way to do it.
- Soldering -- If you bought a Simblee Breakout Board, you're going to have to solder some pins to it to use it in a breadboard. In addition to the general soldering tips in our main soldering tutorial, our Pi Wedge B+ Hookup Guide has some really great tips on soldering pins to a breakout board.
- Logic levels -- The Simblee board uses 3.3V signals, rather than 5V, and it's important that you understand the distinction to avoid damaging your Simblee.
General Hardware Information
While the Simblee is, in most respects, very similar to any other Arduino-compatible breakout boards you may have used, there are a few considerations that apply specifically to Simblee-based boards that you should be aware of.
Reduced LED drive strength
This is the big one. A normal Arduino (an Uno R3, say, or a Sparkfun RedBoard) can output up to 20mA into an LED, from more than one pin at a time. Simblee based boards, however, can only drive 15mA total, across all pins. This means you may have to use larger current limiting resistors (something like a 1k-ohm resistor is appropriate) for LEDs with a low forward voltage (like red, yellow, or orange). Attempting to drive too many LEDs at too high a current may damage your Simblee board.
3.3V drive voltage
This has become more common in recent years, but the prevalence of 5V Arduino and Arduino compatible boards still makes it worth mentioning. If you're not sure of what this means, please refer to our logic level tutorial for more information.
For the LilyPad Simblee and SparkFun Simblee Breakout, we've provided some onboard protection circuitry that will allow you to use the 5V FTDI Basic programming adapter (or the LilyPad version) to program them. We recommend against using the 3.3V FTDI Basic (so much that I'm not even going to link to it), as it lacks sufficient supply current to run a Simblee module at programming power levels. Both Simblee boards have onboard power regulation circuitry to convert the 5V power to the 3.3V that the Simblee needs, which brings us to...
Powering your Simblee board
As mentioned above, both Sparkfun Simblee boards have an onboard power regulator to provide the 3.3V regulated power the modules want. A single-cell LiPo battery (such as this one) makes an excellent power supply for Simblee projects; in fact, the LilyPad Simblee not only has a 2mm JST connector specifically to attach to our batteries, it also has an onboard charge circuit!
Of course, as a Bluetooth Low Energy device, we expect the Simblee to have extremely long battery life. This is, however, heavily contingent on the rest of your design. If you are constantly driving LEDs, for instance, or powering an accelerometer or other sensor, you'll find that the low-power nature of the Simblee module won't help you much at all. Also, you'll need to place the Simblee module into a low power mode much of the time to realize the benefits of the BLE power consumption features. More on this later, in the examples section.
Setting Up Arduino
Adding support for the Simblee to your Arduino IDE
In the bad old days, adding support for a new architecture to the Arduino IDE meant downloading files from some random website, extracting them into some random folder, and then copying them into some obscure location on your hard drive. Those days are behind us!
Introduced in version 1.6.0 of the Arduino.cc version of the IDE, the Boards Manager allows you to download support for a new device from within the IDE itself. The good people behind the Simblee have provided a link which allows you to directly add the Simblee supporting files and tools from the Boards Manager.
Add the download address to your preferences window
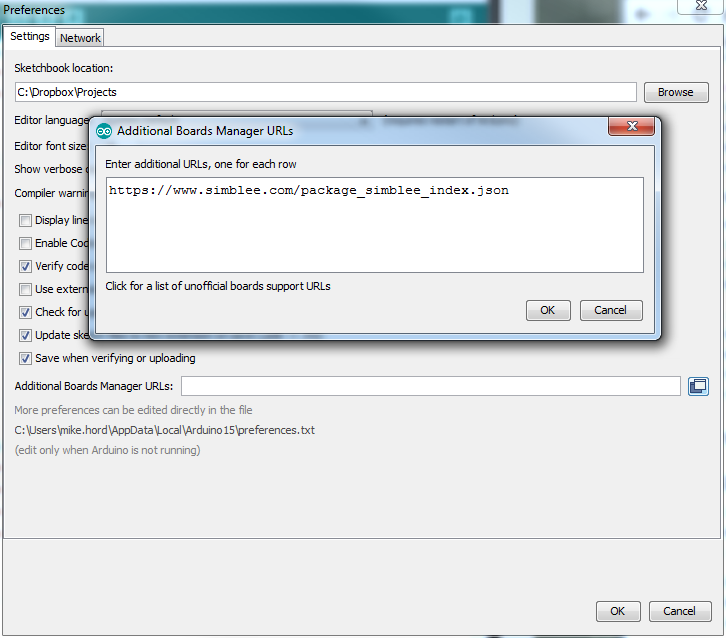
As you can see in the picture above, there's a text field at the bottom of the preferences window for the Arduino IDE (which can be accessed from the "File" menu), labeled "Additional Board Manager URLs". Click the little box next to the field, and paste the appropriate link from below into the first open line in the text box that opens:
For Arduino 1.6.5, use this link:
https://www.simblee.com/package_simblee_index.json

For Arduino 1.6.7 or later, use the following link:
https://www.simblee.com/package_simblee166_index.json
Click the "OK" button, then "OK" in the "Preferences" window. This adds the address of the resource to the IDE, so you can access it from within the Boards Manager. We recommend against using Arduino 1.6.6, as there have been issues observed during development.
Open the Boards Manager and download the support package

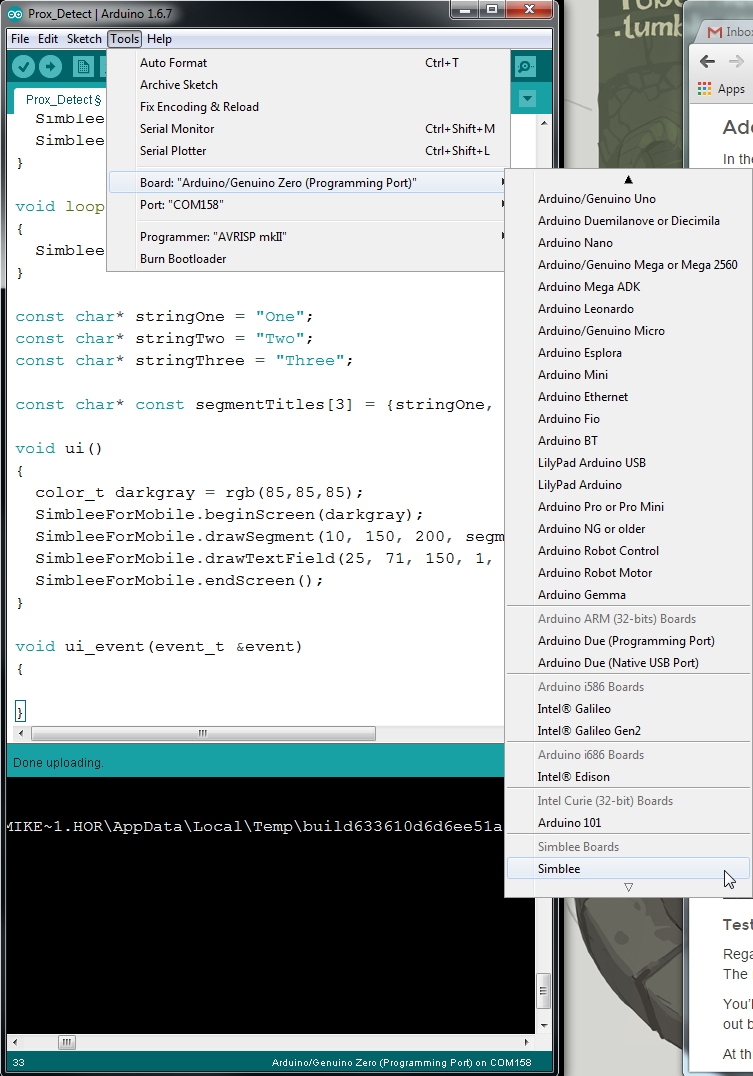
Next, open the Boards Manager. It can be found under the "Tools" menu, at the head of the board selection submenu. Selecting it will bring up a window that looks like this:
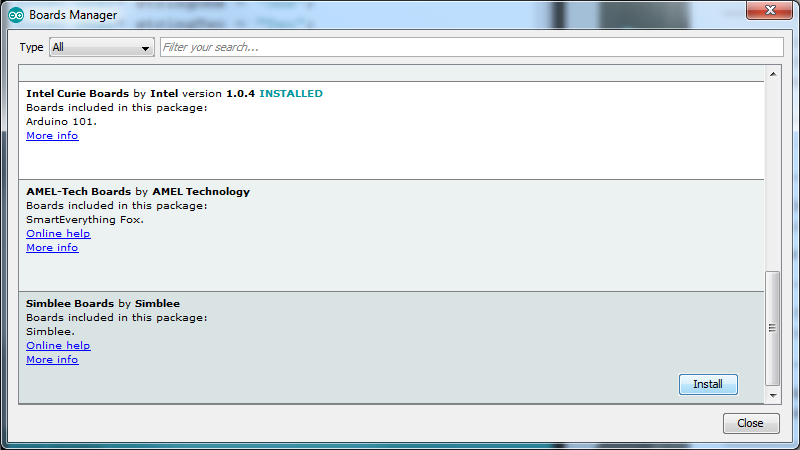
Type "Simblee" into the search window, and hit enter. A description of the Simblee support package should appear in the scroll window. If the package description doesn't appear, try restarting your IDE.
Click anywhere in that description field to select it, and a button labeled "Install" should appear. Click it, and wait for the bar across the bottom to fill in.
Once the download is complete, restart the IDE, and you should see the Simblee in your board selection menu.
Testing the installation
Regardless of the board you've purchased, you're going to select the same thing from the boards menu: "Simblee". The module at the heart is the same, as is the upload process.
You'll also want to select the appropriate COM port for your board; I'm going to assume you know how to figure that out but if you need help, you can check out our "Installing the Arduino IDE" tutorial.
At this point, you should have a blank sketch open, with nothing but setup()
and loop() functions.
Hit the "Upload" button, and wait. After a few moments, you should see the uploading progress message in the bottom frame of the IDE window:
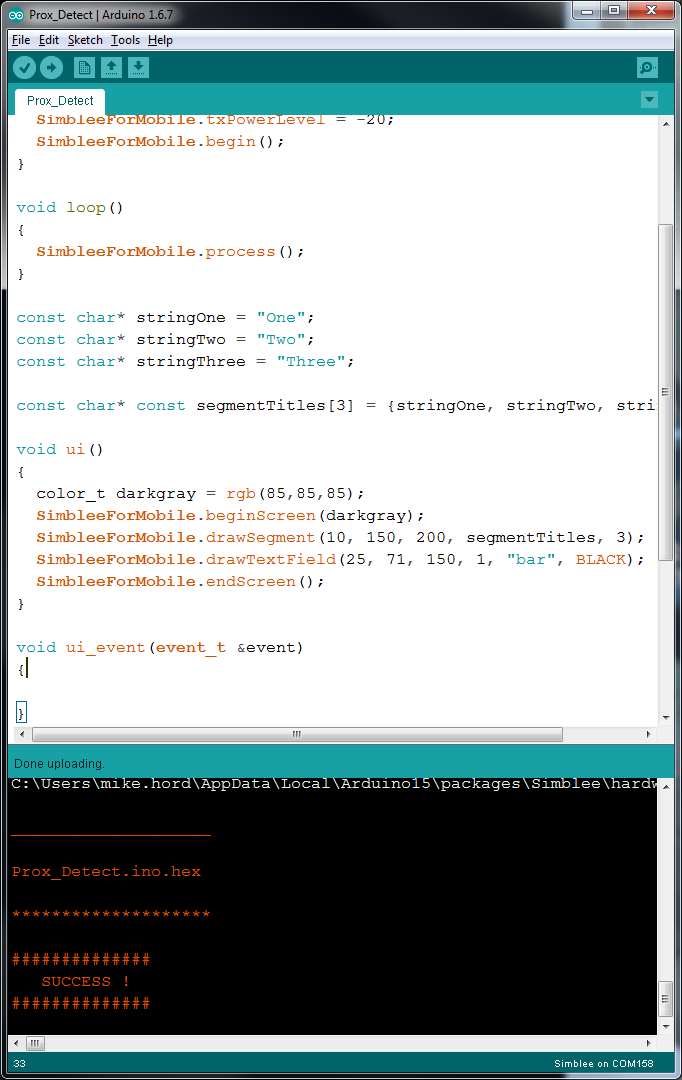
If that happens, congratulations! You've got the IDE properly upgraded to support Simblee.
If it fails, try restarting the IDE, check and make sure you have the right COM port selected (again, check the Installing the Arduino IDE tutorial for help), or reinstall the support package through the boards manager.
Installing the App
At this time (early Feb 2016), the Simblee app is only available for iOS. RFDigital expect to have an Android version available sometime in the first quarter of 2016. We'll update our site when that happens.
To interact with the Simblee module from a mobile device, you'll need to install the Simblee for Mobile app. This free download is available for iOS only, through the Apple App Store.
The Simblee for Mobile app must be downloaded from the Apple App Store. Simply open the App Store and search for "Simblee for Mobile", and the download page should come up automatically.
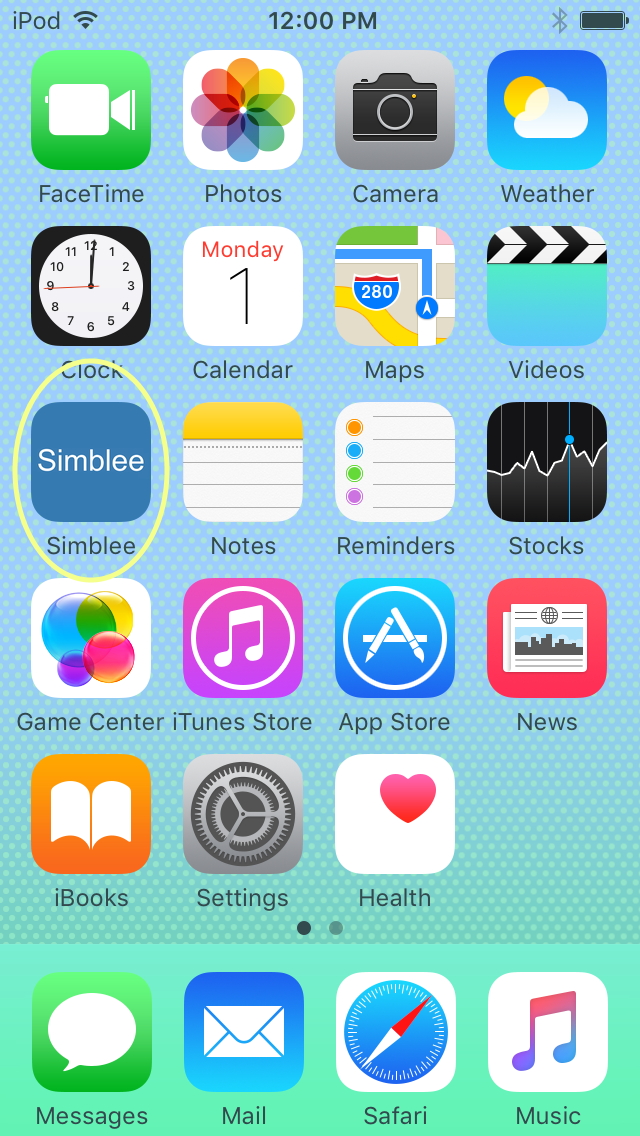
Once the install has finished, you'll find the Simblee for Mobile app on one of your home screens.
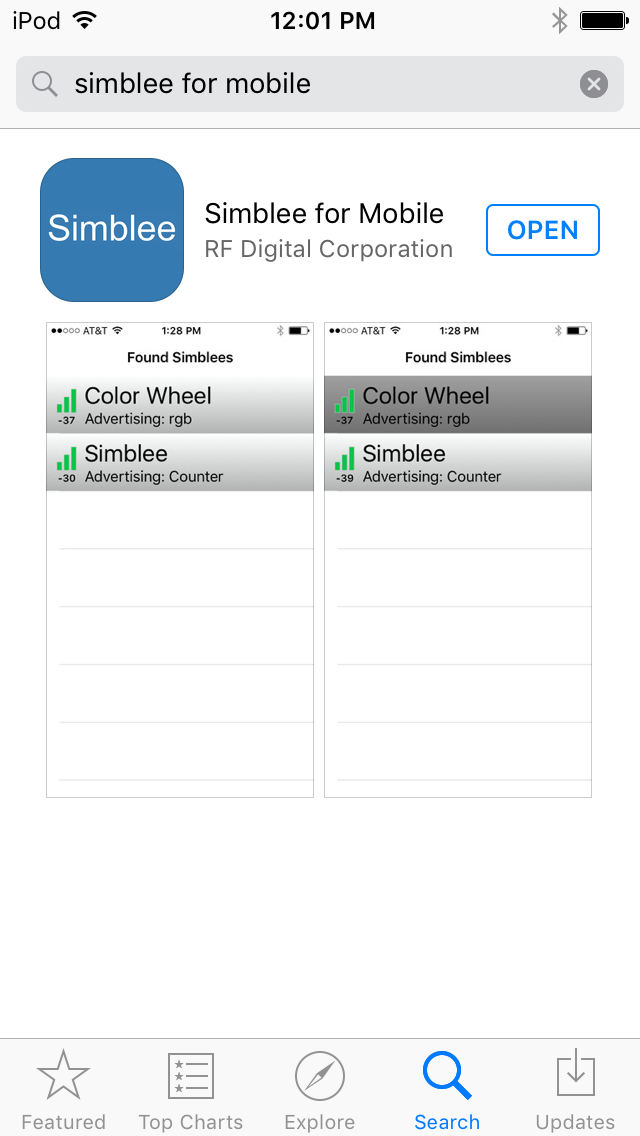
Opening the app will show a screen like this, where you'll see a list of all the active Simblee devices in the area.
You can then connect to the active devices by simply touching the name in the list.
General Coding Concepts
Since the Simblee introduces a new concept (a synchronized but self-contained application running on a remote device), there are a few new concepts in the way code is written for the Simblee that we should go over before we dive into the examples.
New Functions
First and foremost, you'll notice that any sketch which uses the Simblee UI
library (called "SimbleeForMobile", hereafter abbreviated SFM) has at least two additional functions: ui() and ui_event(). Let's explore what these are
for.
ui() is basically the SFM equivalent of the setup() function. It creates
the default objects that the user will see when connecting the Simblee app to a particular Simblee device and how those objects will behave. It gets called on connection to a new device (maybe -- we'll cover the circumstances under
which a device can cache the interface later).
ui_event() is a callback function which gets triggered when the user "does
something" in the UI. We'll get into the specifics of what that "something" may be later, but broadly, it's just what you'd expect: interacts with a button, moves a slider, enters a text value, etc.
SimbleeForMobile.process()
This one is simple, if extremely important. During each iteration of loop(), you need to call this function to handle processing of events from the UI. It's important to note that, since this function is getting called during loop(), excessive busy-wait delays (like the delay() function) will impact the responsiveness of your application more than anything else will.
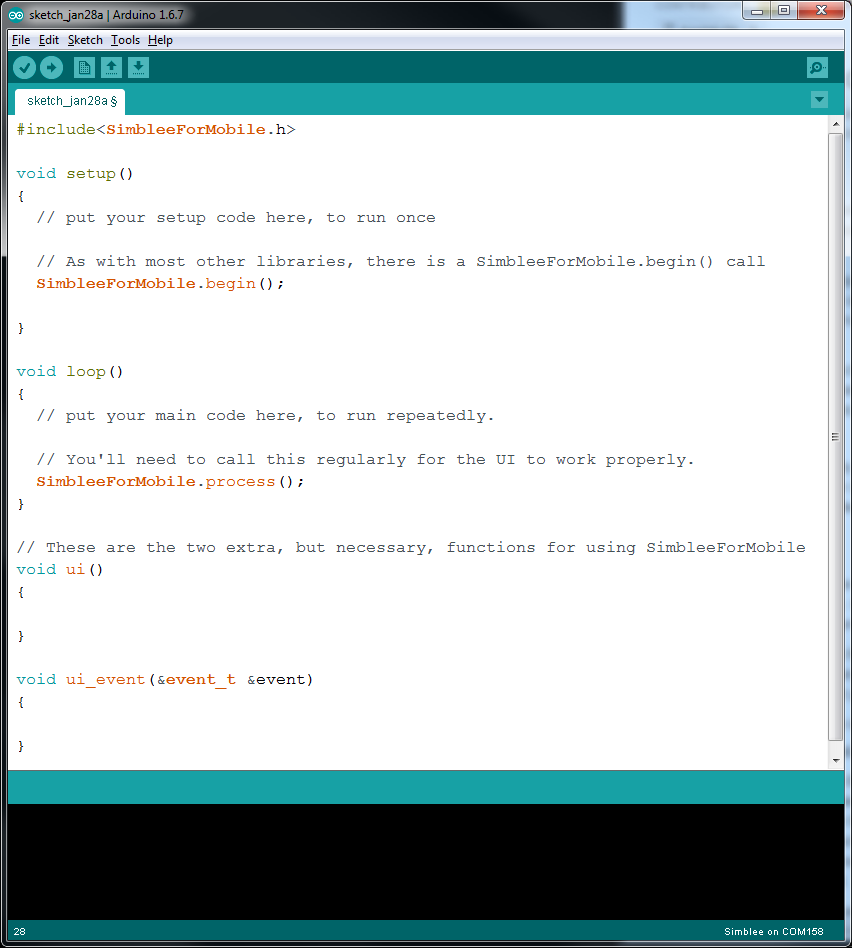
Here's a blank SimbleeForMobile sketch, showing all the new features in place.
Power Management
As mentioned earlier, while the Simblee is a Bluetooth Low Energy device, there is nothing inherently low energy about it while it's operating normally. In fact, it may be consuming more power than a regular Arduino! In order to realize the benefits of BLE, you must learn to manage the power state of the processor.
Broadly speaking, this means that you'll want to put the device in low power mode for as much of the time as possible, waking up only when necessary and then powering down again immediately. This "sleep as much as possible protocol" brings us to the next point: host/client synchronization.
We'll cover this in an example later; for now, I want to point it out to avoid that concept slipping through the cracks.
Host/client synchronization
One of the key problems with BLE is keeping client devices synchronized with their hosts. For a BLE device to minimize power use, it must sleep a lot of the time; this means not necessarily being available to hear a communications request from the host when it is sent. To work around this limitation, the host and client agree on a "wake-up interval", during which the client will listen for the host and the host will attempt to contact the client. In a bidirectional system, there's room for a lot of slop; they can repeat messages as often as needed until an acknowledgement is received.
However, some BLE devices are made to be very low power, running on batteries for months at a time or more. One of the ways this is possible is by waking up only long enough to squirt a tiny data packet out into the ether, and then going immediately back to sleep. Host devices must, therefore, be listening during these times, or they'll miss the packet.
As we'll see later, it's possible to set the time gap between these data transmissions to very short times (20ms) to very long times (days). As you might imagine, this means that BLE modules must have very accurate internal real time clocks. This can be used to our advantage for other reasons, as well.
Library Reference
This page is intended to provide a reference to the various commands that are provided in the Simblee libraries. While we will try to provide examples of as many of these as possible, this list will give a strict explanation of each function.
There are ten Simblee-specific libraries: SimbleeAESCOM, SimbleeCloud, SimbleeForMobile, SimbleeGZLL, SimbleeRNG, SimbleeAES, SimbleeBLE, SimbleeCOM, SimbleeForMobileClient, and SimbleeNonBLE. In addition, there are Simblee-compatible versions of three "standard" Arduino libraries: SPI, Servo, and Wire. We won't cover all of these; there just isn't time. We're going to focus on SimbleeForMobile, SimbleeForMobileClient, SimbleeBLE, and SimbleeNonBLE, as these are probably the most widely applicable.
SimbleeNonBLE
Strictly speaking, SimbleeNonBLE isn't really a library; it's created as a library folder to provide example code for Simblee devices that isn't specific to using the Simblee as a BLE device. Thus, there's no need to include "SimbleeNonBLE.h" in any of your code files (indeed, the file is empty). However, there are some functions that are likely to be useful that can be found in the examples folder in this "library".
If anything is different to what you'd normally expect on a "standard" Arduino board, we'll mention it here.
analogRead(uint32_t ulPin)-- Returns a uint32_t (range 0-1023) representing the analog voltage on pinulPin. The Simblee supportsanalogRead()on pins 1-6 only.analogWrite(uint32_t ulPin, uint32_t ulValue)-- Provides a PWM output on pinulPinof duty cycleulValue/255. Unlike most Arduino boards, any pin can be used foranalogWrite(), but only up to four at one time.getDeviceId()-- Returns a uint64_t which is unique to this particular Simblee module. The upper and lower uint32_t values comprising this value can be individually accessed viagetDeviceIdLow()andgetDeviceIdHigh().Simblee_pinWake(uint32_t ulPin, uint32_t dwWake)-- Choose a pin to wake the device from sleep.dwWakecan be eitherHIGH,LOW, orDISABLED.Simblee_pinWakeCallback(uint32_t ulPin, uint32_t dWake, pin_wake_t callback)-- The first two parameters are the same as forSimblee_pinWake(); the third is the name of a function returning typeintand receiving one argument,uint32_t pinName. This code will be called upon a pin-based wake up from sleep mode.Simblee_pinWoke(uint32_t ulPin)-- Returnstrueif the recent wakeup was caused by the pin number passed in.Simblee_resetPinWake(uint32_t ulPin)-- Resets the status of that pin's wakeup register. Must be called before returning to low power mode!Simblee_ULPDelay(uint64_t ms)-- Put the Simblee device into "ultra low-power" mode formsmilliseconds. Macros exist to define the parameter asMILLISECONDS(x),SECONDS(x),MINUTES(x),HOURS(x), orDAYS(x); if you pass the parameterINFINITEthe Simblee won't wake up until a predefined pin event occurs. In this mode, the Simblee consumes about 500uA of current. If no callback function is specified and the waking event was a pin input, execution resumes on the line after theSimblee_ULPDelay()function was called. If a callback function exists, all input wakeups will vector to that code rather than executing the code following theSimblee_ULPDelay()call.Simblee_systemOff()-- Put the system into double secret low power mode. In this mode, waking up will take longer and can't be done on a timed basis; however, the power consumption is even further reduced over ultra low power mode, to around 1uA. On power up, execution begins with the callback function specified using theSimblee_pinWakeCallback()function; if you haven't set a callback function, execution is immediately suspended back into low power mode.Simblee_systemReset()-- Software system reset call. Begins execution at the beginning of the sketch; this will cause the Simblee to drop any active connections.
SimbleeForMobile
The SimbleeForMobile library implements the functions necessary to draw objects in the Simblee for Mobile app. This code is resident on the Simblee module and is uploaded when the module connects to the mobile device; it can be cached on the device to reduce load times for future connections.
Common Functions
These four functions must be in every SimbleeForMobile sketch for it to work. The first two must be called and the second two must be defined.
SimbleeForMobile.begin()-- Perform initial setup for the library. Typically, this is called at the end of thesetup()function.SimbleeForMobile.process()-- Must be called once per loop to handle all the background processes necessary to the interaction between Simblee and host. Typically, the call to this function is the last thing done in theloop()function.
These two functions must be defined in your sketch for it to work; add them to the sketch below setup() and loop().
void ui()-- Defines the UI on the host device.void ui_event(event_t &event)-- Called when an event occurs on the host device. Theevent_tobject contains information about what particular type of event occurred; more on this in a later section.
Configuration Variables
Some of these variables are identical to the ones in the SimbleeBLE library; indeed, SimbleeForMobile is built on top of SimbleeBLE. Do not attempt to use both SimbleeBLE and SimbleeForMobile in the same sketch, however.
All of these configuration variables must be set before calling
SimbleeForMobile.begin()
SimbleeForMobile.deviceName-- Name displayed in the Simblee app. This string's length plus the length of theSimbleeForMobile.advertisementDatastring must be less than 16 characters long.SimbleeForMobile.advertisementData-- Data displayed in the Simblee app. This string's length plus the length of theSimbleeForMobile.deviceNamestring must be less than 16 characters long.SimbleeForMobile.txPowerLevel--intbetween -20 and +4 representing transmit power, in dBm. Default is +4; only values which a multiples of 4 are allowed.SimbleeBLE.advertisementInterval--intvariable declaring, in ms, the frequency with which to issue advertisement packets. Range from 20ms to 10.24s; the actual range units are in units of 0.625ms, so the actual interval will only be an approximation of this value. If the device is in nonconnectable mode, the actual interval will be a minimum of 100ms. Default is 80ms.
Callback Functions
Certain events (apart from UI events on the host device) will cause a callback function to be activated. Here's a list of those functions; to use any of them, define them in your sketch below the four standard SimbleeForMobile functions.
void SimbleeForMobile_onAdvertisement(bool start)-- Called when advertisement starts, or stops, andstartreports which event occurred.void SimbleeForMobile_onConnect()-- Called when a host connects to the Simblee device.void SimbleeForMobile_onDisconnect()-- Called when a host disconnects from the Simblee.void SimbleeForMobile_onRSSI(int rssi)-- Called when new RSSI information is available. This is the signal strength at the Simblee, not the host.
UI Drawing Concepts
Now for the good part: how to draw a UI on the host! These functions may be
called at any time, in any function; if you call them during the ui()
function call, however, they will only be sent once, on connection, which makes the bandwidth usage lower.
A note on position: all objects are created with their upper left corner at the reference location. The upper left corner of the screen is 0,0, and the X and Y coordinate values increase as you move towards the right or bottom edges of the screen. To find the X and Y dimensions of the screen, you may reference the SimbleeForMobile.screenWidth and SimbleeForMobile.screenHeight variables.
It is possible to use the device in either portrait or landscape mode. The mode is selected when SimbleeForMobile.beginScreen() is called. More on this below.
Bookending your UI items with SimbleeForMobile.beginScreen() and
SimbleeForMobile.endScreen() within the ui() function allows the Simblee
app to determine what portions of the UI the user expects to remain fixed.
Anything not between those two function calls will not be cached on the host device and will be reuploaded at every device reconnection.
UI Elements
A note about colors: many of these objects accept one or more parameters of
type color_t. color_t variables contain red, green, blue, and alpha channel information, and are returned by the functions rgb(redVal, greenVal, blueVal) and rgba(redVal, greenVal, blueVal, alphaVal). There are also some pre-defined macros for certain colors: BLACK, RED, GREEN, BLUE, YELLOW, MAGENTA, CYAN, WHITE, GRAY, and CLEAR.
Rectangle
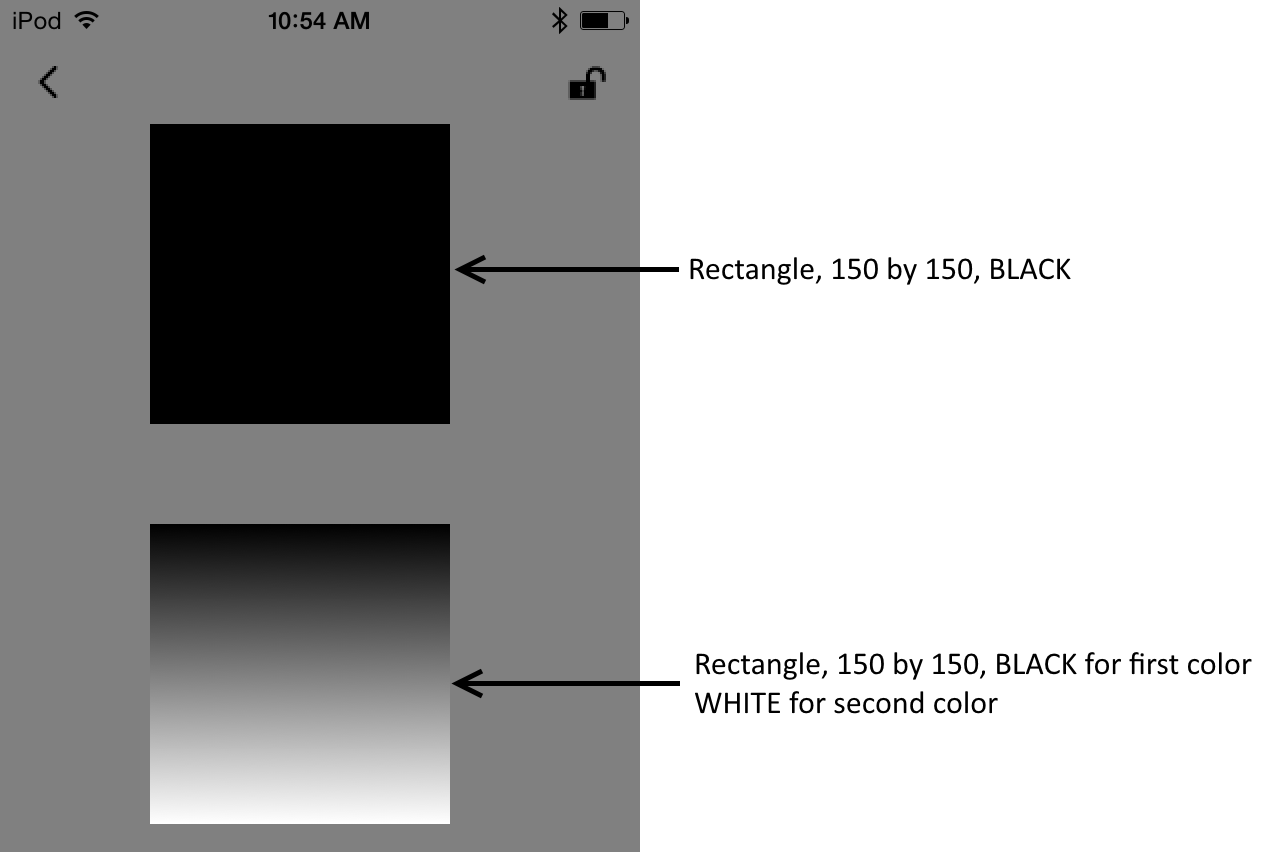
The simplest object that can be drawn in the UI is a rectangle. Parameters are the x,y coordinates of the upper left corner, x and y dimensions, and color. If so desired, a second color parameter can be passed, and the rectangle will be colored as a gradient from top to bottom.
language:c
uint8_t drawRect(uint16_t x, uint16_t y, uint16_t w, uint16_t h, color_t color);
uint8_t drawRect(uint16_t x, uint16_t y, uint16_t w, uint16_t h,
    color_t color, color_t color2);
Text Box
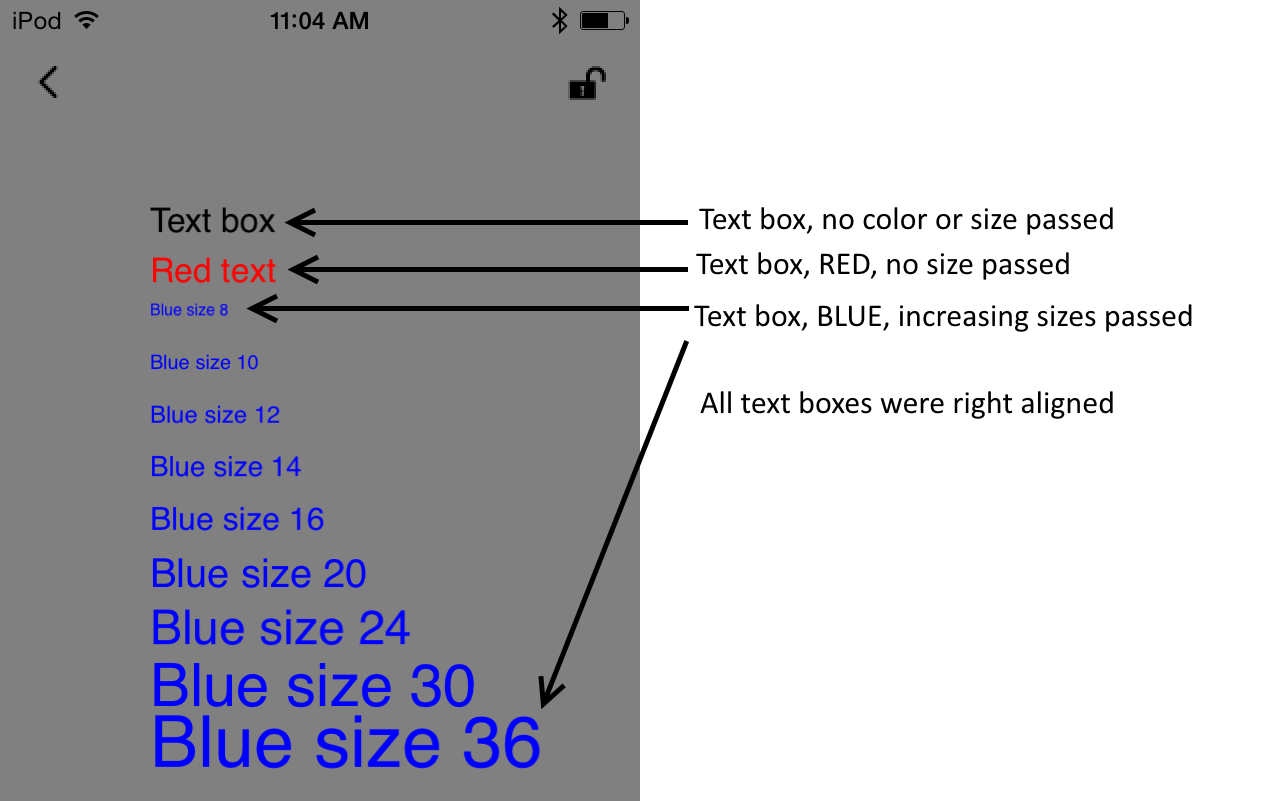
Text boxes can be either numeric or alphanumeric. They are created via
overloaded calls to the SimbleeForMobile.drawText() function; height is
automatically calculated. Text cannot be made bold, italicized, etc, but the
size and color may be altered, and alphanumeric text boxes may contain multiple
lines of text (by inserting '\n' characters in the string). Text boxes may only
be used for user input by detecting a touch, like a button; for user text value
inputs, see "Text Fields", up next.
language:c
uint8_t drawText(uint16_t x, uint16_t y, const char* title);
uint8_t drawText(uint16_t x, uint16_t y, const char* title, color_t color);
uint8_t drawText(uint16_t x, uint16_t y, const char* title, color_t_color,
    uint8_t size);

uint8_t drawText(uint16_t x, uint16_t y, int16_t value);
uint8_t drawText(uint16_t x, uint16_t y, int16_t value, color_t color);
uint8_t drawText(uint16_t x, uint16_t y, int16_t value, color_t color,
    uint8_t size);
Text Field

A text field is intended to receive user input in the form of a string or
number. Unlike text boxes, width is not automatically calculated and must be
supplied to the function after x and y are specified. After width is the last
mandatory field, a string which will be the default value upon launch of the
script. This string can, of course, be empty, if you don't want to display a
default value. Optional parameters are placeholder text, which appears whenever
the text field is empty (including when the default text string is empty),
color, which is the text color, and background, which is the color of
the background inside the field. For a numerical text field, instead of a
default string, a default value is entered; however, this means that the
placeholder text will never be visible in a numerical text field. Numerical
text fields will also cause the keyboard to be brought up in a numerical mode,
but the input is not constrained to numbers.
language:c
uint8_t drawTextField(uint16_t x, uint16_t y, uint16_t w, const char* text);
uint8_t drawTextField(uint16_t x, uint16_t y, uint16_t w, const char* text,
    const char* placeholder);
uint8_t drawTextField(uint16_t x, uint16_t y, uint16_t w, const char* text,
    const char* placeholder, color_t color);
uint8_t drawTextField(uint16_t x, uint16_t y, uint16_t w, const char* text,
    const char* placeholder, color_t color, color_t background);

uint8_t drawTextField(uint16_t x, uint16_t y, uint16_t w, int16_t value);
uint8_t drawTextField(uint16_t x, uint16_t y, uint16_t w, int16_t value,
    const char* placeholder);
uint8_t drawTextField(uint16_t x, uint16_t y, uint16_t w, int16_t value,
    const char* placeholder, color_t color);
uint8_t drawTextField(uint16_t x, uint16_t y, uint16_t w, int16_t value,
    const char* placeholder, color_t color, color_t background);
Button
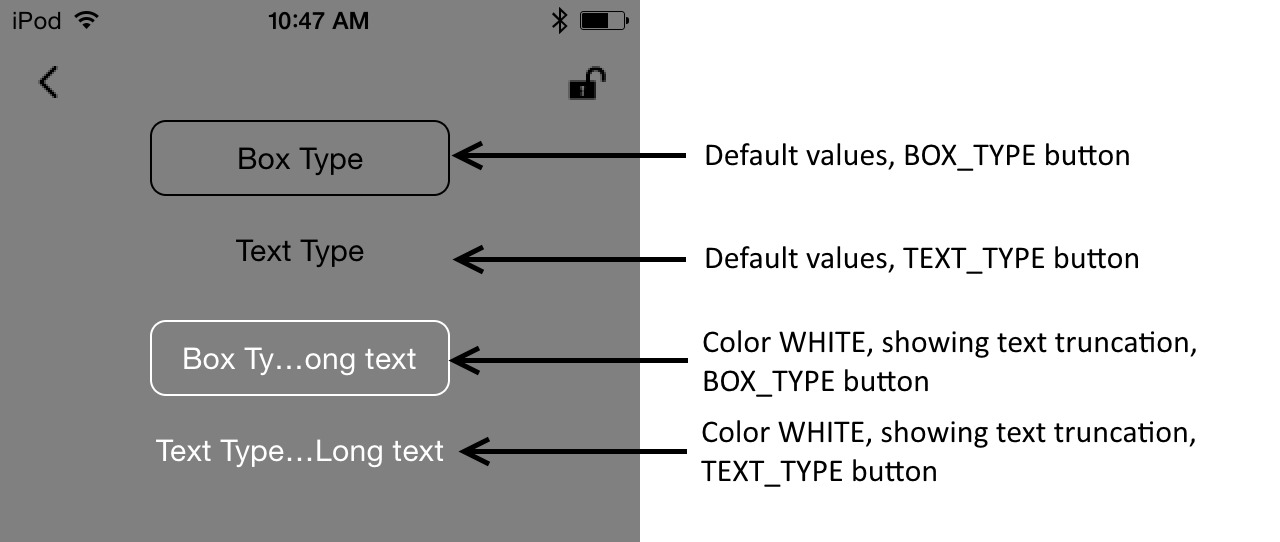
Buttons are the simplest default interactive UI element. Unlike text boxes,
they can have a specified width, and the title will be centered inside the
button. The background of the button is always clear; the text can be colored.
The type argument can be either BOX_TYPE or TEXT_TYPE.
language:c
uint8_t drawButton(uint16_t x, uint16_t y, uint16_t w, const char* title);
uint8_t drawButton(uint16_t x, uint16_t y, uint16_t w, const char* title,
    color_t color);
uint8_t drawButton(uint16_t x, uint16_t y, uint16_t w, const char* title,
    color_t color, uint8_t type);
Switch
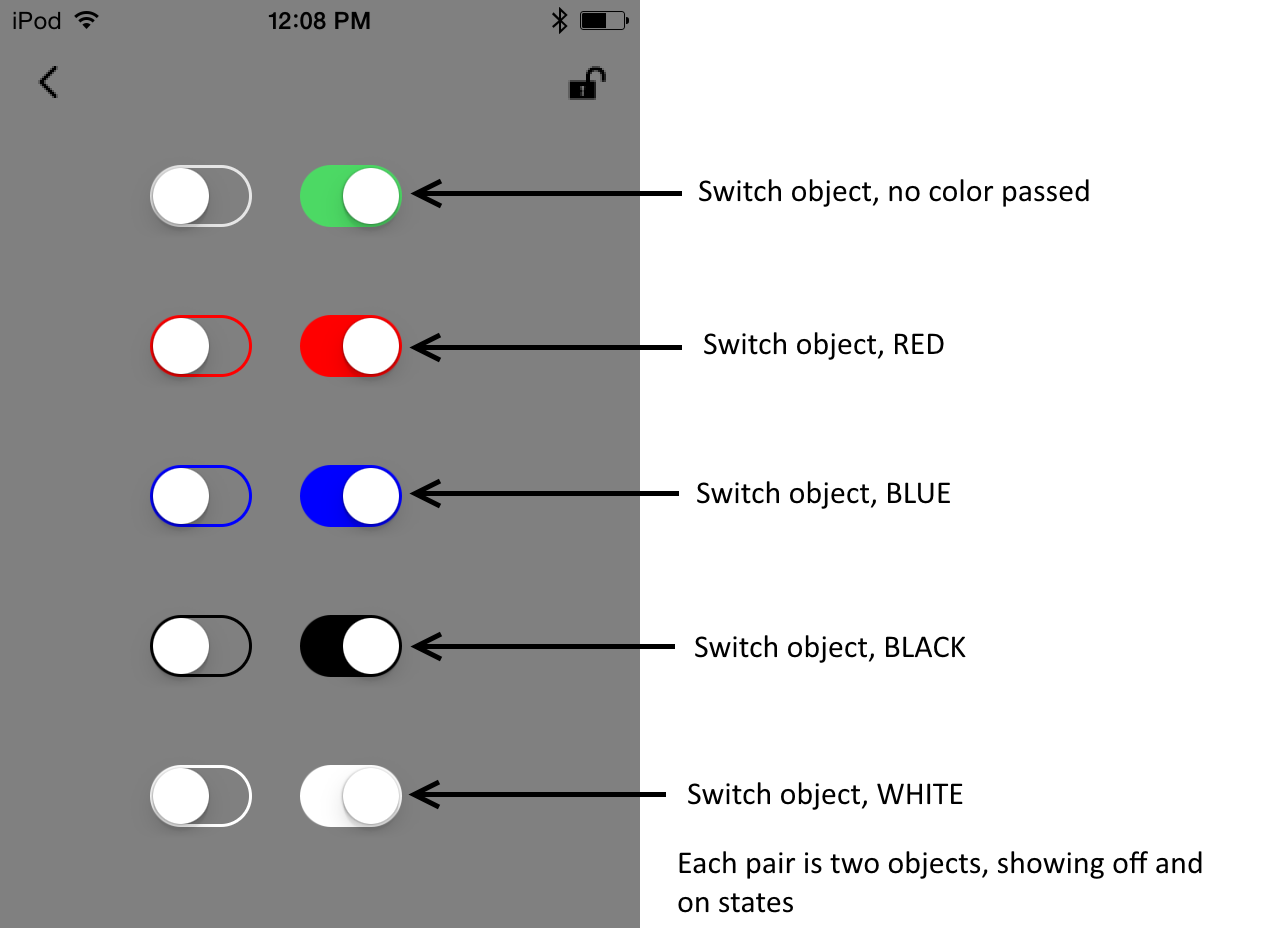
Switches are on/off toggles; the only valid parameters are location and color. They will change to a more subdued color variation when off.
language:c
uint8_t drawSwitch(uint16_t x, uint16_t y);
uint8_t drawSwitch(uint16_t x, uint16_t y, color_t color);
Segment
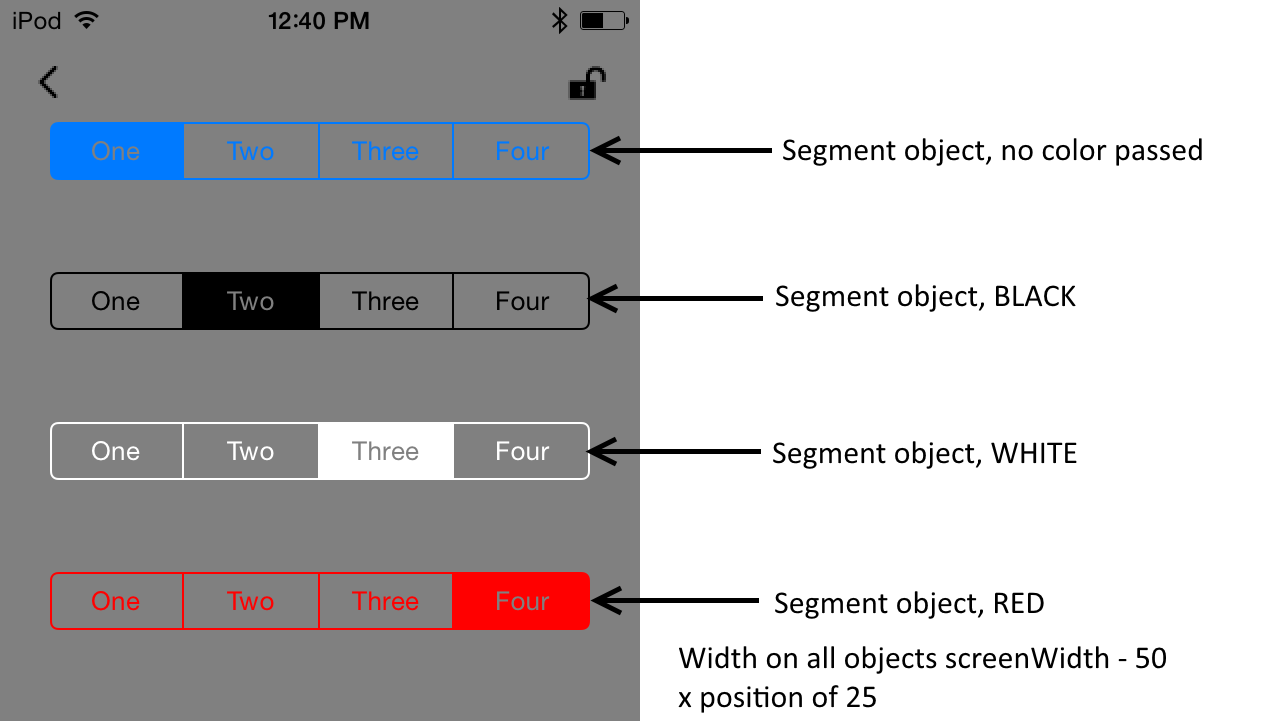
Segment objects are a "choose one" option. Aside from the x and y location
parameters, the overall width (w) of the object (not of each segment!), the
name of a const array of const char\* objects, the number of desired
segments (i.e., the number of objects in the array), and, optionally, the
color of the object must all be provided.
language:c
// Syntax for specifying segment titles; odd names and values used to show
//  that segment text and title variable names are completely arbitrary.
const char* alice = "blue";
const char* bob = "leopard";
const char* texas = "hematite";

const char* const bullDozer[3] = {alice, bob, texas};

uint8_t drawSegment(uint16_t x, uint16_t y, uint16_t w, const char* const
    *title, uint8_t count);
uint8_t drawSegment(uint16_t x, uint16_t y, uint16_t w, const char* const
    *title, uint8_t count, color_t color);
Slider
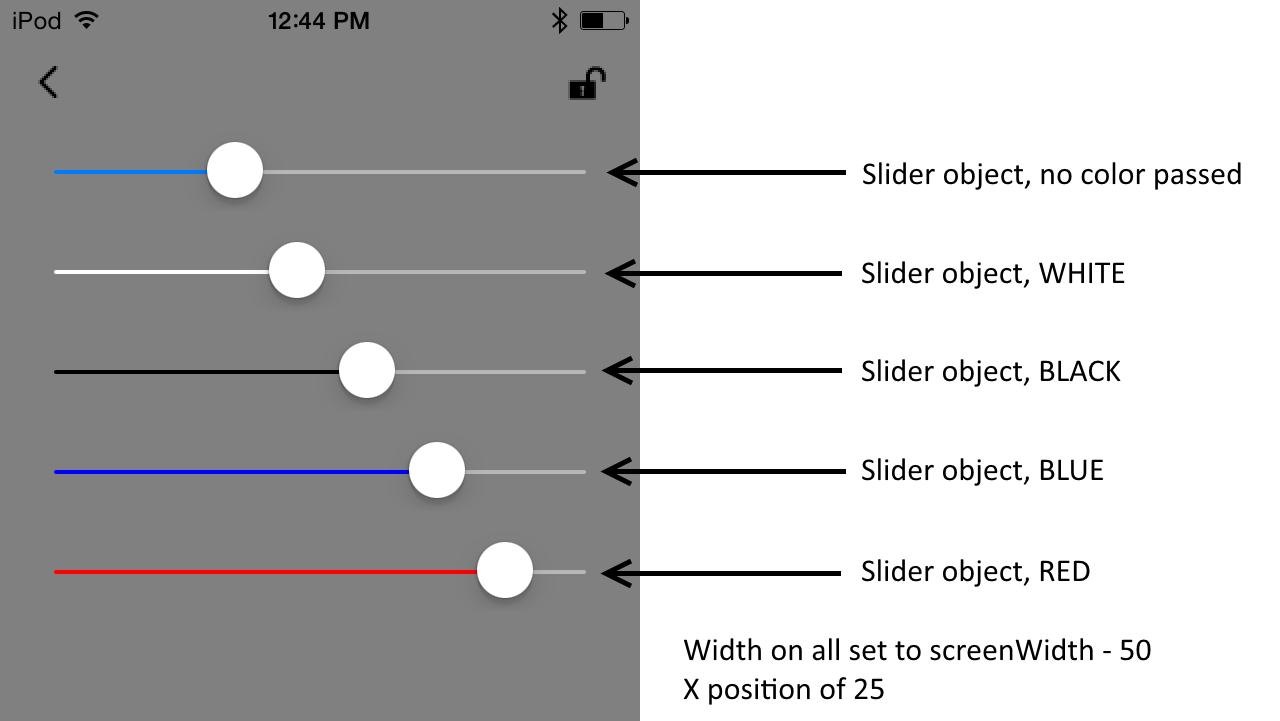
For gross adjustments of value (speeds, volumes, etc.) where absolute actual values aren't of great importance, a slider is probably the best choice. Parameters are x and y position, width of the object, minimum and maximum values, and, optionally, color.
language:c
uint8_t drawSlider(uint16_t x, uint16_t y, uint16_t w, int16_t min,
    int16_t max);
uint8_t drawSlider(uint16_t x, uint16_t y, uint16_t w, int16_t min,
    int16_t max, color_t color);
Stepper
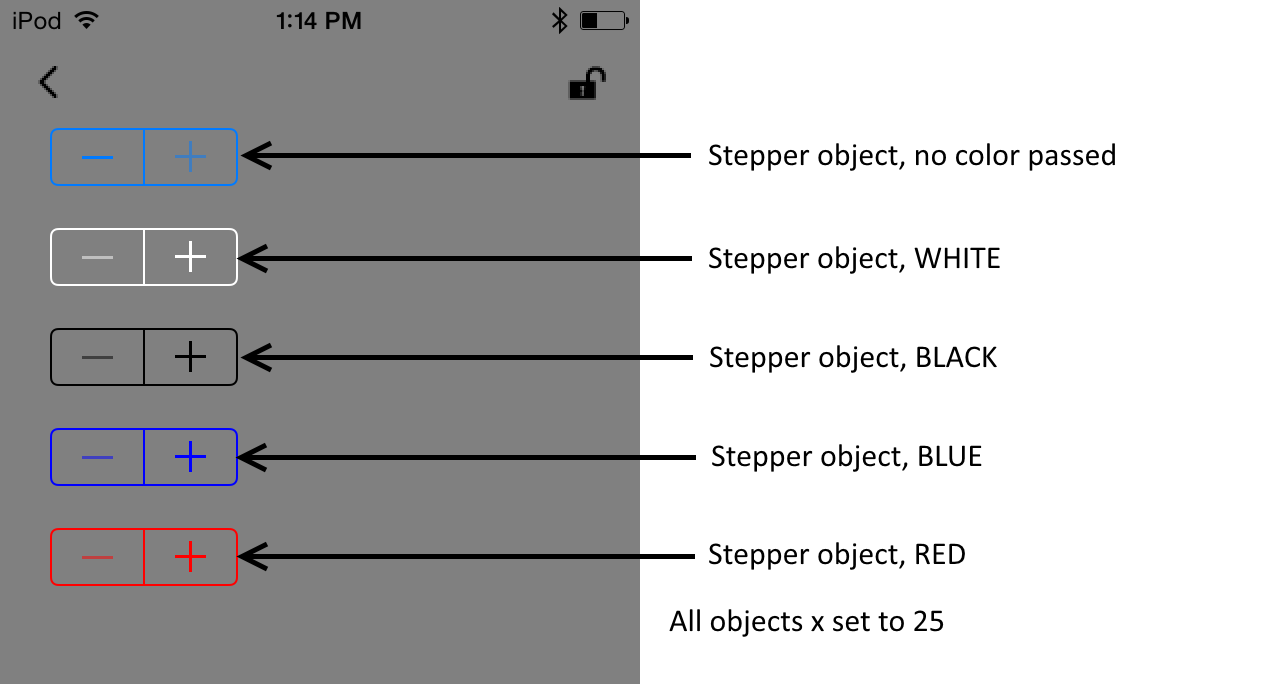
For fine adjustments, a stepper object may be more appropriate. Each press of
either of the buttons of a stepper object increments or decrements a value,
accordingly; the user may hold the button down to continuously increment or
decrement. A textField object should be used if the current value is to be
displayed, as the stepper has no means of display itself.
Note that the w parameter is unused and may be set to any value.
language:c
uint8_t drawStepper(uint16_t x, uint16_t y, uint16_t w, int16_t min,
    int16_t max);
uint8_t drawStepper(uint16_t x, uint16_t y, uint16_t w, int16_t min,
    int16_t max, color_t color);
Images
It is possible to include custom images in your Simblee UI; this is not recommended, however, as the image will be stored in the Simblee firmware as a full-size PNG bitmap image meaning that even relatively small images will take up a large chunk of the available code memory in the Simblee. We're not going to go into the full process for doing this; it would take up too much space in this already-large tutorial.
To encode an image, you'll need a program called "xxd". This program will convert a PNG file to a .h file; that file must then be moved into your sketch folder.
Up to 31 images may be stored in this fashion. For an example of using this functionality, see the "Temperature" example included in the Simblee support package.
#### UI Element Update Functions
It's possible to update the position, width, height, and the color(s) of an
object after it is created. Most objects can be updated using one of these
functions; the id parameter is the value returned by the function called to
create the object.
language:c
void updateX(uint8_t id, uint16_t x);
void updateY(uint8_t id, uint16_t y);
void updateOrigin(uint8_t id, uint16_t x, uint16_t y);

void updateW(uint8_t id, uint16_t w);
void updateH(uint8_t id, uint16_t h);
void updateSize(uint8_t id, uint16_t w, uint16_t h);

void updateRect(uint8_t id, uint16_t x, uint16_t y, uint16_t w, uint16_t h);
void updateColor(uint8_t id, color_t color);
void updateColor2(uint8_t id, color_t color2);
textBox and textField have their own specialized update functions which can
only be applied to them:
language:c
void updateValue(uint8_t id, int16_t value);
void updateText(uint8_t id, const char *text);
Finally, any object can be shown, or hidden, by using the setVisible()
function. Passing true makes the object visible if it is hidden.
language:c
void setVisible(uint8_t id, bool visible);
Reacting to UI Events
Whenever a UI event occurs, the ui_event() function is called. You can
specify what an event is using the setEvents() function.
language:c
void setEvents(uint8_t id, uint8_t events);
The events parameter is the logical OR of the constants EVENT_PRESS,
EVENT_DRAG, and EVENT_RELEASE. When an object is touched (EVENT_PRESS),
dragged, or released, ui_event() is called. Within ui_event(), information
about the event is contained in the event object:
event.id-- The identifier (value returned by the function which created the object) of the object generating the event.event.type-- The type of the event (one ofEVENT_PRESS,EVENT_RELEASE, orEVENT_DRAG)event.value-- The current value of the object.event.text-- The current text of the object (only valid for non-numericTextFieldobjects)
For image objects, there are two additional event types: EVENT_POSITION and
EVENT_COLOR. These behave as the others, but indicate that the returned
information is one of the following data chunks.
event.x,event.y-- The position within the object (not relative to the absolute screen coordinates) where the event occurred.event.red,event.blue,event.green,event.alpha-- RGBA information about the pixel that was touched (only valid in image objects)
SimbleeBLE
This library controls the more basic elements of the BLE interface:
advertisement, iBecon functionality, data transfer, and proximity, for example.
You'll need to add #include <SimbleeBLE.h> to the top of your main sketch
file to use any of these functions. This is fairly low-level stuff and is not
needed to use the Simblee to communicate with the Sibmlee phone app; however,
you will likely need it to develop your own phone application.
General BLE Functionality
Some of these things can be useful even when interfacing with the Simblee for Mobile app.
If you wish to set any of these variables, you must do so before calling
SimbleeBLE.begin().
SimbleeBLE.txPowerLevel--intbetween -20 and +4 representing transmit power, in dBm. Default is +4; only values which a multiples of 4 are allowed.SimbleeBLE.customUUID-- thisconst char\*variable allows the user to change the UUID of the Simblee module. This will break compatability with the Simblee app but may be useful in situations where you are creating your own application.SimbleeBLE.deviceName--const char\*variable holding the name of the Simblee module. By default, it is "Simblee". The combined length of the device name and advertisement data must be less than or equal to 18; any longer and the name will be truncated to one character to make room for the data.SimbleeBLE.radioActive-- Evaluates to true if the radio is currently transmitting data, and false otherwise. Can be used to delay timing critical code until immediately after the radio has transmitted data to reduce the chances that the radio will interrupt the timing critical code; however, the radio cannot be disabled, so it's up to the user to make sure that the time required is shorter than the time before the next radio packet.
Advertisement
Advertisement is the means by which a peripheral BLE device communicates its existance to central devices in the area which are currently scanning for advertising devices. Advertising comes in four flavors, depending upon whether the advertisement is connectable or not, and whether it is directed or not. The simblee supports only undirected advertising (i.e., broadcast), but it can be connectable or not connectable.
Simblee modules can also only function as peripheral devices, not central. Also, you must not exceed 9600 baud during BLE mode; failure to adhere to this will actually lock up your sketch.
SimbleeBLE.advertisementInterval--intvariable declaring, in ms, the frequency with which to issue advertisement packets. Range from 20ms to 10.24s; the actual range units are in units of 0.625ms, so the actual interval will only be an approximation of this value. If the device is in nonconnectable mode, the actual interval will be a minimum of 100ms. Default is 80ms.SimbleeBLE.advertisementData--const char\*variable pointing to a string containing some data sent out with each advertisement packet. Defaults to "sketch" and is the description that shows up in the Simblee app under the device name. Max 32 characters. The combined length of the device name and advertisement data must be less than or equal to 18; any longer and the name will be truncated to one character to make room for the data.SimbleeBLE_onAdvertisement(bool start)-- This function is automatically called when advertisement is started or stopped;startistrueif advertising was started andfalseif it was stopped. It is not called when an advertising packet is sent out, however.
Connections
These functions and variables control the connection to a host device. Most of these can be ignored for interoperation with the Simblee mobile app; however, the functions called on connection and disconnection may be useful.
These variables must be set before calling SimbleeBLE.begin().
SimbleeBLE.connectable--boolvariable used to enable/disable the connectable state of the Simblee.SimbleeBLE_onConnect()-- Called when a new connection to the Simblee is opened.SimbleeBLE_onDisconnect()-- Called when a connection to the Simblee is closed.SimbleeBLE_onRSSi(int RSSI)-- Called when new RSSI (received signal strength indicator) data is available. This is at the Simblee, not at the host. Values range from 0dBm (best) to -127dBm, although the connection will be severed as too unreliable around -92dBm.SimbleeBLE_onReceive(char \*data, int len)-- Called when data has been received from the host.
Note that the above functions are not a part of the SimbleeBLE class; they are defined elsewhere. The following functions are part of the SimbleBLE class.
These functions send various data types back to the host. Again, note that this mechanism is not required when dealing with the Simblee for Mobile app.
SimbleeBLE.send(char data)SimbleeBLE.send(const char \*data, int len)SimbleeBLE.sendByte(uint8_t data)SimbleeBLE.sendInt(int data)SimbleeBLE.sendFloat(float data)SimbleeBLE.updateConnInterval(in min_conn_interval_ms, int max_conn_interval_ms)-- Request that the host change the connection interval to some number of milliseconds between the min and max values. The host may reject this or choose a value out of this range entirely, at its discretion.SimbleeBLE.getConnInterval()-- Return anintspecifying the current connection interval in milliseconds. Minimum value is 7.5ms, max is 4s.
iBeacon functionality
iBeacon is a protocol developed by Apple for making BLE devices that can be used to transmit small data packets to nearby devices. iBeacons are one-way; the receiving devices cannot communicate back to the iBeacon devices.
As with the advertisement variables, these must be set before calling
SimbleeBLE.begin().
SimbleeBLE.iBeacon--boolwhich enables iBeacon mode.
SimbleeBLE.iBeaconUUID -- array of 16 uint8_t values comprising the UUID to
be used in iBeacon mode.
SimbleeBLE.iBeaconMajorandSimblee.iBeaconMinor-- These twounsigned shortvariable values are reported by the iBeacon constantly, along with the UUID and theiBeaconMeasuredPowervalue. Both default to 0.SimbleeBLE.iBeaconMeasuredPower-- Signal strength of this module as measured at 1m, in dBm. This value is stored as an unsigned 8-bit integer; you'll need to convert the value to hex before writing to the variable. The default value is -59dBm; that converts to 0xC5 in two's complement expressed as hexadecimal. Apps which attempt to determine distance to the module will use this as a base value for calculating the probable distance to the module.
Control an LED
This example shows you how to control an LED on (or attached to) a Simblee board from your smart device. We'll be using an LED connected to pin 2; this is provided for you on the SparkFun Simblee Breakout Board. If you're using the SparkFun LilyPad Simblee Board, there is an LED attached to pin 13, so you can change the led variable in the code to reflect that. For the RFDigital Simblee Breakout, you'll need to connect an LED to a pin of your choice and change the code accordingly.
This example shows not only how to structure the code, but also how to use the "switch" and "button" objects, and how to add an event trigger to an object that doesn't normally have it.
Here's the complete listing of the code; it can be downloaded from the GitHub repository directly or from Github as a zip file.
language:c
/****************************************************************************
 * LED_Control LED Control from smart phone Mike Hord @ SparkFun Electronics 26
 * Jan 2016 https://github.com/sparkfun/Simblee_Tutorials
 *
 * This example demonstrates the use of the SimbleeForMobile library to control
 * a pin on a Simblee module from a phone app. We'll show both a button and a
 * switch in this example.
 *
 * Resources: Please install the Simblee support files before attempting to use
 * this sketch; see
 * https://learn.sparkfun.com/tutorials/simblee-concepts#setting-up-arduino for
 * details.
 *
 * Development environment specifics: Arduino.cc IDE v1.6.7
 *
 * This code is beerware; if you see me (or any other SparkFun employee) at the
 * local, and you've found our code helpful, please buy us a round!
 * ****************************************************************************/

// To use the SimbleeForMobile library, you must include this file at the top
// of your sketch. **DO NOT** include the SimbleeBLE.h file, as it will cause
// the library to silently break.
#include <SimbleeForMobile.h>

const int led = 2; // The Simblee BOB (WRL-13632) has an LED on pin 2.
int ledState = LOW;

// Every draw command returns a uint8_t result which is the object id that was
// created. If you wish to change the object later, you'll need this value,
// and if you want to catch an event created by an object, you'll need it
// there, too. Make sure you create these id variables outside of any function,
// as you'll need to refer to them in many other functions.

uint8_t btnID;
uint8_t switchID;

void setup()
{
  pinMode(led, OUTPUT);
  digitalWrite(led, ledState);

  // advertisementData shows up in the app as a line under deviceName. Note
  // that the length of these two fields combined must be less than 16
  // characters!
  SimbleeForMobile.advertisementData = "Blink";
  SimbleeForMobile.deviceName = "WRL-13632";

  // txPowerLevel can be any multiple of 4 between -20 and +4, inclusive. The
  // default value is +4; at -20 range is only a few feet.
  SimbleeForMobile.txPowerLevel = -4;

  // This must be called *after* you've set up the variables above, as those
  // variables are only written during this function and changing them later
  // won't actually propagate the settings to the device.
  SimbleeForMobile.begin();
}

void loop()
{
  // This function must be called regularly to process UI events.
  SimbleeForMobile.process();
}

// ui() is a SimbleeForMobile specific function which handles the specification
// of the GUI on the mobile device the Simblee connects to.
void ui()
{
  // color_t is a special type which contains red, green, blue, and alpha
  // (transparency) information packed into a 32-bit value. The functions rgb()
  // and rgba() can be used to create a packed value.
  color_t darkgray = rgb(85,85,85);

  // These variable names are long...let's shorten them. They allow us to make
  // an interface that scales and scoots appropriately regardless of the screen
  // orientation or resolution.
  uint16_t wid = SimbleeForMobile.screenWidth;
  uint16_t hgt = SimbleeForMobile.screenHeight;

  // The beginScreen() function both sets the background color and serves as a
  // notification that the host should try to cache the UI functions which come
  // between this call and the subsequent endScreen() call.
  SimbleeForMobile.beginScreen(darkgray);

  // Create a button slightly more than halfway down the screen, 100 pixels
  // wide, in the middle of the screen. The last two parameters are optional;
  // see the tutorial for more information about choices for them. The BOX_TYPE
  // button has a bounding box which is roughly 38 pixels high by whatever the
  // third parameter defines as the width.
  btnID = SimbleeForMobile.drawButton(
                              (wid/2) - 75,          // x location
                              (hgt/2) - 22,          // y location
                              150,                   // width of button
                              "Reverse LED",         // text shown on button
                              WHITE,                 // color of button
                              BOX_TYPE);             // type of button

  // Buttons, by default, produce only EVENT_PRESS type events. We want to also
  // do something when the user releases the button, so we need to invoke the
  // setEvents() function. Note that, even though EVENT_PRESS is default, we
  // need to include it in setEvents() to avoid accidentally disabling it.
  SimbleeForMobile.setEvents(btnID, EVENT_PRESS | EVENT_RELEASE);

  // Create a switch above the button. Note the lack of a title option; if you
  // want to label a switch, you'll need to create a textBox object separately.
  // A switch's bounding box is roughly 50 by 30 pixels.
  switchID = SimbleeForMobile.drawSwitch(
                              (wid/2) - 25,          // x location
                              (hgt/2)+22,            // y location
                              BLUE);                 // color (optional)
  SimbleeForMobile.endScreen();
}

// This function is called whenever a UI event occurs. Events are fairly easy
// to predict; for instance, touching a button produces a "PRESS_EVENT" event.
// UI elements have default event generation settings that match their expected
// behavior, so you'll only rarely have to change them.
void ui_event(event_t &event)
{
  // We created the btnID and switchID variables as globals, set them in the
  // ui() function, and we'll use them here.


  if (event.id == btnID)
  {
    if (event.type == EVENT_PRESS)
    {
      if (ledState == HIGH) digitalWrite(led, LOW);
      else digitalWrite(led, HIGH);
    }
    if (event.type == EVENT_RELEASE)
    {
      if (ledState == HIGH) digitalWrite(led, HIGH);
      else digitalWrite(led, LOW);
    }
  }

  // If the event was a switch press, we want to toggle the ledState variable
  // and then write it to the pin.
  if (event.id == switchID)
  {
    if (ledState == HIGH) ledState = LOW;
    else ledState = HIGH;
    digitalWrite(led, ledState);
  }
}
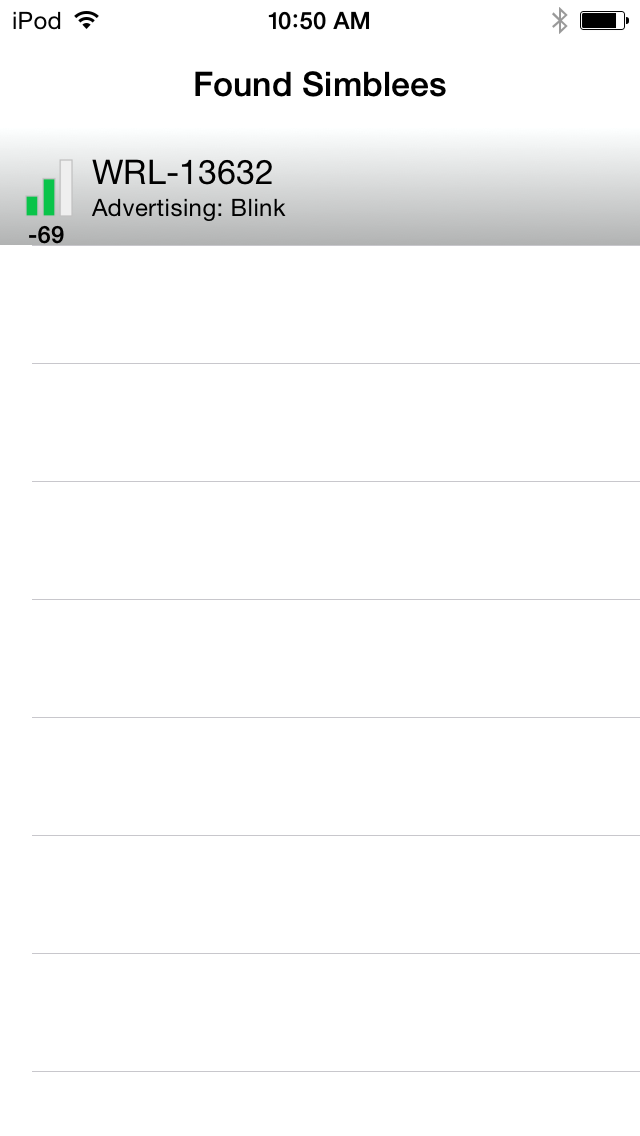
Once the code is loaded, you should see this in the Simblee app:
Touching the listing for the Simblee we just programmed will bring up the application interface we just specified by programming the module with the code above:
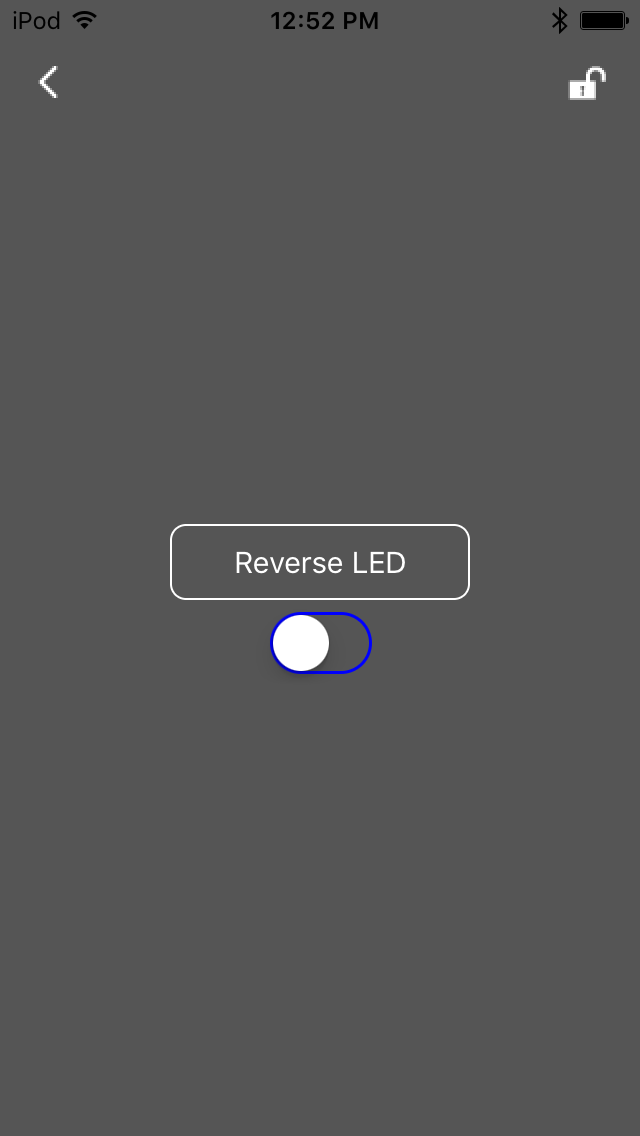
As you can see from playing with it a bit, toggling the switch on the app turns the LED on and off, and pushing the button reverses the current state of the LED until it's released.
Output Control w/ Transistors
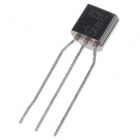
If you decide to drive multiple LEDs, try using a transistor as a switch.
For controlling loads with the pins, try looking at some of these transistors:
Reading from the Simblee
Sending data to the Simblee is only one half of the equation; we need to be able to get data back, when appropriate, as well.
This is a simple demonstration of doing just that; we listen to a button on pin 3 and then change the color of a box on the phone screen. The action shown on the phone is arbitrary; we could just as easily change a text value, for instance, or even move an object.
Here's the complete listing of the code; it can be downloaded from the GitHub repository directly or from Github as a zip file.
language:c
/****************************************************************************
 * Read_Input Read a Simblee input from smart phone
 * Mike Hord @ SparkFun Electronics 26 Jan 2016
 * https://github.com/sparkfun/Simblee_Tutorials
 *
 * This example demonstrates the use of the SimbleeForMobile library to read
 * the state of a pin on a Simblee module from a phone app.
 *
 * Resources: Please install the Simblee support files before attempting to use
 * this sketch; see
 * https://learn.sparkfun.com/tutorials/simblee-concepts#setting-up-arduino for
 * details.
 *
 * Development environment specifics: Arduino.cc IDE v1.6.7
 *
 * This code is beerware; if you see me (or any other SparkFun employee) at the
 * local, and you've found our code helpful, please buy us a round!
 * ****************************************************************************/

// To use the SimbleeForMobile library, you must include this file at the top
// of your sketch. **DO NOT** include the SimbleeBLE.h file, as it will cause
// the library to silently break.
#include <SimbleeForMobile.h>

const int btn = 3; // The Simblee BOB (WRL-13632) has a button on pin 3.

// Every draw command returns a uint8_t result which is the object id that was
// created. If you wish to change the object later, you'll need this value, and
// if you want to catch an event created by an object, you'll need it there,
// too. Make sure you create these id variables outside of any function, as
// you'll need to refer to them in many other functions.

uint8_t boxID;

void setup()
{
  // Protip: using INPUT_PULLUP very rarely causes any problems but can solve
  // a lot of problems with input signals that aren't pulled strongly.
  pinMode(btn, INPUT_PULLUP);

  // advertisementData shows up in the app as a line under deviceName. Note
  // that the length of these two fields combined must be less than 16
  // characters!
  SimbleeForMobile.advertisementData = "Button";
  SimbleeForMobile.deviceName = "WRL-13632";

  // txPowerLevel can be any multiple of 4 between -20 and +4, inclusive. The
  // default value is +4; at -20 range is only a few feet.
  SimbleeForMobile.txPowerLevel = -4;

  // This must be called *after* you've set up the variables above, as those
  // variables are only written during this function and changing them later
  // won't actually propagate the settings to the device.
  SimbleeForMobile.begin();
}

void loop()
{
  // All we want to do is detect when the button is pressed and make the box on
  // the screen white while it's pressed.

  // This is important: before writing *any* UI element, make sure that the UI
  // is updatable!!! Failure to do so may crash your whole program.
  if (SimbleeForMobile.updatable)
  {
    // Okay, *now* we can worry about what the button is doing. The
    // updateColor() function takes the id returned when we created the box and
    // tells that object to change to the color parameter passed.
    if (digitalRead(btn) == LOW) SimbleeForMobile.updateColor(boxID, WHITE);
    else SimbleeForMobile.updateColor(boxID, BLACK);
  }
  // This function must be called regularly to process UI events.
  SimbleeForMobile.process();
}

// ui() is a SimbleeForMobile specific function which handles the specification
// of the GUI on the mobile device the Simblee connects to.
void ui()
{
  // color_t is a special type which contains red, green, blue, and alpha
  // (transparency) information packed into a 32-bit value. The functions rgb()
  // and rgba() can be used to create a packed value.
  color_t darkgray = rgb(85,85,85);

  // These variable names are long...let's shorten them. They allow us to make
  // an interface that scales and scoots appropriately regardless of the screen
  // orientation or resolution.
  uint16_t wid = SimbleeForMobile.screenWidth;
  uint16_t hgt = SimbleeForMobile.screenHeight;

  // The beginScreen() function both sets the background color and serves as a
  // notification that the host should try to cache the UI functions which come
  // between this call and the subsequent endScreen() call.
  SimbleeForMobile.beginScreen(darkgray);

  // SimbleeForMobile doesn't really have an kind of indicator- but there IS a
  // drawRect() function, and we can freely change the color of the rectangle
  // after drawing it! The x,y coordinates are of the upper left hand corner.
  // If you pass a second color parameter, you'll get a fade from top to bottom
  // and you'll need to update *both* colors to get the whole box to change.
  boxID = SimbleeForMobile.drawRect(
                          (wid/2) - 50,        // x position
                          (hgt/2) - 50,        // y positon
                          100,                 // x dimension
                          100,                 // y dimensionrectangle
                          BLACK);              // color of rectangle.

  SimbleeForMobile.endScreen();
}

// This function is called whenever a UI event occurs. Events are fairly easy
// to predict; for instance, touching a button produces a "PRESS_EVENT" event.
// UI elements have default event generation settings that match their expected
// behavior, so you'll only rarely have to change them.
void ui_event(event_t &event)
{
  // In this case, we're sending data back from the Simblee to the app, so we
  // don't really care about any events that might occur.
}
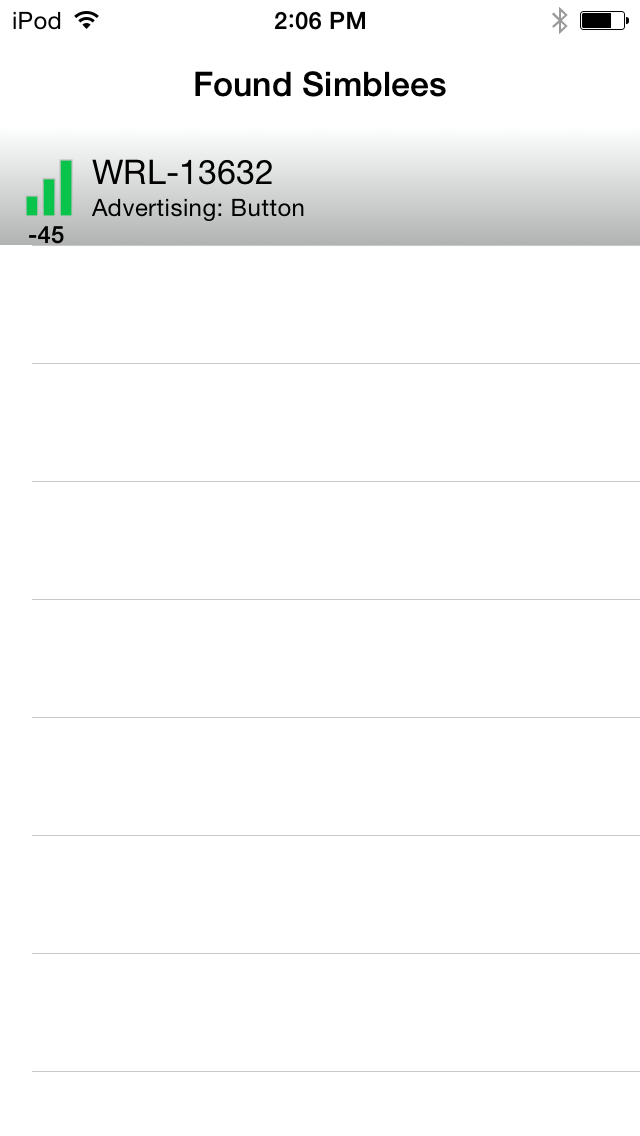
You'll know the sketch upload worked because the Simblee will appear in the app like this:
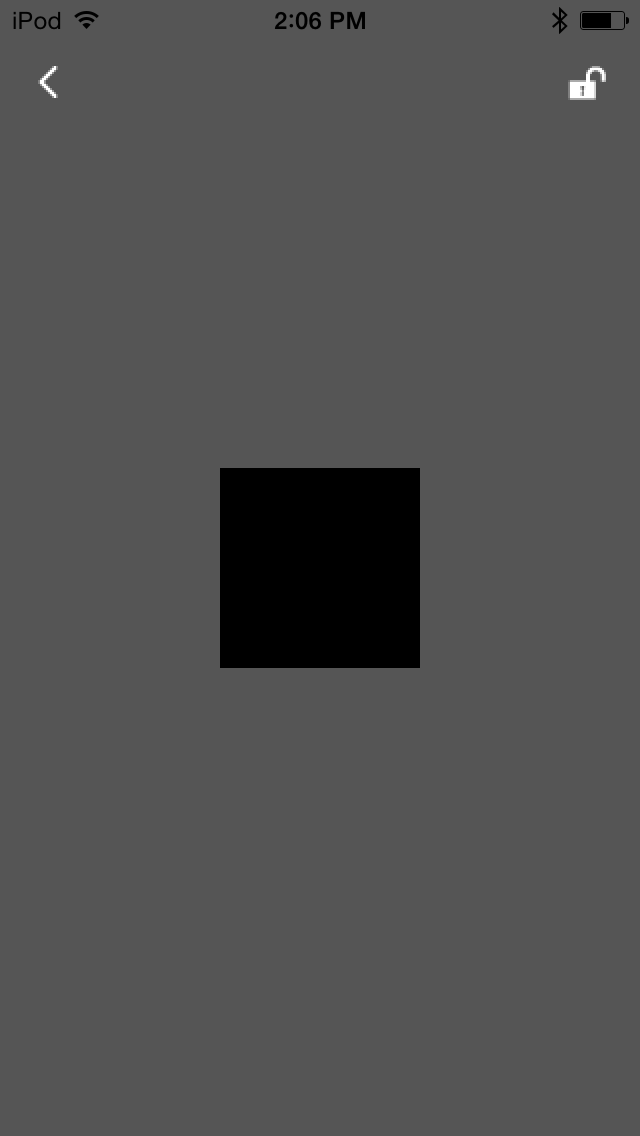
Here's what the GUI we've created looks like when the button is not pressed (left) and when it is pressed (right):
Low Power Modes
As a Bluetooth Low Energy device, one of the main benefits of the Simblee module is a long battery life. Under normal circumstances, the module draws about 5mA. This will drain one of our [CR2032 coin cell batteries] in around two days' time.
There are two lower power modes available, however: Ultra Low Power mode, and Off. They differ in how the processor can be awakened and in how much power the processor consumes in that mode.
In ULP mode, the processor consumes about 1/10 the current it does running normally. It can be told to awaken after a specific amount of time or on an event (a rising or falling edge) on a specified pin. The improvement in battery life depends, of course, on how often the processor is awakened; wake it too often and remain awake too long and you may notice very little improvement at all.
In Off mode, the processor consumes about 1/5000 the current it normally does. In this mode, only a pin change event can wake the processor, and it can only execute code within a specially created callback function. However, with current consumption this low, the shelf life of the battery becomes a serious consideration when calculating the total battery life.
Here's the complete listing of the code; it can be downloaded from the GitHub repository directly or from Github as a zip file.
language:c
/****************************************************************************
 * Low Power Example Sketch
 * Low_Power.ino
 * 29 Jan 2016
 * https://github.com/sparkfun/Simblee_Tutorials
 *
 * This app is a way to show how the Simblee Low Power modes can be used.
 *
 * Resources: Please install the Simblee support files before attempting to use
 * this sketch; see
 * https://learn.sparkfun.com/tutorials/simblee-concepts#setting-up-arduino for
 * details.
 *
 * Development environment specifics: Arduino.cc IDE v1.6.7
 *
 * This code is beerware; if you see me (or any other SparkFun employee) at the
 * local, and you've found our code helpful, please buy us a round!
 * ****************************************************************************/

// To use the SimbleeForMobile library, you must include this file at the top
// of your sketch. **DO NOT** include the SimbleeBLE.h file, as it will cause
// the library to silently break.
#include <SimbleeForMobile.h>

const int led = 2; // The Simblee BOB (WRL-13632) has an LED on pin 2.
int ledState = LOW;
const int button = 3;

void setup()
{
  pinMode(led, OUTPUT);
  digitalWrite(led, ledState);
  pinMode(button, INPUT_PULLUP);

  // advertisementData shows up in the app as a line under deviceName. Note
  // that the length of these two fields combined must be less than 16
  // characters!
  SimbleeForMobile.advertisementData = "LoPow";
  SimbleeForMobile.deviceName = "WRL-13632";

  // txPowerLevel can be any multiple of 4 between -20 and +4, inclusive. The
  // default value is +4; at -20 range is only a few feet.
  SimbleeForMobile.txPowerLevel = -4;


  // This must be called *after* you've set up the variables above, as those
  // variables are only written during this function and changing them later
  // won't actually propagate the settings to the device.
  SimbleeForMobile.begin();
}

void loop()
{
  // There are two low power modes: Ultra Low Power and Off. ULP consumes about
  // 1/10 of the power that a fully on Simblee consumes; in Off mode, the
  // device is using about 1/5000 of the normal power consumption!

  // The system can be brought out of ULP mode either on a timed basis (see the
  // tutorial for more information; broadly, pass a number of milliseconds to
  // the Simblee_ULPDelay() function and the processor will awaken that many
  // milliseconds later) or by a pin transition event. In Off mode, *only* a
  // pin event can wake the processor!

  // Simblee_pinWakeCallback() executes the passed function when a pin causes
  // the device to leave either sleep mode. Options for the second parameter
  // are HIGH, LOW, or NONE, and correspond to the triggering state of the pin.
  Simblee_pinWakeCallback(button, LOW, buttonCallback);

  // Simblee_pinWake() sets up the device to awaken from sleep mode, but does
  // NOT provide a callback function. In ULP mode, execution will resume on the
  // line after the function call to Simblee_ULPDelay(); in Off mode, the
  // processor will immediately revert to sleep mode unless a callback
  // function is available.
  //Simblee_pinWake(button, LOW);

  // Simblee_systemOff() puts the device in a very low power mode, where it
  // consumes less than 1uA of current (compared to about 5000uA during normal
  // operation). In this mode, *only* a pin transition can bring the device out
  // of sleep, and you *must* provide a callback function with
  // Simblee_pinWakeCallback() for any code to be executed!
  Simblee_systemOff();

  // Simblee_ULPDelay() causes the processor to sleep for some number of
  // milliseconds. There are utility macros defined for converting from larger,
  // more convenient units: DAY(x), HOURS(x), MINUTES(x), SECONDS(x) will each
  // cause the processor to wait for x of that number of units. Pass INFINITE
  // to delay until a pin event occurs.
  //Simblee_ULPDelay(INFINITE);

  // If a pin event woke the processor, you MUST call the
  // Simblee_resetPinWake() function for that pin, or the processor will
  // immediately exit sleep mode upon reentering it.
  Simblee_resetPinWake(button);

  // We're blinking the LED here a bit longer than in the callback function, so
  // we can differentiate between which section of code is executing.
  digitalWrite(led, HIGH);
  delay(1500);
  digitalWrite(led, LOW);

  // This function must be called regularly to process UI events.
  SimbleeForMobile.process();
}

// ui() is a SimbleeForMobile specific function which handles the specification
// of the GUI on the mobile device the Simblee connects to.
void ui()
{
  // Empty, for this sketch's purposes.
}

// This function is called whenever a UI event occurs. Events are fairly easy
// to predict; for instance, touching a button produces a "PRESS_EVENT" event.
// UI elements have default event generation settings that match their expected
// behavior, so you'll only rarely have to change them.
void ui_event(event_t &event)
{
  // Empty for this sketch's purposes.
}

// This function (the name of which is completely arbitrary) is executed after
// a pinWake event pulls the processor out of low power mode. Here, we just
// blink the LED on for 500ms, just as a visual check that we have pulled out
// of low power mode.
int buttonCallback(uint32_t button)
{
  Simblee_resetPinWake(button);
  digitalWrite(led, HIGH);
  delay(500);
  digitalWrite(led, LOW);
}
There are no SimbleeForMobile UI elements defined in this sketch; note that, when in low power mode, the Simblee dictates when the host device gets updated, so the host device cannot interact with the Simblee. A Simblee in low power mode cannot be found in the app, either, although if you are connected to a Simblee when it enters ULP mode, the app will remain connected. Entering Off mode will cause the device to disappear from the app, and the connection to be lost.
Resources and Going Further
Here are some additional resources for more information about the Simblee.
- Simblee product homepage
- Simblee for Mobile reference -- PDF covering the basics of using the Simblee for Mobile Library to make a UI on a host device.
- Simblee User's Manual -- PDF covering far more detail of programming the Simblee.
- Simblee LilyPad Hookup Guide -- Hookup guide covering topics more specific to the Simblee LilyPad board.
- Simblee Breakout Board Hookup Guide -- Hookup guide covering topics specific to the SparkFun Simblee breakout board.
For more Bluetooth fun, check out these other SparkFun tutorials.