SparkFun Inventor's Kit for Edison Experiment Guide
 Shawn Hymel
 Experiment 10: Keyboard
Introduction
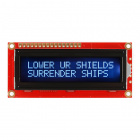
The Edison, luckily for us, has a USB On-the-Go (OTG) port, which means that we can optionally treat the Edison as a USB host or a USB device. In this experiment, we will use the OTG port as a USB host port and connect a keyboard to our Edison. We will then be able to type and have the characters appear on the LCD.
In the second part of the experiment, we take the concept one step further and have the Edison host a web page that acts as a simplistic chat room. Anyone on the same network can view the page, post messages, and see messages from the Edison (as they were typed into the keyboard).
Parts Needed
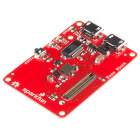
We’ll be using the same circuit as in the previous example. The only thing we will be adding is the USB OTG cable, which will be plugged into the Base Block. In addition to the Edison and Block Stack, you will need the following parts:
- 1x Breadboard
- 1x Character LCD
- 1x 10k Potentiometer
- 16x Jumper Wires
- 1x USB OTG Cable


Suggested Reading
- How USB Works -- How USB sends data over a couple of wires
- Socket.IO chat room example -- We base our chat room on this example. This Socket.IO example does a great job of explaining how it works.
Concepts
USB OTG
USB OTG is an interesting concept in the world of computer peripherals. Most USB connections require a host and a device (or several devices that have been plugged into a hub that goes to a host). However, OTG allows for a device to automatically detect whether it should play the role of a host or a peripheral.
Normally, USB plugs have 4 pins. OTG introduces a fifth pin (known as the "ID pin") that allows the device to determine if it should be a host or a peripheral.

In our case, we will be using a special OTG cable that enumerates that ID pin and terminates with a normal type-A receptacle. This allows us to plug in USB peripherals (such as keyboards and mice) and the Edison will become the USB host.
If you were using the OTG port for previous exercises to create a USB network, you were putting the Edison into device mode. The powers of OTG are very useful.
Linux Hacking
OK, we're not going to actually hack Linux. However, we are going dig into the file system in order to detect key presses on the keyboard.
Whenever we plug in a keyboard, Linux creates a file in /dev/input/ with the name eventX, where X is a number assigned to that device. In our Edison, the keyboard is event2, assuming no other devices are plugged in (you can also figure out which device is your keyboard by logging into the Edison and executing the command cat /proc/bus/input/devices).
If we read the contents of this file, it updates every time a keyboard event occurs (e.g. key down, key up). We can create a stream listener with fs.readStreamListener() on this file that calls a function every time new data appears in the file.
The data that is provided to the callback is in the form of a fairly large buffer of raw bytes. Knowing that, we can look at specific bytes to figure out what kind of event is occurring:
- Byte 24 is a key event
- Byte 28 is the type of event (0x01 means "key down")
- Bytes 26 and 27 refer to the key that has been pressed (for example, 19 is the 'r' key)
The input event codes can be found in the input-event-codes.h file.
Chat Room
Chat rooms are nearly as old as the Internet itself. Dating back to the early 1970s, users could send text messages to everyone viewing a page or connected with a special program.
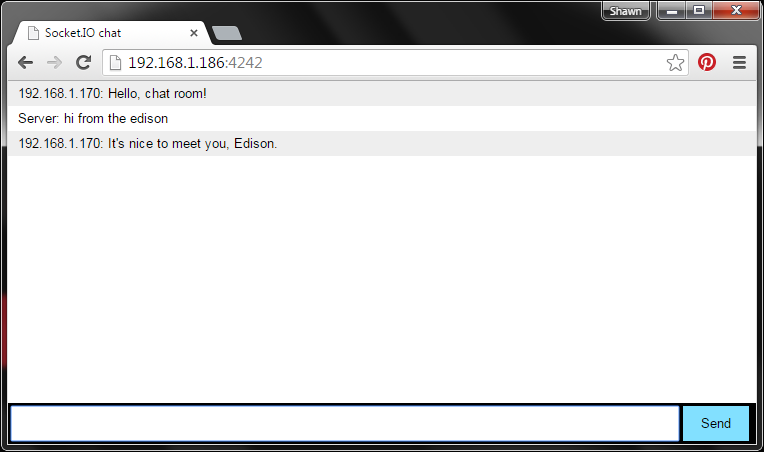
We are going to construct a very simple chat room using Socket.IO. In this exercise, we create a web page with three fields. At the bottom, users can enter a text message and send it with a button. Taking up most of the page is the "room" itself.
When a user sends a message, the text is sent to the server running the chat room (the Edison, in this case), and the server then sends out that text to all users currently looking at the page in a browser.
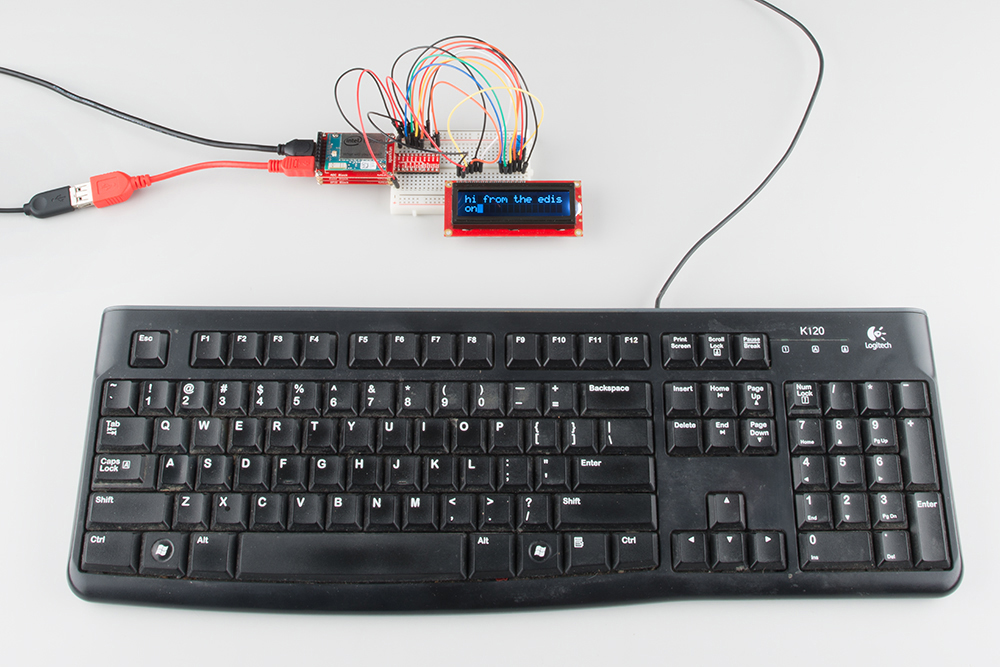
Hardware Hookup
The circuit is the same as in the previous experiment.
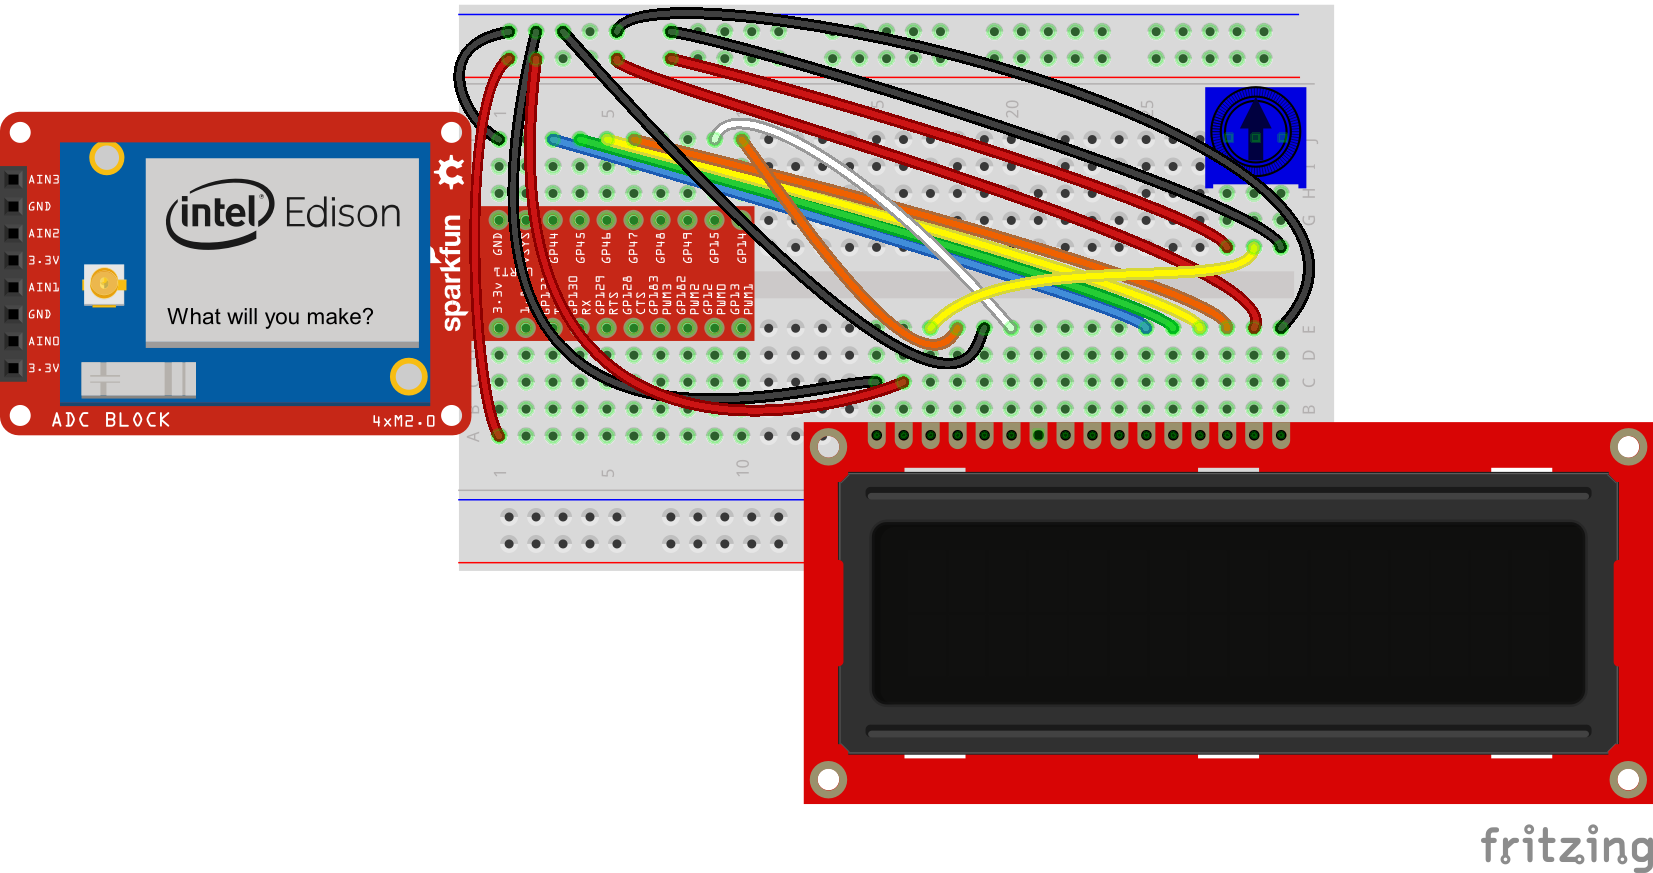
Plug the USB OTG cable into the port labeled "OTG" on the Base Block. Plug your USB keyboard into the other end of the OTG cable.

Part 1: Keyboard to LCD
The Code
Create a new Blank IoT Application Template. Copy the following into package.json:
language:javascript
{
  "name": "blankapp",
  "description": "",
  "version": "0.0.0",
  "main": "main.js",
  "engines": {
    "node": ">=0.10.0"
  },
  "dependencies": {
      "johnny-five": "0.9.11",
      "edison-io": "0.8.18"
  }
}
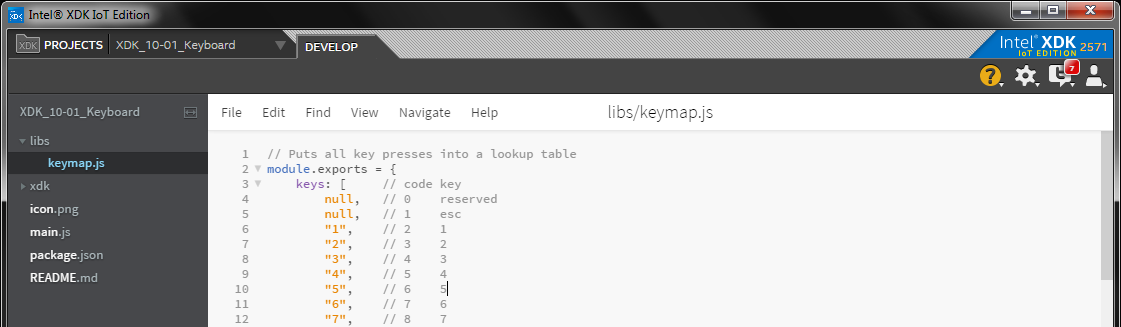
In the file explorer, create a new directory named libs. In libs, create a file named keymap.js. In that file, copy in the following:
language:javascript
// Puts all key presses into a lookup table
module.exports = {
    keys: [     // code key
        null,   // 0    reserved
        null,   // 1    esc
        "1",    // 2    1
        "2",    // 3    2
        "3",    // 4    3
        "4",    // 5    4
        "5",    // 6    5
        "6",    // 7    6
        "7",    // 8    7
        "8",    // 9    8
        "9",    // 10   9
        "0",    // 11   0
        "-",    // 12   minus
        "=",    // 13   equal
        "bksp", // 14   backspace
        null,   // 15   tab
        "q",    // 16   q
        "w",    // 17   w
        "e",    // 18   e
        "r",    // 19   r
        "t",    // 20   t
        "y",    // 21   y
        "u",    // 22   u
        "i",    // 23   i
        "o",    // 24   o
        "p",    // 25   p
        "[",    // 26   left brace
        "]",    // 27   right brace
        "enter",// 28   enter
        null,   // 29   left ctrl
        "a",    // 30   a
        "s",    // 31   s
        "d",    // 32   d
        "f",    // 33   f
        "g",    // 34   g
        "h",    // 35   h
        "j",    // 36   j
        "k",    // 37   k
        "l",    // 38   l
        ";",    // 39   semicolon
        "'",    // 40   apostrophe
        "`",    // 41   grave
        null,   // 42   left shift
        "\\",   // 43   backslash
        "z",    // 44   z
        "x",    // 45   x
        "c",    // 46   c
        "v",    // 47   v
        "b",    // 48   b
        "n",    // 49   n
        "m",    // 50   m
        ",",    // 51   comma
        ".",    // 52   dot
        "/",    // 53   slash
        null,   // 54   right shift
        null,   // 55   kpasterisk
        null,   // 56   left alt
        " "     // 57   space
    ]
};
Your project should have the following files:
In main.js, copy in:
language:javascript
/*jslint node:true, vars:true, bitwise:true, unparam:true */
/*jshint unused:true */
// Leave the above lines for propper jshinting

/**
 * SparkFun Inventor's Kit for Edison
 * Experiment 10 - Part 1: Keyboard
 * This sketch was written by SparkFun Electronics
 * November 18, 2015
 * https://github.com/sparkfun/Inventors_Kit_For_Edison_Experiments
 *
 * Capture keystrokes from a USB-connected keyboard and display them on a
 * character LCD.
 *
 * Released under the MIT License(http://opensource.org/licenses/MIT)
 */

// Import the filesystem module and our keymap table
var fs = require('fs');
var keymap = require('./libs/keymap.js');

// We'll also need johnny-five and its Edison wrapper
var five = require('johnny-five');
var Edison = require('edison-io');
var board = new five.Board({
    io: new Edison()
});

// Global variables
var lcd;
var cursorPos;

// Johnny Five initialization
board.on('ready', function() {

    // Create our LCD object and define the pins
    // LCD pin name:    RS  EN DB4 DB5 DB6 DB7
    // Edison GPIO:     14  15  44  45  46  47
    lcd = new five.LCD({
        pins: ["GP14", "GP15", "GP44", "GP45", "GP46", "GP47"],
        backlight: 6,
        rows: 2,
        cols: 16
    });

    // Turn on LCD, clear it, and set cursor to home
    lcd.on();
    lcd.clear();
    lcd.home();
    lcd.blink();
    cursorPos = 0;
    console.log("Start typing!");
});

// Create a stream that emits events on every key stroke
var readableStream = fs.createReadStream('/dev/input/event2');

// Callback for a key event
readableStream.on('data', function(buf) {

    // Check for key down event and determine key pressed
    if ((buf[24] == 1) && (buf[28] == 1)) {
        var keyCode = ((buf[27] & 0xff) << 8) | (buf[26] & 0xff);
        var keyChar = keymap.keys[keyCode];

        // Make the character appear on the LCD
        if (lcd !== undefined) {

            // If it is a backspace, delete the previous character
            if (keyChar === 'bksp') {
                cursorPos--;
                if (cursorPos <= 0) {
                    cursorPos = 0;
                }
                lcd.print(" ");
                lcd.cursor(
                    Math.floor(cursorPos / lcd.cols),
                    (cursorPos % lcd.cols)
                );
                lcd.print(" ");
                lcd.cursor(
                    Math.floor(cursorPos / lcd.cols),
                    (cursorPos % lcd.cols)
                );

            // If it is a return character, clear the LCD
            } else if (keyChar == 'enter') {
                lcd.clear();
                cursorPos = 0;

            // Otherwise, print the character to the LCD
            } else if ((keyChar !== null) && (keyChar !== undefined)) {
                lcd.print(keyChar);
                cursorPos++;
            }

            // Stop the cursor at the end of the LCD
            if (cursorPos >= (lcd.rows * lcd.cols)) {
                cursorPos = (lcd.rows * lcd.cols) - 1;
            }

            // Update the cursor position (wrap to second line if needed)
            lcd.cursor(
                Math.floor(cursorPos / lcd.cols),
                (cursorPos % lcd.cols)
            );
        }
    }
});
What You Should See
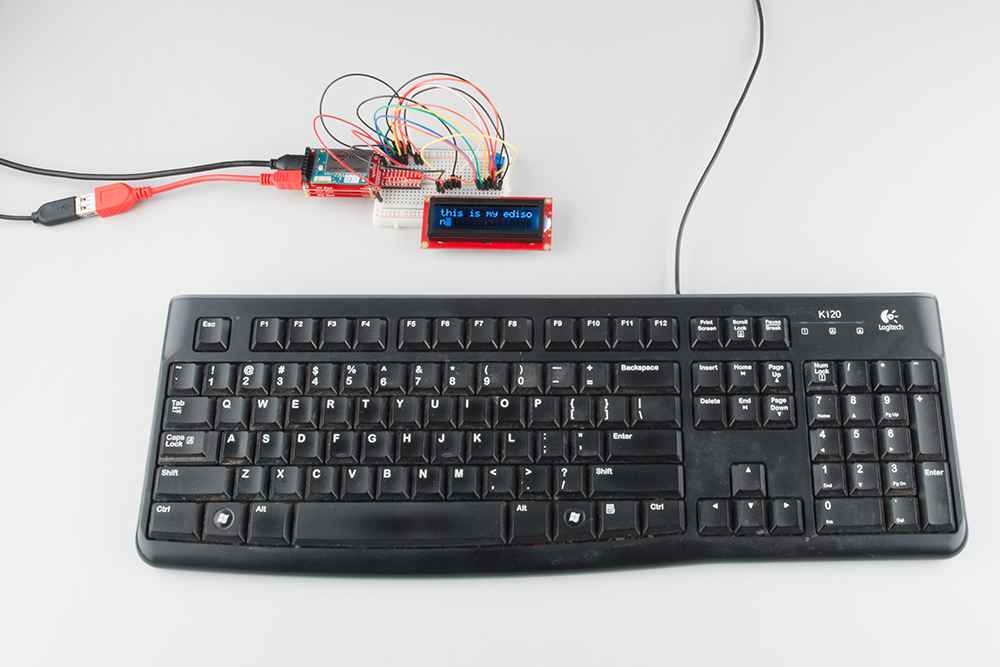
Make sure that your keyboard is plugged into the OTG port and run the program. You should be able to type on the keyboard and have the text appear on the LCD!
Code to Note
readableStream.on('data', function(buf) {...}) is the callback for when the /dev/input/event2 file receives new data (e.g. a key was pressed). Within the function of the callback, we figure out which key was pressed by looking at specific bytes in buf.
Using bytes 26 and 27 of buf, we create an index for our lookup table (called keymap). This keymap was created in the keymap.js file. The keymap is just an array. When we index into the array with the number created from bytes 26 and 27, we are returned a string corresponding to the key that was pushed.
You might have noticed that we defined our keymap table in a separate file (keymap.js). We can store functions, variables, objects, etc. in another file and access them if we do 2 things:
- Define an exports object in the external file with
module.exports. This allows properties of that object to be accessed by code in the importing file. In this case, we want access to thekeysarray. - In the importing file (main.js in this instance), include the external file with a
require()statement and assign it to a variable. In this case, we included the keymap.js file withvar keymap = require('./libs/keymap.js');. Then, we were able to access thekeysvariable withkeymap.keyslater in the code.
Part 2: Chat Room
The Code
Create another project with the Blank IoT Application Template. In package.js, copy in:
language:javascript
{
  "name": "blankapp",
  "description": "",
  "version": "0.0.0",
  "main": "main.js",
  "engines": {
    "node": ">=0.10.0"
  },
  "dependencies": {
      "socket.io": "1.3.7",
      "express": "4.10.2",
      "johnny-five": "0.9.11",
      "edison-io": "0.8.18"
  }
}
Like in part 1, create a new directory and file within the project: libs/keymap.js. In that file, copy in:
language:javascript
// Puts all key presses into a lookup table
module.exports = {
    keys: [     // code key
        null,   // 0    reserved
        null,   // 1    esc
        "1",    // 2    1
        "2",    // 3    2
        "3",    // 4    3
        "4",    // 5    4
        "5",    // 6    5
        "6",    // 7    6
        "7",    // 8    7
        "8",    // 9    8
        "9",    // 10   9
        "0",    // 11   0
        "-",    // 12   minus
        "=",    // 13   equal
        "bksp", // 14   backspace
        null,   // 15   tab
        "q",    // 16   q
        "w",    // 17   w
        "e",    // 18   e
        "r",    // 19   r
        "t",    // 20   t
        "y",    // 21   y
        "u",    // 22   u
        "i",    // 23   i
        "o",    // 24   o
        "p",    // 25   p
        "[",    // 26   left brace
        "]",    // 27   right brace
        "enter",// 28   enter
        null,   // 29   left ctrl
        "a",    // 30   a
        "s",    // 31   s
        "d",    // 32   d
        "f",    // 33   f
        "g",    // 34   g
        "h",    // 35   h
        "j",    // 36   j
        "k",    // 37   k
        "l",    // 38   l
        ";",    // 39   semicolon
        "'",    // 40   apostrophe
        "`",    // 41   grave
        null,   // 42   left shift
        "\\",   // 43   backslash
        "z",    // 44   z
        "x",    // 45   x
        "c",    // 46   c
        "v",    // 47   v
        "b",    // 48   b
        "n",    // 49   n
        "m",    // 50   m
        ",",    // 51   comma
        ".",    // 52   dot
        "/",    // 53   slash
        null,   // 54   right shift
        null,   // 55   kpasterisk
        null,   // 56   left alt
        " "     // 57   space
    ]
};
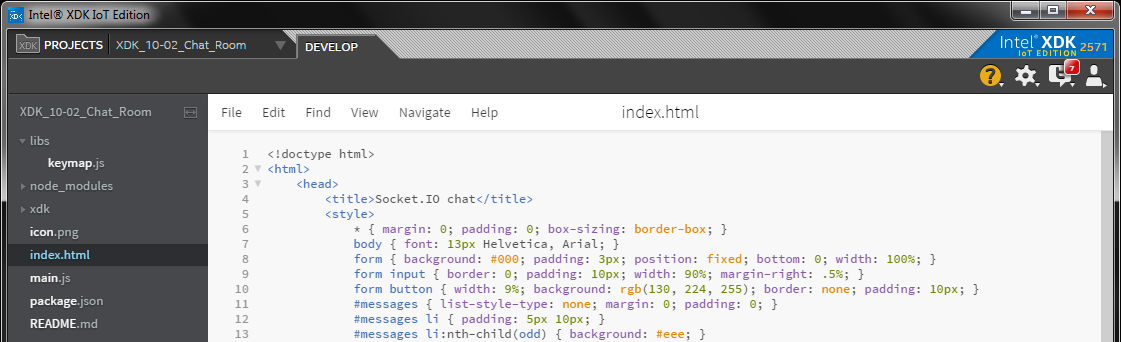
Create a new file in the project called index.html, and copy in the following:
<!doctype html>
<html>
    <head>
        <title>Socket.IO chat</title>
        <style>
            * { margin: 0; padding: 0; box-sizing: border-box; }
            body { font: 13px Helvetica, Arial; }
            form { background: #000; padding: 3px; position: fixed; bottom: 0; width: 100%; }
            form input { border: 0; padding: 10px; width: 90%; margin-right: .5%; }
            form button { width: 9%; background: rgb(130, 224, 255); border: none; padding: 10px; }
            #messages { list-style-type: none; margin: 0; padding: 0; }
            #messages li { padding: 5px 10px; }
            #messages li:nth-child(odd) { background: #eee; }
        </style>
    </head>
    <body>
        <ul id="messages"></ul>
        <form action="">
            <input id="m" autocomplete="off" /><button>Send</button>
        </form>
        <script src="/socket.io/socket.io.js"></script>
        <script src="http://code.jquery.com/jquery-1.11.1.js"></script>
        <script src="http://code.jquery.com/jquery-2.1.4.js"></script>
        <script>

            // Create our socket.io object
            var socket = io();

            // Get content from the input box and sent it to the server
            $('form').submit(function() {
                socket.emit('chat message', $('#m').val());
                $('#m').val('');
                return false;
            });

            // If we receive a chat message, add it to the chat box
            socket.on('chat message', function(msg) {
                $('#messages').append($('<li>').text(msg));
            });
        </script>
    </body>
</html>
Save that file. You should have the following files:
In main.js, copy in:
language:javascript
/*jslint node:true, vars:true, bitwise:true, unparam:true */
/*jshint unused:true */
// Leave the above lines for propper jshinting

/**
 * SparkFun Inventor's Kit for Edison
 * Experiment 10 - Part 2: Chat Room
 * This sketch was written by SparkFun Electronics
 * November 20, 2015
 * https://github.com/sparkfun/Inventors_Kit_For_Edison_Experiments
 *
 * Serves a chat room where users can post messages. Captures keyboard input
 * and posts messages to the chat room.
 *
 * Released under the MIT License(http://opensource.org/licenses/MIT)
 */

// Import the filesystem module and our keymap table
var fs = require('fs');
var keymap = require('./libs/keymap.js');

// We'll also need johny-five and its Edison wrapper
var five = require('johnny-five');
var Edison = require('edison-io');
var board = new five.Board({
    io: new Edison()
});

// Import HTTP and Express modules
var app = require('express')();
var http = require('http').Server(app);
var io = require('socket.io')(http);

// Global variables
var port = 4242;
var lcd;

// Johnny Five initialization
board.on('ready', function() {

    // Create our LCD object and define the pins
    // LCD pin name:    RS  EN DB4 DB5 DB6 DB7
    // Edison GPIO:     14  15  44  45  46  47
    lcd = new five.LCD({
        pins: ["GP14", "GP15", "GP44", "GP45", "GP46", "GP47"],
        backlight: 6,
        rows: 2,
        cols: 16
    });

    // Turn on LCD, clear it, and set cursor to home
    lcd.on();
    lcd.clear();
    lcd.home();
    lcd.blink();
    lcd.cursorPos = 0;
    lcd.msg = "";
    console.log("Start typing!");
});

// Create a stream that emits events on every key stroke
var readableStream = fs.createReadStream('/dev/input/event2');

// Callback for a key event
readableStream.on('data', function(buf) {

    // Check for key down event and determine key pressed
    if ((buf[24] == 1) && (buf[28] == 1)) {
        var keyCode = ((buf[27] & 0xff) << 8) | (buf[26] & 0xff);
        var keyChar = keymap.keys[keyCode];

        // Make the character appear on the LCD
        if (lcd !== undefined) {

            // If it is a backspace, delete the previous character
            if (keyChar === 'bksp') {
                if (lcd.msg !== "") {
                    lcd.msg = lcd.msg.slice(0, -1);
                }
                lcd.cursorPos--;
                if (lcd.cursorPos <= 0) {
                    lcd.cursorPos = 0;
                }
                lcd.print(" ");
                lcd.cursor(
                    Math.floor(lcd.cursorPos / lcd.cols),
                    (lcd.cursorPos % lcd.cols)
                );
                lcd.print(" ");
                lcd.cursor(
                    Math.floor(lcd.cursorPos / lcd.cols),
                    (lcd.cursorPos % lcd.cols)
                );

            // If it is a return character, post message and clear the LCD
            } else if (keyChar == 'enter') {
                console.log("Server: " + lcd.msg);
                io.emit('chat message', "Server: " + lcd.msg);
                lcd.clear();
                lcd.cursorPos = 0;
                lcd.msg = "";

            // Otherwise, print the character to the LCD
            } else if ((keyChar !== null) && (keyChar !== undefined)) {

                // Have the character appear on the LCD and append to message
                lcd.print(keyChar);
                lcd.cursorPos++;

                // Stop the cursor at the end of the LCD
                if (lcd.cursorPos >= (lcd.rows * lcd.cols)) {
                    lcd.cursorPos = (lcd.rows * lcd.cols) - 1;
                }

                // Remove the last char if we reached the end of the buffer
                if (lcd.msg.length >= (lcd.rows * lcd.cols)) {
                    lcd.msg = lcd.msg.slice(0, -1);
                }

                // Append character to message
                lcd.msg = lcd.msg.concat(keyChar);
            }

            // Update the cursor position (wrap to second line if needed)
            lcd.cursor(
                Math.floor(lcd.cursorPos / lcd.cols),
                (lcd.cursorPos % lcd.cols)
            );
        }
    }
});

// Send the web page on client request
app.get('/', function(req, res) {
    res.sendFile(__dirname + "/index.html");
});

// Create a handler for when a client connects
io.on('connection', function(socket) {
    var clientIP = socket.client.conn.remoteAddress;

    // If we get a chat message, send it out to all clients
    socket.on('chat message', function(msg) {
        console.log(clientIP + ": " + msg);
        io.emit('chat message', clientIP + ": " + msg);
    });
});

// Start the server
http.listen(4242, function() {
    console.log('Server listening on port ' + port);
});
What You Should See
You should be able type on the keyboard and have the text appear on the LCD, like in part 1.
However, if you open a browser on a computer that is on the same network as the Edison, you should be able to browse to http://<Edison's IP address>:4242 and see a simple chat room. Enter in some text at the bottom. Then, type in some text on the keyboard attached to the Edison. Press 'enter' to send that message to the chat room!
Code to Note
language:javascript
app.get('/', function(req, res) {
    res.sendFile(__dirname + "/index.html");
});
Serves the web page (index.html) to the client's browser on a request.
language:javascript
// If we get a chat message, send it out to all clients
socket.on('chat message', function(msg) {
    console.log(clientIP + ": " + msg);
    io.emit('chat message', clientIP + ": " + msg);
});
This is the crux of the chat room. Any new message we receive from the socket.io connection, we broadcast it to all other clients connected.
In index.html, we handle text entry with:
language:javascript
$('form').submit(function() {
    socket.emit('chat message', $('#m').val());
    $('#m').val('');
    return false;
});
When we click the "Send" button, we capture the text in the input box and send it to the server (Edison). the Edison then relays that text, and we look for messages from the Edison with:
language:javascript
socket.on('chat message', function(msg) {
    $('#messages').append($('<li>').text(msg));
});
On a message from the Edison, we add it as a list item in the main messages pane.
Troubleshooting
- The LCD isn't working! -- Double-check the wiring and adjust the potentiometer.
- Nothing happens when I type on the keyboard -- Make sure that the keyboard is plugged into the OTG port on the Base Block. Additionally, some keyboards are not supported, so we recommend trying a different USB keyboard, if you can.
Going Further
Challenges
- You might have noticed that capital letters are not supported from the keyboard. We can detect that the shift key has been pushed, but in our examples, we ignore it. Make the shift key work and have capital letters actually appear on the LCD and in the chat room!
- Create a chat room log. By default, once messages are broadcast, they only appear in the browsers for clients who are connected. Sometimes, it is helpful for the server to maintain a log of all the messages that appeared in the chat room. Devise a way to store all messages into a file on the Edison so that it can later be read (also known as "auditing").