SparkFun Qwiic RFID-IDXXLA Hookup Guide
 Elias The Sparkiest
Example Code
Let's take a look at the first two example sketches provided in the SparkFun Qwiic RFID Arduino Library.
Example 1 - Read Tag Basics
For this first example we'll be grabbing the scanned card and the time between when it was scanned and when we request the number, by typing the number 1 into the Arduino IDE's Serial Terminal. If you downloaded the SparkFun Qwiic RFID Arduino Library directly then open the example located in the in the examples folder: SparkFun_Qwiic_RFID_Arduino_Library > Examples >Example1_Read_Tag_Basics.ino . If you've downloaded the library through the Arduino Library Manager, then in the Arduino IDE you can navigate to File>Examples>SparkFun Qwiic RFID Arduino LIbrary>Example1_Read_Tag_Basics.
Let's walk through the setup at the very top of the code. Nothing too surprising here, we've #included-ed the Wire library as well as the SparkFun Qwiic RFID library. We then initialize the library with the Qwiif Rfid myRfid(RFID_ADDR) declaration. You may notice that it takes the Qwiic RFID Reader's address as one of it's arguments: RFID_ADDR. In the setup we begin the Wire, Serial, as well as the Qwiic RFID library. If there is a problem between your Redboard and the SparkFun Qwiic RFID board, then we'll print out an error message.
language:c
#include <Wire.h>
#include "SparkFun_Qwiic_Rfid.h"

#define RFID_ADDR 0x7D // Default I2C address

Qwiic_Rfid myRfid(RFID_ADDR);

String tag;
float scanTime;
int serialInput;

void setup()
{
  // Begin I-squared-C
    Wire.begin();
    Serial.begin(115200);

  if(myRfid.begin())
    Serial.println("Ready to scan some tags!");
  else
    Serial.println("Could not communicate with Qwiic RFID!");

  // Want to clear tags sitting on the Qwiic RFID card?
  //myRfid.clearTags();
}
In the main loop, we're looking for the number 1 to be entered into the Serial terminal. When that's entered we're going to grab the RFID tag with the myRFId.getTag() function call and get its' "scan" time (in seconds) with the myRFID.getPrecReqTime() function call. Just a quick note on the "time". This is not the time of day the tag was scanned but rather the time between when it was scanned and when you requested it. This gives each RFID tag a unique property even when you scan the same card twice, because their scan times will be different.
language:c
void loop()
{
  if (Serial.available() > 0){

    serialInput = Serial.read();
    if (serialInput == 49){   // "1" on your keyboard is 49 in ASCII

      tag = myRfid.getTag();
      Serial.print("Tag ID: ");
      Serial.print(tag);
      scanTime = myRfid.getPrecReqTime();
      // If this time is too precise try:
      // long time = myRfid.getReqTime();
      Serial.print(" Scan Time: ");
      Serial.println(scanTime);

    }

  }
}
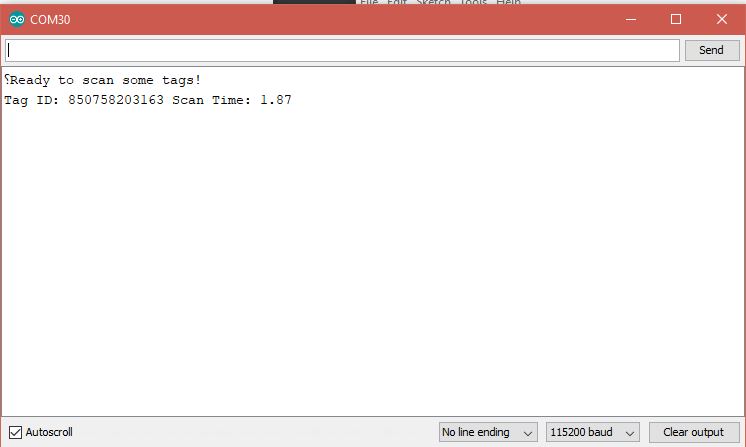
After scanning a card and waiting a number of seconds, then entering 1 into the Serial Terminal, my output looks like this.
If you need a similar example, but one that reads all 20 tags that can be stored on the SparkFun Qwiic RFID ID-XXLA Reader, then check out Example5_Get_All_Available_Tags
Example 2 - Read Tag Interrupt
For this next example we'll be using an additional pin as an interrupt that will indicate that a card has been scanned, which makes this not a pure Qwiic example. We'll use that interrupt to initiate a request to read the tag that the SparkFun Qwiic RFID Reader is holding onto. If you the downloaded the SparkFun Qwiic RFID Arduino Library directly then open the example located in the in the examples folder: SparkFun_Qwiic_RFID_Arduino_Library > Examples >Example2_Read_Tag_Interrupt.ino . If you've downloaded the library through the Arduino Library Manager, then in the Arduino IDE you can navigate to File>Examples>SparkFun Qwiic RFID Arduino LIbrary>Example2_Read_Tag_Interrupt.
At the top we #include the new library and use the default address for our Qwiic Rfid myRfid(RFID_ADDR) declaration. In the setup we communicate with the SparkFun Qwiic RFID Reader with the myRfid.begin statement. If there is any issue communicating with the Qwiic RFID we'll know about them here. Last but not least we pull the interrupt pin on pin 3 up high with pinMode(intPin, INPUT_PULLUP) to put it into a known HIGH state. When a tag is read this line will go LOW.
language:c
#include <Wire.h>
#include "SparkFun_Qwiic_Rfid.h"

#define RFID_ADDR 0x7D // Default I2C address

// Interrupt Pin on pin 3.
const int intPin = 3;
String tag;

Qwiic_Rfid myRfid(RFID_ADDR);

void setup()
{
  // Begin I-squared-C
    Wire.begin();
    Serial.begin(115200);

  if(myRfid.begin())
    Serial.println("Ready to scan some tags!");
  else
    Serial.println("Could not communicate with the Qwiic RFID Reader!!!");

  // Put the interrupt pin in a known HIGH state.
  pinMode(intPin, INPUT_PULLUP);

  // Want to clear tags sitting on the Qwiic RFID card?
  //myRfid.clearTags();

}
In the loop, we're just monitoring the Qwiic RFID's interrupt pin that will indicate that a tag has just been read. This will initiate a call to myRfid.getTag() that will pull in the scanned card's RFID tag ID.
language:c
void loop()
{

  // If the pin goes low, then a card has been scanned.
  if(digitalRead(intPin) == LOW){
    tag = myRfid.getTag();
    Serial.println(tag);
  }

  delay(500); // Geeze, woah! Slow it down mate.

}
And that's it!
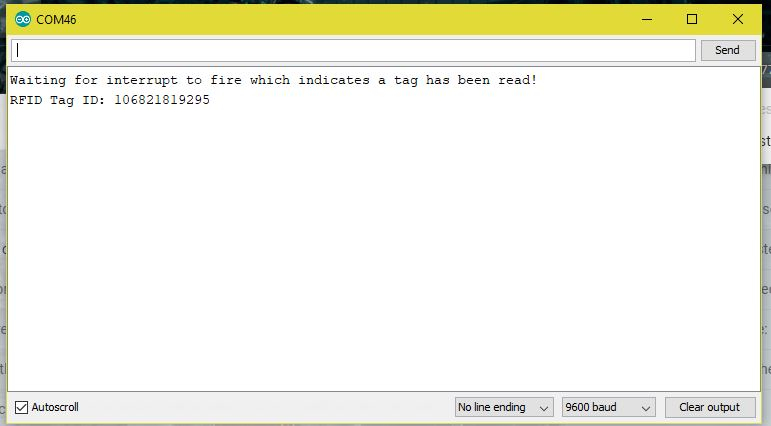
If you have not already, select the board and COM port of your Arduino and upload the Example1_ReadTag.ino code. Then open your Serial Monitor at 9600 and scan a tag,
You should see the following: