SparkFun Troubleshooting Tips
 bboyho
Software Checks
There are many languages out there. For the scope of this tutorial and troubleshooting, we are going to focus on the Arduino IDE (Integrated Development Environment) and common problems when uploading code to an Arduino development board. However, some of these tips may be useful when troubleshooting in other development environments.
FTDI Drivers
• Did you install the FTDI drivers?
If you have not uploaded to an Arduino that uses an FTDI before or connected an FTDI to your computer, you need to make sure that you have installed the latest FTDI drivers. Try looking at the tutorial listed below for installing the driver for your operating system. The tutorial is based off of FTDI's instructions. For more in-depth guidance, try looking at FTDI's Installation Guides.
How to Install FTDI Drivers
June 4, 2013
Keep in mind that device drivers can vary depending on the USB-to-serial converter populated on the development board. If you are using a different chip, you will need to install the respective drivers. Here are a few other drivers:
For more information about different drivers, check out this blog post.
• How do I know if I have drivers installed?
With the device is plugged in, you can see a few COM ports when you select Tools > Serial Port in the Arduino IDE's menu. When you unplug the device and reopen Tools > Serial Port, you might see a COM port disappear. By process of elimination, you can see what COM port it has enumerated to. You can also see this when you open your device manager checking the Ports (COM & LPT) tree.
• How do I know if my USB-to-serial converter is sending serial data?
To verify that the FTDI or any USB-to-serial converter is working, you could do a serial loop back test or echo test. In order to perform this test, you would connect a jumper wire between the UART pins Rx and Tx.
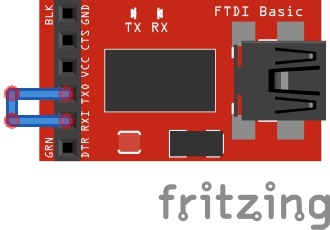
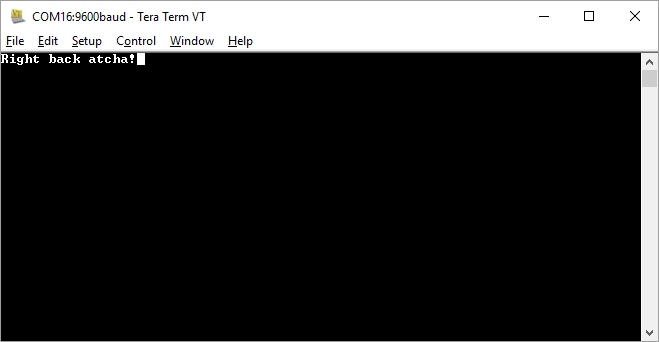
Open a serial terminal (like Tera Term) with the setting 9600 baud, 8-none-1-none. By typing into the serial terminal, any characters sent using a keyboard will be echoed back on the screen. You should also see the Rx and Tx status LEDs indicating when data is being sent.
Arduino IDE Versions
• Is there something wrong with my Arduino IDE?
There are improvements and benefits with each version release of the Arduino IDE. However, there can be unforeseen bugs and differences in the way that code is compiled. If there are warnings in the error output, usually you can ignore them. If you are having issues compiling, sometimes you need to uninstall and reinstall the Arduino IDE on a computer. You can also try deleting certain Arduino files.
If the Arduino-based development board does not require a certain IDE version, you can try rolling back and using a lower version of the Arduino IDE (like v1.6.5). Rolling back and testing with a stable/working IDE may be the solution until the next release.
Board Selection
• Did you select the correct board definition?
If you did not select the correct board definition, you will not able to upload code. Check the Arduino's associated documentation for more information on the correct board selection. You can find a list of Arduino board definitions in the Tools > Board selection menu.
• Why am I not able to see my Arduino board in the board selection menu?
There can be some issues with the Arduino IDE v1.6+ due to the different file structure requirements. This may cause an Arduino board to not show up in the default list.
The latest SparkFun Arduino-compatible board updates can be found on the SparkFun Arduino board add-on GitHub repository. This repository contains support for SparkFun's Arduino-compatible development boards and instructions on how to install the board add-ons:
If you tried installing the latest board and code is still not compiling, you may want to roll back to a previous version of the board add-on. If there was more than one board version released, you should be able to click on the board in the board manager and see a small dropdown menu for different versions.
COM Port Selection
• Did you select the correct COM port?
You need to make sure that you are selecting the correct COM port in your Tools > Serial Port menu. With the device plugged in, you can see a few COM ports when you select Tools > Serial Port in the Arduino IDE's menu. When you unplug the device and reopen Tools > Serial Port, you might see a COM port disappear. By process of elimination, you can see what COM port it has enumerated to. You can also see this when you open your device manager checking the Ports (COM & LPT) tree.
Installed Arduino Libraries
• Does your example code require libraries to be installed?
If you don't install the libraries, Arduino won't understand certain functions because they were not defined for it. You will usually be able to see example code try to include it near the top of the sketch file. I recommend looking at this tutorial to properly install the libraries.
Installing an Arduino Library
January 11, 2013
• I installed the necessary Arduino libraries, so why is it still not compiling?
Try reinstalling the Arduino IDE. There was one case when one of our engineers uninstalled and reinstalled the Arduino IDE when he had problems with a library. Otherwise, you may want to reinstall the Arduino library. Sometimes the library downloaded is corrupt or accidentally installed wrong, so you would need to reinstall the Arduino library.
Corrupt Bootloader or Bricked Arduino
• How do I recover my Arduino if the bootloader is corrupt?
If you have another Arduino microcontroller or an AVR programmer, you could reinstall the bootloader. The tutorial listed below was written for an Arduino Uno with ATmega328P. If you are using a different AVR microcontroller or Arduino-compatible board, you may need to select a different board definition to burn its bootloader.
Installing an Arduino Bootloader
December 4, 2013
• My Arduino with ATmega32U4 stopped working after uploading new code. What happened to my ATmega32U4-based microcontroller?
Most likely the wrong board definition was selected when uploading code, or something is interfering with the register that handles COM port communication. There is a way to recover the ATmega32U4-based Arduino using the double reset method. You may need an AVR programmer as a last resort. Try checking out the comment here for links to more in-depth tips on recovering ATmega32U4s with different bootloaders.
Semantics Error and Debugging
• Why is my code not working even though it compiles?
This sounds like a pretty general question, but it's likely a semantic error. While the code is able to compile and is free from syntax errors, the code might not be written to do what you intended. Assuming the hardware connections and boards are good, it is possible that:
- A pin or variable was not initialized correctly.
- A variable was not calculated and saved correctly.
- The wrong variable is printing to the Serial Monitor.
- You are using values outside of an array[].
- There is a baud rate mismatch.
- A
delay()function is preventing a certain line from executing fast enough. - The sequence of code is not executed properly.
The list of reasons why this may be happening can go on depending on the complexity of the project. The simplest method of debugging can be turning on an LED when we reach a certain part of the code. However, the best method of troubleshooting Arduino code is to try to step through using the serial.print() function to debug. If used correctly, the function is more flexible and can indicate that we have entered a line of code.
Maybe you want to print "I entered this function" to the Serial Monitor after pressing a button or when a sensor reaches a certain value. The serial.print() function can also be used to inspect variables in order to know what to expect from a sensor's output range. The function can also be used to verify calculations. Other environments allow you to step through the code to simulate what may happen without the need for serial.print().