Teensy Arduino Shield Adapter Hookup Guide
 Toni_K
 Hardware Overview
There are several features on the Teensy Adapter Shield to be aware of. While this shield provides basic Arduino compatibility with a standard shield, there's a few other fun features to check out.
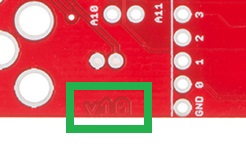
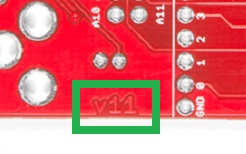
Note: This shield has been updated to v1.1. The only difference in the revision is a single jumper to isolate the Vcc power from 5V. Just in case users accidentally connect 5V to the ISP pins (the Teensy is a 3.3V board).
The jumper pad and markings are shown below:
Teensy Compatibility
The adapter design interfaces with all features of the Teensy 3.1 and Teensy 3.2, but the adapter fits the Teensy LC footprint as well. Not all of the features available on the adapter are compatible with the LC due to the microcontroller's limitations. Please check the datasheets to ensure functionality for your project to determine the best Teensy for your use case.
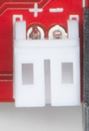
Real Time Clock Battery
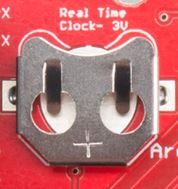
The battery holder included for the shield allows the users to install this into a project and run the RTC (Real Time Clock) on the Teensy as a time keeping option. The included coin cell battery outputs 3V and will power the RTC in case of system power loss to maintain accurate time.
This feature does not work with the Teensy LC.
JST Power Connector
This connector breaks out the 3.3V power line from the Teensy. You can power external devices off of this using a JST jumper wire, or you can solder wires directly to this connection instead.
This header can also be used as a power input to both the Teensy and the Arduino footprint and is not regulated down. The voltage supplied on the connector must be 3.3V.
You must cut the VIN/VUSB jumper on the bottom of the Teensy if you intend to power the Teensy via this connection and use USB for communication/programming.
Barrel Jack
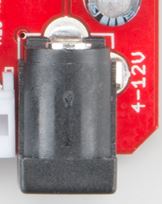
The barrel jack allows the user to power the Teensy and Shield combo using a wall adapter or any power supply with a male barrel jack. This voltage can be anywhere from 4-12V, and is regulated to 5V for powering the Teensy. This power supply connects directly to VRAW on the Arduino shield footprint and is not regulated down. Please read the datasheet for any shields you intend to connect to via the adapter shield.
You must cut the VIN/VUSB jumper on the bottom of the Teensy if you intend to power the Teensy via this connection and use USB for communication/programming.
I2C Jumpers
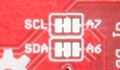
The two solder jumpers included on the adapter allow the user to configure the I2C lines on the board. The adapter ships with the jumpers closed by default, connecting the SDA and SCL pins of the Teensy to pins A4 and A5 on the Arduino footprint respectively. If you have an Arduino Leonardo-compatible shield, you can swap this jumper to isolate the SDA and SCL lines on the same-named pins, and access A6 and A7 of the Teensy on A4 and A5 of the Arduino footprint. A4 and A5 of the Teensy will still connect to the Arduino footprint SDA and SCL.
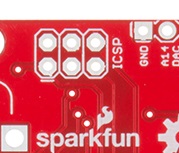
ICSP Header
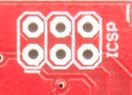
The ICSP header breaks out the SPI pins for Leonardo-compatible shields. You can also use this header to reprogram the Teensy if you have an AVR programmer.
Power Isolation Jumper
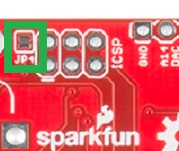
If you are using the updated v1.1 adapter, there is a power isolation jumper marked J4, next to the ICSP/ISP pins. This jumper by default is open and is used to isolate Vcc of the adapter board from the ISP pins. This is used to prevent users from accidentally frying their boards when providing 5V power instead of the 3.3V that the Teensy is rated for.
Additional Analog Pins
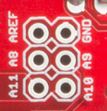
Just because you're using the Teensy with an Arduino shield doesn't mean you want to lose the extra features of the Teensy! We've broken out additional analog pins 8-11 from the Teensy to a 6-pin header, along with AREF and GND. These pins don't interact with the Arduino shields at all, and are simply a bonus for external sensors or inputs if desired.
DAC Pin Header

One of the other great features of the Teensy is the onboard Digital-to-Analog converter. We've broken this pin out to the board's edge, along with the PROG pin, and two corresponding GND pins.