Thumb Joystick Hookup Guide
 MikeGrusin
 bboyho
Arduino Examples: Breakout
Hardware Hookup
The breakout board provides five labeled connections. You'll connect these lines to your project or microcontroller. In this example, we'll use the RedBoard with ATmega328P. For stability, make sure to have part of the breadboard under the joystick.
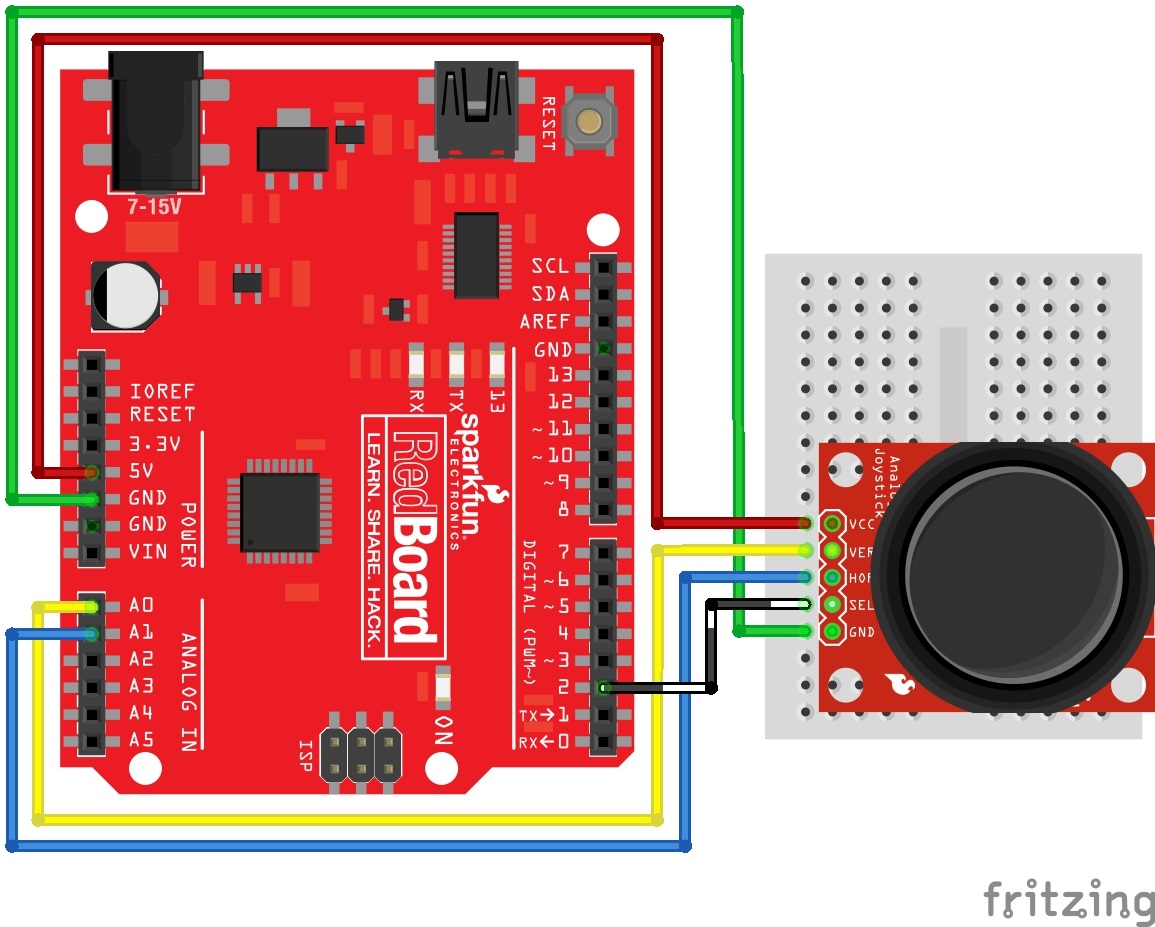
Hookup Table
| RedBoard w/ Atmega328P | Thumb Joystick Breakout |
|---|---|
| 5V | VCC |
| A0 | VER |
| A1 | HOR |
| 2 | SEL |
| GND | GND |
Thumb Joystick Breakout Board Example
Here's an example Arduino sketch which sets up the microcontroller to read the inputs, and then continuously prints the values to the serial monitor. If you're using a different microcontroller, the steps should be similar; you'll just need to determine how to read analog and digital inputs on your device. Copy the code and paste it in the Arduino IDE. Select Arduino/Genuino Uno as the board, the COM port that it enumerated on, and hit the upload button.
language:c
// Thumb Joystick Breakout Board Example
// Modified by: Ho Yun "Bobby" Chan, SparkFun Electronics, 2/19
// Written by: Mike Grusin, SparkFun Electronics 3/11
// This code is free, baby. Use it however you like.

// This sketch shows the basic operation of the Thumb Joystick (COM-09032) and breakout board (BOB-09110).
// The joystick outputs two analog voltages (VERT and HORIZ), and one digital signal (SEL) for the pushbutton.

// Connections to joystick (change if you use different pins):

const int VERT = 0; // analog
const int HORIZ = 1; // analog
const int SEL = 2; // digital

// Also connect the joystick VCC to Arduino 5V, and joystick GND to Arduino GND.

// This sketch outputs serial data at 9600 baud (open Serial Monitor to view).

//initialize variables for analog and digital values
int vertical, horizontal, select;

void setup(){
  /* old method to turn on the pull-up resistor for the SEL line
     before Arduino IDE v1.01 (see http://arduino.cc/en/Tutorial/DigitalPins)
     make the SEL line an input*/
  //pinMode(SEL, INPUT);
  //digitalWrite(SEL, HIGH);

// make the SEL line an input
  pinMode(SEL, INPUT_PULLUP);

  // set up serial port for output
  Serial.begin(9600);
}

void loop(){

  // read all values from the joystick

  vertical = analogRead(VERT); // will be 0-1023
  horizontal = analogRead(HORIZ); // will be 0-1023
  select = digitalRead(SEL); // will be HIGH (1) if not pressed, and LOW (0) if pressed

  // print out the values

  Serial.print("vertical: ");
  Serial.print(vertical, DEC);
  Serial.print(" horizontal: ");
  Serial.print(horizontal, DEC);
  Serial.print(" select: ");
  if (select == HIGH) {
    Serial.println("not pressed");
  }
  else {
    Serial.println("PRESSED!");
  }
}
What You Should See
Open the serial monitor at 9600 baud to begin seeing the raw output values. With the vertical "↑ V" pointing away from you, start moving the joystick around.
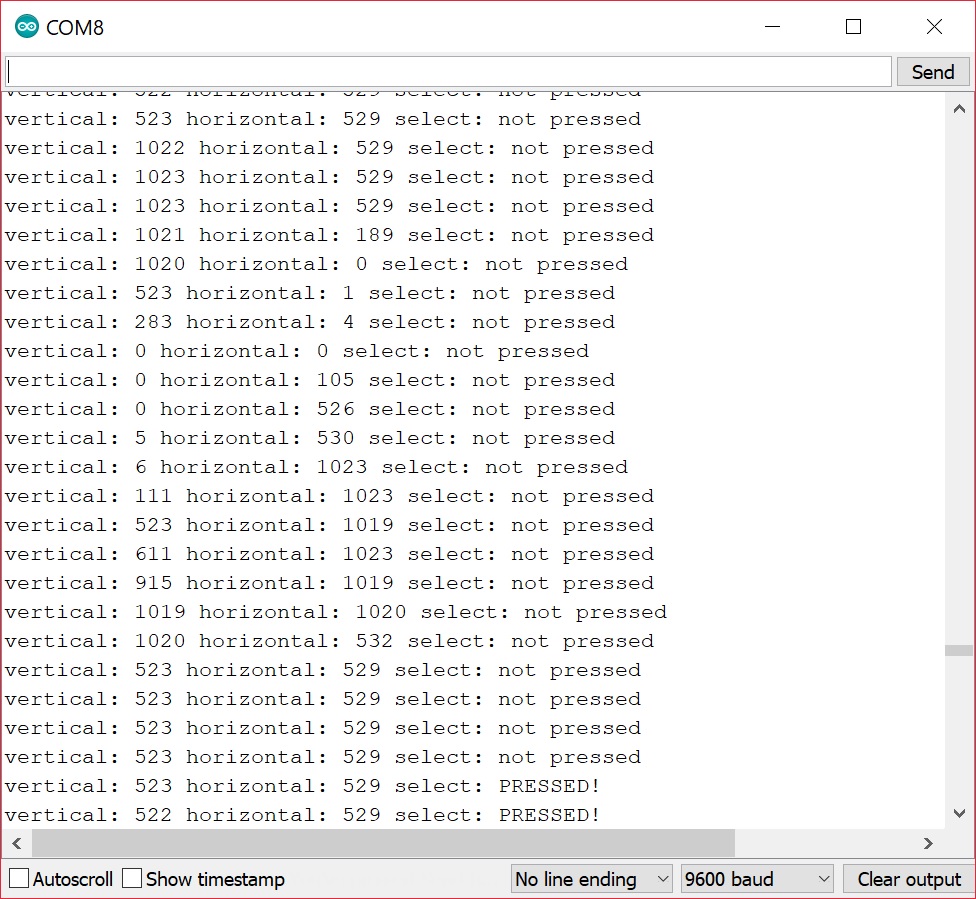
In this case, the joystick was sitting around 520 for the vertical and horizontal values when not moving. Moving the joystick up toward the up arrow and in a clockwise motion, the joystick will read a value of about 1023 for the vertical component while the horizontal sits at the same value. Moving it to the right, the vertical component will sit at the resting value of about 520 again while the horizontal component will read a value of about 0. As the joystick moves down toward you, you'll notice the vertical component will drop to 0 and the horizontal will sit at it's resting value again. Moving the joystick to the left, you'll noitice the vertical component sit back to its resting value while the horizontal component jump up to 1023. Finally, you'l receive a the "PRESSED!" message when pressing down on the joystick.
This joystick is a low-power device. The analog and switch outputs should be connected only to high-impedance inputs, such as I/O ports on a microcontroller or op-amp inputs. Don't try to hook the joystick directly to LEDs, motors, or other high-current devices (more than 1mA), or you may damage it.
Looking for more examples with the joystick? Check out the examples in the next section for the shield!