Understanding the BC127 Bluetooth Module
 SFUptownMaker
Example: SPP Connection
On this page, we'll provide an example Arduino sketch connecting two boards, each of which has a pushbutton and an LED, and pushing either button will light up both LEDs.
For simplicity's sake, we're going to write this so the code and hardware for both processors is the same.
The Hardware
I'm going to keep this simple:
- two SparkFun Arduino Pro Minis
- two BC127 breakout boards
- two buttons
- two 10k linear potentiometers
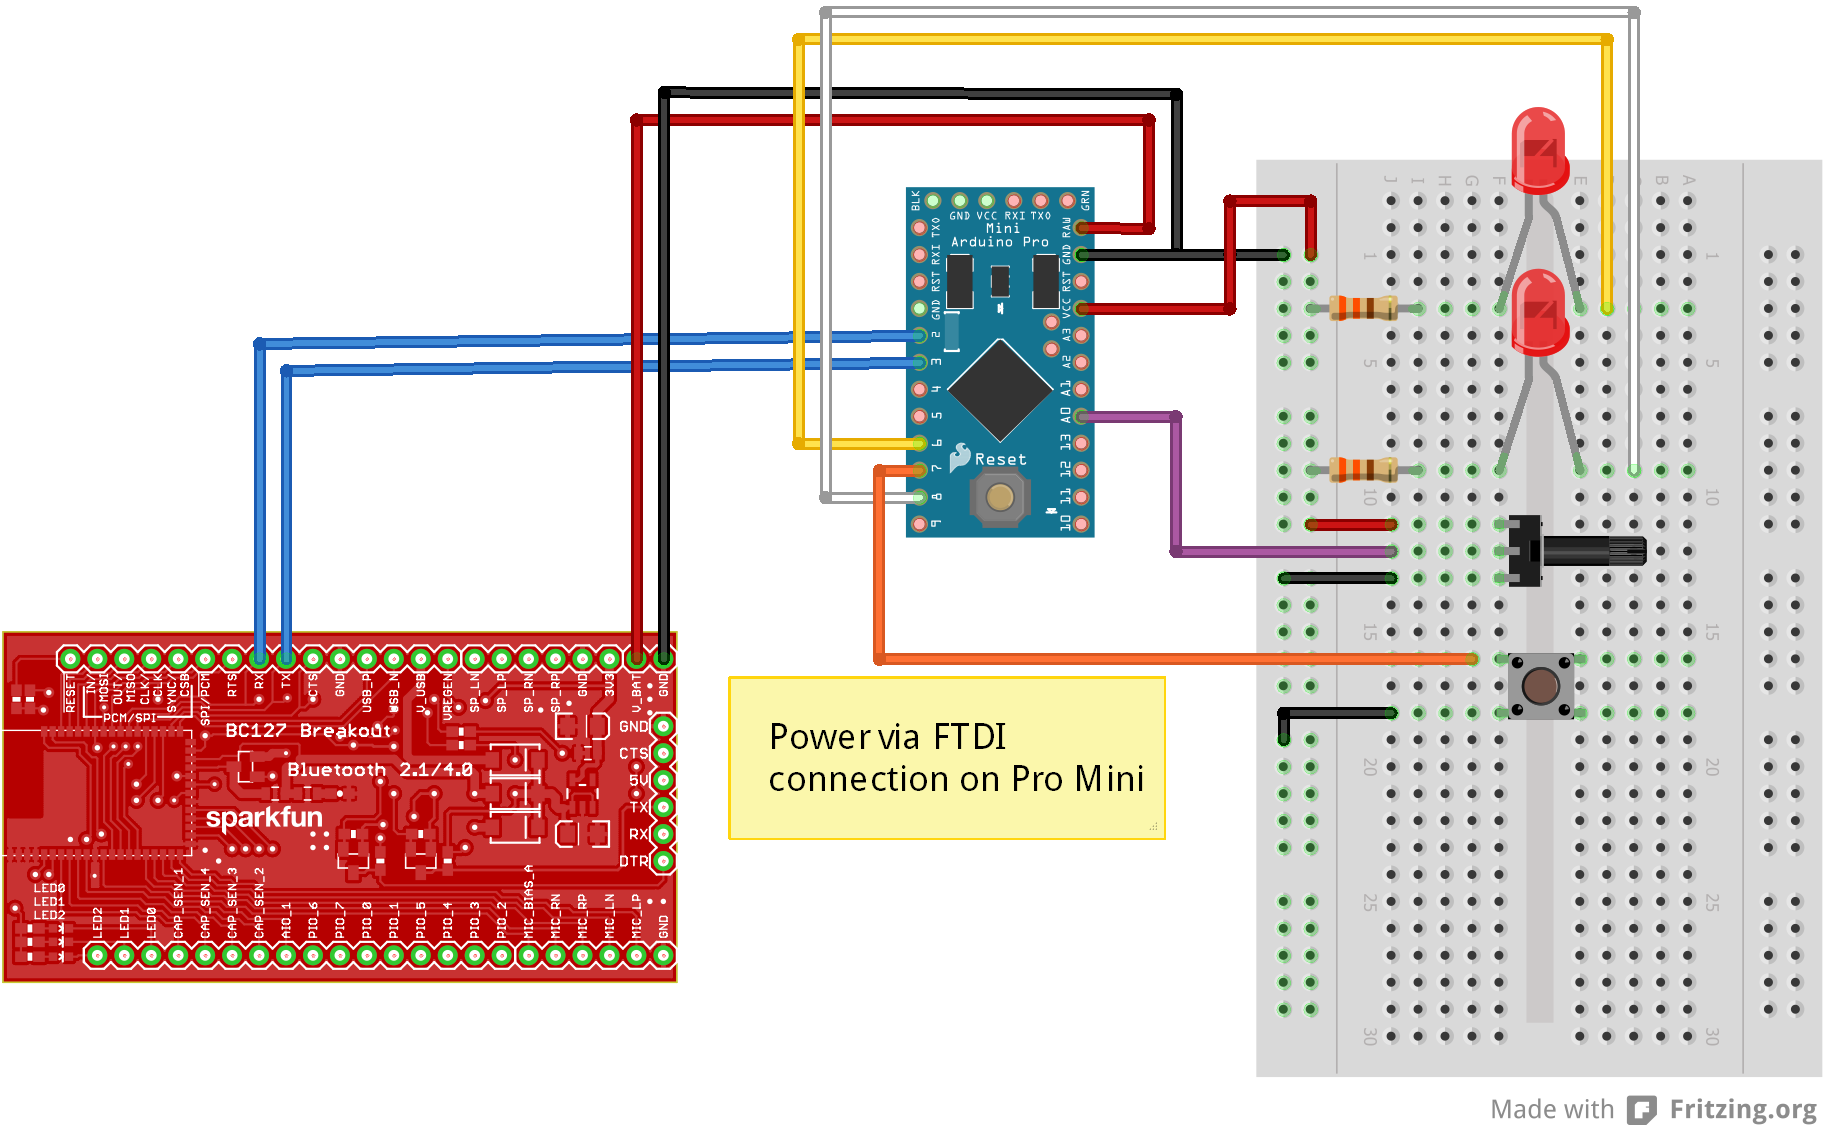
- four red LEDs (with 330-ohm current limiting resistors).
As I said above, the hookup and code for the two boards will be identical.
Here's a Fritzing diagram showing the connection of one half of the setup; make two of these:
The Code
Note: This example assumes you are using the latest version of the Arduino IDE on your desktop. If this is your first time using Arduino, please review our tutorial on installing the Arduino IDE. If you have not previously installed an Arduino library, please check out our installation guide.
Everything you need to know is in the comments.
language:c
// Include the two libraries we need to use this; I'm using a software serial port
//  because time-sharing the hardware port with uploading code is a pain.
#include <bc127.h>
#include <SoftwareSerial.h>

// Create a software serial port.
SoftwareSerial swPort(3,2);  // RX, TX
// Create a BC127 and attach the software serial port to it.
BC127 BTModu(&swPort);

// Aliases for the input and output pins we're going to use.
#define POTPIN    A0
#define PWMLED    6
#define BUTTONPIN 7
#define DIGLED    8

void setup()
{
  // Serial port configuration. The software port should be at 9600 baud, as that
  //  is the default speed for the BC127.
  Serial.begin(9600);
  swPort.begin(9600);

  // Blast the existing settings of the BC127 module, so I know that the module is
  //  set to factory defaults.
  BTModu.exitDataMode(); // Just in case...do this or other commands won't take.
  BTModu.restore();
  BTModu.writeConfig();
  BTModu.reset();

  // Configure the inputs and outputs.
  pinMode(BUTTONPIN, INPUT_PULLUP);
  pinMode(DIGLED, OUTPUT);

  String buffer;  // We'll use this for capturing data from the module. I'm using
                  //  a String to make it easy to parse.

  // NB- we can assume that at this point our soft serial buffer is empty; that's
  //  all handled by the restore/write/reset cycle at the top. For other programs,
  //  your mileage may vary on this point, so it might not be a bad idea to purge
  //  the buffer before you start reading in from it.

  // Okay, first tricky bit. Since we've got the same code on both boards, we need
  //  some way to pair them. We want to wait here until the board is paired; what
  //  we'll do is wait for the button to be pressed, and then initiate pairing. We
  //  will also monitor traffic coming in from the BC127 and watch for the string
  //  "OPEN_OK SPP\n\r"; if we see that, we can bail, since we know the module
  //  is now connected. We *could* use the connectionState() function, *but* that
  //  function has such a long latency (it takes about 500ms to get a definitive
  //  answer from the module) that the chance of missing a button press is really
  //  pretty high- you'd have to hold the button for 500ms to be sure to catch it.
  while (1)
  {
    // We're going to do two things in this loop: check for a connection message,
    //  indicating that we were connected to by a remote device, and check for the
    //  button press and try to connect when we see that. Here's the connection
    //  message polling part.

    // We need to buffer our incoming serial data...
    if (swPort.available() > 0) buffer.concat((char)swPort.read());

    // ...then, we need to check if it's a full line from the serial port, and
    //  check its contents if it is.
    if (buffer.endsWith("\r"))
    {
      // If the buffer has a serial port connection message, we can break out of
      //  the while loop after entering data mode.
      if (buffer.startsWith("OPEN_OK SPP"))
      {
        BTModu.enterDataMode();
        Serial.println("Connected!");
        break;  // Exit the while loop.
      }
      buffer = "";  // Otherwise, clear the buffer and go back to waiting.
    }
    //////////////////////////////////////////////////////////////////////////////
    // Okay, this next bit is the push button polling section. Note that once the
    //  button has been pressed, it's quite a long time (10+ seconds) before we
    //  return to what we were doing above.
    if (digitalRead(BUTTONPIN) == LOW)
    {
      Serial.println("Attempting to connect...");
      if (BC127Connect() == BC127::SUCCESS)
      {
        Serial.println("Connection succeeded!");
        break;
      }
      else Serial.println("Connection failed. Back to waiting!");
    }
  }
}

// Ideally, I'd have made this a static variable and put it inside loop(), but that
//  causes Arduino to have a little hissy-fit, so I'll make it a global instead.
String inBuffer = "";

// If we've gotten to loop(), we can assume that we're connected to the remote
//  device. We're going to pass a packet back and forth that looks like this:
//     xy\r
//  x  - 8-bit value for the brightness of the dimmable LED.
//  y  - 0x00 or 0x01 for whether the remote button is pressed or not.
//  \r - end of string value. \r is not a valid data byte, so it makes a good
//       check on complete packet receipt.
void loop()
{
  // These are the variables we need to get this job done. By making them static,
  //  they only get initialized once and persist through loop calls.

  static byte outBuffer[3];
  static int ledVal = 0;
  static boolean buttonVal = false;
  static unsigned long lastLoop = millis();

  // This first bit is where we handle the receipt of characters from the remote
  //  device. We'll handle our data collection and sending later.

  // Add to the buffer one character at a time...
  if (swPort.available() > 0) inBuffer.concat((char)swPort.read());
  // ...then check to see if we've received an end-of-packet character...
  if (inBuffer.endsWith("\r"))
  {
    // ... and parse the packet if we have.
    ledVal = (int)inBuffer[0]; // This is a pre-linearized value from the pot on the
                               //  other board.
    digitalWrite(DIGLED, (int)inBuffer[1] ? LOW : HIGH); // This is the other board's
              //  button state. We want to invert it, of course, so a received 1
              //  (indicating the other button is high/unpressed) results in a low
              //  for this board's LED.
    inBuffer = "";  // Clear the buffer.
  }

  analogWrite(PWMLED, ledVal);

  // Our standard "loop without delay" method.
  if (lastLoop + 50 < millis())
  {
    lastLoop = millis();
    outBuffer[0] = (byte)(linearizeLED(analogRead(POTPIN)));
    outBuffer[1] = (boolean)digitalRead(BUTTONPIN);
    outBuffer[2] = '\r';
    swPort.write(outBuffer[0]);
    swPort.write(outBuffer[1]);
    swPort.write(outBuffer[2]);
  }
}

// Sweet little function that takes a potentiometer's input and turns it into a
//  PWM values that will appear, to a user, to be a linear brightness increase
//  across the range of the potentiometer.
int linearizeLED(int potVal)
{
  int PWMArray[] = {0, 1, 2, 3, 5, 7, 9, 12, 16, 20, 25, 31, 38, 46, 54, 64, 75, 87,
                      100, 114, 130, 147, 165, 185, 207, 230, 255};
  byte index = map(potVal, 0, 1024, 0, 26);
  return PWMArray[index];
}

// Useful function which identifies a local BC127 module and connects to it.
int BC127Connect()
{
  int connectionResult = BC127::REMOTE_ERROR; // Our return value. Assume failure.
  BTModu.inquiry(10);   // Spend 13 seconds seeking local devices.
  String address;   // Buffer for addresses we've found.
  // This loop will scan through the addresses found (there will be a maximum of
  //  five) and identify any BC127 modules (their addresses all start with "20FABB").
  for (byte i = 0; i < 5; i++)
  {
    // If there IS an address at index i...
    if (BTModu.getAddress(i, address))
    {
      // ...check to see if it's a BC127 and if it IS...
      if (address.startsWith("20FABB"))
      {
        // ...attempt to connect to it...
        connectionResult = BTModu.connect(address, BC127::SPP);
        break; // ...and quit looking at the rest of the addresses.
      }
    }
  }
  // Okay, hopefully, by now we've found and connected to a BC127. If not, return
  //  an error...
  if (connectionResult != BC127::SUCCESS) return connectionResult;
  // ...but, if so, we want to try to enter data mode.
  else connectionResult = BTModu.enterDataMode();
  return connectionResult;
}