Understanding the BC127 Bluetooth Module
 SFUptownMaker
Usage Examples
Here we're going to explore three use cases: connecting the BC127 to a cell phone or other media player device, streaming audio from one BC127 to another, and connecting a BC127 to another device with the SPP protocol and transmitting data between the two.
BC127 as Media Controller and Audio Output
When connected with a media playing device (I'll be using my cell phone) and the A2DP and AVRCP profiles, the BC127 can be used as an output and control device for music or other audio signals.
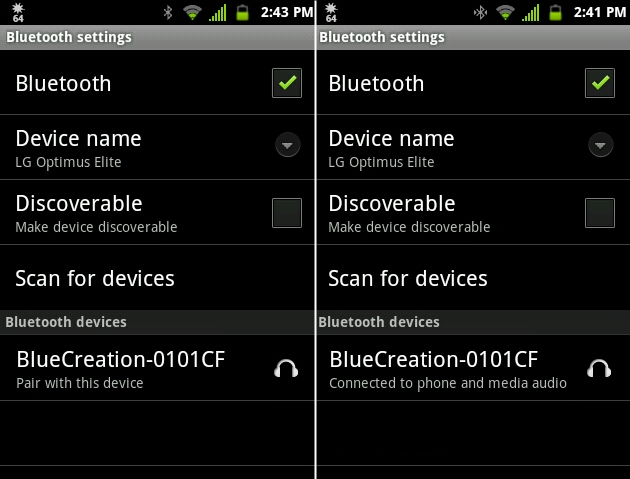
I'll start by pairing my phone with the BC127. Above you can see a couple of screenshots from my phone, showing what I see when I scan for devices, and what shows up when I've successfully connected to the BC127.
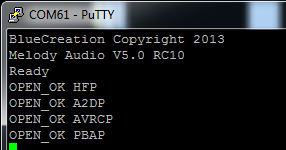
This is what the serial output on the BC127 looks like during the pairing process.
You can see that it reported a neAw connection with four profiles: Hands-Free Profile (HFP), Advanced Audio Distribution Profile (A2DP), Audio/Visual Remote Control Profile (AVRCP), and Phonebook Access Profile (PBAP). At this point, I can send commands back from the BC127 to the phone to start, stop, and pause tracks, or to advance or go back in the track list. Furthermore, the BC127 will receive messages when playback is started or stopped at the phone end. Here's an example of me starting playback on the phone, pausing it, then unpausing it via the serial terminal:
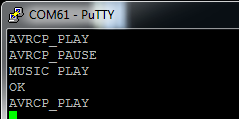
You'll note that the MUSIC PLAY command generated two responses: an OK from the BC127 indicating that the command was received and performed successfully, and an echo AVRCP_PLAY response from the phone, indicating that it successfully complied with the request. This echo response may take some time to arrive at the BC127 module, but the command executes on the phone very rapidly.
In addition to the various music control commands (see the previous page for a complete list), the BC127's various PIO pins can be used to control playback. These signals are active high; pull the pin to the module's supply voltage to send the signal.
Here's a list of functions performed by various pins:
- PIO_0 - Local volume up
- PIO_1 - Local volume down
- PIO_2 - Play/pause playback
- PIO_4 - Track backward
- PIO_5 - Track forward
The Purpletooth Jamboree board includes pins (and solderable headers) to access all of these functions.
Important note: if you receive a phone call while connected to a phone via HFP, it will interrupt your A2DP stream. If you don't have a microphone connected to the BC127, you may be unable to interact with your caller. You can disable HFP on the BC127 to prevent this; the audio output will stil be paused but the audio streams won't be transferred to the module, so you can use the speaker and mic on the phone itself.
Sending Audio from One BC127 to Another
Another great use of the BC127 is device-to-device audio. You can use this to add Bluetooth streaming to any device with an audio output to another; for example, you can stream audio across the room from your PC to a stereo amplifier without running a cord.
The process is a similar to pairing with a cell phone, as above, but requires that you pre-configure one of your BC127 modules to act as a source--they ship configured as sinks.
There are two ways to do this: with the input pins or programatically. With the input pins, simply pull the VREGEN pin high for one second (or, push the VRECEN/PAIR button on the Purpletooth Jamboree board). This will change the necessary settings, reset the board, and connect to the BC127 module with the strongest signal. Here's a screenshot of two modules undergoing this process (the source device is on the left):
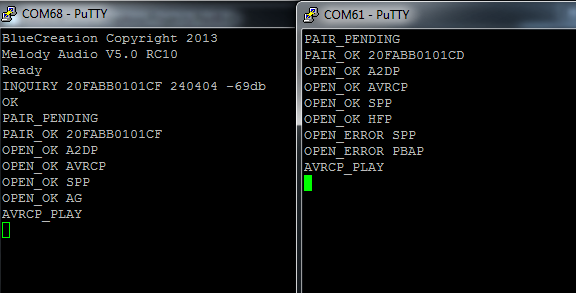
You'll know the module has started its pairing process becasue the LEDs will switch off momentarily.
Also note that the audio stream won't begin until the AVRCP_PLAY command is sent. In this case, it was sent by pressing the play button on the Jamboree board; sending a MUSIC PLAY command to either module is perfectly acceptable as well.
Programatically, you'll need to perform these steps:
- For best results, do a
RESTOREWRITERESETcycle on both modules, so we know what their settings are. You don't have to do this, especially if you're comfortable with the implications of any settings you've changed, but the rest of this process assumes the modules are at factory default. - On the source device (the one that has the audio input), run
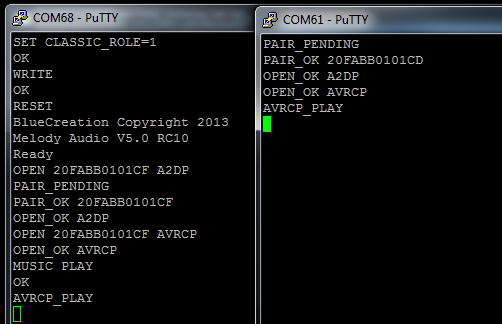
SET CLASSIC_ROLE=1. This makes the device a master. This is really important--if you skip this, the connection will work and you'll get no errors, but the audio won't work. - If you want the source device to connect automatically to the sink, run
SET AUTOCONN=1. If you don't do this, you'll need to tell it to reconnect every time you reset it our power cycle it. WRITEandRESETto make those changes stick and take effect.- Connect to the other BC127 module (I'm connecting to 20FABB0101CF): 'OPEN 20FABB0101CF A2DP`.
- Issue the
MUSIC PLAYcommand on the source device. If you want remote access from the sink to starting playback, you'll need to open an AVRCP profile connection from the source to the sink (OPEN 20FABB0101CF AVRCP).
Here's a screenshot of two devices, starting in factory default, being connected up:
BC127 SPP Connection
The final use case example I'll demonstrate is connecting the BC127 as a serial device and transferring data. Here's a screen shot of two BC127 devices being connected:
Here are the steps you'll need to perform to duplicate this demo:
- For best results, do a
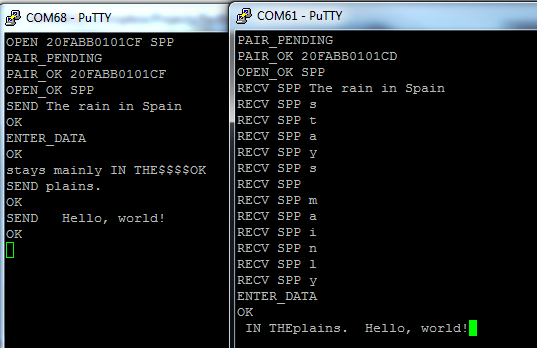
RESTOREWRITERESETcycle on both modules, so we know what their settings are. You don't have to do this, especially if you're comfortable with the implications of any settings you've changed, but the rest of this process assumes the modules are at factory default. - Unlike with audio transfers, there is no source device and no sink device, here. They are both considered endpoints. That means you can initiate the connection from either end. To connect,
OPEN 20FABB0101CF SPP. - At this point, you can send data by prepending your data with
SEND. TrySEND The rain in Spain. Data is sent on carriage return (i.e., the ENTER key); this means you can't send a CR character, unless you're in data mode. - To enter data mode, use the
ENTER_DATAcommand. You can see now that data ("stays mainly") is streaming directly over the link, but that it's being received piecemeal on the right side device. After I put that device in data mode, you can see the data coming in more naturally ("IN THE"). - To exit data mode, you'll need to leave a short gap in the character stream (by default, 400ms), then enter
$$$$, then allow a short gap (again, 400ms). This will exit data mode. Note that even though I'm sending data ("plains.") in command mode, the receiving device remains in data mode and receives only the data I sent. Also note that the first space afterSENDis not transmitted, but subsequent spaces are (" Hello, world!").