Using GitHub to Share with SparkFun
 SFUptownMaker
Forking a Repository
Now that we've gotten our client installed, we need to grab the repository that we want to make our changes on. We'll use the repository for the other GitHub tutorial for this example.
Fork Globally...
The first step is to fork the repository from SparkFun's account to your own. While there are other ways to take a copy of the repository and work with it, forking is the preferred method, because it makes it easier to submit pull requests (which notify the original owner that you have changes that you'd like considered for inclusion) later.
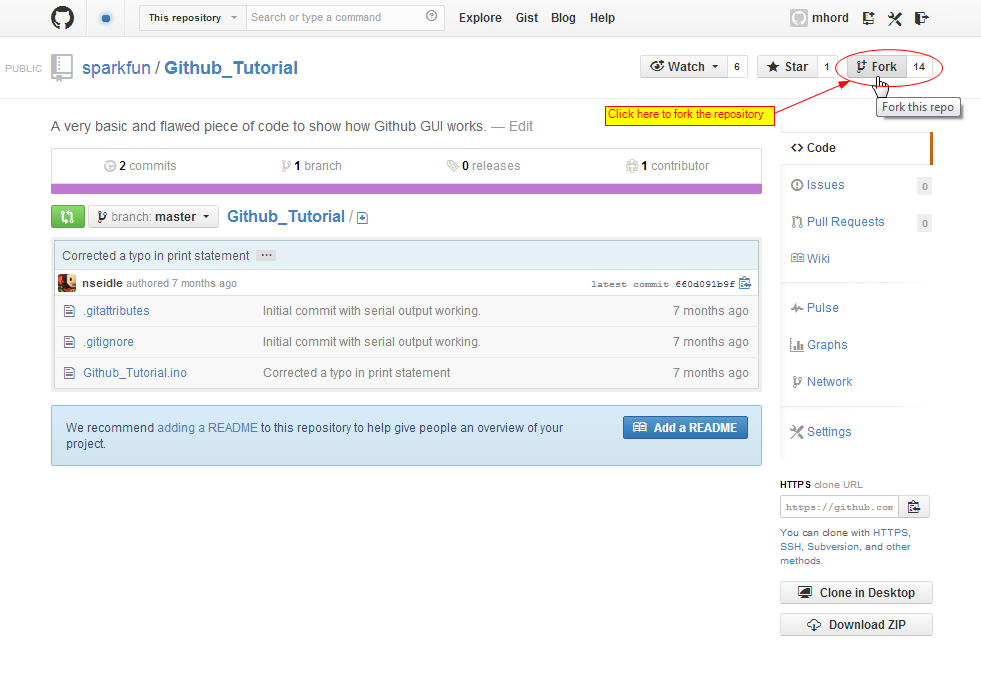
Once you're on the repository page, look for the "Fork this repo" button. You can see it in the image above; forking is core functionality of GitHub, so, even if the interface has changed slightly, you should be able to find it. Click the button and you'll see something like this:

Looks just like the old version, no? If you'll note, though, the account name is different--now it's in my account rather than the SparkFun account.
...Code Locally
Now we need to make a local copy. While you can edit simple text files directly on GitHub, it's reasonable to assume most of your work will be done on a local terminal. Pick a location to store the files that you'll be working with (I store mine in a folder called "Projects" in my DropBox folder; git plays very well with DropBox!). Here's a sequence of commands to get those files from GitHub to your local computer and store them in a directory of your choosing:
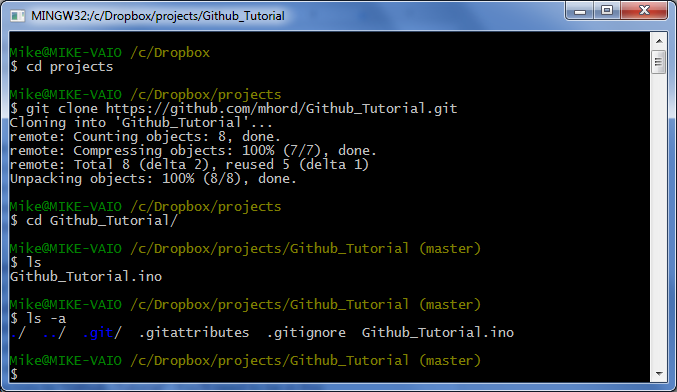
Let's take the commands here one at a time:
cd projects- change directory to "projects". This is where I keep, well, my projects.git clone https://github.com/mhord/Github_Tutorial.git- Tell git you want to clone the repository located at this address. The address is case sensitive and git will choke if it's not exactly right. Cloning creates a copy of the repository, complete with push and pull links back to the original on GitHub. We'll talk about what this means in a bit.cd Github_Tutorial/- change directory to "Github_Tutorial". You'll need to be in this directory whenever you're working with this repository.ls- list the files in the directory.ls -a- list all the files currently in the directory. Files and folders prepended with a '.' will not normally show up when you type "ls", so you need the -a switch to see them.
The .git directory contains all the "under-the-hood" stuff git needs to work its magic. Never, ever mess with it. .gitattributes contains some bookkeeping information telling git how to deal with certain file types; you don't really need to worry about it now, as it's not something you'll be modifying and is not found in all repositories. .gitignore is a text file telling git which files it should skip when committing changes. A good example of files that you might want to exclude are .o files when building a software project, or the .b#x and .s#x files that EAGLE creates as back-ups when you're editing board layouts or schematics.
Other files should be pretty self-explanatory--they're the "meat", the stuff you're really interested in editing.