WAV Trigger Hookup Guide V11
 JordanDee
 Introduction
NOTE: This guide is for the latest version of the WAV Trigger, V11. If You have an older version (the version number can be found on the back of the PCB), please refer to this tutorial.
The WAV Trigger is a development platform that allows you to easily add music and sound effects to your project. The WAV Trigger plays uncompressed WAV files up to 16-bit stereo 44.1kHz, the same quality as audio CD's. One significant feature is that the board has the ability to play multiple tracks at the same time, mixing up to 8 stereo tracks together on the fly. The board has a audio jack and a 2-pin output that can be connected to either headphones or speakers for audio output.
Tracks are played when some type of condition is met. For example, the most basic use is to connect a button between ground and a trigger. By default, when the button is pressed, the track (.WAV file) on the micro SD card to that corresponds to that trigger will be played. There are more advanced options that can be created with a configuration file that allows triggers to play random tracks, pause tracks, and change volume, amongst other operations.
In addition to using buttons and switches, sounds can be triggered by the digital outputs of microcontrollers or sensors. This can allow for many interesting uses of this product that depend on environmental stimuli. There are various ways to configure your board, which we'll detail later in the tutorial.
We will also explain how to use the WAV Trigger's applications for configuration, flashing new firmware, or controlling the board remotely with a serial connection. Download these applications with the links below for either Windows or Mac.
Required Materials
The beauty of the WAV Trigger is that you can make it as simple or as complex as you want. However, to follow along with this tutorial you will need a few things besides just a WAV trigger board. At the very least you will need some wire to connect your triggers to ground and test them out. You may also want to grab some male and/or female headers, some buttons and switches, and a Micro SD card to store the files you want to trigger. For software debugging, configuration settings, and testing you'll need a USB mini-B cable and an FTDI Basic.
In addition to the hardware mentioned above, you'll need to download the WAV Trigger Applications to follow along.
- Robertsonics - WAV Trigger's Homepage
- WAV Trigger Applications for Windows
- WAV Trigger Applications for Mac
Suggested Reading/Viewing
Before you begin, you should watch the WAV Trigger Demo Video. It goes over both the basic and advanced features of the WAV Trigger.
This tutorial builds upon some other concepts. Check out any that you may be unfamiliar with before continuing.
Hardware
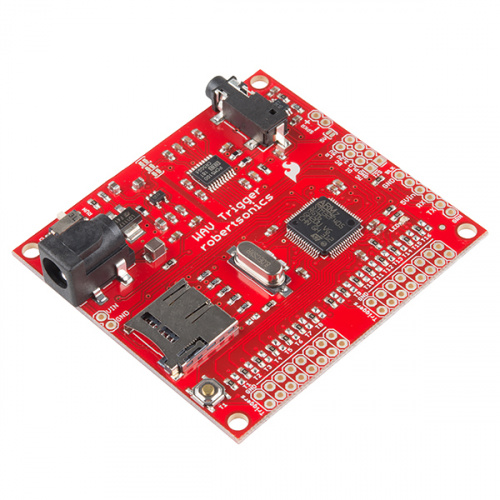
Let's take a look at the WAV Trigger's hardware so we can get an idea of where things are and how to use the board.

The barrel jack is where you supply power. Alternatively, you can use the nearby VIN and GND via's for supplying power. Either way, any input voltage between 6V and 15V will work.
There is a run/load switch that should always be set to run when you are using the board normally. The board is set to load only when updating the firmware on the ARM processor, which is done before hand at SparkFun. It will only be necessary to put the switch into the load setting if there is a newer version of firmware that you would like to use.
The micro SD card is where your .WAV files and optional configuration file are stored. This micro SD card works well with the board and also includes a micro SD USB Card Reader for transferring the files to/from your computer.
The audio jack is the standard 3.5mm variety and can be used with headphones or speakers of your choice. There is also a 2 pin header for directly wiring and soldering a speaker such as this to the board itself.
The FTDI port is used to program the firmware or can be used with the WAV Trigger's Remote Control App to test triggers using your computer instead of hardware. This way, you can test triggering tracks before soldering hardware to the actual trigger ports. The FTDI port can also be used in conjunction with WAV Trigger's Initialization Editor so when you set a trigger to a non default function such as playing a random track, you can experiment with the trigger's functionality without first having to put the configuration file on the SD card. We will explain more about configuration and testing triggers with the computer later on. To use this port, consider an FTDI Basic.
This button, by default, triggers the first track on the memory card. A future release of the firmware may allow you to modify its functionality.
The row of 16 triggers are the core of this board's utility. These are what we are going to use to start the playing of music or sound effect tracks on the SD card. We'll also learn how to use them for more advanced options like playing a random track or changing volume with the help of a configuration file. Keep in mind, ground connections are closest to the edge of the board and are there for convenience to be used along with a trigger. The actual triggers are the second row from the edge.
Now that we have an understanding of the board's hardware, let's dive a bit deeper into what you can do with it.
Drill Holes and Pin Spacing
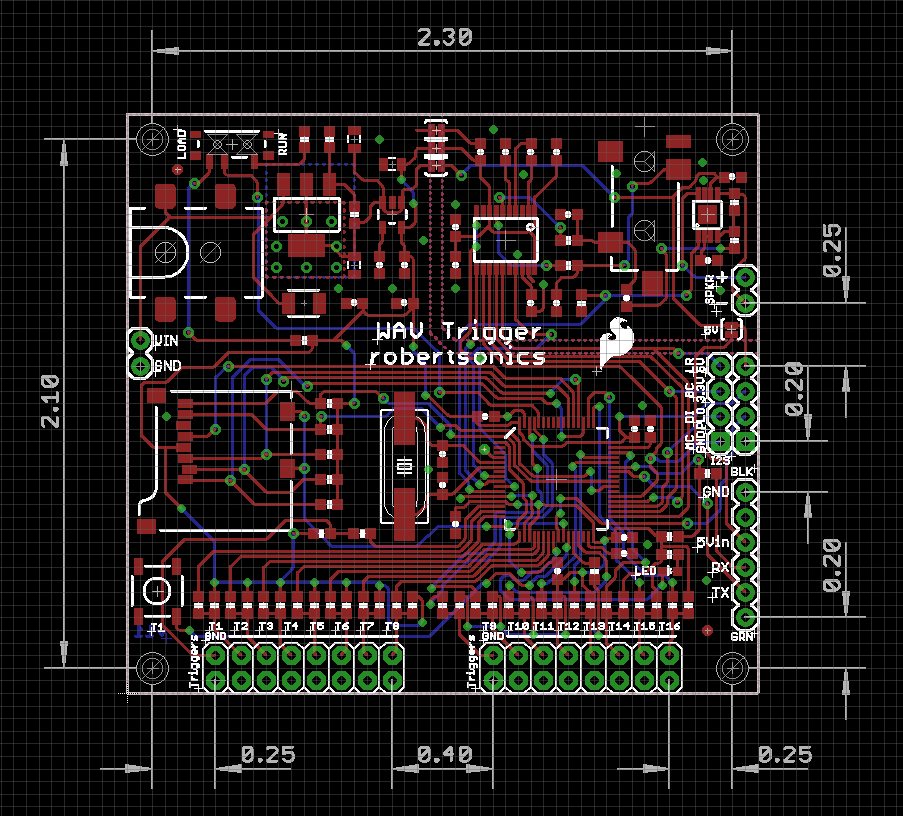
In case you are interested in mounting this nifty little board somewhere, you might want to know where the holes and the pins are located for your enclosure. The mounting holes are sized for a 4-40 machine screw. All dimensions in this drawing are in inches, and the pins are all a standard 0.100" pitch.
Operation
The Basics
By default, each trigger will cause its corresponding track to play when it is connected with ground. For example, first place a track on the micro SD card called 001-example-name.WAV. The name doesn't matter as long as it starts with 001 and is a WAV audio file. Plug the microSD card into the WAV Trigger. Power the board with a source that can provide between 6V and 15V, and connect headphones or speakers.
Using a stripped piece of wire, connect the via for T1 with the via for GND (no soldering necessary). This shorts trigger 1 to ground, causing track 001 to play. You could also solder a switch or button between the T1 and GND connections so that they trigger the sound. Trigger 1's sound file will continually play while it's held to ground.
The other triggers will work the same way by default. For example, if you have a file named 012-music.WAV on your SD card, connecting Trigger 12 (T12) to ground (GND) will cause this file to play. If you play this track while trigger 1 or another track is still playing, the two will mix together, since polyphony is enabled by default, and you will hear both at the same time. This allows you to mix music with sound effects or whatever else you desire.
Here are some sample tracks with which to experiment.
Note: If you are using a microcontroller or sensor to trigger the tracks, make sure you are matching up your logic levels. You may need to use one of our logic level converters.
Extra Features
There are many other ways of using these triggers including playing random tracks, pausing tracks, or even changing volume as it plays. These features will be discussed in detail since they require configuration with the InitMaker application. This app allows you to change how each trigger works, test them, and then save your setup to put on the SD card along with your tracks. If you have not downloaded the app, now would be a good time. Here are the links again:
Here is a picture of the InitMaker, which we'll use to test different methods of setting up a trigger and make our configuration file to put on the SD card so the board's triggers behave the way we want.
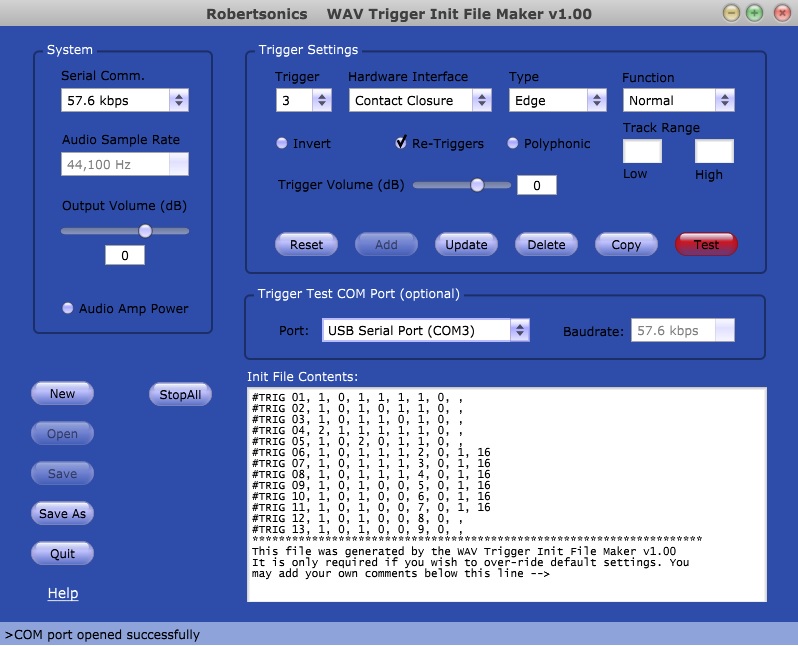
Let's go over each setting, piece by piece.
System Settings
Serial Baudrate - This sets the baudrate for the async serial port. This baudrate will remain in effect until the next power cycle. The default is 57.6kbps.
Initial Volume - This gain will be applied to the final mix output of the WAV Trigger, until overridden by a volume command. The range is -70dB to +10dB, and the default value is 0dB (unity gain). This gain affects the final output mix of the WAV Trigger, not the individual tracks that make up the mix.
Audio Amp Power - This enables or disables the on-board mono audio amplifier. If you plan to use the speaker connection, check this option. If you plan to use the stereo line-level output, leave this option unchecked to save power. Important: The default setting is disabled.
Trigger Settings
Trigger - This selects which trigger's functionality we are changing.
Hardware Interface - In short, use "Contact Closure" for when you're connecting triggers to buttons or switches. The trigger will start if physically connected to ground, and otherwise will be high due to an internal pull-up resistor. Use “Active – 3.3V/5V” with active devices like microcontrollers or sensors. If this is selected, the trigger will be activated if connected to a high signal (3.3V or 5V) and will otherwise remain low due to an internal pull-down resistor.
Type - By default, “Edge Triggered” starts the track when the trigger first goes active, and the track continues to play until stopped by some other event. “Level Triggered” starts the track when the trigger goes active, but the track plays only as long as the trigger remains active.
Function - This option selects the function that the trigger will perform. Some of the functions require that a range of tracks be specified, and the values in the range can be from 1 to 999.
“Normal”, the default function, directs the WAV Trigger to play the corresponding track number.
“Next” plays the next track in the specified range, starting with the low track and wrapping back to that track after playing the high track in the range.
“Previous” plays the previous track in the specified range, starting with the highest track and wrapping back to that track after playing the lowest track in the range.
“Random” plays a random track from the specified range. It will not play the same track twice in a row.
“Pause” will pause all the tracks in the specified range. These tracks will remain paused until they are resumed or restarted. Combining with the “Level Triggered” type option creates a momentary Pause feature; The specified tracks will resume when the trigger is released.
“Resume” will resume all the tracks in the specified range, provided that they are still “paused”.
“Stop” will stop all the tracks in the specified range. Combining with the “Level Triggered” type option will create a “Stop and Inhibit” function, preventing all the tracks in the range from restarting as long as the trigger remains active.
“Volume Up” or Volume Dn” will re-purpose the trigger to be a volume control. Each activation of the trigger will increase or decrease the output stage volume of the WAV Trigger by 1dB.
Invert - This check box will invert the logic of the trigger. The default is active low. Checking this option makes the trigger active high. This is automatically checked when selecting an "Active 3.3V/5V" hardware interface.
Re-Triggers - This option enables certain trigger functions to work again immediately while the track(s) that they may have previously started is(are) still playing. For example, with the “Normal” trigger function, enabling this option allows the trigger to restart the corresponding track, even if it has not finished playing, while disabling this option prevents the trigger from working until the track has finished playing (or is stopped by some other event.) Similarly, for the “Next”, “Previous” and “Random” functions, disabling this option prevents the trigger from working until whatever track was previously started from this trigger is finished. This is enabled by default.
Polyphonic - This option specifies that the track played by the trigger function can be mixed with any track(s) currently playing. When this option is disabled, activating the trigger will stop any and all tracks that are currently playing before the new track is started.
You can find more information on these settings and the application in Robertsonic's User Guide for the WAV Trigger.
Now that you have a sense of the possibilities, let's walk through an example of testing a custom trigger and initialization file.
Example
- The 1GB SparkX SD Card, from our catalog, since it isn't a Class 10 card and can lead to reliability issues.
- SD Cards with a capacity larger than 32GB, since it can be difficult to convert them to the FAT16 or FAT32 file system format with a 32kB file allocation size.
For more information on compatible SD cards, please check out the Robertsonics website:
For this example, make sure you have the sample WAV files already on your micro SD card and have the card in your WAV Trigger board.
Without any configuration at all, you should be able to play each track by connecting the trigger pin with the ground pin. Each track just says the name of the number of the trigger.
Now to test a custom trigger, we need to use the InitMaker application.
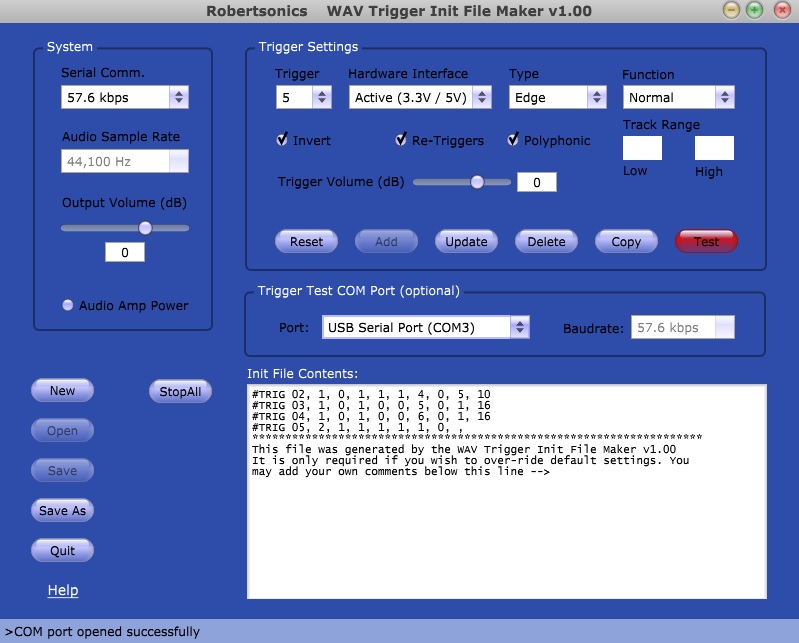
Let's set up a few triggers as an example. Leave trigger 1 with its default settings. Set trigger 2 to play a random track between 5 and 10. First, select random under the "Function" category, then input 5 and 10 under "Track Range". Click the Add button below the settings to add it to the configuration file.
Follow the same procedure to setup a few more triggers. Set trigger 3 to pause and trigger 4 to resume. Also set trigger 5 to the hardware interface of "Active 3.3V/5V" used for when we connect microcontrollers or sensors. Remember to click Add after setting up each trigger to add it to the configuration. If you don't, the settings you input won't be remembered.
Before creating our initialization file, we can test out a custom trigger, if desired, with a USB mini-B cable and an FTDI Basic. Select trigger 2. It should still be set up to play a random track between 5 and 10. Make sure the correct COM port is selected, the one corresponding to your FTDI, then hit the red Test button. Afterwards, activate trigger 2 by connecting its pin to ground. It should randomly play a track between 5 and 10. If this test doesn't work, try reconnecting the FTDI Basic, restarting the InitMaker application, or restarting the WAV Trigger itself.
Now that we have set up triggers 1 through 5, let's save them to a configuration file. Your InitMaker screen should like this if you have it set up the way we described above:
Now, save this configuration using the Save As button in the lower left. The file will need to be called wavtrigr.ini. Put this file on your micro SD card along with the sound files. In case you had trouble making this file, you can download it here.
Also, to demonstrate the pause and resume functions, you may want a longer wav file to play. Here is a longer WAV file you can download if you don't have any of your own currently. Replace the current file that begins with '001' on your SD card with this track. As a side note, you can convert any of your MP3's to WAV's easily with programs like Audacity.
Now that you have your micro SD card loaded with sound files (including new, longer track one) as well as the initialization file we just created, let's test it out to see if it works.
Connect Trigger 1's pin to ground, the first track should play. Connect Trigger pin 3 to ground, and track 1 should pause. Connect Trigger pin 4 to ground, and track 1 should resume. Connect Trigger pin 2 to ground, and a random track between 5 and 10 will play. It should mix with track one if it's still playing, so you'll hear both at once.
To simulate a microcontroller, connect Trigger pin 5 to the 3.3V pin on the side of the board and track 5 should play. Just be very careful not to accidentally connect 3.3V to the GND pins. Remember, the ground pins are closest to the edge of the board, while the trigger pins are the second row from the edge.
You should now have a good idea of how to make a configuration file and customize your triggers. Keep playing with the various options until they suit your project.
Remote App
Another application you can use to do some basic testing with your WAV Trigger is the Serial Control Utility. This allows you to connect your powered WAV Trigger to a computer with an USB mini-B cable and an FTDI Basic.
When you load the application, it will look like this:
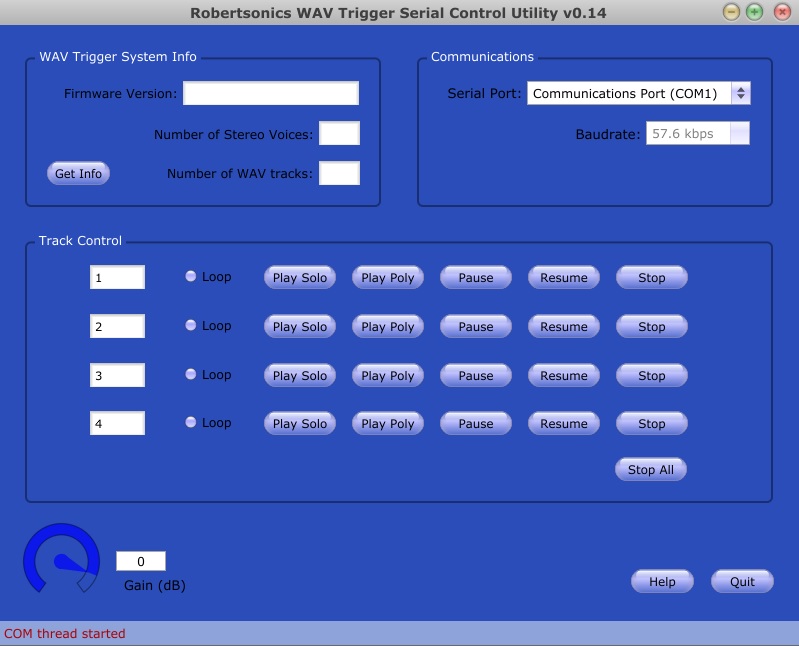
First, select the correct COM port for your FTDI device. Check that you are properly connected by clicking the Get Info button in the top left, and seeing if the Firmware version field is populated. If not, reconnect your FTDI, restart the Control Utility, and/or repower your board before trying again.
Once connected, you can use the Track Control to play tracks on the SD card. As an example, click loop by Track 1 and hit Play Poly. This will continuously play track 1 on your device. Now if you hit Play Poly by Track 2, track 2 will play mixed with the looping track 1. If you hit Play Solo instead, track 1 will stop, and you'll only hear track 2 play. You can also pause, resume, and stop tracks as well as change the overall volume.
Feel free to mess around with this utility, it's essentially for getting a quick feel for your tracks and how well they work together without having to mess with wires and physical connections.
Firmware Updates
The final utility you may need to use at some point is the WAV Trigger's Firmware Flasher Utility. This app allows you to update the firmware on the WAV Trigger should new firmware be released.
This application is very simple. It takes a hex file, the compiled new firmware from the creator at RobertSonics, and updates the firmware on your device. All you'll need for this is a USB mini-B cable and a FTDI Basic.
The application looks like this:
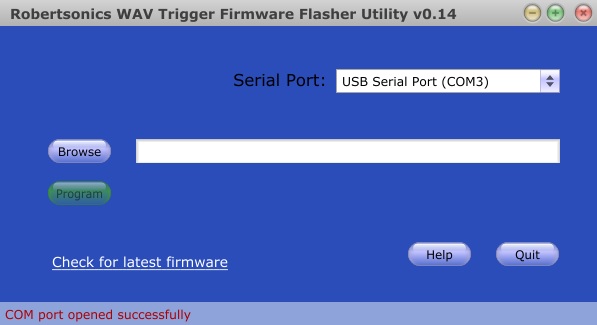
Make sure you set the switch on your WAV Trigger from Run to Load before uploading new firmware. Also make sure that your WAV TRigger is powered via the barrel jack.
Select the COM port for your FTDI, click Browse, and select the hex file you have downloaded. Then click program. Wait for it to tell you the process is complete, and you can test out the new firmware.
Resources and Going Further
By now, you have a good idea of how to get rocking with the WAV Trigger board and its associated applications. You may even already have plenty ideas of how your going to use this in your future projects.
Enjoy playing and mixing those tracks, and always feel free to share your experiences and creations with us here at SparkFun.
Additional Resources:
- Robertsonics - WAV Trigger's Homepage
- User Guide
- WAV Trigger Demo Video
- Firmware Updates and Utilities
- WAV Trigger Applications for Windows
- WAV Trigger Applications for Mac
- microSD Cards for Audio 2024
- microSD Cards for Audio
- Arduino Library
- GitHub Hardware Repo
The following resource was sent in by SparkFun customer, Nic Danielson. It is an exhaustive list of what you need to name your WAV files if you want them to be triggered by specific MIDI Notes and Channels. It's laid out like a piano. A lot easier instead of having to do the math every time. Download the PDF file by clicking the link below.
Check out these other great audio related SparkFun tutorials: