XBee Shield Hookup Guide
 jimblom
Example: Communication Test
Double-Check Your XBee Network
Before continuing with this example, you'll need to make sure your XBee's are configured correctly -- they need to be on the same network and have compatible destination and MY addresses. By default, XBees will all be compatibly configured, but we recommend setting up unique network ID's and addresses. Check out the Configuring Networks page of our Exploring XBee's and XCTU tutorial for help with that.
Exploring XBees and XCTU
March 12, 2015
This example assumes you have XCTU installed and two compatibly-configured XBees -- one connected to your computer via a USB Explorer (or Dongle, or Serial Explorer) and another plugged into the Shield/Arduino.

The Arduino Sketch
Let's start simple. In this section, we'll upload a sketch which passes data between your serial monitor and the XBe using the serial UART. This sketch can be use to create a "portal of communication" between your Arduino's serial monitor, and another XBee (connected to a computer via a USB Explorer). The first uses software serial defined pins on an Arduino. The second example uses the native hardware serial defined pins.
Software Serial Passthrough
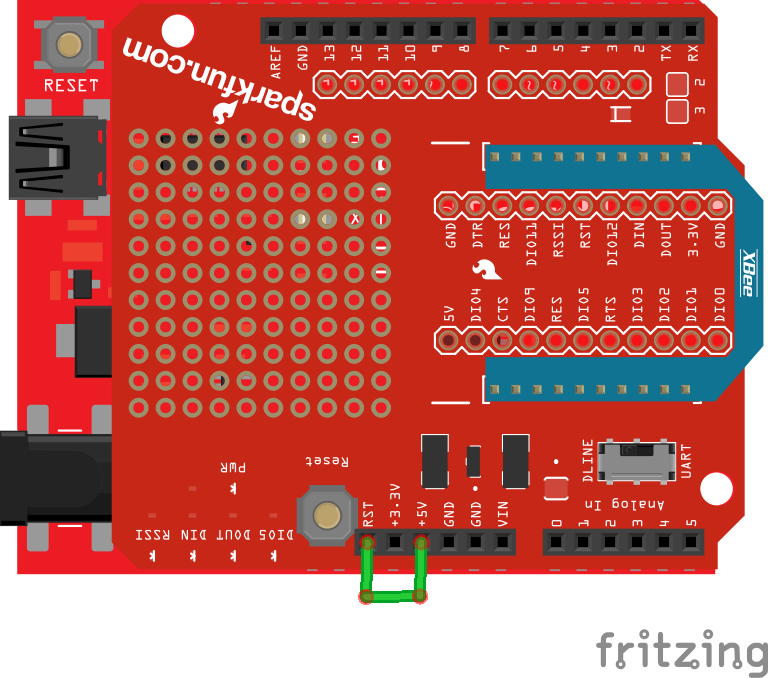
Here's the sketch we'll use. It makes use of the SoftwareSerial library, which is included with all of the recent Arduino releases. Before uploading this sketch, make sure the switch on the Shield is in the "DLINE" position!
Copy and upload the sketch below.
language:c
/*****************************************************************
XBee_Serial_Passthrough.ino

Set up a software serial port to pass data between an XBee Shield
and the serial monitor.

Hardware Hookup:
  The XBee Shield makes all of the connections you'll need
  between Arduino and XBee. If you have the shield make
  sure the SWITCH IS IN THE "DLINE" POSITION. That will connect
  the XBee's DOUT and DIN pins to Arduino pins 2 and 3.

*****************************************************************/
// We'll use SoftwareSerial to communicate with the XBee:
#include <SoftwareSerial.h>

//For Atmega328P's
// XBee's DOUT (TX) is connected to pin 2 (Arduino's Software RX)
// XBee's DIN (RX) is connected to pin 3 (Arduino's Software TX)
SoftwareSerial XBee(2, 3); // RX, TX

//For Atmega2560, ATmega32U4, etc.
// XBee's DOUT (TX) is connected to pin 10 (Arduino's Software RX)
// XBee's DIN (RX) is connected to pin 11 (Arduino's Software TX)
//SoftwareSerial XBee(10, 11); // RX, TX

void setup()
{
  // Set up both ports at 9600 baud. This value is most important
  // for the XBee. Make sure the baud rate matches the config
  // setting of your XBee.
  XBee.begin(9600);
  Serial.begin(9600);
}

void loop()
{
  if (Serial.available())
  { // If data comes in from serial monitor, send it out to XBee
    XBee.write(Serial.read());
  }
  if (XBee.available())
  { // If data comes in from XBee, send it out to serial monitor
    Serial.write(XBee.read());
  }
}
Software Serial Note
The demo code was originally designed for the ATmega328P on the Arduino Uno. Not all the pins can support change interrupts for a serial Rx pin depending on what Arduino microcontroller is used. If you were using it with ATmega2560 (i.e. Arduino Mega 2560) or ATmega32U4 (i.e. Arduino Leonardo, Pro Micro 5V/16MHz, Pro Micro 3.3V/8Mhz, FioV3, etc.), you would need to re-define the software serial pin definitions, remove the solder jumpers for pin 3 & 2, and reroute the pins. For more information about the limitations, try looking at the Arduino reference language for the Software Serial library.Pin Definitions
To use re-define the software serial pins on an Arduino Mega 2560 or Arduino Leonardo, you would just need to comment out the line where it says: SoftwareSerial XBee(2, 3); // RX, TX
//SoftwareSerial XBee(10, 11); // RX, TXReroute Pins
To reroute the pins, on an Arduino Mega 2560 or Leonardo, you would need to remove the solder jumper and reroute pads to the respective pins. |
 |
| Pins Rerouted for ATmega2560-Based Arduino | Pins Rerouted for ATmega32U4-Based Arduino |
Basically when the XCTU or serial terminal opens a COM port to the Arduino, computer resets the microcontroller while looking for the XBee. Therefore, it can’t communicate with the XBee because the Arduino is rebooting.
Hardware Serial Passthrough
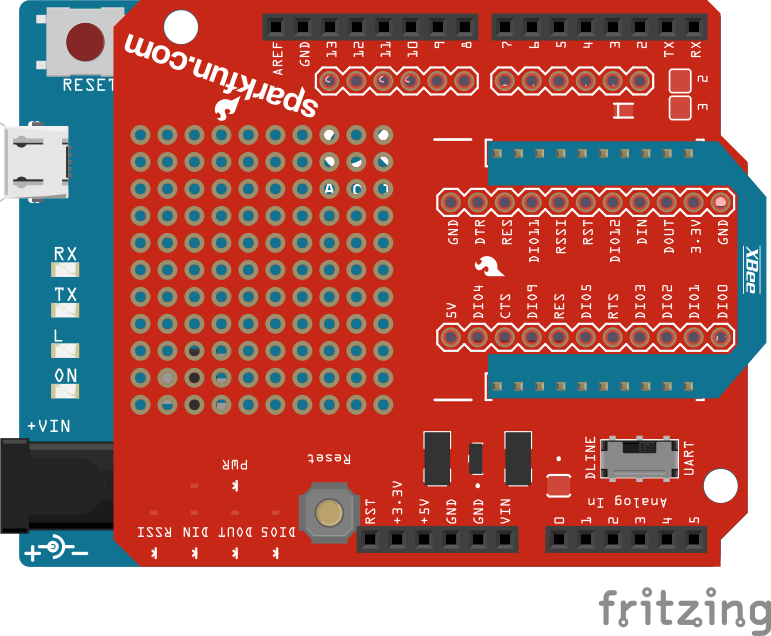
This example is for those trying to use the hardware UART on an ATmega32U4-based Arduino. Copy and upload the sketch below. You can also download it here.
language:c
/*****************************************************************
Leonardo_XBee_Serial_Passthrough.ino

Set up a serial port to pass data between an XBee Shield
and the serial monitor.

Hardware Hookup:
  The XBee Shield makes all of the connections you'll need
  between Arduino and XBee. If you have the shield make
  sure the SWITCH IS IN THE "UART" POSITION. That will connect
  the XBee's DOUT and DIN pins to Arduino pins 0 and 1.
*****************************************************************/

// Leonardo Serial  is the USB port
// Leonardo Serial1 is pins 0 and 1

void setup()
{
  // Set up both ports at 9600 baud. This value is most important
  // for the XBee. Make sure the baud rate matches the config
  // setting of your XBee.
  Serial1.begin(9600);  //XBee/UART1/pins 0 and 1
  Serial.begin(9600);   //USB

}

void loop()
{
  if (Serial.available()) //USB
  { // If data comes in from serial monitor, send it out to XBee
  Serial1.write(Serial.read()); //XBee/UART1/pins 0 and 1

  }
  if (Serial1.available())   //XBee/UART1/pins 0 and 1
  { // If data comes in from XBee, send it out to serial monitor
    Serial.write(Serial1.read());  //Serial port

  }
}
What You Should See
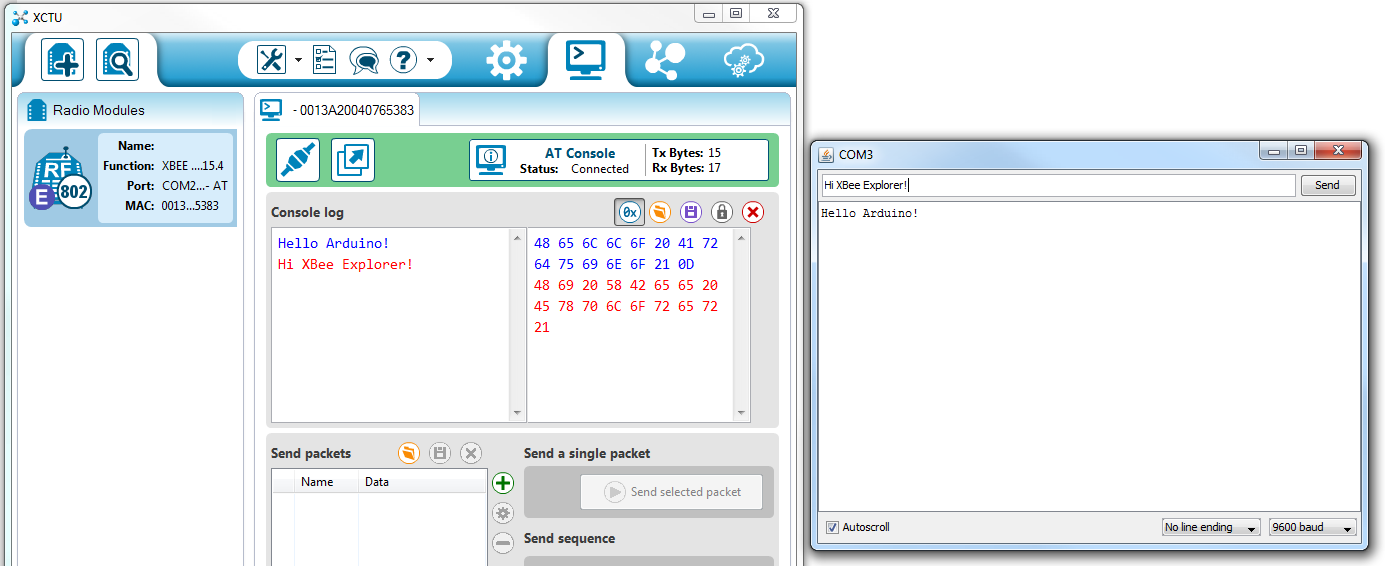
After you've uploaded the code, follow this series of steps to verify that everything is working:
- Open the Arduino's Serial Monitor. Make sure the baud rate is set to 9600.
- Switch to XCTU and click over to console mode.
- Type something in the console view, it should show up on the Serial Monitor.
- Type something into the Serial Monitor (and press "Send"), it should show up in the console view.
- Yay!
You can use this setup to create a chat system. If you have another computer nearby, try to see how far your XBees can be from each other while still reliably communicating.
If your XBee's aren't communicating with each other, try getting them closer together (if they were far apart to begin with). Otherwise, check out our troubleshooting section of the Exploring XBee tutorial.