SparkFun's Rapid Prototyping Lab (Part III)
In this final installment, we talk about the completed workspace from parts I and II

In Part I of this series, we discussed some of my inspirations for workspace organization and theory. In Part II we talked about where to buy stuff. Finally, today, I'm going to give you the tour of what I ended up with and how it has been laid out.
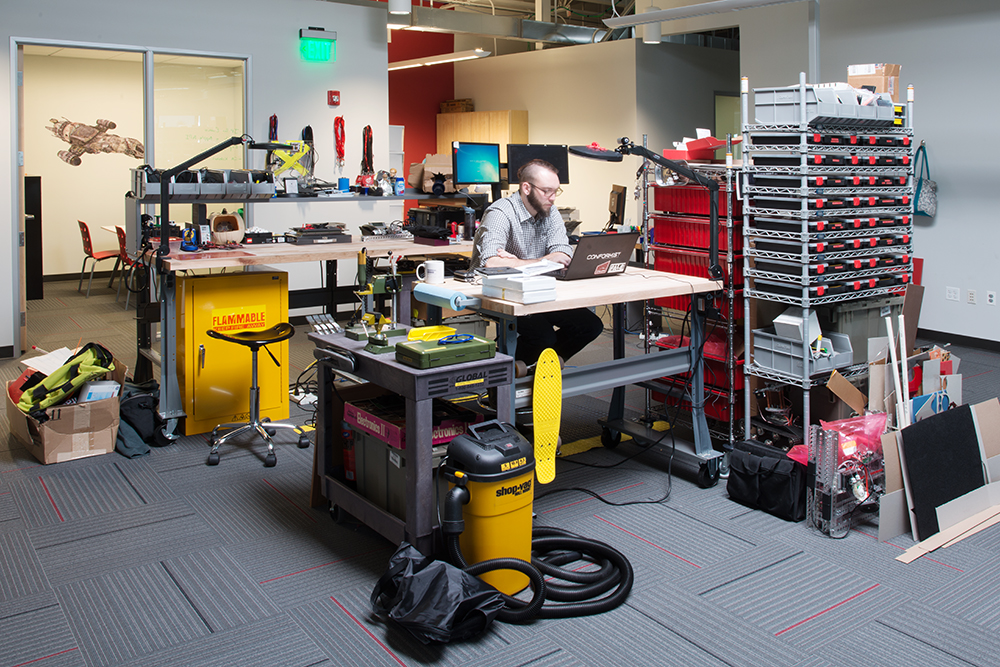
Big Bench
The 96" workbench became the main staging area for projects in the lab. My computer workstation is bolted to one side of the bench so that I can quickly reference schematics and pictures while I'm working. On the other side of the bench, I've created a soldering area by putting down a silicone mat and attaching one of the magnifying lamps. A soldering iron and hot air rework station stay plugged in by the mat so that they're always ready to go.
There's also a riser that runs the full length of the workbench where larger and more frequently used parts and tools are stored in stackable shelf bins. Because the lab also acts as a backdrop for video content and a stop on our office tours, I also use this space to display working demos!
Little Bench
The 48" bench has become the hardest working space in the lab. The only things that live on this bench permanently are a magnifying lamp and a shop towel dispenser. The bench also has an easily accessible power outlet. The idea was to have a work surface that would remain completely clean unless it was in use. So far, it's been a great success! One way I'm keeping this space clean is by moving projects that are in progress, but not being actively hacked on, into a project bin...
Project Bins
A rolling wire rack with 7 plastic tubs works as a rotating storage space for builds in progress. All materials associated with a given project live in the bin until the project is completed.
These tubs are unfortunately useful for a ton of different things... And they've become a sort of catch-all in the short time since their implementation. It will ultimately fall on me to ensure that these bins are used correctly. But they're very handy in theory.
Parts Bins
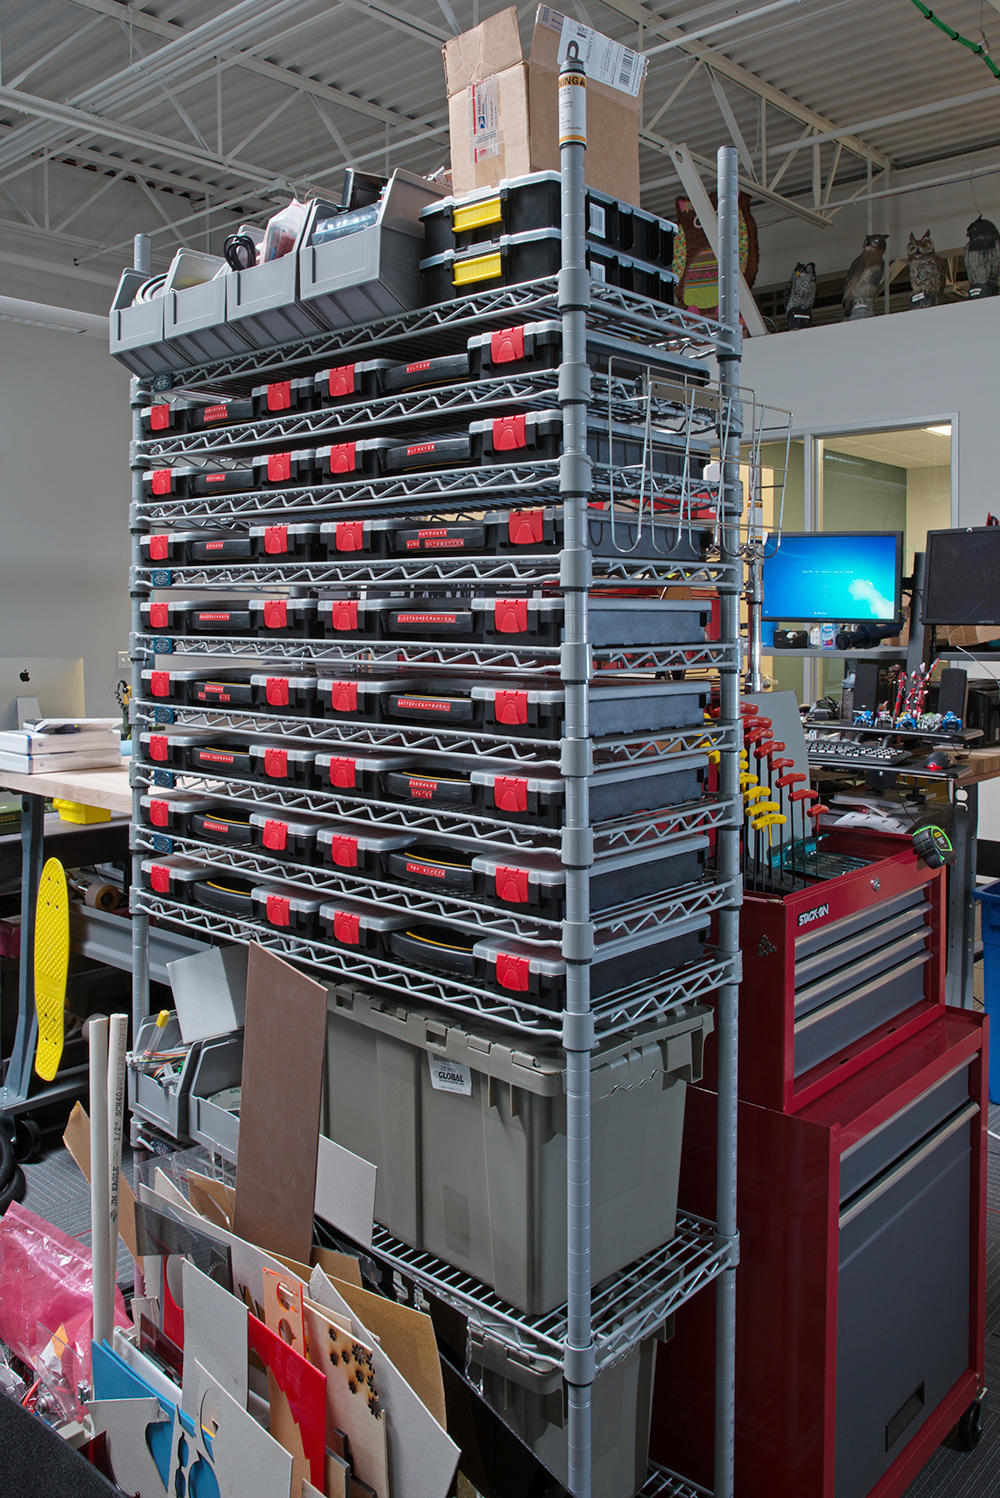
Glorious, Beautiful, Logical. The parts bins are my pride and joy. Sixteen plastic organizers are individually labeled and categorized. These organizers are stacked on a wire shelf so that they can be quickly browsed and individually removed and replaced without bothering the rest of the stack. The same wire shelf houses a few distribution bins for larger parts as well as stackable bins for things like heavy hardware and wire.
Tool Chest
Hand tools like screwdrivers, wire strippers, and hammers live in the tool chest. When a tool isn't actively being used, it should be findable here. I've cut some foam to the size of the drawers in order to make dedicated spaces for each tool. Dedicated spaces ensure that each tool is findable and also make it easy to identify missing tools.
Fab Cart
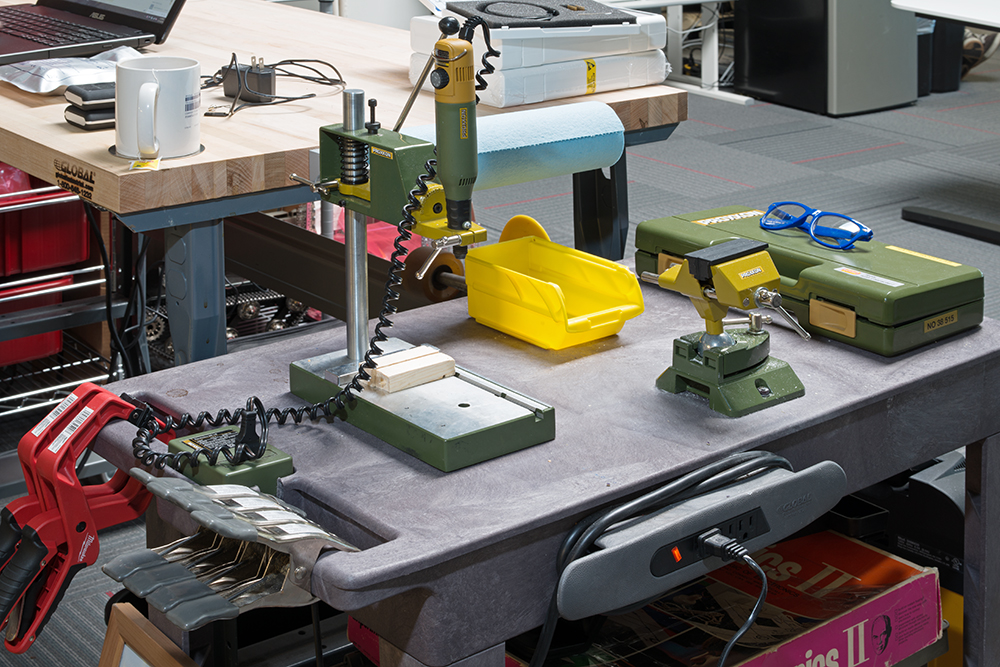
One of my rolling plastic carts has been dedicated to fabricating small parts. The rotary tool lives there with the drill press and a precision vise. Since this cart generates the most dust, it also houses a ShopVac for quick cleanup.
Travel Cart
This rolling cart is a general purpose cart for doing demo work around the building, since part of what I do is installing and maintaining publicly displayed demo projects. Nothing should live on this cart permanently, it's just a utility cart.
How Is It Working So Far?
Everything is still floating around and finding its place in my process. But for the most part, everything is serving the purpose that I intended. Shocking, I know... One thing I've noticed is that the best planning you can do is to plan for change. You won't be able to predict perfectly what you need in your space, or where it should be. What you can do, however, is to make your shop flexible. A small example from my experience? The soldering iron originally lived on the big workbench but I found myself doing more soldering on the small workbench so I rearranged some things and made it easy to swap back and forth. Bottom line: Plan the best you can, and plan to change the plan.
If you have any questions, or want to share pictures of your shop, please leave a comment! I can't wait to hear from you!


Much cleaner and more roomy than my workbench. I also keep a nice microsope handing for soldring super tiny parts. And have my 3D printer hooked up too. Seems like I have to clean it every other day, just a few hours into a new project and its like a hurricane came through.
Clean up your room :)-
Mine definitely looks that way mid-project (actually, that doesn't look so bad!)
Some people are clean-as-you-go, and I tried to do that for a while. It definitely has its merits but I found that on tight deadlines, I'm better off letting everything get messy and then cleaning thoroughly between projects.
I see you, Firefly
Love it! Wish I had me one of those models ;)
I'm a leaf on the wind, watch how I store parts.
"Now here's something you cant do..." Pulls soldering iron out of the cargo bay
Let me know when you are finished with all that stuff. I have a home for it in my basement. ;) (Nicely done, BTW!)
The floor doesn't look like it's anti-static. In our lab we also have little chains on the chair so that no static builds up. Also there is almost no space for stuff. You need walls full of bins and shelves, not one little rack, unless this is a Lego play room :-P I mean, don't get me wrong, it looks nice and all, but you need to maximize the space. It doesn't look like it's well organized. There are so many things that would bother me, I can't even list all of them. How about that fire proof storage cabinet, that's where I would wanna put my legs and that would drive me crazy there! Don't worry about making it look pretty, it needs to be functional and nothing else.
Software!? Your computer features heavily... what software(s) are you using on it?? For example, I've tried a couple of different web-based circuit design "solutions", and found them to be easy-to-use and utterly-useless at providing any kind of "working" simulation of my circuits. On the other hand, I've failed to get any of the more-expensive ones to work, because they're totally incomprehensible to use. Lots of people make cool stuff nowdays, so I'm guessing there's something out there that actually works, and isn't impossible to understand and use?
But what it is???
I gave up trying to make my workspace happen in our garage or our spare bedroom (which is full of two gigantic laser cutters!) - so I looked around outside and decided that the 12' wide by 20' long strip of mangey grass down the side of our house was wasted on two trash cans and some air conditioners...so I set about building an 8'x16' workshop there. It cost me about $1000 worth of 2x4's, 3/4" plywood floors on concrete blocks with hardyboard sides and a shingled roof...plus three weekends of 'sweat equity'. It's turned out really nicely. It has an extra-wide door and two windows at each end - so it could plausibly be useful as a really great garden shed for someone in the future. I have a plastic-strip curtain halfway down to divide the 'dirty' space (drill stand, chopsaw, lathe, dremels, etc) from the 'clean' area (solder station, computers, tool storage, etc). All of the walls are done in pegboard - floor to ceiling...so there is more than enough space to hang most tools in easy sight. The space up in the roof is great for stacking large chunks of wood, plastic and metal. With 32 feet of counter-top and shelving beneath, I don't lack storage...and I have a 'cosy' 4' wide walkway down the length of the building.
It's a tight space - you wouldn't want two people working there - but because it's utterly custom, I can cram an immense amount of stuff into it...and one advantage of it being so small is that the aggressive organization it imposes means that everything has to be put back in it's place because there is literally no place else to put it...and also, you're never more than two steps away from the tool, part or fastener that you need.
We added a little 'deck' at one end, with flower boxes under the windows, so my wife is happy with how it looks from the back garden.
-- Steve
I've noticed that the SparkFun website has a lot of video content show in what appears to be work stations. Some of these videos seem to be shot with multiple video cameras running simultaneously, an either switched on the fly or edited later. Is this Lab set up for that kind of video recording, and if so, how do you mount cameras and what kind of software do you use for capture? Is there anything else on this topic already in the blog that I haven't found?
I have a question regarding the Flor tiles. What do you about static?
What is the flooring? Is it anti-static by any chance?
I have always found that if you keep your workstation clean and organized it improves your work flow; you spend less time looking for the tool or part you need and more time working on your project. As a rule, I always make sure that every tool I own has a home and after I finish a project everything goes back where it belongs. I also go through my stuff each year and ask "Do I use this? Will I ever use this?" I find that keeps the amount of extra unused junk I have to a minimum and keeps my workstation clean.
I don't see any sort of saw on your fabrication cart. How do you cut down stock? One of the most used tools in our little makerspace is a Rockwell Bladerunner. It's basically a jigsaw mounted upside down in a table. It's not a good quality tool and wont do precision work but it turns out to be really useful for simple cuts in flat stock and sizing sheet material for small CNC we have. It can also do limited curve cutting. Works for wood, plastic, and thin metal (with the right blade of course).
What about an antistatic mat? I am of the opinion that this is one critical item for a high end workstation used for electronic projects... I hate it when ESD delays my work. I'll admit I don't have one at my home workshop, but will wear an ESD strap as an attempt to eliminate one potential failure point.
Seems like an odd place for the hazardous chemical cabinet. It looks like you have no leg space at your soldering station with that cabinet under it.
Don't know how well it would work for you, but I use one of those wire racks with pull out bins like this right next to my workbench. They work great because you can pull them out partly and then paw through them looking for stuff. I put stuff in them based on "category": miscellaneous electronic components (usually salvaged), motors/magnetic stuff, battery holders, batteries, PSUs, salvaged circuit boards waiting to be cannibalized when I need a specific component, small mechanical parts, etc. On top, I have a pull out drawer system like this that I keep small stuff in. One of the drawers houses all the screws I pull out of stuff I disassemble for parts, that screw drawer has saved me quite a few times on projects. Never know when I need an obscure metric screw that just happened to come from that 80's hard drive I disassembled last year :)
Oh, and for all the bigger stuff/ works in progress, I have one of those big wire shelves across the room that is chocked full, floor to ceiling with stuff.
What is that drill press? I need it!
It's great, isn't it? That's the MICROMOT Drill Stand for PROXXON MICROMOT rotary tools.
Love the work you have done, and I will be replicating much of it. What would help those who come behind you is a proper BOM (Bill of Materials) listing the make, model, and sources of things like your parts bins and shelves (did you buy extra shelves for the parts rack, or did you cannibalize a few shelves?) Thanks in advance!
Ask and you shall receive! BOM
You ROCK!!!
So my big question is what you will end up doing with your bins. This was a huge problem at my old workplace. Things that were still useful just got tossed in bins, and no one wanted to sort through them (it was a very small company). I was probably more guilty than anyone else, but we never found a good solution to that. We also had sorted bins, but there were a couple floating around that just had the misc remains of a finished project, or unfinish project, or various things that were on the workbench and needed to disappear.
I don't see any test gear. A bench power supply and a soldering station, yes. Meters and scopes, no. Today you can do all that with a USB dongle for your laptop I suppose. Oh. That gave me an idea....hmmm. Might be a new project.
Anyway, are you planning to describe a project process? Like do you keep everything in a GIT repo? Schematics, data sheets, code, drawings, parts spreadsheets, log-blog, photos? Can you do a paperless project and keep going if your laptop is stolen or spontaneously combusts? Curious people want to know!
By the way, when you have money to burn, a Stanley-Vidmar cabinet will average a 3 to 1 space savings over shelves and bins. I love them but even very well used they are out of reach for home.
For most projects, you can replace the bench supply with a bunch of rechargeable batteries and get voltages in 1.2v increments easily. For an oscilloscope, I bought one of those tiny 'DSO' scopes - not the fastest thing in the world - but plenty good enough for most Arduino/RaspberryPi projects - I got mine for $70, you can download it's data via USB into your PC as a ".wav" file! My signal generator is the sound port from my PC...I can generate way more waveforms with Audacity or with a quick C++ program than I'll ever need...and (very cool) I can use audacity to replay signals that I captured from my DSO scope...which is an amazingly useful trick for testing bits of circuit in isolation from each other.
To be honest I rarely have a need for scopes or analyzers but when I do, I have the USB versions tucked next to the rework station.
Describing the process of a project is a great idea! Maybe I'll pick one that will be easy to document in-situ and make a blog post out of that.
Those Stanley-Vidmar modular parts drawers are awesome. I looked at something similar for this space but I couldn't justify the cost. Maybe next time around.
Are those labels made with those old school DYMO mechanical embosser? HAHA! nice
I love the embossing label makers, I use it whenever I can. I also have a DYMO RHINO industrial label maker that will print shrink-tube. That's been an awesome addition to the shop.
I aspire to one day own the old-school dymo embosser for metal tape labels.
Blasted owls!
That's not an owl, that's a firefly!