Arduino: Under the Hood
Ever wonder how the Arduino IDE translates your code into instructions for the processor?

Since's Mike's post was bumped from the homepage last Thursday to make room for the Arduino/Microsoft partnernship announcement, we wanted to give his work some more facetime while Casey finishes up his regularly-scheduled Enginursday post!
Here, I'll cover the basic steps that the IDE uses to make that conversion, and how it compares with more traditional versions of coding for microcontrollers. I'll be doing this with the current official release build, 1.6.3, from Arduino.cc.
First, I'm going to lay some groundwork. When you write code for the Arduino platform, what you're really doing is writing C++ and then letting the IDE do some of the menial tasks which, historically, the programmer has been responsible for. When viewed through that lens, some things start to make a little more sense.
The second thing to note is that, deep inside the Arduino IDE directory, there are a bunch of other files that the IDE uses to flesh out your sketch. You provide the barest skeleton of what you want done, and those files provide the details that support them. You can find that by opening your IDE folder up, going to hardware/arduino/avr/cores/arduino/ and snooping around.
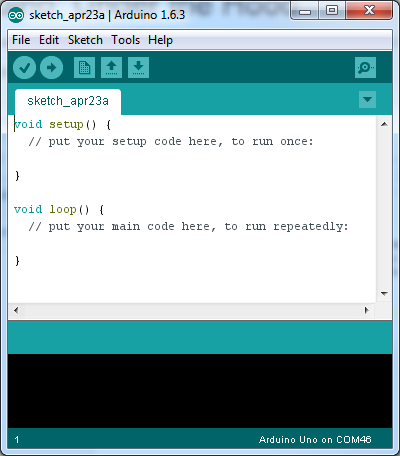
If you're reading this, chances are, this looks awfully familiar to you. If you've ever written code in a more traditional environment, there are a few things that you'll notice right away are missing: a main() function, function prototypes, and any included header files. We'll tackle those things one at a time.
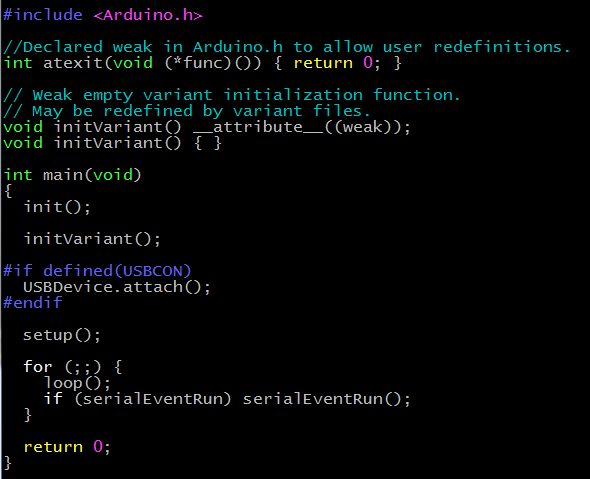
In the directory I pointed you to above, there's a file called "main.cpp." This is what is inside that file. I'll not go into all of it; I just wanted to point out a few things.
First and foremost, #include <Arduino.h>. That file contains all the glorious declarations and definitions that make the Arduino "language" a thing: constants, function declarations, all that good stuff. You'll find that file included over and over in under-the-hood Arduino code.
Also, here's your main() function. It's clear now that some setup code gets run before your setup() function, and that loop() is a function that gets called over and over. In fact, all the Arduino IDE is doing is calling the AVR port of the popular gcc C++ compiler!
It's also clear that, if loop() never returns, something associated with handling serial port communications doesn't happen. That's an important point, because it means that we should avoid busy waiting inside loop and allow loop to return regularly so that background task can be completed!
Now, let's hit the "Verify" button, and see what happens. I've turned on "Verbose Output" for compilation in the preferences; if you've never done that, it's an interesting (if opaque and arcane) view into what the IDE is doing.
Here's the first line of output produced during compilation. It's nicely representative of the next two dozen:
C:\Dropbox\Arduino\arduino-1.6.3\hardware\tools\avr/bin/avr-g++ -c -g -Os -w -fno-exceptions -ffunction-sections -fdata-sections -fno-threadsafe-statics -MMD -mmcu=atmega328p -DF_CPU=16000000L -DARDUINO=10603 -DARDUINO_AVR_UNO -DARDUINO_ARCH_AVR -IC:\Dropbox\Arduino\arduino-1.6.3\hardware\arduino\avr\cores\arduino -IC:\Dropbox\Arduino\arduino-1.6.3\hardware\arduino\avr\variants\standard C:\Users\MIKE~1.HOR\AppData\Local\Temp\build8696096967875291896.tmp\sketch_apr23a.cpp -o C:\Users\MIKE~1.HOR\AppData\Local\Temp\build8696096967875291896.tmp\sketch_apr23a.cpp.o
Whoa. That's a lot to swallow, isn't it? I'll break it down, step-by-step, so it's more digestible.
C:\Dropbox\Arduino\arduino-1.6.3\hardware\tools\avr/bin/avr-g++
First, part of the reason it's so long is that it's displaying absolute paths for everything. So really, everything through the first space is the location information for the location of the compiler, which is the program that creates the machine code that the processor will actually interpret into actions to be performed.
-c -g -Os -w -fno-exceptions -ffunction-sections -fdata-sections -fno-threadsafe-statics -MMD
-mmcu=atmega328p -DF_CPU=16000000L -DARDUINO=10603 -DARDUINO_AVR_UNO -DARDUINO_ARCH_AVR
These are all switches which get passed to the compiler at run time, and which tell it information about how you want this file compiled. It would take too much space to explain all of them, but some probably make sense: -mmcu=atmega328p tells the compiler what kind of processor you're using, and the -D items are passed into the compiler as macro definitions, meaning that, for instance, anywhere the compiler sees "F_CPU" in the file, it will do a simple textual substitution of "16000000L" in its place.
-IC:\Dropbox\Arduino\arduino-1.6.3\hardware\arduino\avr\cores\arduino
There are a couple of these, and they tell the compiler where to look for any files that were defined with #include (as with Arduino.h above). The compiler will also, by default, look inside the directory the file resides in.
C:\Users\MIKE~1.HOR\AppData\Local\Temp\build8696096967875291896.tmp\sketch_apr23a.cpp
This tells the compiler which file you actually want it to operate upon. Except, hey! That's not where I saved my sketch! I'll get to this in a minute, but for now, just understand that the first thing the IDE does is create a temp directory and move a bunch of stuff into it.
-o C:\Users\MIKE~1.HOR\AppData\Local\Temp\build8696096967875291896.tmp\sketch_apr23a.cpp.o
Finally, this is the name of the file that this compilation will produce. A '.o' file, usually referred to as an "object" file, contains machine code, but is itself usually useless until linked into a larger program.
Let's take a look at that temp directory that the IDE created, and see what we see.
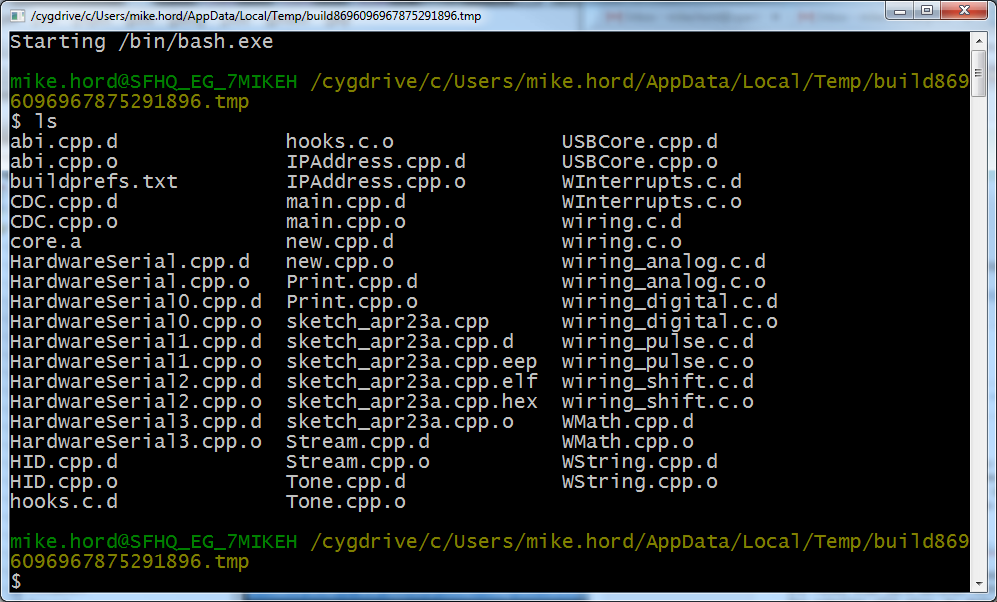
Wow, lots of stuff in here, huh? Aren't you glad you don't have to deal with it all? We've talked about what a ".o" file is; you'll see a bunch of them in here, one for each source file in that Arduino cores folder I pointed you to earlier, as well as any within any included libraries. I'm going to skip most everything else in here; I don't have room for all the details. The two most important files are "sketch_apr23a.cpp" and "sketch_apr23a.cpp.hex".
The ".hex" file is literal machine code, with a little bit of added formatting to make it more human-readable. If you are comfortable using other tools to upload your code, this is the file that you should upload to the processor.
Let's look at the contents of "sketch_apr23a.cpp," though.
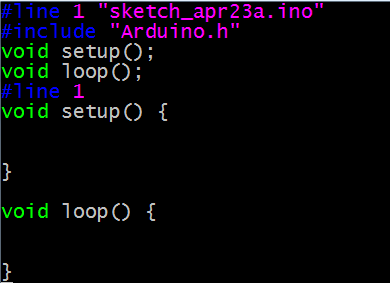
Aha! There are the missing #include and function prototypes for setup() and loop()! If you don't know what that means, don't worry- the big takeaway is that the Arduino IDE adds some magic content to your sketch, which takes some of the weight off your shoulders.
Another thing of note: if you had more than one file with the ".ino" suffix in your sketch, they'd be added, alphabetically, to the bottom of this file, rather than treated as additional files to be individually compiled.
From here on, the process is fairly procedural. The ".o" files get linked and translated into the ".hex" file (itself a process almost long enough to write a post on), and then avrdude (an open-source helper program older than the Arduino IDE) is invoked to handle uploading the code to the processor. The real magic of the Arduino IDE lies in the manipulation of the sketch to create a valid source file and the automated inclusion and linkage of the extended core functionality that lives in that "cores" directory.
As the Arduino IDE has developed and matured, the rules that govern this process have gone from set in stone to written in sand. In the earlier versions, all of these settings were hard-coded into the source of the IDE, and the average user didn't stand much chance of modifying them. Since Arduino 1.5, however, many of those settings have been moved to external files, where they can be tinkered with relatively easily. This allows the savvy user to add support for any desired platform, even if they don't know Java well enough to edit the IDE itself.
At any rate, I hope you've enjoyed this peek under the hood of the Arduino IDE to see what really goes on in there. Maybe you'll even find it useful!


Great article! Thanks for the insight
One missing step in your description is that all the core files are compiled into an archive called core.a and that the sketch is then linked against this archive so that only the core code needed by the sketch is included in the final hex file.
Excellent article. Months ago I had peeked at this and got scared and ran away. Nice to have a friendly guide with a machete. A related question: I've routinely done C programming for Atmel in other environments like Imagecraft and have never figured out how to use the Arduino IDE to upload a plain old hex file produced elsewhere. Reasons for doing this range from being able to upload via serial instead of an AVRISP Mkii, and notably the incompatibility between the AVRISP's JUNGO USB Driver and Arduino's. Any tips on how to take a standard hex file and cover it with the secret sauce to make the Arduino uploader eat it like a regular Arduino .ino file? Are there structural reasons that make that too hard (or impossible) or is it just a matter of say, renaming it and making some associated files and putting them in some special place (like the temp folder)? Thanks!
It's doable but awkward. One of the things that you can do with the arduino ide is upload a given board flavor's bootloader with an attched programmer. The hex file that the ide uses for that operation is defined in the boards.txt file. You can either rename your hex file to match one of the existing ones or create a new boards.txt entry cor your desired target.
The second option is really flexible as you can tell the ide to look wherever you want, to use whatever processor you want, set the fuses how you want, etc. Basically, by tweaking boards.txt, you can use the ide as a frontend for avrdude.
Very interesting article. I had always wondered where the main() function was, thanks for the read!
Very nice article. I'd love to see a follow-up on the "gotchas" that can pop up for those familiar with C/C++ when using the Arduino IDE (such as variable scope across "tabs"). I've yet to see a good article on this anywhere.
Seconded. It would be nice to see a write-up of differences between the Arduino language and C/C++, for those of us who are familiar with one and want to leap into the other.
Good idea! There are a few.
I'm planning to write up a tutorial digging into the whole process in great detail; I'll include that as a section.
Is it possible to add flags to gcc from within the IDE? For example, if I wanted to add -Wall, can I do that?
Not from within the IDE; you can, however, add flags by editing the platform.txt file that lives in the hardware directory (Arduino/hardware/arduino/avr/, for instance).
That file contains all the command line options used to build and link the project; there's no way to pass a flag from within a file back out, as far as I know.
Hey, guys. Microsoft's most recent moves into IoT, Raspberry Pi, and now possibly Arduino seem HUGE for the maker community. Yet, I haven't really heard anything about it from those "in the know" in the maker community. Have you been following this? If so, I would like to see your take on it, perhaps this warrants an article.
http://winbeta.org/news/windows-10-iot-core-insider-preview-released-microsoft-will-be-free-makers
I actually just wrote a quick article about it here.
In my opinion (which is not necessarily reflective of SparkFun's), I think it's a good thing. I think there is so much negativity from the era of Ballmer at Microsoft. It seems their new CEO (Satya Nadella) has some interesting ideas. I think this will overall be good stuff for the Maker and DIY community.
One of the most interesting niblets of information was that the API would allow embedded projects (RaspPi, Arduino, etc.) to utilize sensors from Windows devices, specifically mentioning Windows Phones like the Lumia 530. This is a huge deal considering that the Lumia 520 can be had for about $20 (retail price, no contract) in the US. It's packed with GPS, IMU, Ambient light, touchscreen, camera, GPRS/GMS modem, etc. all for $20. Does sparkfun even offer an IMU/GPS shield for that price?! Not to mention the fact that it's an entire freaking phone. And if this API extends to the HoloLens (like they showed in the video) and, who knows, maybe more of their devices like the Microsoft Band smartwatch and the XBOXone and maybe even tie into their cloud services... The possibilites are mind-boggling.
Please oh please do tell where in the world you're finding those Lumias for $20!?!?