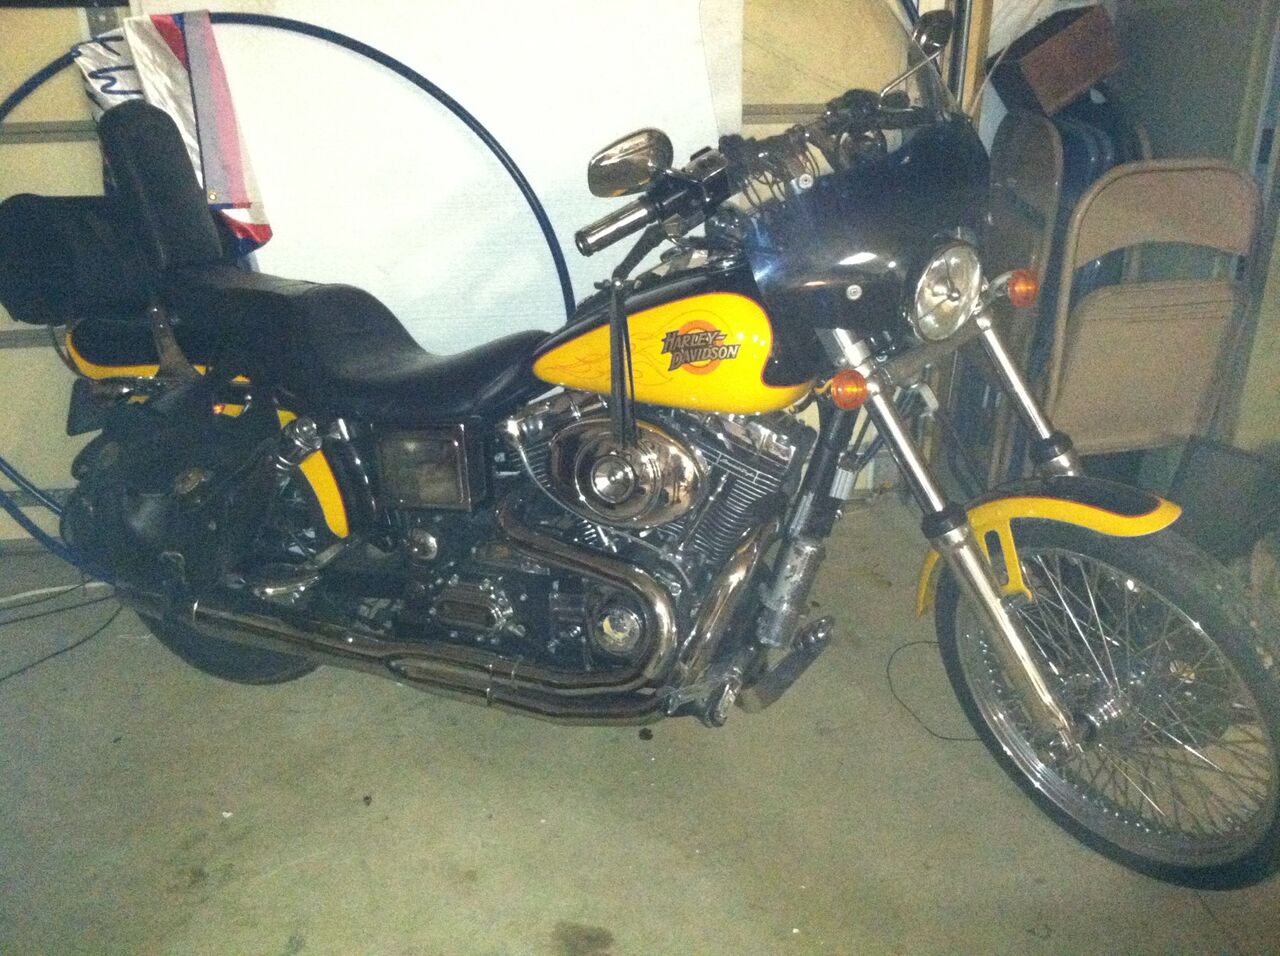
A few years ago I moved to Colorado to work here at SparkFun and postponed a project I had been working on: Building a full size MAME arcade cabinet. A couple of months ago I decided I was going to pick the project back up and plan it so that I could work on it with my dad during my 4th of July vacation. I wanted to use his motorcycle as design inspiration for the cabinet.


When starting a large project such as this one, I always spend tons of time reading everything I can come across related to the topic at hand. However, for the most part I kept coming back to just a few resources during the design process:
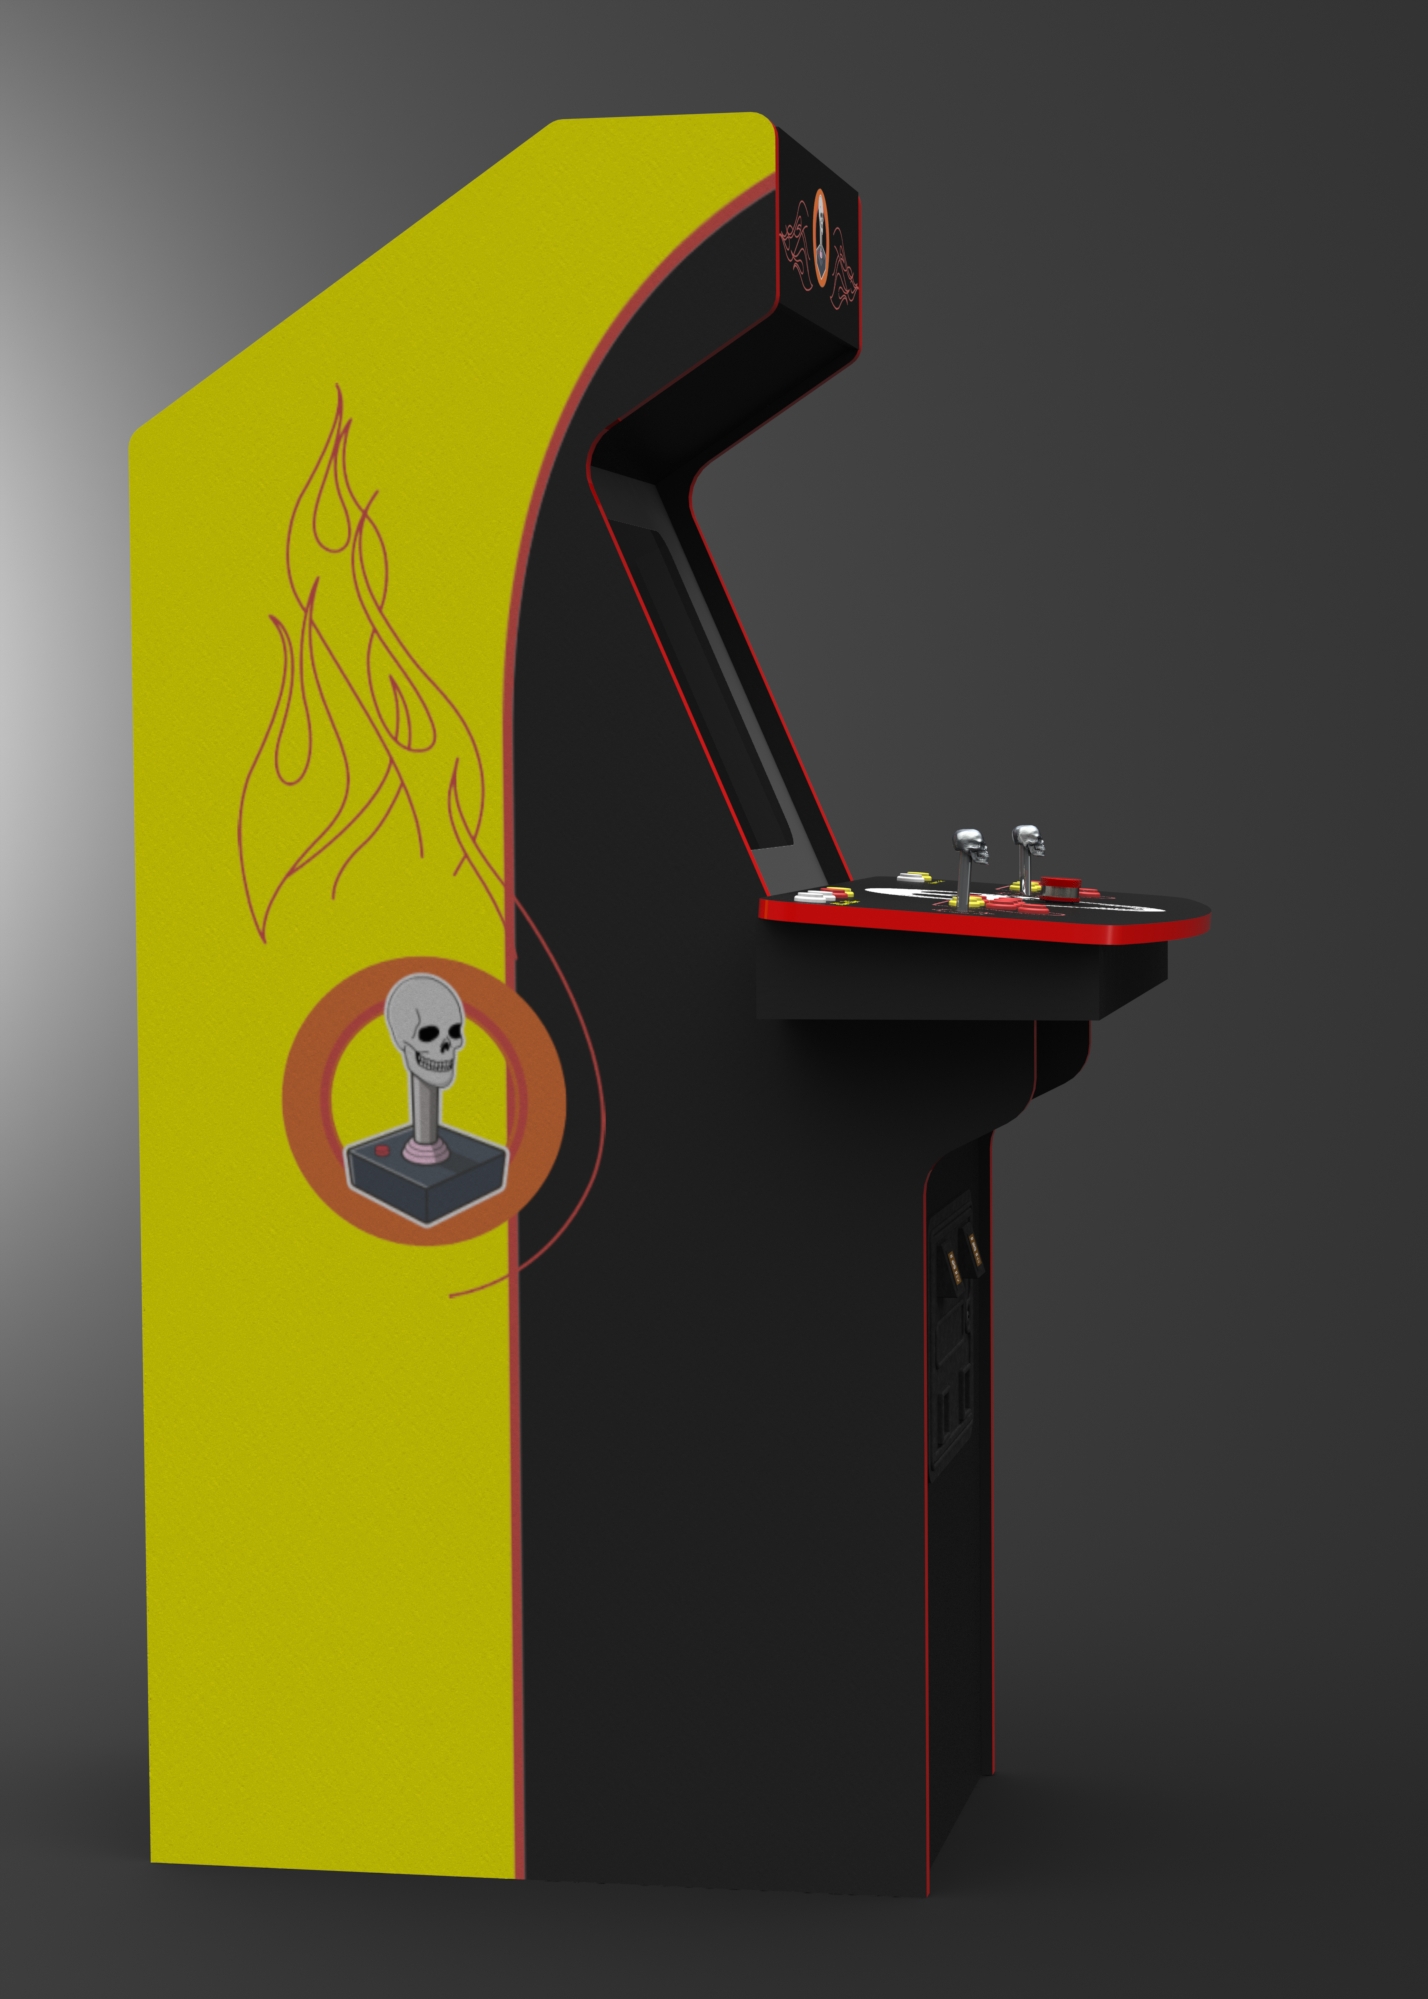
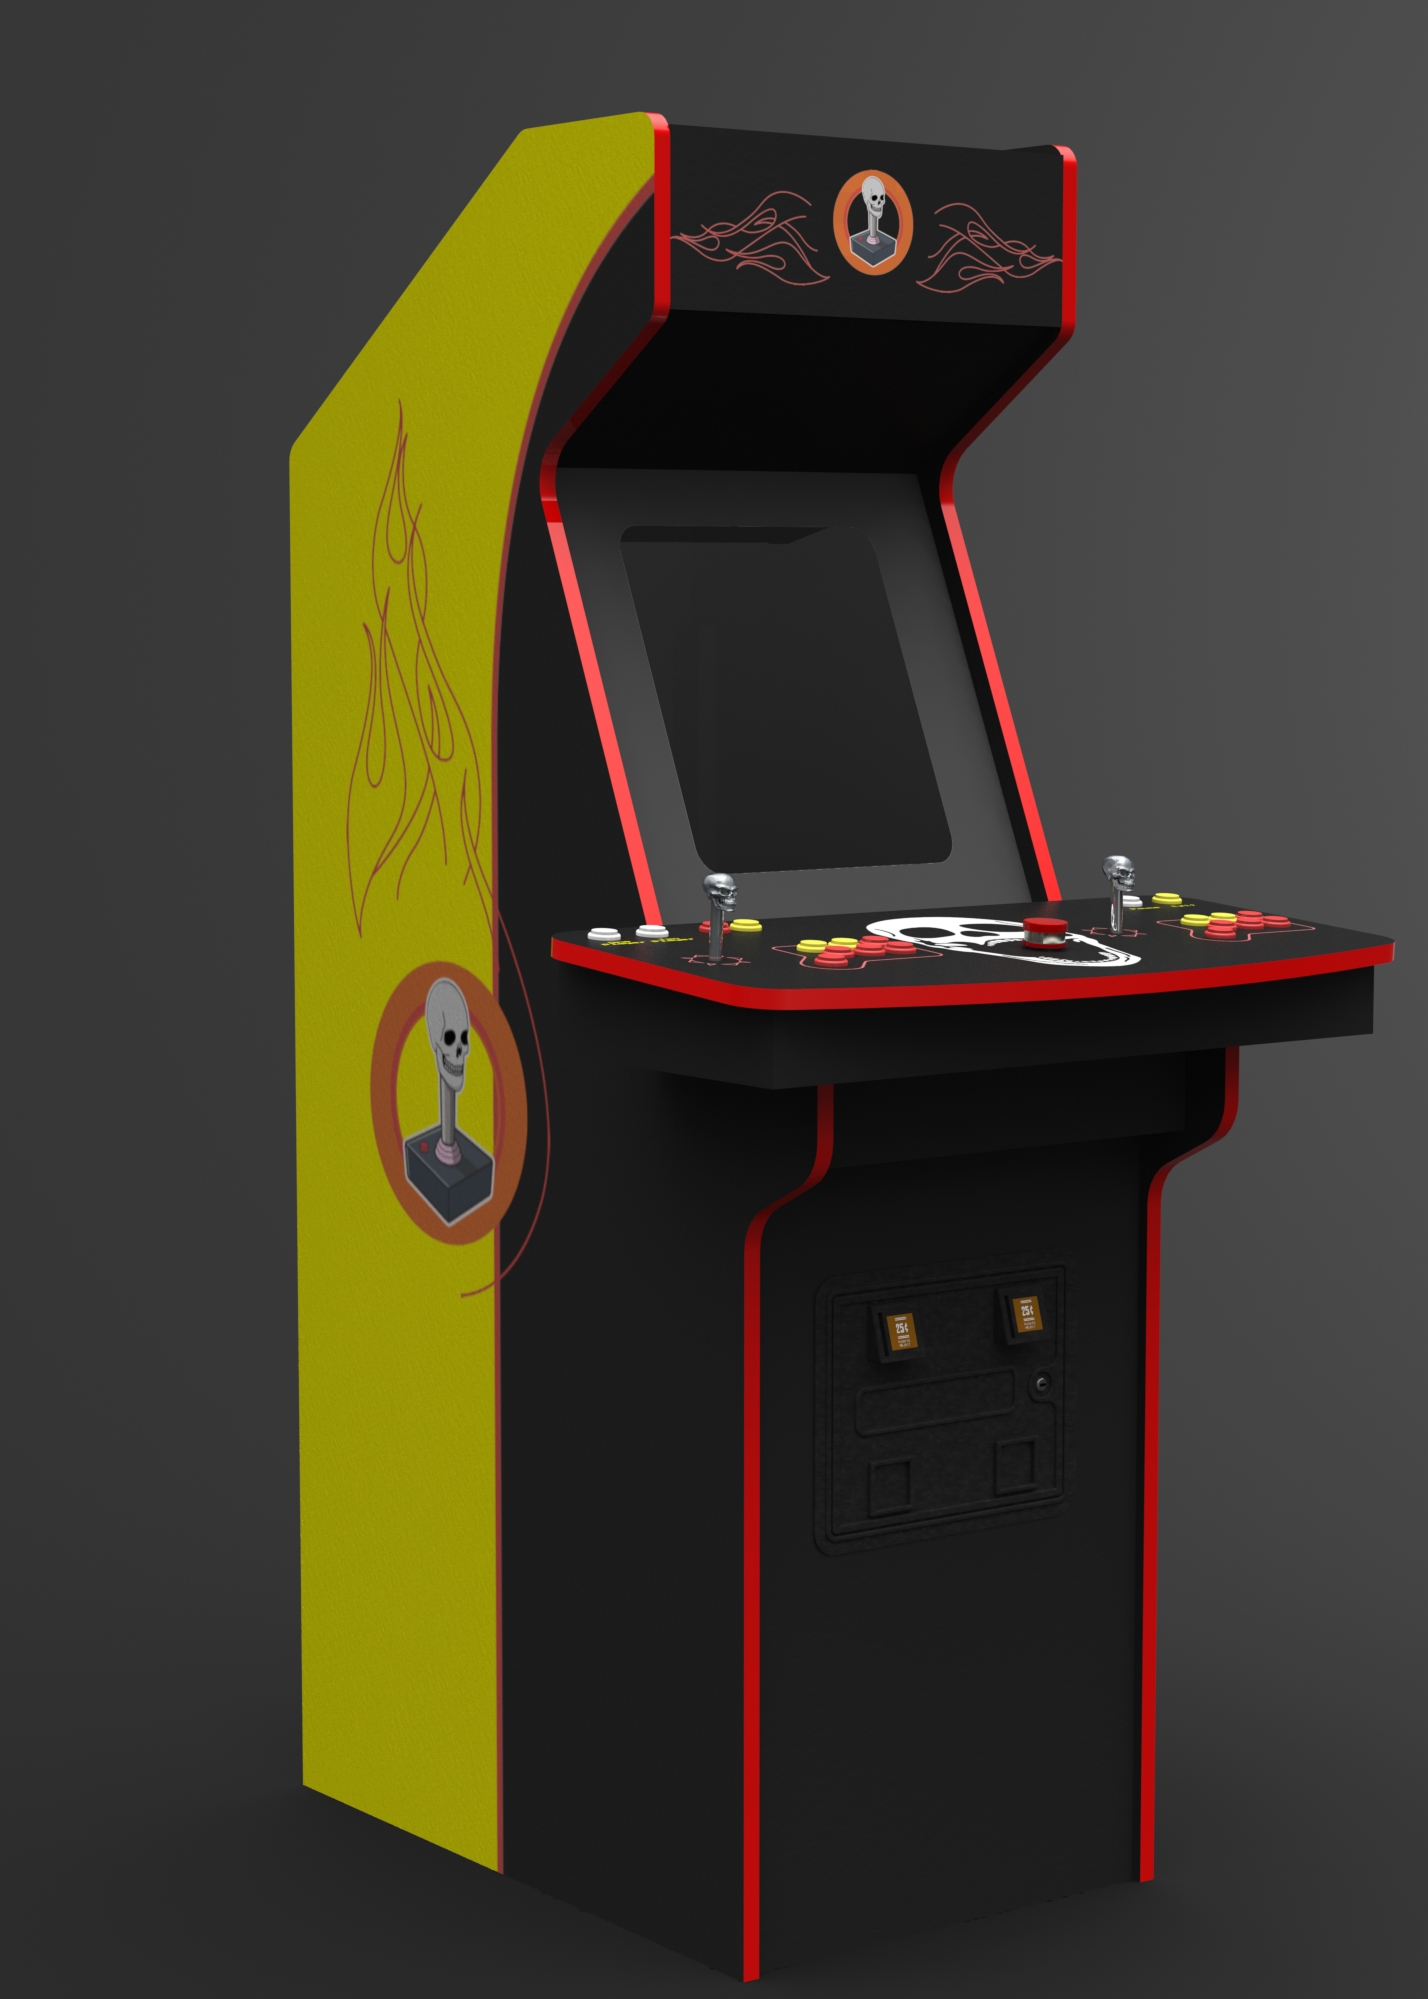
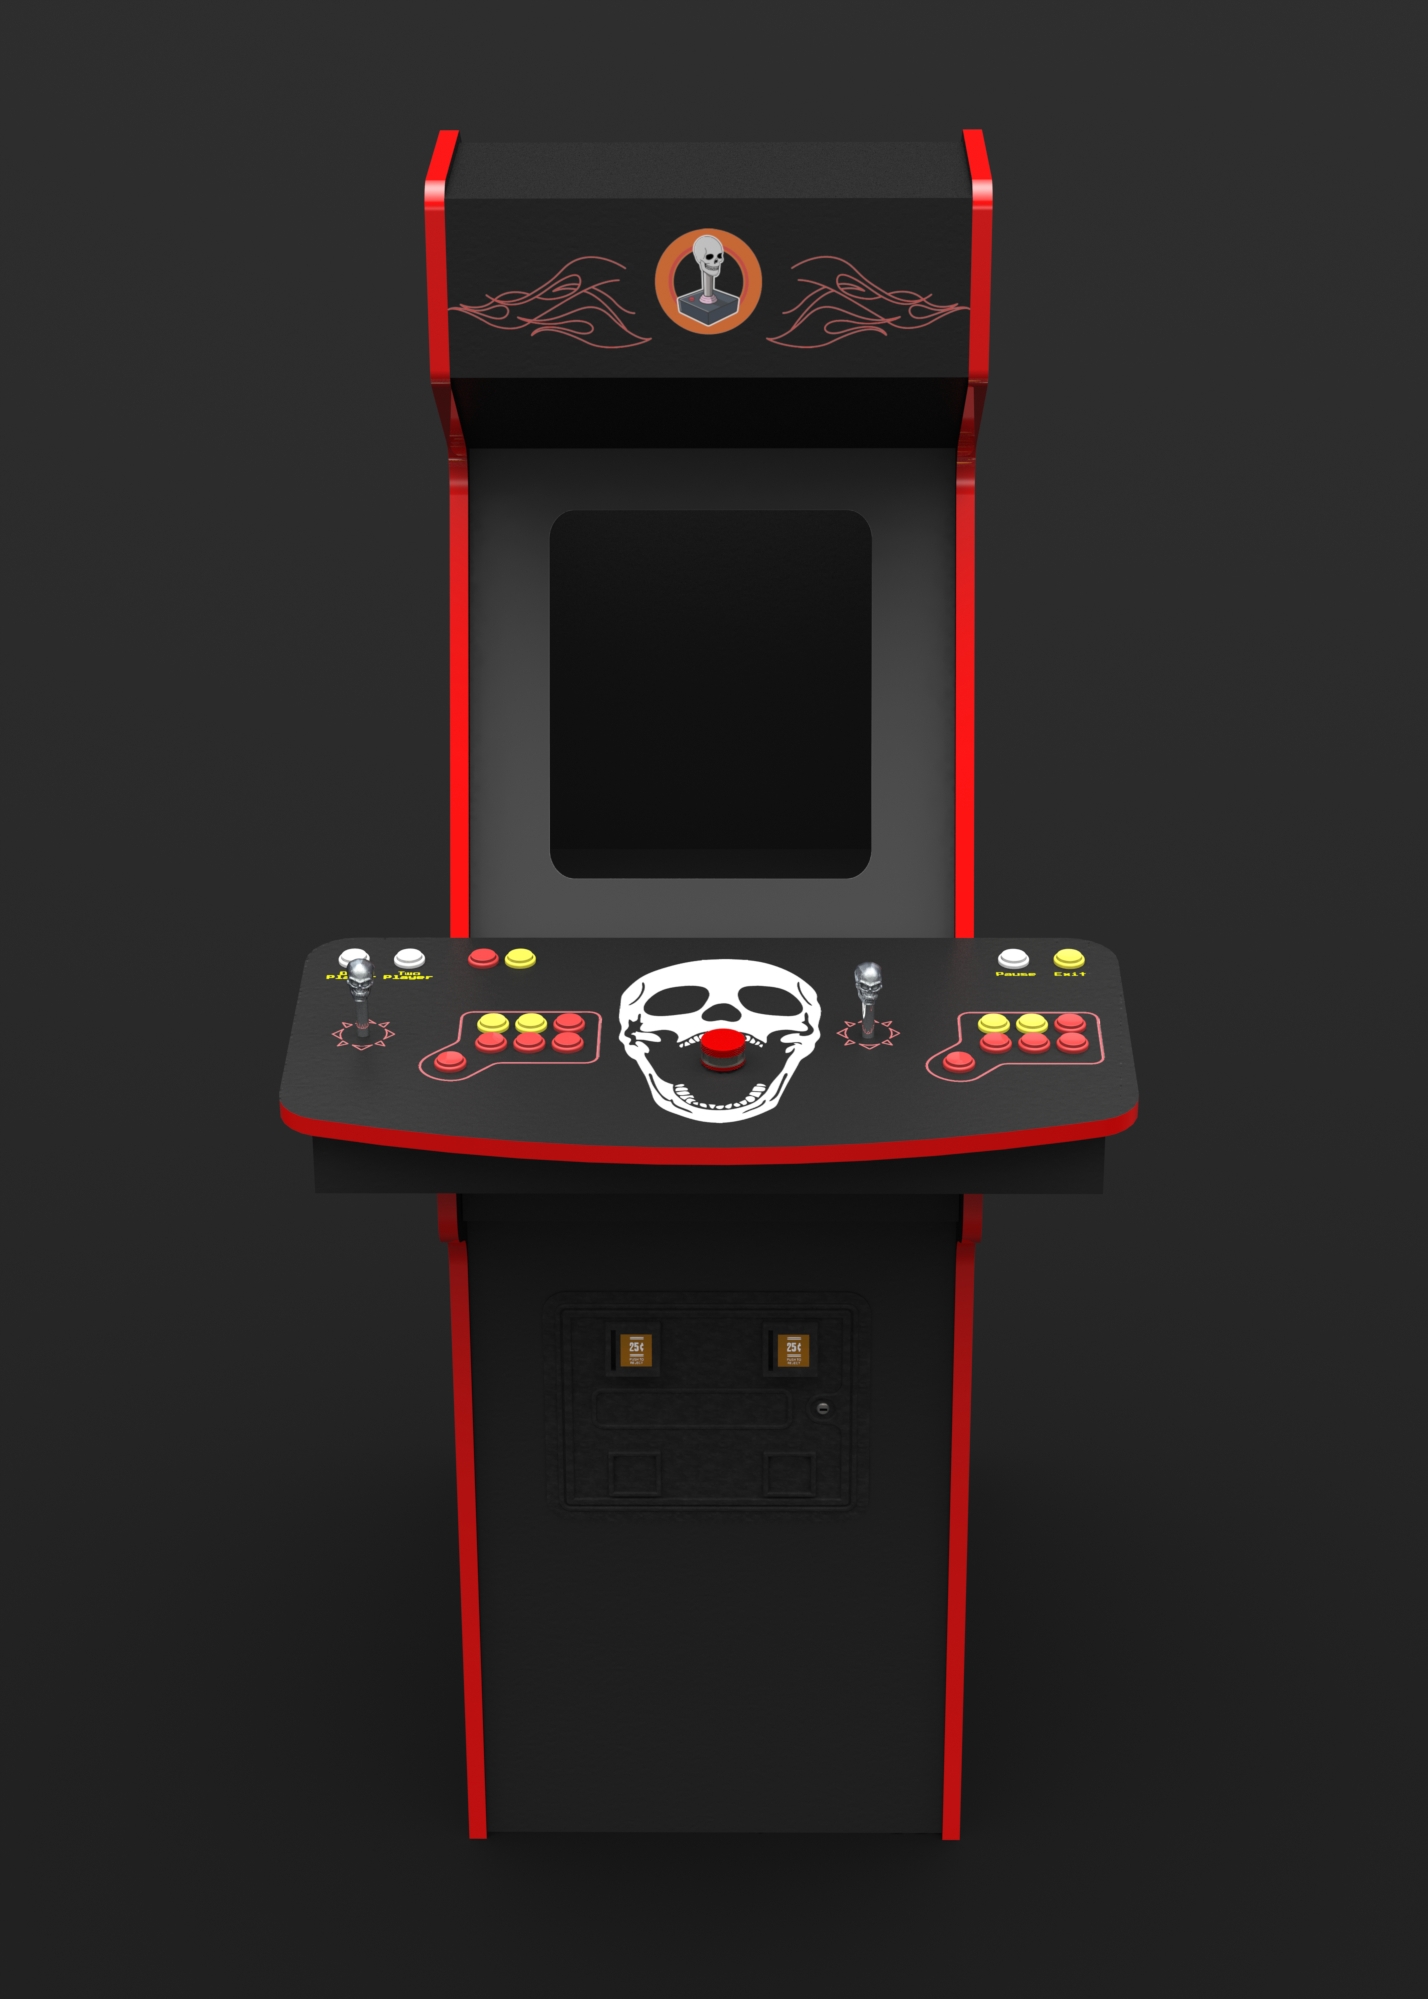
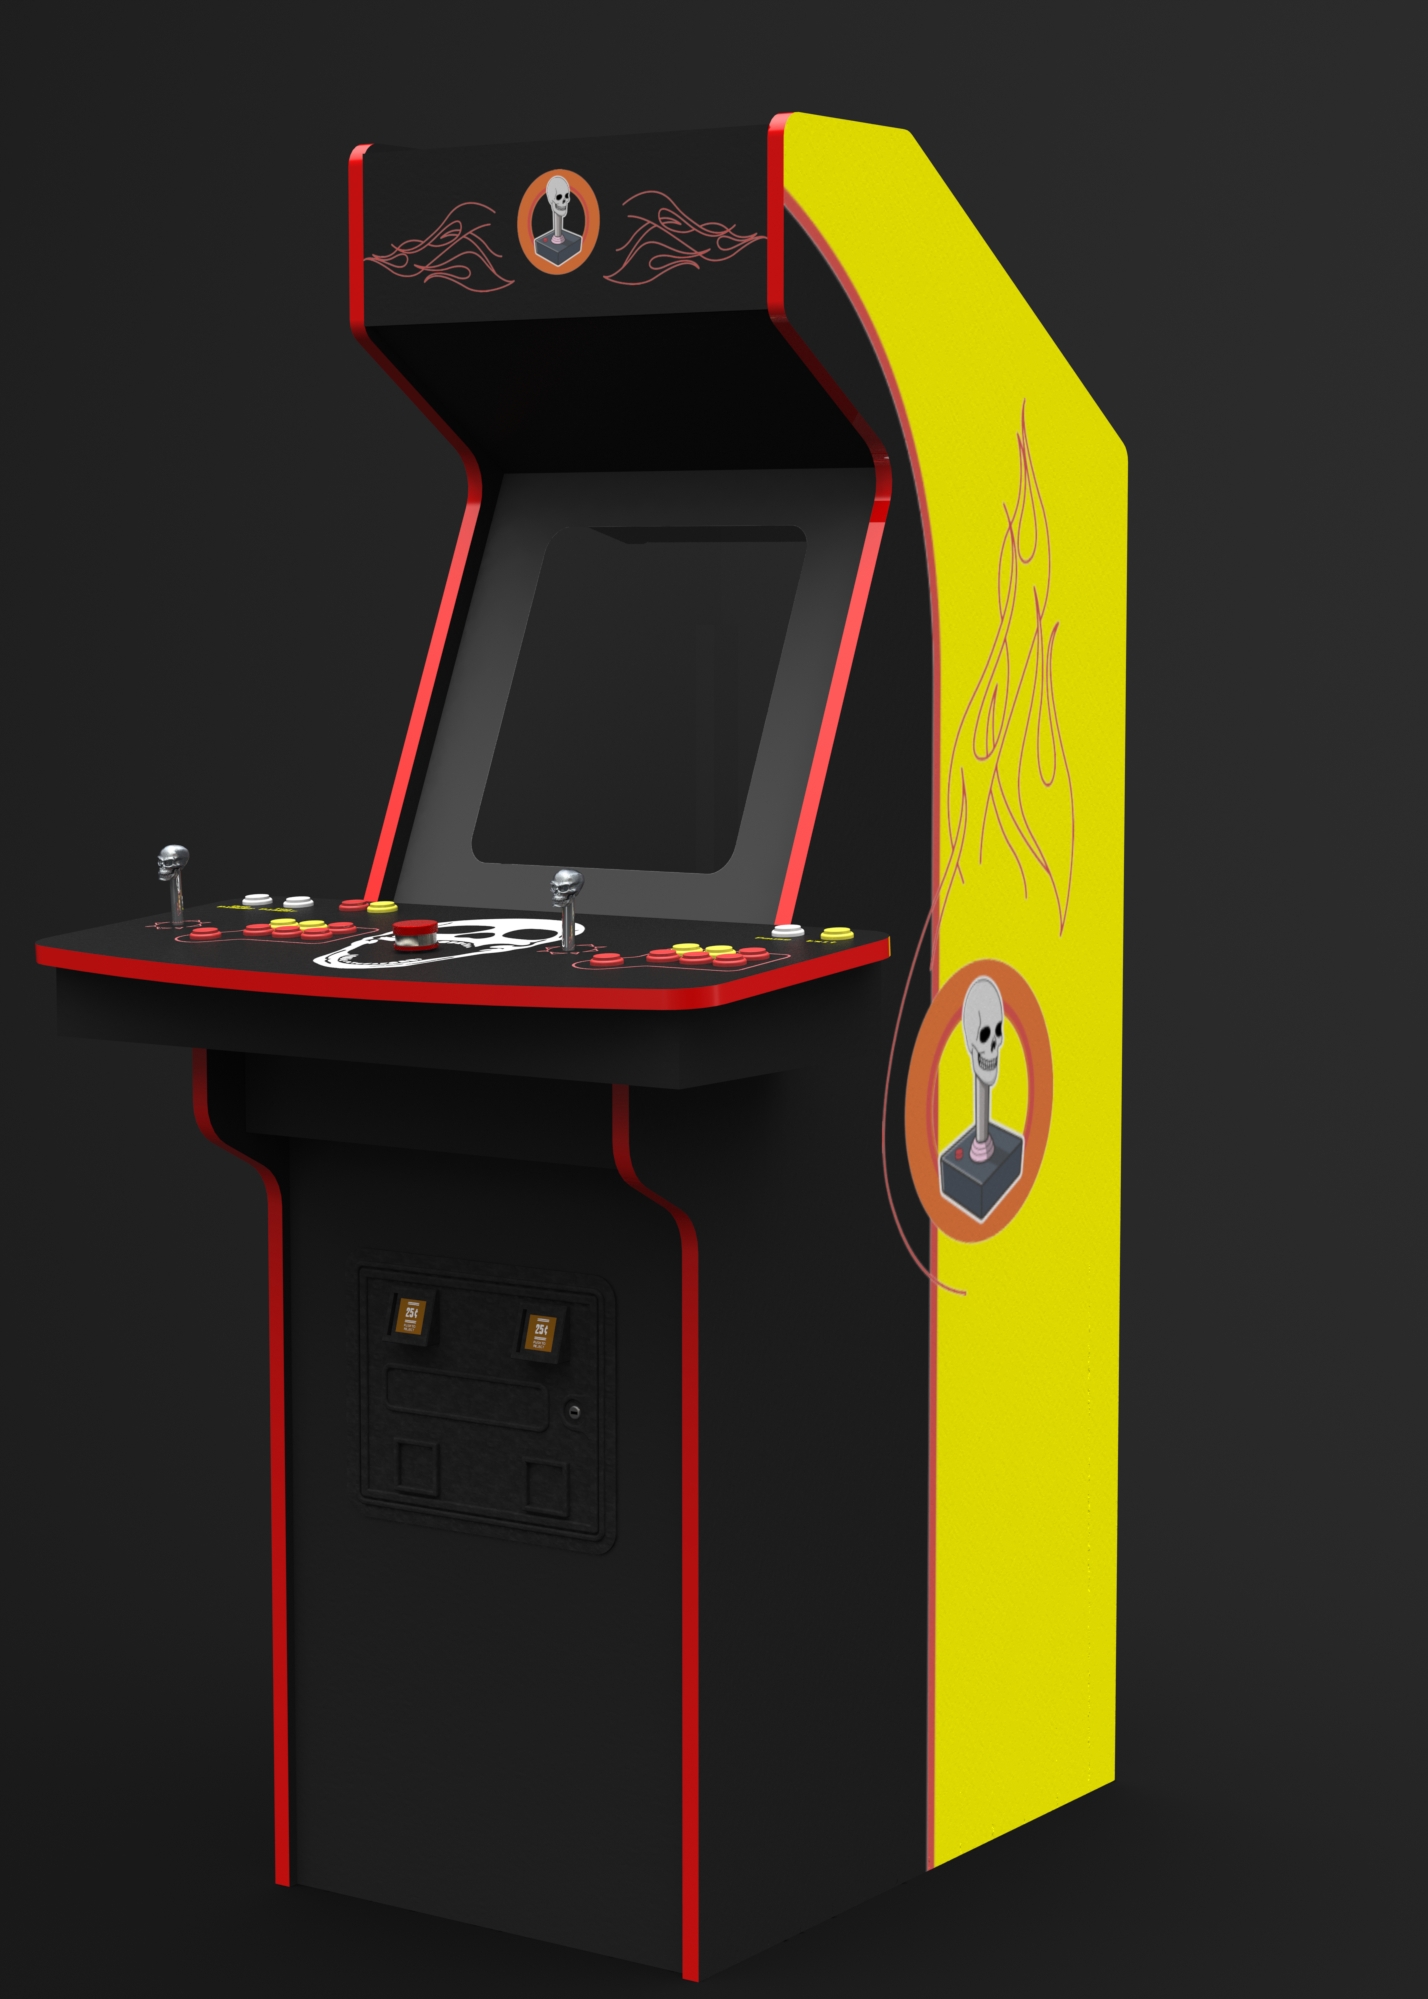
Overall Shape and Construction
For the shape I went with something in-between the arcadecab design and David's design. For construction I am going to follow David's lead. I will use threaded wood inserts and many dado joints, including the monitor bezel to prevent light leak. It is important to know what monitor you intend to use so that you can properly adjust the width of the cabinet.
Control Panel
Arguably, the most important part of the cabinet. I had a hard time laying out the components and designing the graphics of this part of the cabinet. Luckily, there are many fantastic examples of this, just look at this beautiful control panel from David's cabinet.
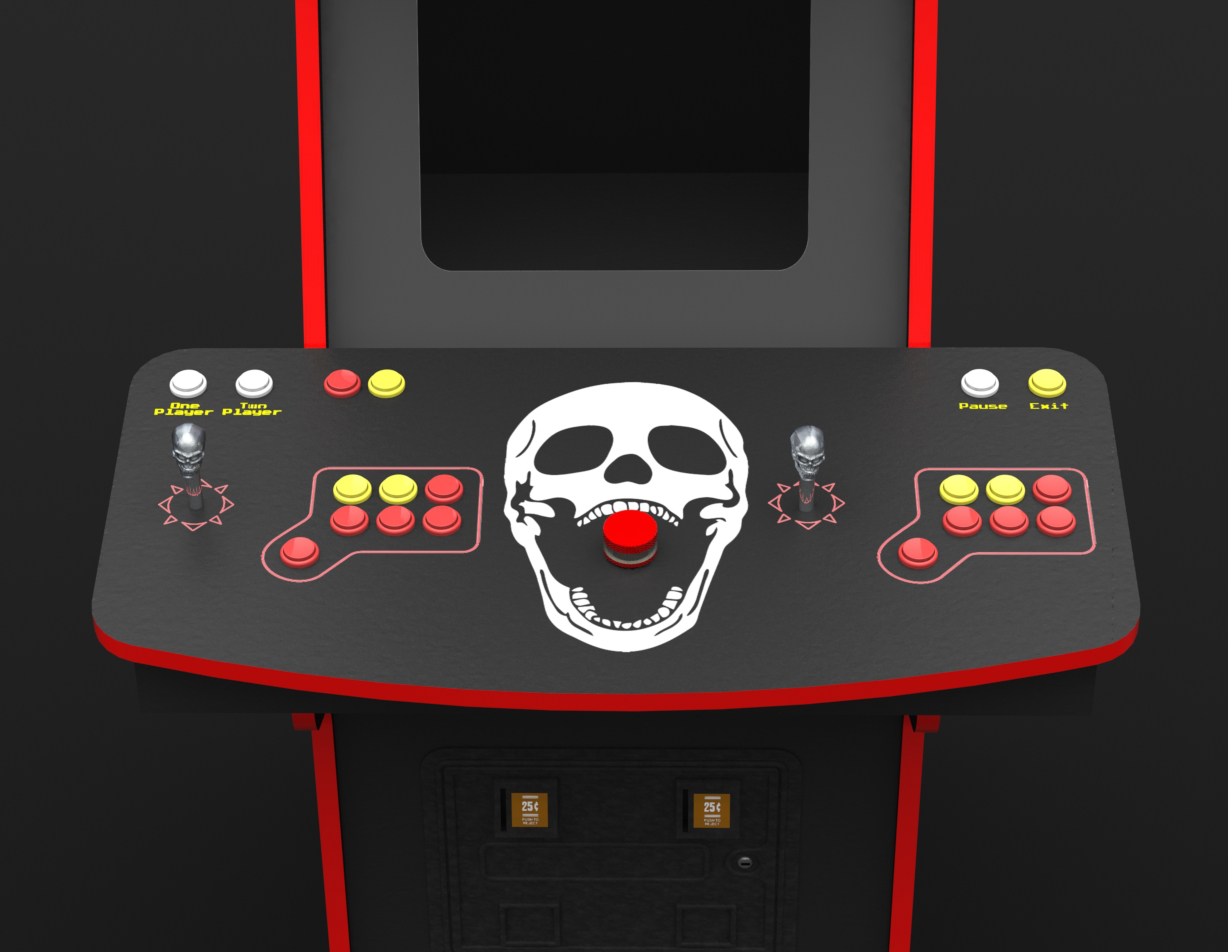
- I decided to go with two joysticks from Ultimarc that have the capability to switch between 4 and 8 directions from the top of the control panel.
- The trackball was left out because I don't really enjoy the games that utilize it.
- Last year I wrote a Tempest clone but I've never played it on a cabinet so a spinner was a must have.
- I went with David's button layout but I am still considering a last minute change to this one.
- There will be a plexy cover for the controls -- I did not model it because I am lazy.
Hardware
For hardware I plan to use an Raspberry Pi 2 and connect the controls via an I-PAC. There are a few YouTube videos that make this look rather promising but I have not tested it myself just yet. My cabinet will include a coin mech but it is actually illegal to take money on a MAME cabinet.
Software
Pretty simple, just going to use Retropie.
Design
I don't consider myself the best designer but I have spent a lot of time on this and gotten input from many talented people. For the graphics I will have vinyls professionally made. I don't want any of my graphics to contain black. I hope to spray paint all black on the cabinet (I have had good success at making spray paint look like a powder coat in the past) and the graphics will be laid on top of that. Red T-molding will be purchased from t-molding.com
What do you think? Do you have any recommendations on how I can improve the cabinet before I start the build?


Hopefully you finish this project, I'm still waiting for more on Nick's pinball project.
Check out the Howler Arcade Controller. It's open-source and programmable. It can handle all those buttons and more and LEDs. http://www.wolfwareeng.com/
Wow, the workmanship on this is awesome. Great job!
Thanks for the compliment but unfortunately these are still just renders! I will start building the cabinet early July.
Very cool! Building a cabinet is on my summer project list. I would recommend you build a prototype of the control panel first to test the control layout. The custom cabinets that I have played on in the past have had really uncomfortable button layouts once you play for 10 minutes or so. My favorite game was always Galaga and it's hard for me to play it on a multi system with a different button spacing than is on the original. Test out your top 10 or so favorite games and make sure the button layout is going to be comfortable for you.
Before committing much time on the cabinet itself, I would get all the electronics working, including making a dummy of the control layout. You can just get a project panel from HD or Lowes for that. Then you can tweak layout, spacing etc as well as making sure that all the hookups will work the way you want. Much easier to put in a wiring loom that you know works, rather than one you think "should" work, and then have to debug the system in situ.
Well, that may be a bit harder to build than Adafruit's "cupcade" but it sure looks nicer! http://scharkalvin.weebly.com/about-me.html
Great design and layout, I really appreciate that you kept the control panel simple. So many first-time mame cabinet builders fall into the trap of "I WANT TO PLAY ALL OF THE GAMES!" and put every control mechanism under the sun on the control panel, making it an unusable, unintuitive mess. While the skull-handles are cool and work well with the theme, have a way to swap them out; they will get uncomfortable quickly during longer play sessions.
My big concern, though, would be the RPi being at the heart of the machine. If you really want to use it, it will be okay for much older games, but as you start to get into games from even the early 90s the RPi will start struggling. Mame was built with x86 in mind, with several x86-specific JIT and DRC cores, leading other platforms like ARM, MIPS and SPARC to use slower emulation methods, and with the RPi's slower core this can compound the problem.
Besides the core, there's also graphics problems I'd worry about. Even though it doesn't seem it, mame does depend on 3D acceleration. I think (I could be wrong here) but the 2d surface-based outputs are not really well supported, and I'm not well versed in the RPi's 3D abilities (if any, but if you're doing the compositing in software at high resolutions, you're gonna have a bad day).
If you're using a RPi for the low cost, I'd probably suggest splurging a bit more on a low-end NUC or some other low-end x86 machine; it'll likely cost a bit more, but will perform much better.
Edit: Second look after coffee, extend the width of the control panel by a few inches, the player 1 joystick looks like there's not enough hand-rest for the left hand. If you're worried about fitting through standard doors, make the control panel removable using snap latches, http://na.suzohapp.com/all_catalogs/arcade_game_parts/49-0059-00
Yeah, if the Pi ends up being too under powered then I will just throw one of my old gaming PC's in there. The Pi does seem to be promising though here's a youtube video of someone playing Metal Slug. There's not really much of a reason to use a Pi other than the fact that I like the look of Retropie and I think there's more of a "wow" factor if you show someone the inside of the cabinet and it's just a couple of circuit boards rather than some dusty old pc.
Thanks for the advice about the width of the control board. How much space do you recommend I have around each stick?
I have an old mame cabinet, however, the computer in it died and I haven't done anything with it in years. However, with RetroPie and PiPlay I started looking at the RPi as the computer for it. I have been playing around with the RPi2. Right now I am running PiPlay because it has advmame which uses a newer version of mame than mame4all. It plays everything I want, except 1942: The Loop Master. Apparently those older versions have issues with CP2.
Right now I have the RPi2 hooked up to my big screen TV and using a wired Xbox controller while I try it out. I am noticing advmame is having resolution issues for some games. It doesn't autodetect some correctly so you have to go through the trouble of manually setting video resolution.
I like your design. The only thing I would add is a trackball because I love games like Centipede and Missile Command.
I will want to update my control panel and how it connects. It is removable. However, I built it 15 years ago. So the control panel connects to the an Ipac that stays in the cabinet. To make it removable I used a parallel port connector. I need to update everything to USB based controllers and then only a single USB cable is needed.
I'm actually just about to start on the same project, so I'll be watching yours carefully. I plan on using Arduino to terminate all buttons, trackball, joystick etc. and using the USB Keyboard emulator back to the RBPi this way it has the best compatibility for the various emulators. I'll also be using another arduino to run a bunch of LEDs in the cabinet, perhaps some nice blue ones out of the bottom? But here's my biggest change/suggestion: There's no reason to have a massive cabinet anymore especially with flat screens. So I'll be making mine the standard height and width, but the depth will probably only be 6 inches on the main cabinet, and 12ish including the control panel. This way I can "hang" the cabinet on any wall and not use a large amount of floor space. Another benefit is it'll probably weight half as much!
Yeah, I actually started with a design that was not quite as deep but I quickly reverted the change because I was having a hard time doing anything that looked good on the sides. There will be much wasted space inside this cabinet.
The I-PAC is pretty much just a USB Keyboard emulator. It does some fancy stuff like keeping the key configuration between reboots though.
The Arduino Leonardo, Mini, or Due can be used very similarly to those I-PACs, but the I-PACs have the advantage of having all the low-level coding already done for you. Though, I suppose if one is looking forward to the challenge of the low-level coding, that advantage is actually a disadvantage. ;-)
Though, with some cleverness, by using avrdude directly you could reprogram an Arduino directly from the r-pi with cusomized key-mappings for each different game launched.
As with skinning cats, there are several ways to do this. :-D
Would you be willing to share these graphics. They are awesome