
Classical Arduino Programming
The mentality of Arduino is really to be able to throw some code in there and make it work. Coming from the nitty-gritty world of industrial design, I found the Arduino IDE was a fun toy to play with on weekends. I didn't have to care about being professional and could shoehorn my ideas into the loop, delay and repeat. I thought the Arduino IDE was unprofessional and there's no point to trying to write good code with it, because really, why would you?
however...
After I started working at SparkFun I came up with a challenge for myself. I saw the forty seven effects midi library, looked inside and said, "It's not the Arduino IDE that is wrong. It's my way of thinking that's wrong!" I challenged myself to use the constraints of the IDE to create code that works and is maintainable.
The delay(); statement
The deal breaker from the beginning was the use of the delay statement. One of the first lessons in microcontrollers is that software-driven delays are not a good idea.
A few problems with delays:
- They tie up the program preventing it from doing anything else
- They can't make well-regulated timing loops - user code is unknown in length
- They promote linear thinking
An example using delay
The LED blink application states:
- Turn on
- Wait a second
- Turn off
- Wait another second
- Repeat
Well what if I want another LED to blink every half second?
- Turn on the LED A
- Wait a half a second
- Turn off LED A
- Wait a half a second
- Turn on LED B
- Wait a half a second
- Turn on LED A
- Wait a half a second
- Turn off LED B
- Turn off LED A
- Repeat
It's do-able. But what if I want to flash one LED at one second and the other at 34/92 of a second? Well then I'm in trouble. Or if I want to do any number of services, all at different rates? It becomes a nightmare.
Getting away from delay();
The timer interrupt is a perfect example of something else you can use. As soon as I realize a sketch needs consistent time tracking, a free interrupt gets used. I consulted the Hardware Resource Map from the Google code archive, found a timer I could take hold of, and made the interrupt increment some counter somewhere. Then, I can look at this counter and compare what time it is to some time I've previously recorded. Loop() can race along as fast as possible while the counter regularly increments, and I can do things on intervals.
Using a timer interrupt to unload work from the processor isn't exactly a new concept. I noticed when I code that I always make it the same way, so it was time to pull it out and make it a module. TimerModule is born.
TimerModule: periodic code execution
I want a thing that keeps time without drifting, and operates user code chunks at arbitrary intervals. That's the spec. I made, tested, and incremented until I was happy with it. More importantly, until I could trust it. Here's how it works.
Sketch-level operation
From the highest level, the sketch, the system is drawn like this:
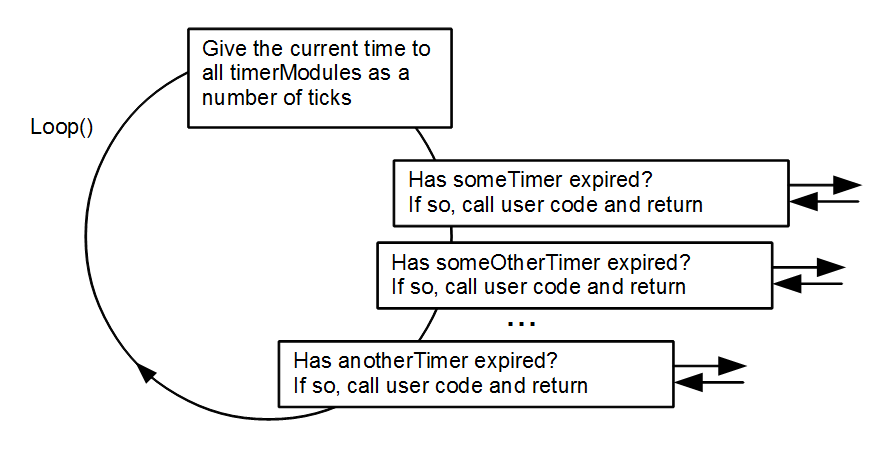
Every time the loop executes, it first updates the current time to all the timers that are in use, then checks if any of the timers have exceeded the defined period. If so, each timer has a place the user code can be executed from. All the while, the interrupt increments the time counter.
Here's how the loop is coded. Objects msTimerA, B, etc. are all TimerModule classes, with msTimerx as the name for copies of the class.
void loop()
{
    //Update the timers, but only once per interrupt
    if( msTicksLocked == 0 )
    {
        msTimerA.update(msTicks);
        msTimerB.update(msTicks);
        msTimerC.update(msTicks);
        //Done?  Lock it back up
        msTicksLocked = 1;
    }  //The ISR will unlock.


    if(msTimerA.flagStatus() == PENDING)
    {
        digitalWrite( LEDPIN, digitalRead( LEDPIN ) ^ 0x01 );
    }
    if(msTimerB.flagStatus() == PENDING)
    {
        digitalWrite( LEDPIN, digitalRead( LEDPIN ) ^ 0x01 );
    }
    if(msTimerC.flagStatus() == PENDING)
    {
        digitalWrite( LEDPIN, digitalRead( LEDPIN ) ^ 0x01 );
    }
    delay(1);
}
There are a few assumptions for this to work.
- The time counter has an infinite size, and will count forever.
- The user code doesn't block operation (aka, delay(5000) in one task prevents the others from working for five seconds).
- The loop() runs faster, slower, or equal to the timer interrupt. Order can't matter.
If these assumptions can be accounted for in code, the goal will have been met.
The first hurdle is that the size of the variable that counts how many times the interrupt has to be triggered. It can't be infinite and must rollover somehow.

The simplest solution is to use a known data type and just let it roll over. If I do that though, I have no way of knowing (ok, we're not looking at low level cpu register bits here). So I add more code. I check during each interrupt if it's above some limit, and reset it to zero.
Graphing the value of the time counter as a function of real time, the rolling action can be seen.
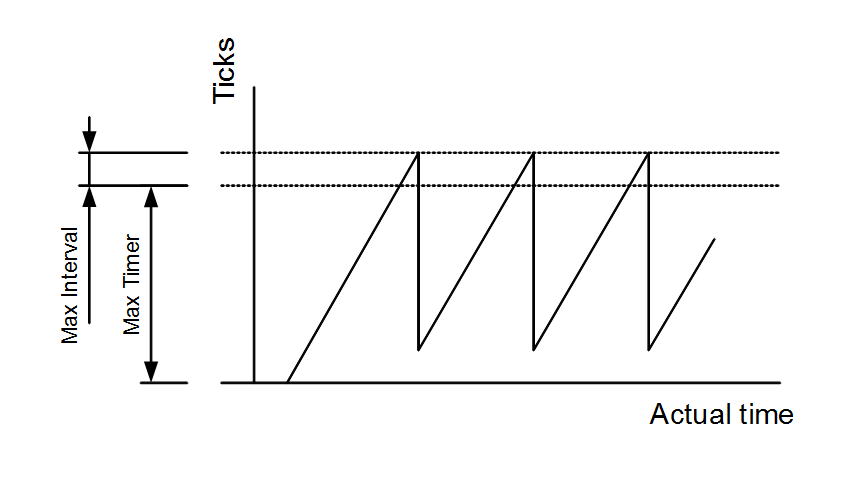
The tick counter (msTicks) counts until some limit is reached and then is reset. The padding below is to handle overflow cases of timer operation and is described later.
The ISR is written like this:
void serviceMS(void)
{
    uint32_t returnVar = 0;
    if( msTicks >= ( MAXTIMER + MAXINTERVAL ) )
    {
        returnVar = msTicks - MAXTIMER;

    }
    else
    {
        returnVar = msTicks + 1;
    }
    msTicks = returnVar;
    msTicksLocked = 0;  //unlock
}
Again, there's a subtle extra part that has been added. Rather than resetting to zero, a known quantity is subtracted from the counter and it's given an overhead. This is actually a product of how the arbitrary timers operate.
To create a sketch with any number of timers (to the extent of the memory available):
- create a new TimerModule in the global scope -
TimerModule myNewTimer - Add it to the list of protected updates -
myTimer.update(msTicks); - Check it in the main loop with
if(msTimerA.flagStatus() == PENDING){do something}- code goes within!
That's all there is to use it. If you want to try it out, drop this GitHub library in your 'libraries' directory, restart Arduino, and select the example "timerModuleExample." This will run on the Teensy 3.1 or Uno/Mega, and will xor the LED at three different rates, giving a pseudo-random like effect.
If you want to see what goes on under the hood, keep reading!
The TimerModule
The TimerModule is a small state machine that is controlled by the call to update, and the check of the flag. Here's the state diagram of the messaging action (Need a refresher? State Machines Enginursday Post):
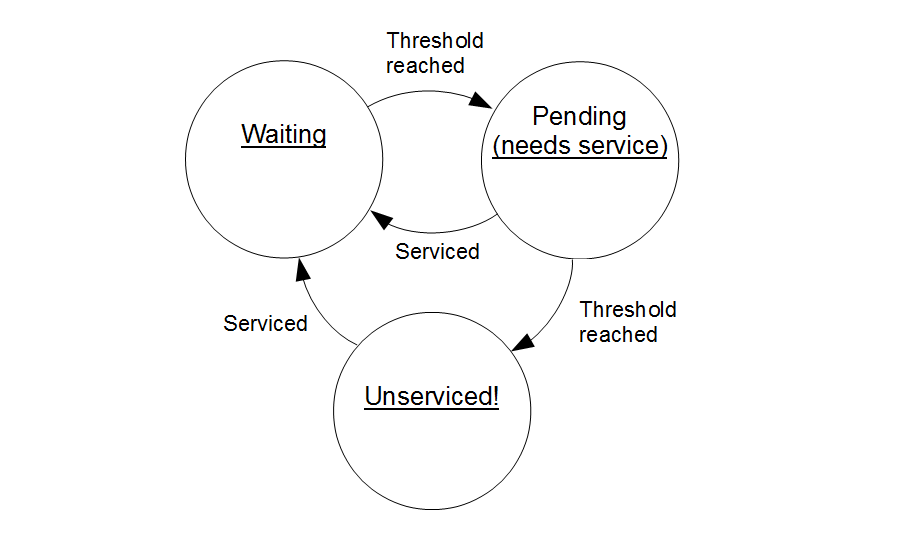
The state is controlled by updating the time and by checking the state. If the module is updated and has passed a threshold, the state increments from waiting to pending, unless it was already pending. If it was, two thresholds have passed without anybody checking the state. Time begins slipping. When the state is checked, it becomes serviced and goes back to waiting.
The last piece of the puzzle is to determine how the timer module handles rollover. Also, what's with the counter overhead in the ISR?
Updating the TimerModule's counters
Take a step back and look at the loop. The loop begins by sending the current time (in msTicks) to each timerModule. Then, it checks to see if any of the updates caused a timer to expire.
Imagine three irregular but closely spaced updates of the timerModule. The loop takes different amounts of time, depending on which timers were executed, so they are not spaced evenly.
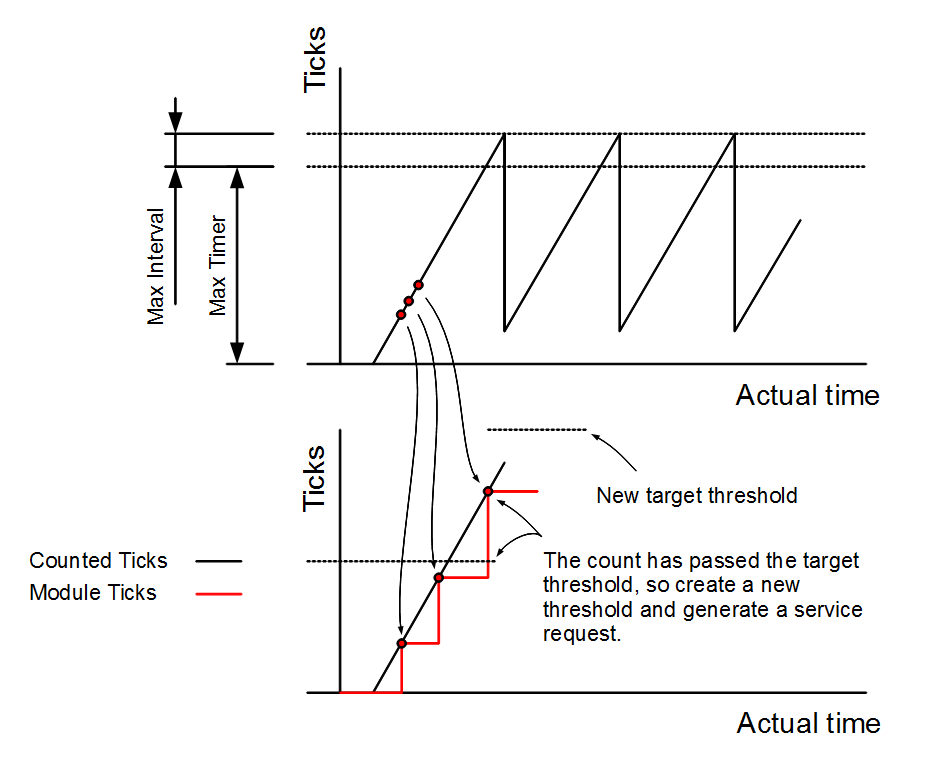
Notice how the internal value of time within the timerModule is a step function. Although the tick counter is updated every time the ISR hits, the timerModule doen't know about it unless the loop vends the information.
Each time they are updated, they check if the current threshold (or next service time) is reached. If so, they activate the state machine and calculate a new threshold for comparison.
Handling rollover
The basic operation is defined, but the case of rollover is still not understood. To investigate, look at what happens as the timer counters get close to the rollover. As Neal Stephenson said in Snow Crash, "Interesting things happen along borders."
The ISR automaticaly rolls the msTicks timer over. If the system presents a timerModule with a new time that is less than the previous time, it knows the ISR must have rolled the msTicks counter. Then, the threshold and the previous threshold time get reduced by MAXTIMER. Now, the counter is at the bottom of the cycle and the threshold is still the same distance away. One of the thresholds is negative though, and the "greater than" check doesn't work.
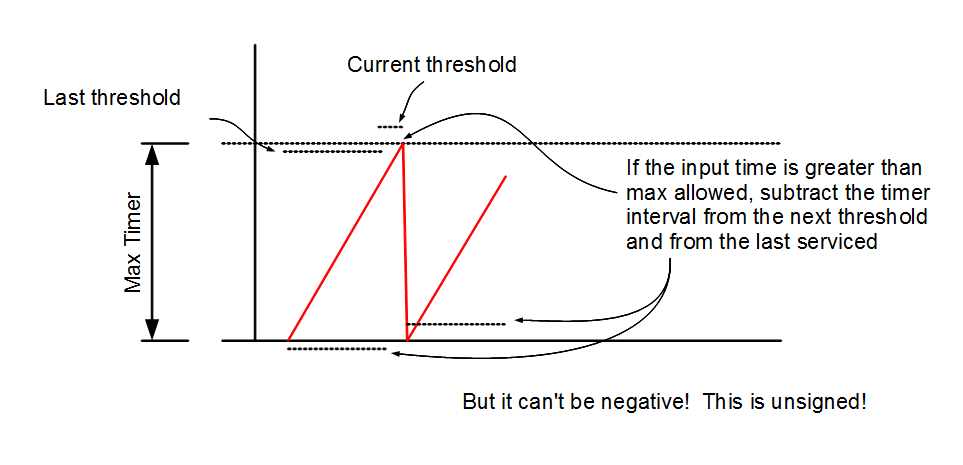
The module needs the next and the last thresholds to determine expiration. Without the padding, one of the thresholds can become negative.
A solution is to add a padding of the longest used timer interval to the bottom of the ticks coming in from the system, or, let the ISR do it automatically.
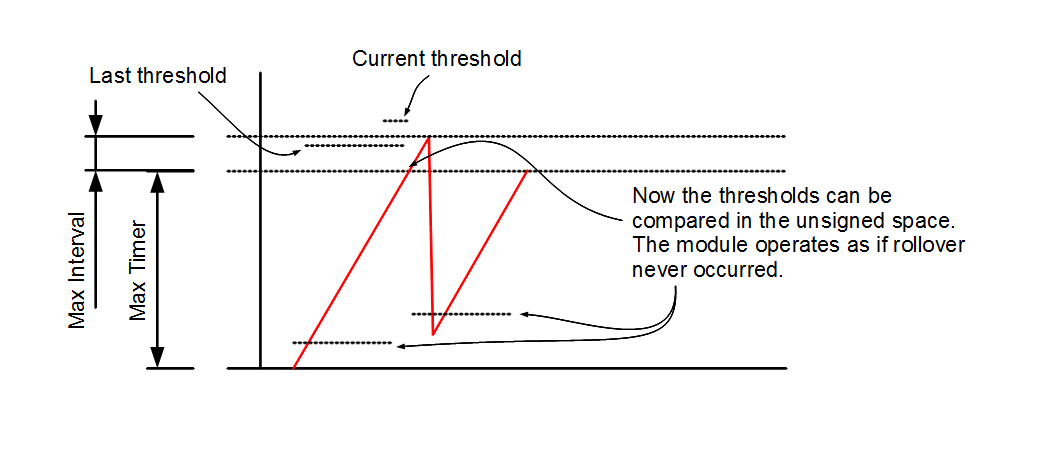
The offset makes sure that all rollovers result in positive thresholds.
Now, the ISR and the time keeping qualities of the TimerModule all ratchet the target numbers automatically. The logic of the TimerModule's state machine is then executed without any knowledge that rollover ever occured. Take a look at the update code of the TimerModule.
void TimerClass::update( uint16_t msTicksInput )
{
    //Check if overflow has occurred
    if( msTicksInput < lastService )  //overflow has occurred
    {
        //Adjust as if nothing ever happened
        lastService = lastService - MAXTIMER;
    }

    //Now process knowing an overflow has been dealt with if present
    if( msTicksInput >= (lastService + interval) )
    {
        //Timer has expired
        //Save the last service time
        lastService = lastService + interval;
        //Ready the flag
        if( flag == WAITING )
        {
            flag = PENDING;

        }
        else
        {
            flag = UNSERVICED;

        }
    }
}
Download the library
The library is compatible with Arduino. Put the library in your libraries folder and try running the example "timerModuleExample" on an Uno/Mega or Teensy 3.1.
Direct link: https://github.com/marshalltaylorSFE/uCModules
This post talks about just one module I commonly use. If you download the library and try it out, you'll find sketches for a few others I didn't want to talk about in the post (check /extras for more pictures!)
Also in the library you'll find:
- TimeKeeper: the stopwatch class
- FlagMessanger: communicate between nested classes
- 32-bit versions of both the TimeKeeper and TimerModule for use on faster processors. They operate with microsecond ticks rather than millisecond ticks.
- A seven-segment display wrapper for our 7-Segment Display
- A collection of panel parts for implementing hardware - still in progress
And as development continues, these modules will be added:
- Dynamically assigned linked list of objects
- Circular buffer with averaging
- RGBA color mixing for Arduino
Let us know what you think below!
I wanted to present how this engineer thinks, but I also wanted to give out something that may be useful to someone. If you gave it a whirl, let me know what your reaction was.
Keep on thinkin'!


Another simple way to do away with delay() is to store millis() at the beginning of a function, and check if enough millis have passed upon the next execution. Works for me and pretty straightforward.
I also keeps the timing right for any processor since it allows for the function execution time to vary.
That's how I started! It's an easier way to understand because it's all 'right there' where the action happens in your loop.
I generated this code as an alternate because I wanted a method that was durable longer than the the max size (even though 50 days is pretty good) and so I could avoid all the global variable declarations. This saves the time within the timerModule object to keep everything neat and tidy. I'm not the best at keeping things straight when I have 10+ timers going on so I devised another mechanism.
Thanks for bringing up millis(). It's way better than delay(), and easier to understand then my classes! I just want people to think, try, and learn.
This is the common way to do it on the Arduino.cc forums, based on the BlinkWithoutDelay sample sketch. User Robin2 (not me) on the forums has posted a couple really good threads expanding on BlinkWithoutDelay:
That second (pinned) thread should really be required reading for beginners who are trying to do things more complicated than the sample sketches.
The first thread is a great example! If anyone thought my method is needlessly complicated, start here!
I'm taking this as a lesson where it's good to read the sparkfun blogs. Because, I wrote this a couple of days ago! So, yea, everyone, read sparkfun. Btw, I think I know a better trick for when the millis() timer rolls over. The trick is to never comare two times with each other but to, instead, subtract first and then compare with zero. Here's my version:
One of your articles inspired me to write a fairly extensive framework for creating state machine based sketches called 'Automaton'. It can be installed via the Arduino library manager or found at:
https://github.com/tinkerspy/Automaton
Documentation and tutorial:
https://github.com/tinkerspy/Automaton/wiki
Unlike the other Arduino state machine libraries it uses a table driven state machine concept in which every machine is an self contained object It allows you to define state machines that can be shared as stand alone Arduino libraries (dependent only upon Automaton) It comes with a collection of predefined reusable state machines for handling buttons, blinking and fading leds, detecting pulses, monitoring analog inputs, timers and receiving commands over serial communications. State machines can communicate with each other via messaging queues.
Bill from Adafruit tackled this very issue in a trio of articles that I found a great example of Object Oriented Programming.
Part 1
Part 2
Part 3
This is a good example of the evolution of the amateur programmer: you ran into a hurdle and sought out a more efficient method, where you stumbled onto other hardware inside the machine you once thought you knew enough about; interrupts!
Imagine what you could do once you learned about the other embedded features waiting to be uncovered! And yet, imagine the time period where these things had not yet existed on a single chip...if at all
Always read your datasheets, and research certain parts of the micro, as they were put there for good reason,mostly stemmed from the long evolution of hardware and software.
You may be interested in learning about other RTOS models out there
This is great! I had a lot of thought while trying to figure out how to say what I meant. One that didn't make the cut was hardware level programming - something the Arduino sucks at. Coming from an EE education, my first real microcontroller experiences were with the MSP430. It has great HW resources that could really be bent to many functions with configuration. You could write whole programs where the main loop was while(1);
This is part of an effort to detach from the hardware layer and take a software approach, something that Arduino is good at, but I didn't have any experience. I haven't made the leap to RTOS yet though, stay posted. I'm always battling if I should make things more or less abstract.
Thanks for the encouragement! Running some sort of RTOS is on a mental list of new projects to start/learn.
This is the beginnings of a RTOS, I have been using FreeRTOS lately on ARMs, it's very convenient to have, saves reinventing the wheel over and over. Thanks for the nice write up and source.
Thank you. FreeRTOS is one I looked at one upon a midnight dreary and will probably revisit. This is a middle point between RTOS and single task programming. Sometimes the task is small enough that I don't want a faster processor just to support the architecture of the system. The example's at 421 bytes ram and 3340 rom for 3 intervals.
The Classical Arduino Programming model is based on polling. Also, it dumbs down the c language (e.g. no need to declare forward references, no need to define types or fiddle with makefiles, etc.) in order to make it easier to learn and focus on problem-solving. Then, through the magic of open source, the student is able to read all of the library code and move to a higher level. Along the way we are exposed to the magic of c++ classes.
Another approach to the problem of riding a bike and chewing gum at the same time is the Scheduler Library. This takes more memory, but as we move into the SAM chips we have more memory.
We could also look at the Arduino IDE as an easy step into the more professional Atmel Studio IDE. The programming model there is somewhat different, with more emphasis on interrupts and semaphores, and with many more options than the beginner needs.
There is more than one way to skin an elephant.
Hmm, the scheduler library. I didn't know this existed. I took a cursory look at the doc page, I'll download it and see how it all works. Thanks!
The Atmel Studio is way more professional. I'm used to the professional tools and have always chided Arduino, until I became stubborn about it and proclaimed "it has to be possible". Using Arduino has taught me many things like figuring out my topology before heading to programming land, because it's impossible to debug. Also, the unit test. I really miss breakpoints though!
I wouldn't say impossible to debug. Just a bit more fiddly, and requires dedication of some parts of the architecture to debugging purposes. Either I/O pins to blink LEDs that you need to remember what they are for, or dedication of the UART for troubleshooting. That can lead to some hard decisions when using shields that communicate with UART (either hardware or software) like the ethernet and gps shields.
I remember one fateful evening when I was wondering why my diagnostic LED didn't seem to be working like I expected it to. For simplicity I wanted to use the on-board pin13 LED for diagnostics. But, I was also using the hardware SPI bus on an UNO, where pin13 is SCK... My forehead got a little flatter that evening... ;-)
I love this post, and feel it would be very useful if I understood what was being said. I too hate delay()!