
Welcome to a new blog post series we're calling "Tech Talk Tuesday," or T³. Each Tuesday, Shawn, Sarah or Nick will take control of the blog and talk about ... whatever they want, really. From projects, to current events, to teardowns, to electronics concepts, we've given them free rein to discuss the stuff in their endlessly engineering minds. If you have suggestions for a topic you'd like to see them cover, let them know in the comments!
A few eagle-eyed viewers on the blog last week recognized the glowing robot head over my desk as belonging to FLCL's Canti. I was psyched to see so many SparkFun/FoolyCooly fans, but it occurred to me that I never did a proper write-up about that build. So I went back through my photos and found a handful of build pics. Let's see if I can pull together an entertaining build log. But first, why?
In 2014, Mike G. (Engineer Extraordinaire) and I followed Dia puppy dog-like into the majestic wonderland of fandom that is DragonCon. If you've never heard of DragonCon before, just let these words wash over you: Atlanta, Labor Day weekend, world's largest fantasy/sci-fi convention. Basically, the world's biggest nerdfest engulfs Atlanta, Georgia, for a weekend of the most epic cosplay, awesome panels and fantastic community that anyone could imagine. We had come along this year to help put on a few SparkFun E-Textiles workshops (which were a big hit! Thanks, DragonCon folks!) but also to just enjoy the spectacle of it all. Personally, I am wont to play dress up for any occasion, but as a SparkFun ambassador, I figured I had better build something with that electronic pizzazz.
Of course, my cosplay white whale is to pilot a full-scale Tachikoma, but that's not a first year at the con sort of project, so I scaled back to a more manageable, humanoid robot. First off, if you aren't absolutely opposed to Japanese animation, you should have watched FLCL by now. Go ahead, I'll wait. It's only a few episodes, and the mixture of off-the-wall humor, unconventional style and rocking all-Pillows soundtrack make it a really unique series. I was revisiting FLCL for probably the 30th time when DragonCon was coming up, and Canti struck me as the perfect cosplay opportunity for a few reasons: his figure is instantly recognizable so I could get as elaborate or as lazy with the costume as I wanted, he incorporates a lighted display, and he's not a serious character. He also doesn't speak, so walking around the costume floor would be a pretty low-pressure, no-impersonations-needed kind of affair.
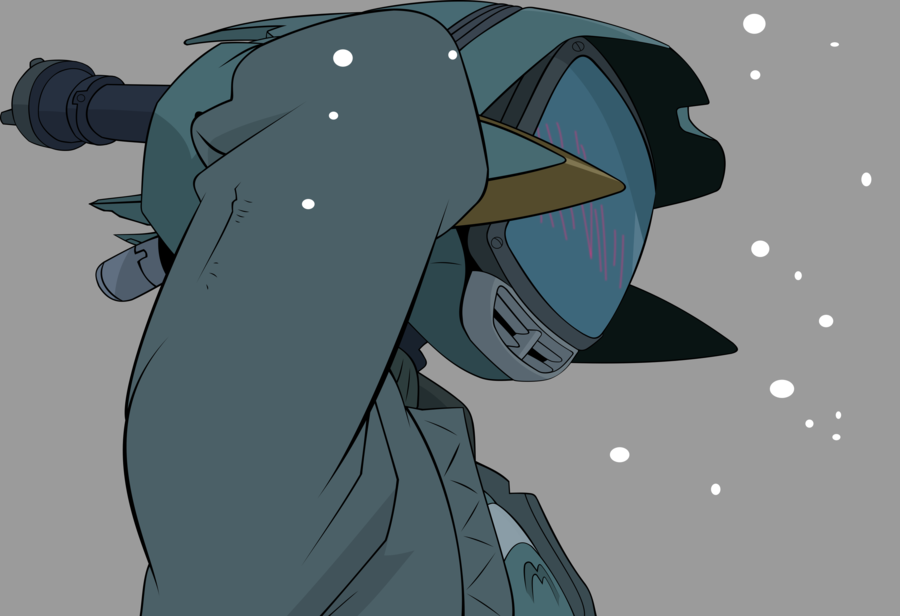
Image courtesy of MathewRL
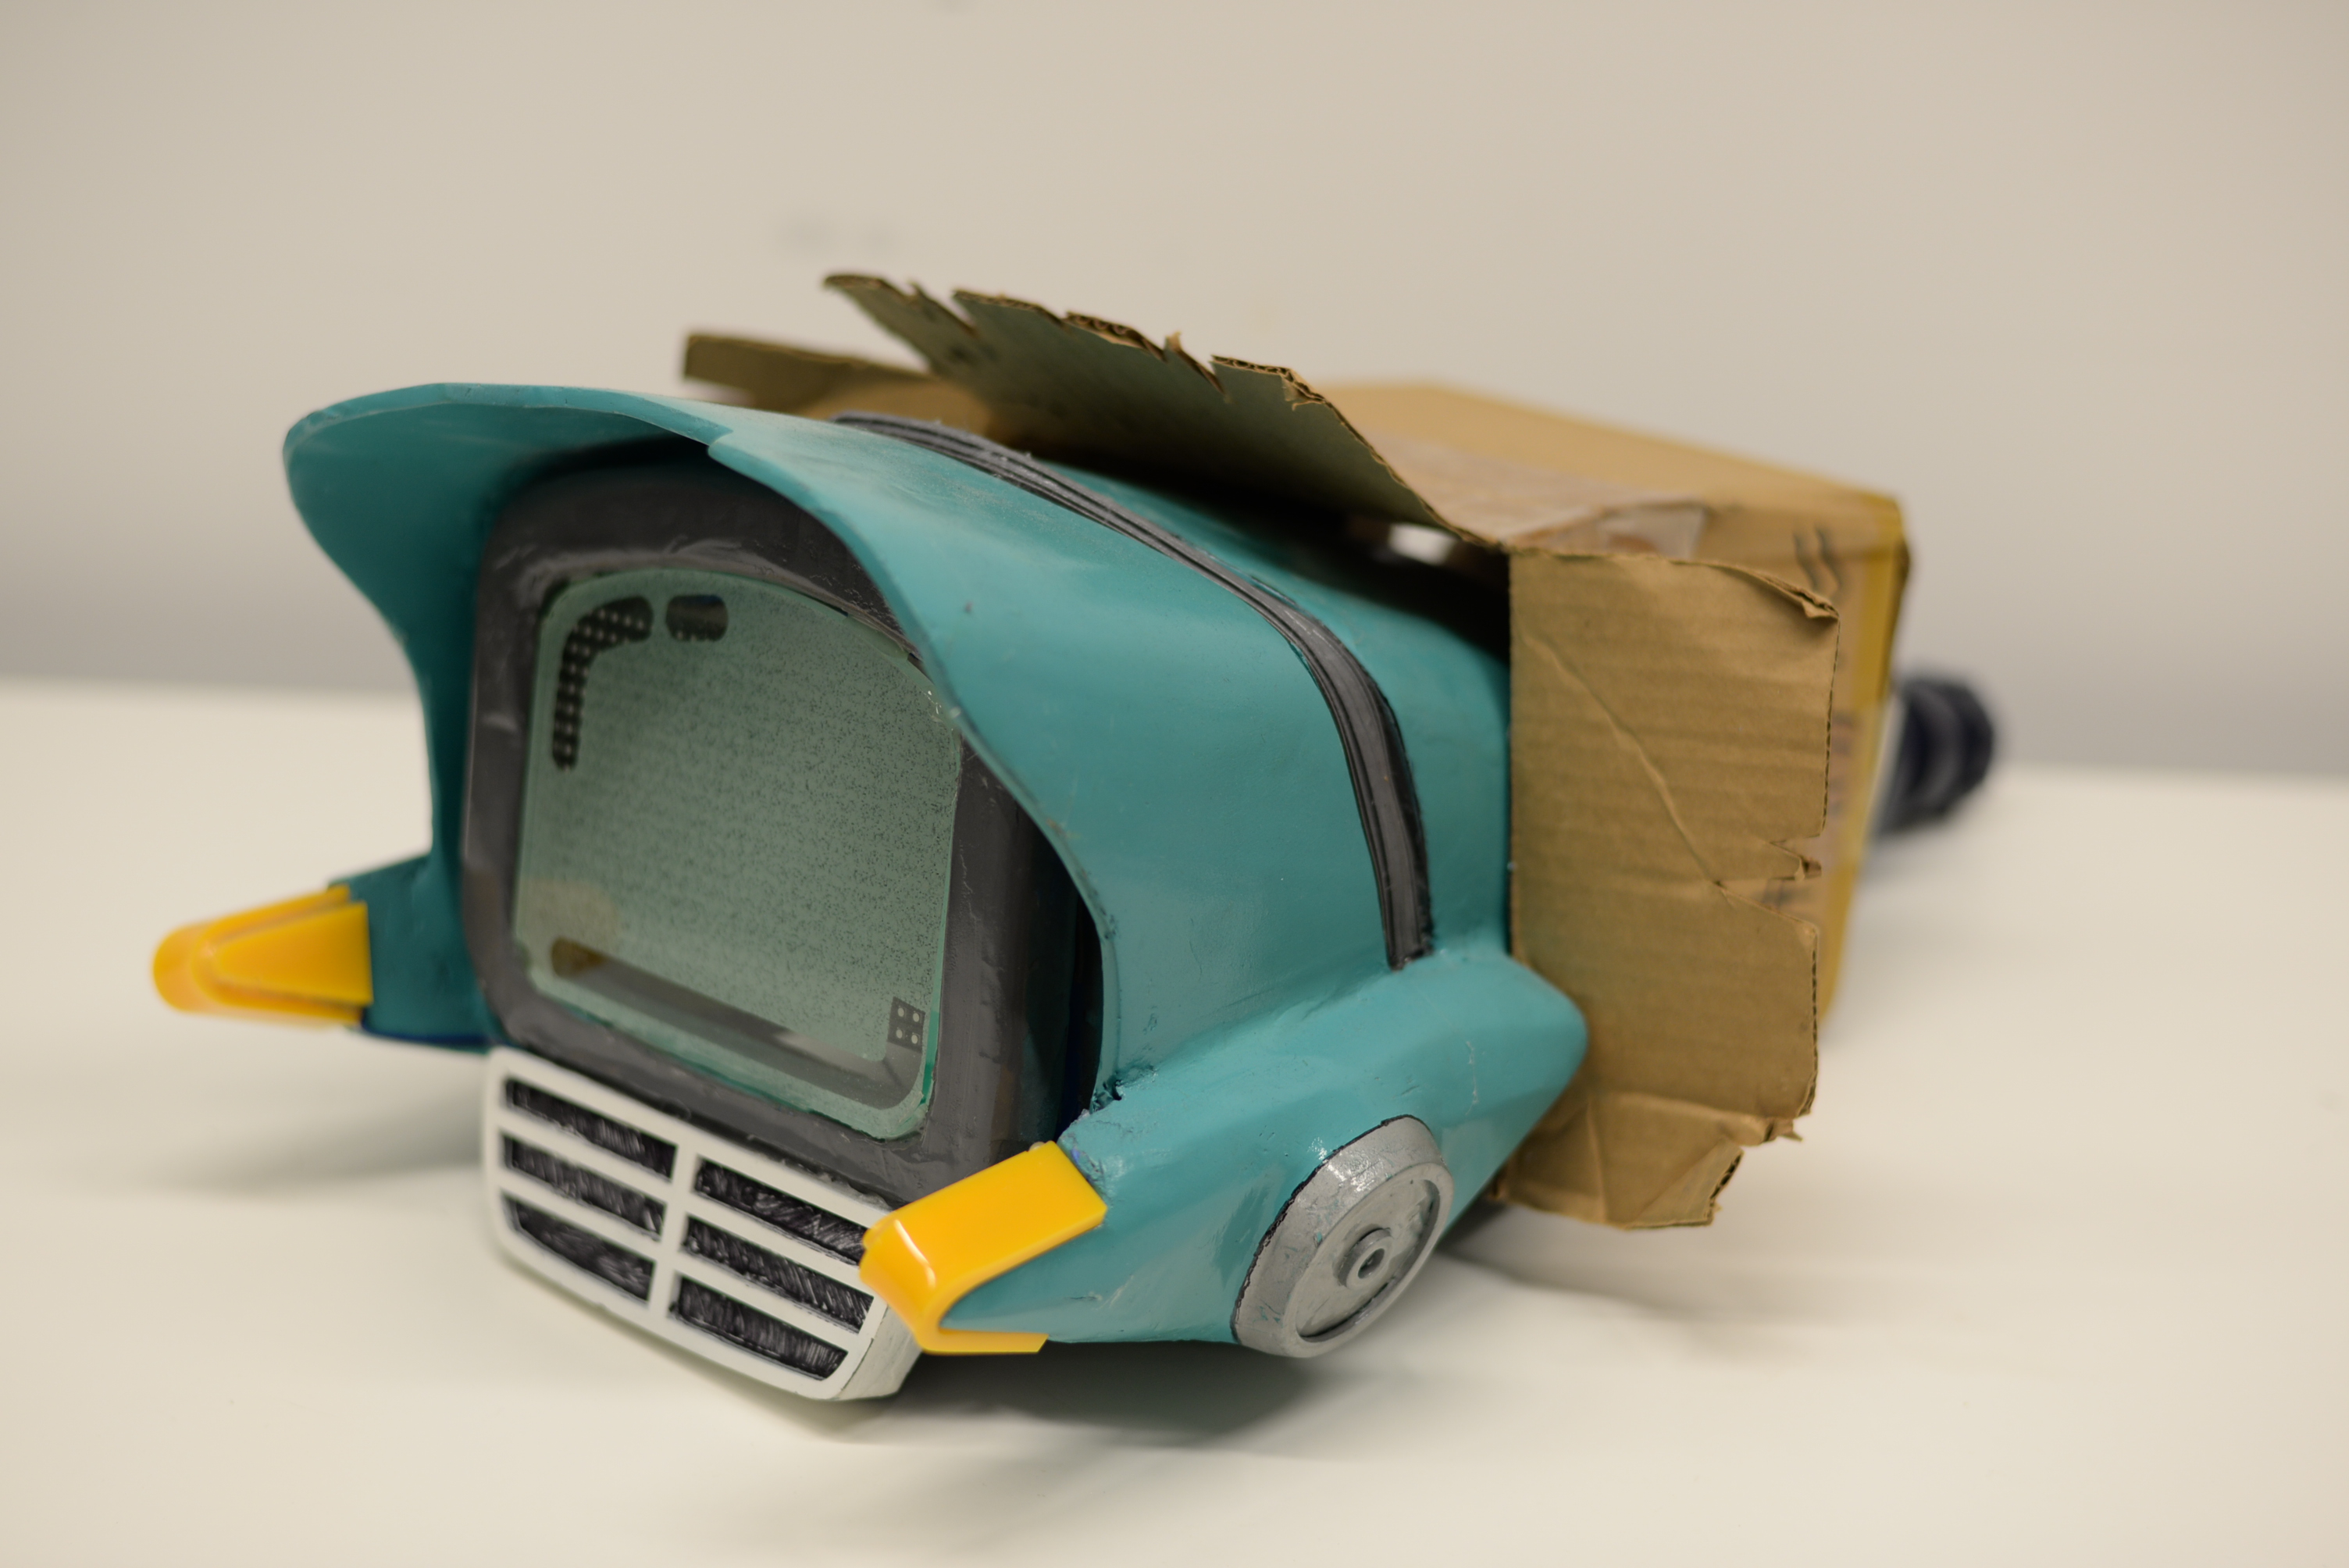
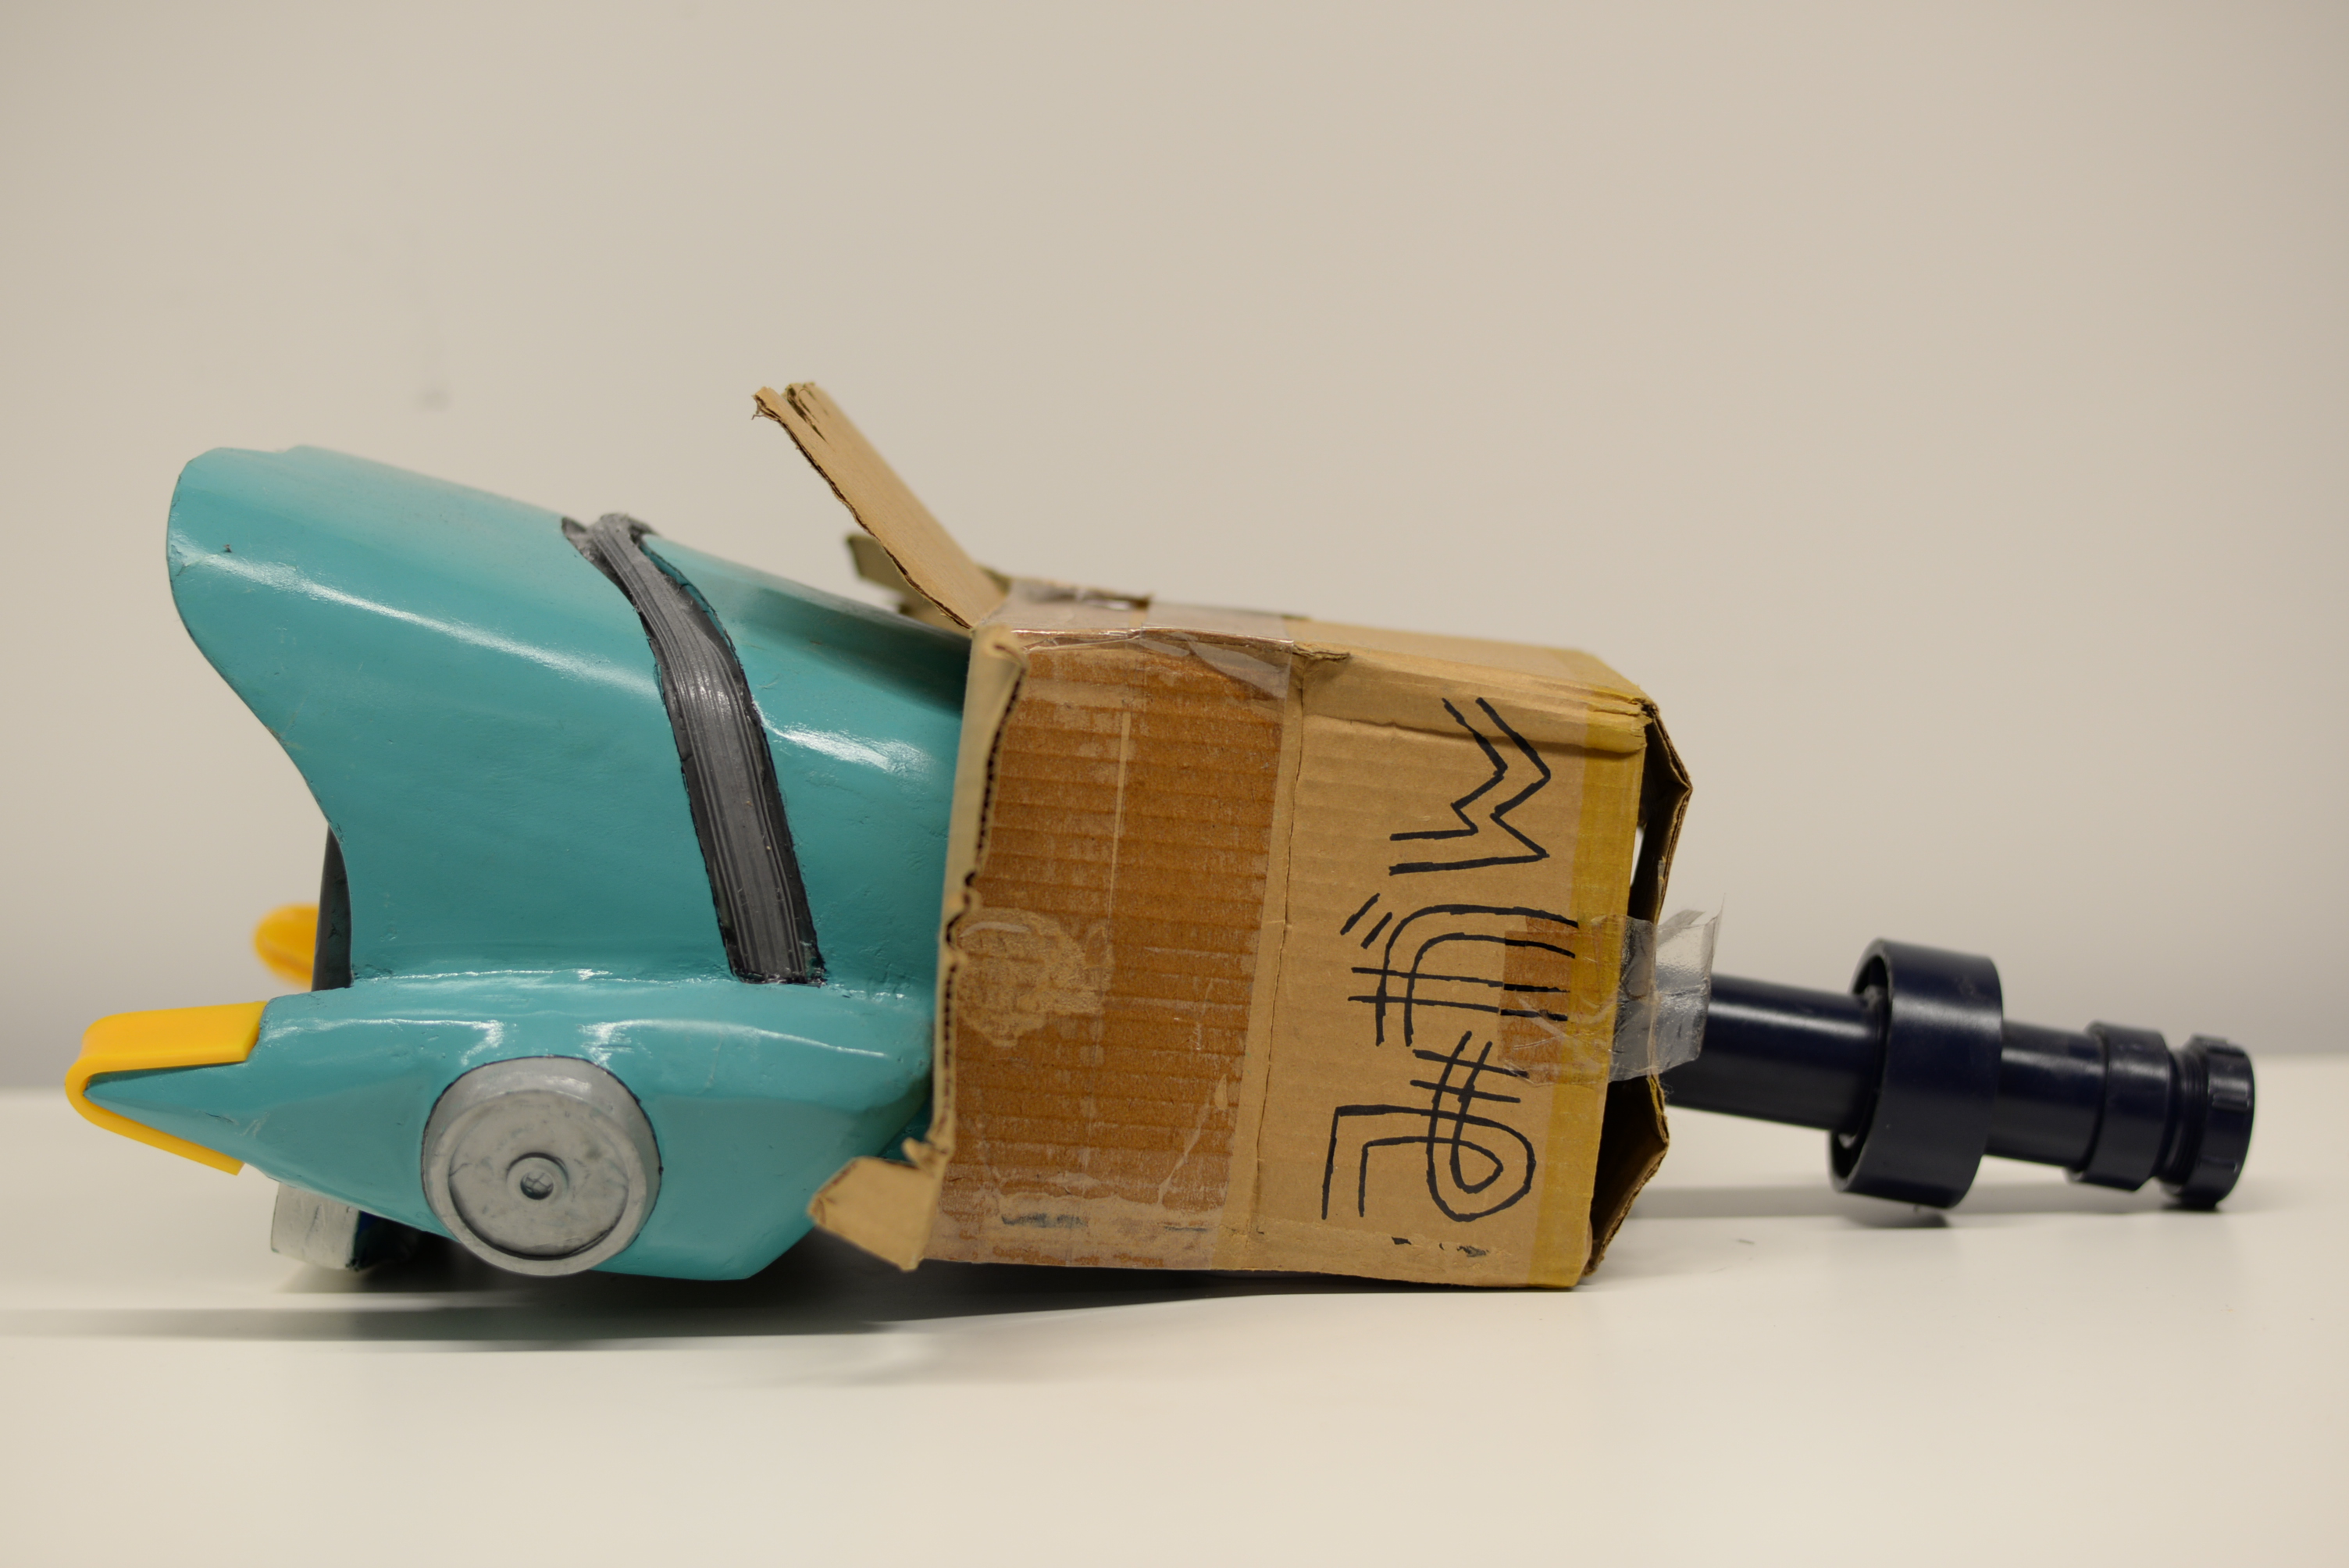
Within the (admittedly hard to follow) fiction of the show, Canti is a robot manufactured by a company called Medical Mechanica in order to capture a powerful space pirate named Atomsk ... but he spends most of his time doing chores for the protagonist's dad. He's a clumsy, bashful, lanky robot that doesn't really do much day-to-day. His head, which looks like an old television set, got smashed pretty good in the first battle of the series, which is why he spends most of the show with a cardboard box over the broken portion in the back. The family dresses him in a greenish raincoat to (very poorly) hide the fact that he's a robot while he goes to the convenience store to get them soda and, uh, special interest magazines.

Obviously, the centerpiece of this costume was the head. If I got the head right, the rest of the costume would barely matter. I went to the Google to see how other people had approached Canti cosplay and found a lot of really awesome-looking costumes but none exactly like what I envisioned. First of all, box-head Canti isn't the most popular version for cosplay. Personally, I really like the box because it's humorous but also hides the back of the assembly and gives me a place to hide the electro-goodies. Secondly, no one had yet attempted a functioning screen! Most people had built the structure of the head out of either pink foam or foam core. This is a pretty classic approach, but I needed a shortcut. So I went shopping at Target and found this:

Image courtesy of Target.com
What do you think of that? Beautiful, isn't it? Okay, it's a plastic trash can, and this isn't exactly the one that I found. But you can see how a small waste bin would have the perfect shape and general size for the robot head in question. I took my waste bin home and stuck it on my head -- not to hide from the work I was making for myself, but to measure how much of the material would need to be removed. After cutting away enough of the trash can for me to fit my head into the side, I started making it look right.
Step 1 was to add the visor that covers Canti's screen and give the shape a little depth. I accomplished this by cutting the visor shape out of a piece of foam core and scoring it on one side with a razor so it would curve nicely around the trash can. A little spray-glue held it in place. The added dimension left some room for me to cut a channel out of the foam core around the top of Canti's head. Then, I cut a piece of foam core that would fit perfectly into the former top of the trash can and glued it into place along with a piece of pink foam, which I carved to form the bezel of Canti's screen. After covering everything in blue tape, this is what I had:
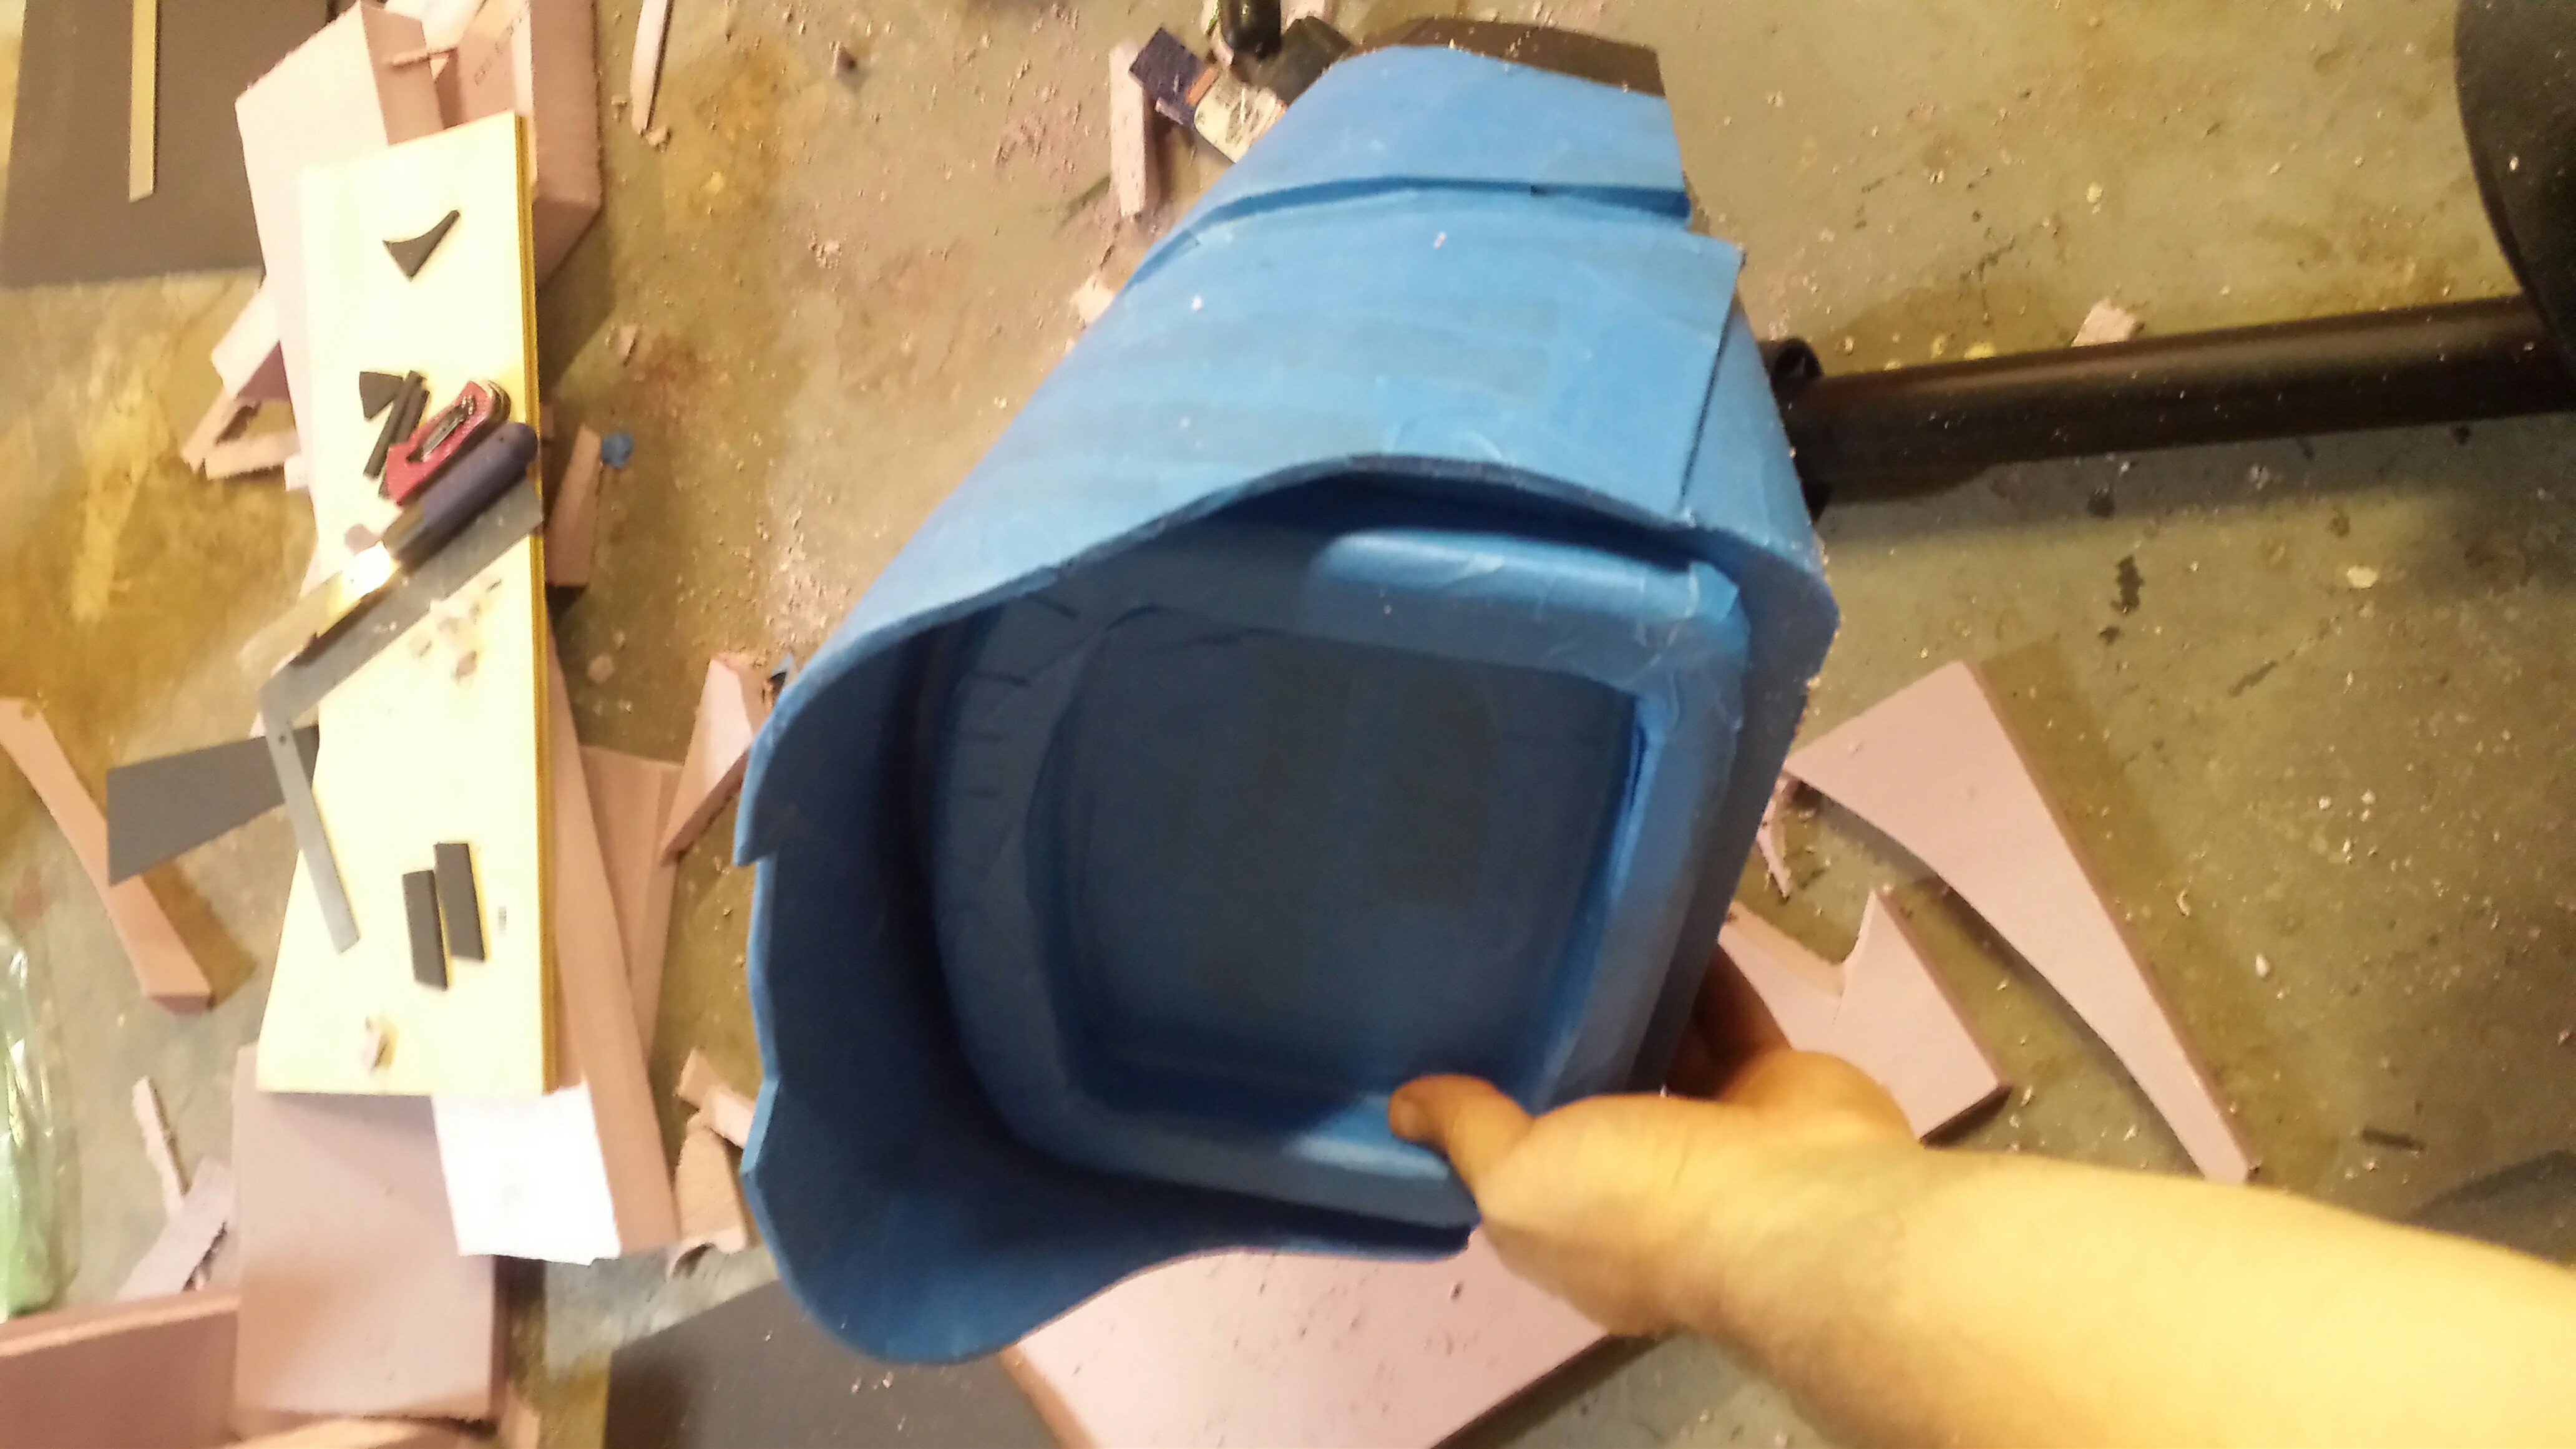
The blue tape served two purposes: it gave me a smooth surface and curved transitions between pieces for applying Bondo later, but it also made everything uniform in color so I had a better sense of the proportions involved.
My next step was to carve the little pieces on either side of his head. I chose to use good old pink insulation foam because I had some lying around and it's a lot less expensive than good high-density carving foam. It carves fairly well, too, if you're willing to do a lot of shaping with a chisel and sandpaper. After significant chisel-and-sandpaper time, and with the guidance of plenty of reference pictures, I was able to make a matching pair of these appendages:
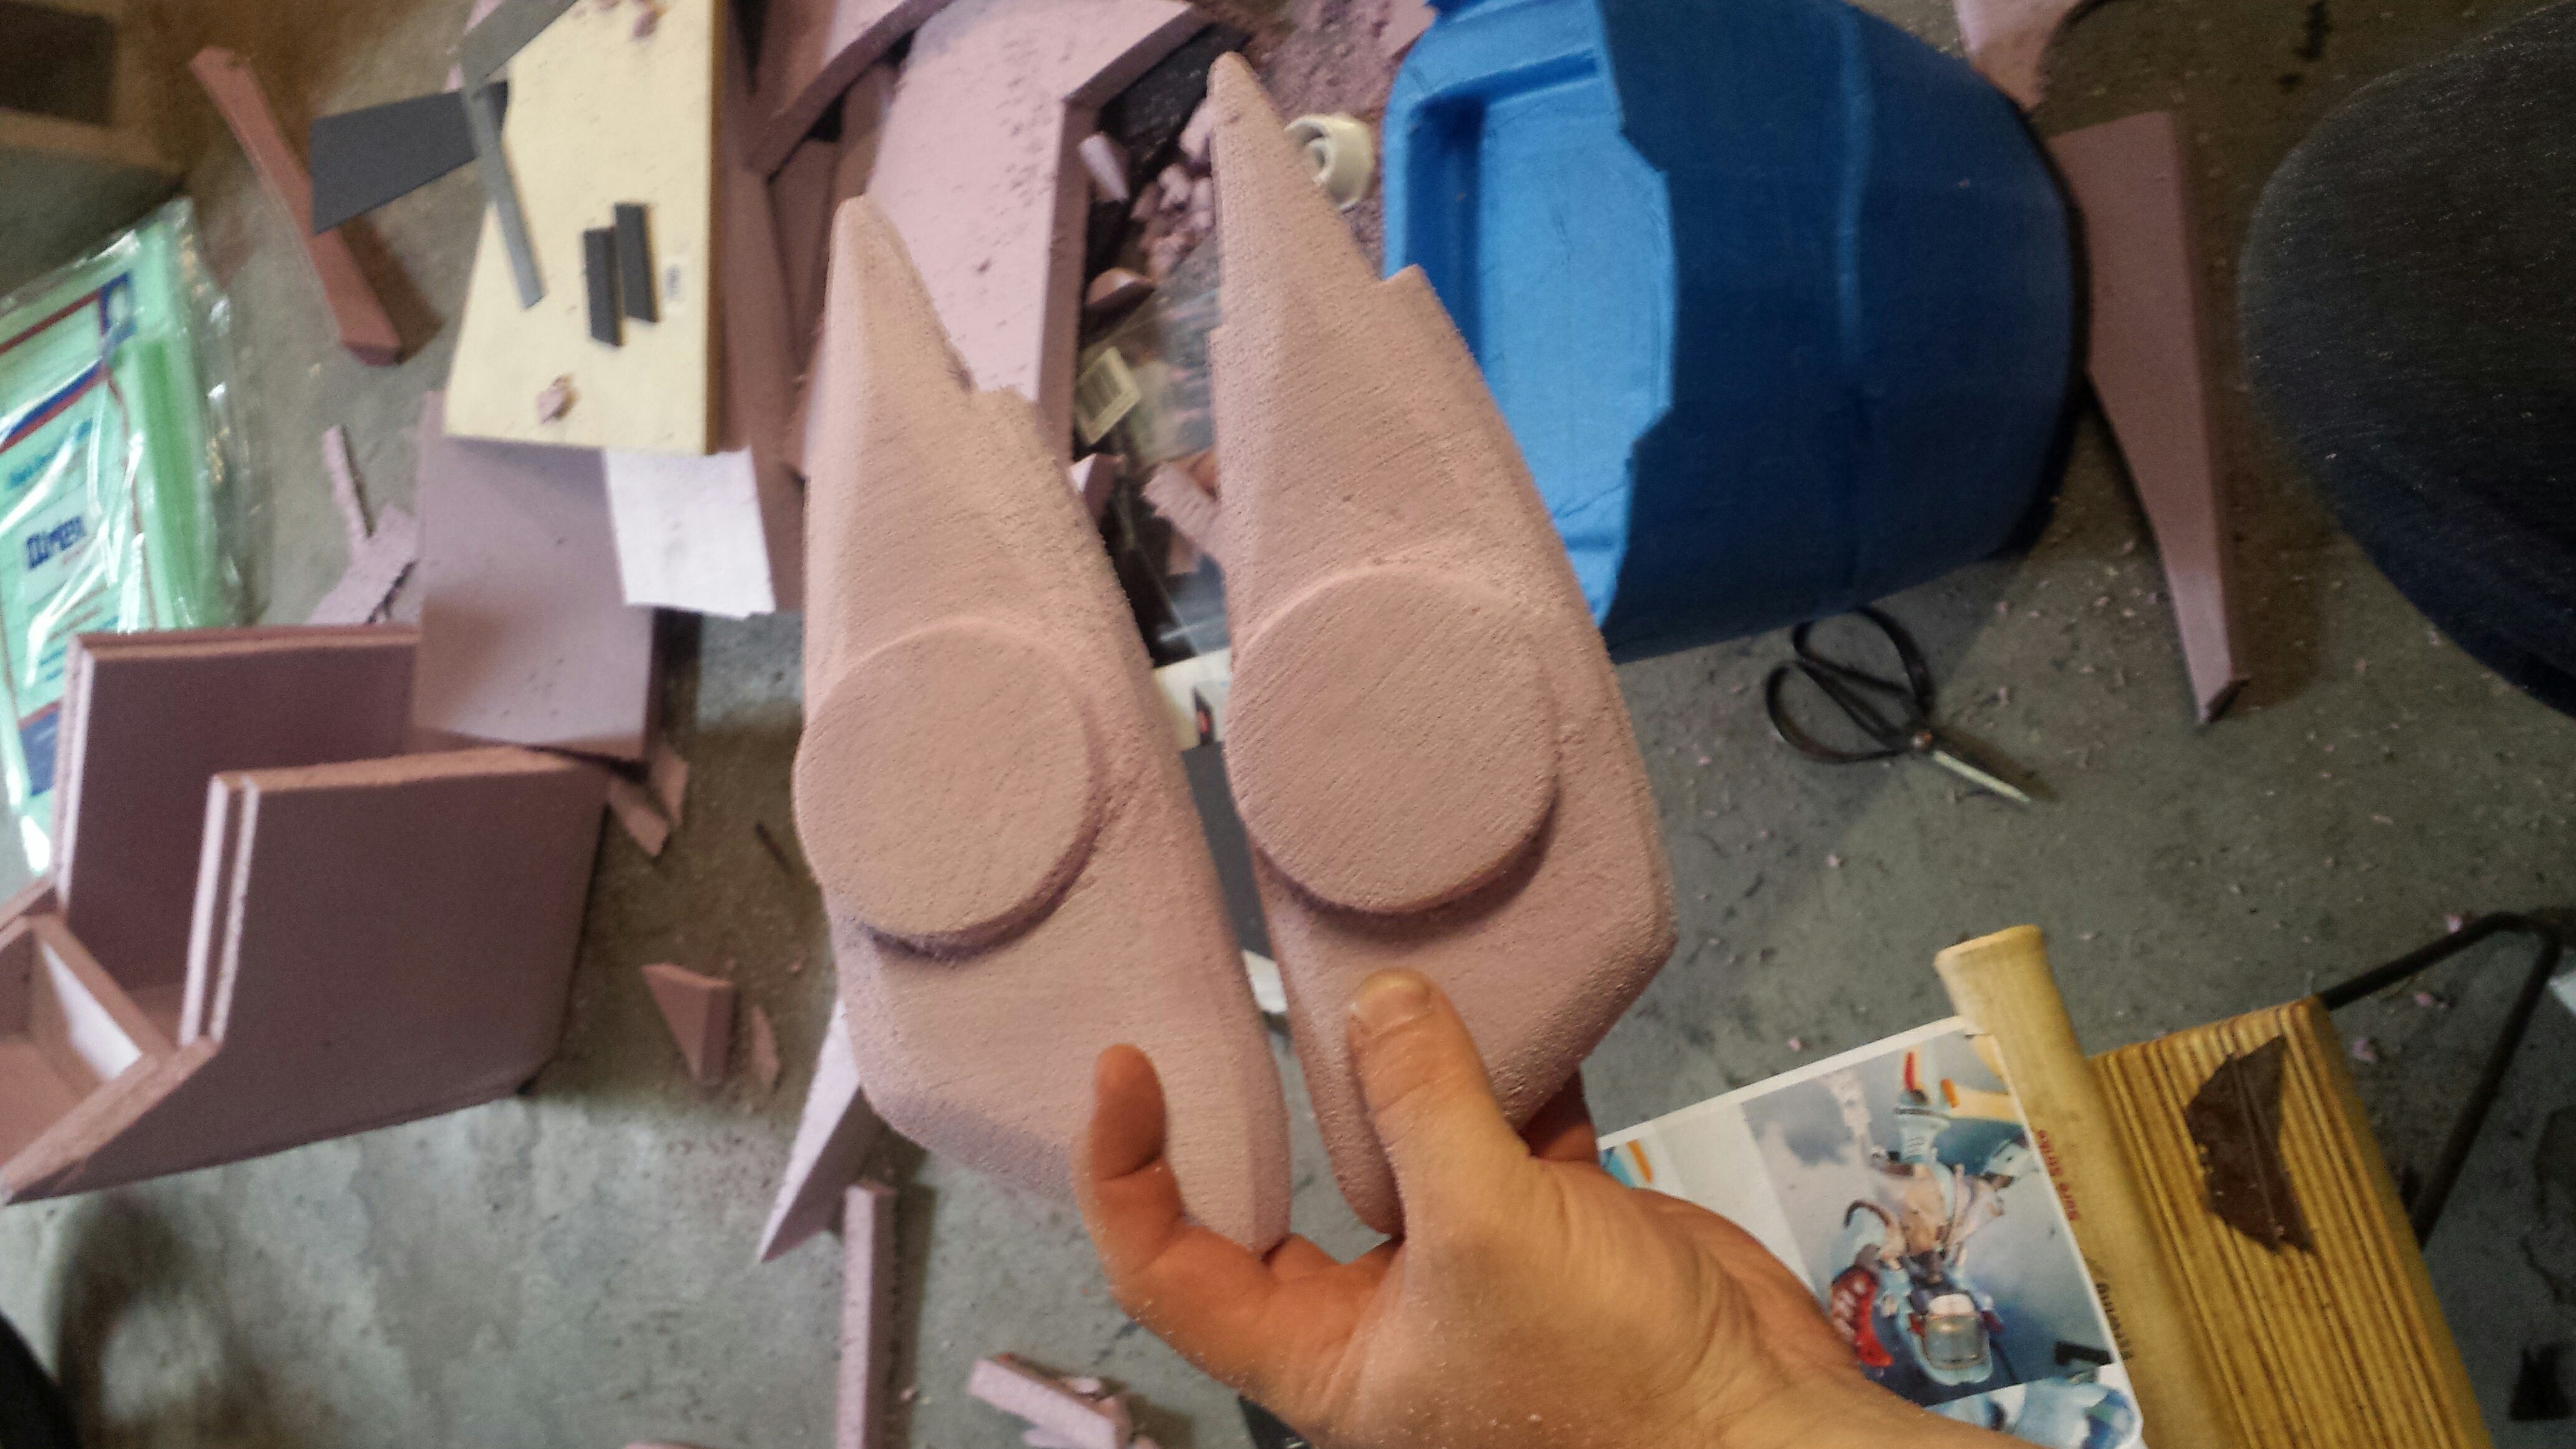
These, too, were covered in blue tape and glued into place. I used a similar construction technique for Canti's "mouth." Each of these pieces was later augmented with laser-cut acrylic parts to give them crisp edges. For the protrusion in the back of Canti's head, I chose an assortment of PVC pipe fittings that looked more or less like the "tube" that was protruding in the cartoon. This was made much easier by the fact that I could just bolt the whole thing to the back of the trash can frame without having to make it too pretty (it would be covered by a box anyway). Here's the construction with the PVC, grill and side protrusions in place:

Unfortunately, I don't have any pictures of the following steps, but I'll quickly explain how I took this basic shape to completion. First, acrylic shapes were added to the wing-shaped sides of the helmet as well as the grill. I also bent a few pieces of yellow acrylic to make rounded tips for the wings, which could be backlit with LEDs.
After all of the acrylic had been glued into place, I covered the whole thing in a thin layer of Bondo auto-body filler. Bondo smells awful, and it makes a terrible mess, but it dries rock hard and can be sanded ultra-smooth for a great paint finish. Bondo also helps to round out any rough transitions or fill small gaps. After the filler step came the worst step of all: sanding. Sanding Bondo is a monstrous process that turns everything around you dusty and smelly. I (and the makers of Bondo) strongly recommend wearing a good mask.
Once sanding was complete, I had a nice, smooth surface that was ready for primer and then paint. I painted the piece using rattle cans, but expensive ones. Spray paint comes in a wide variety of color and quality -- usually the higher the quality, the more color options you get. I used a combination of Montana MTN94 and Ironlak paints. Ironlak can be a challenge to work with because it's a high-concentration acrylic paint and can be thinner and more runny than a lot of people are used to. The colors available from Ironlak are incredible, though, so I bit the bullet, and everything turned out (mostly) fine. On the other hand, I've been using MTN94 for years on everything from art projects to public property larger art projects, and I swear by it.
After paint, final details were filled in with a Sharpie in order to preserve the cartoonish aesthetic. I cut big cartoonish rips into a suitably sized cardboard box and hot-glued it in place. I now had a Canti head with everything except an awesome screen.
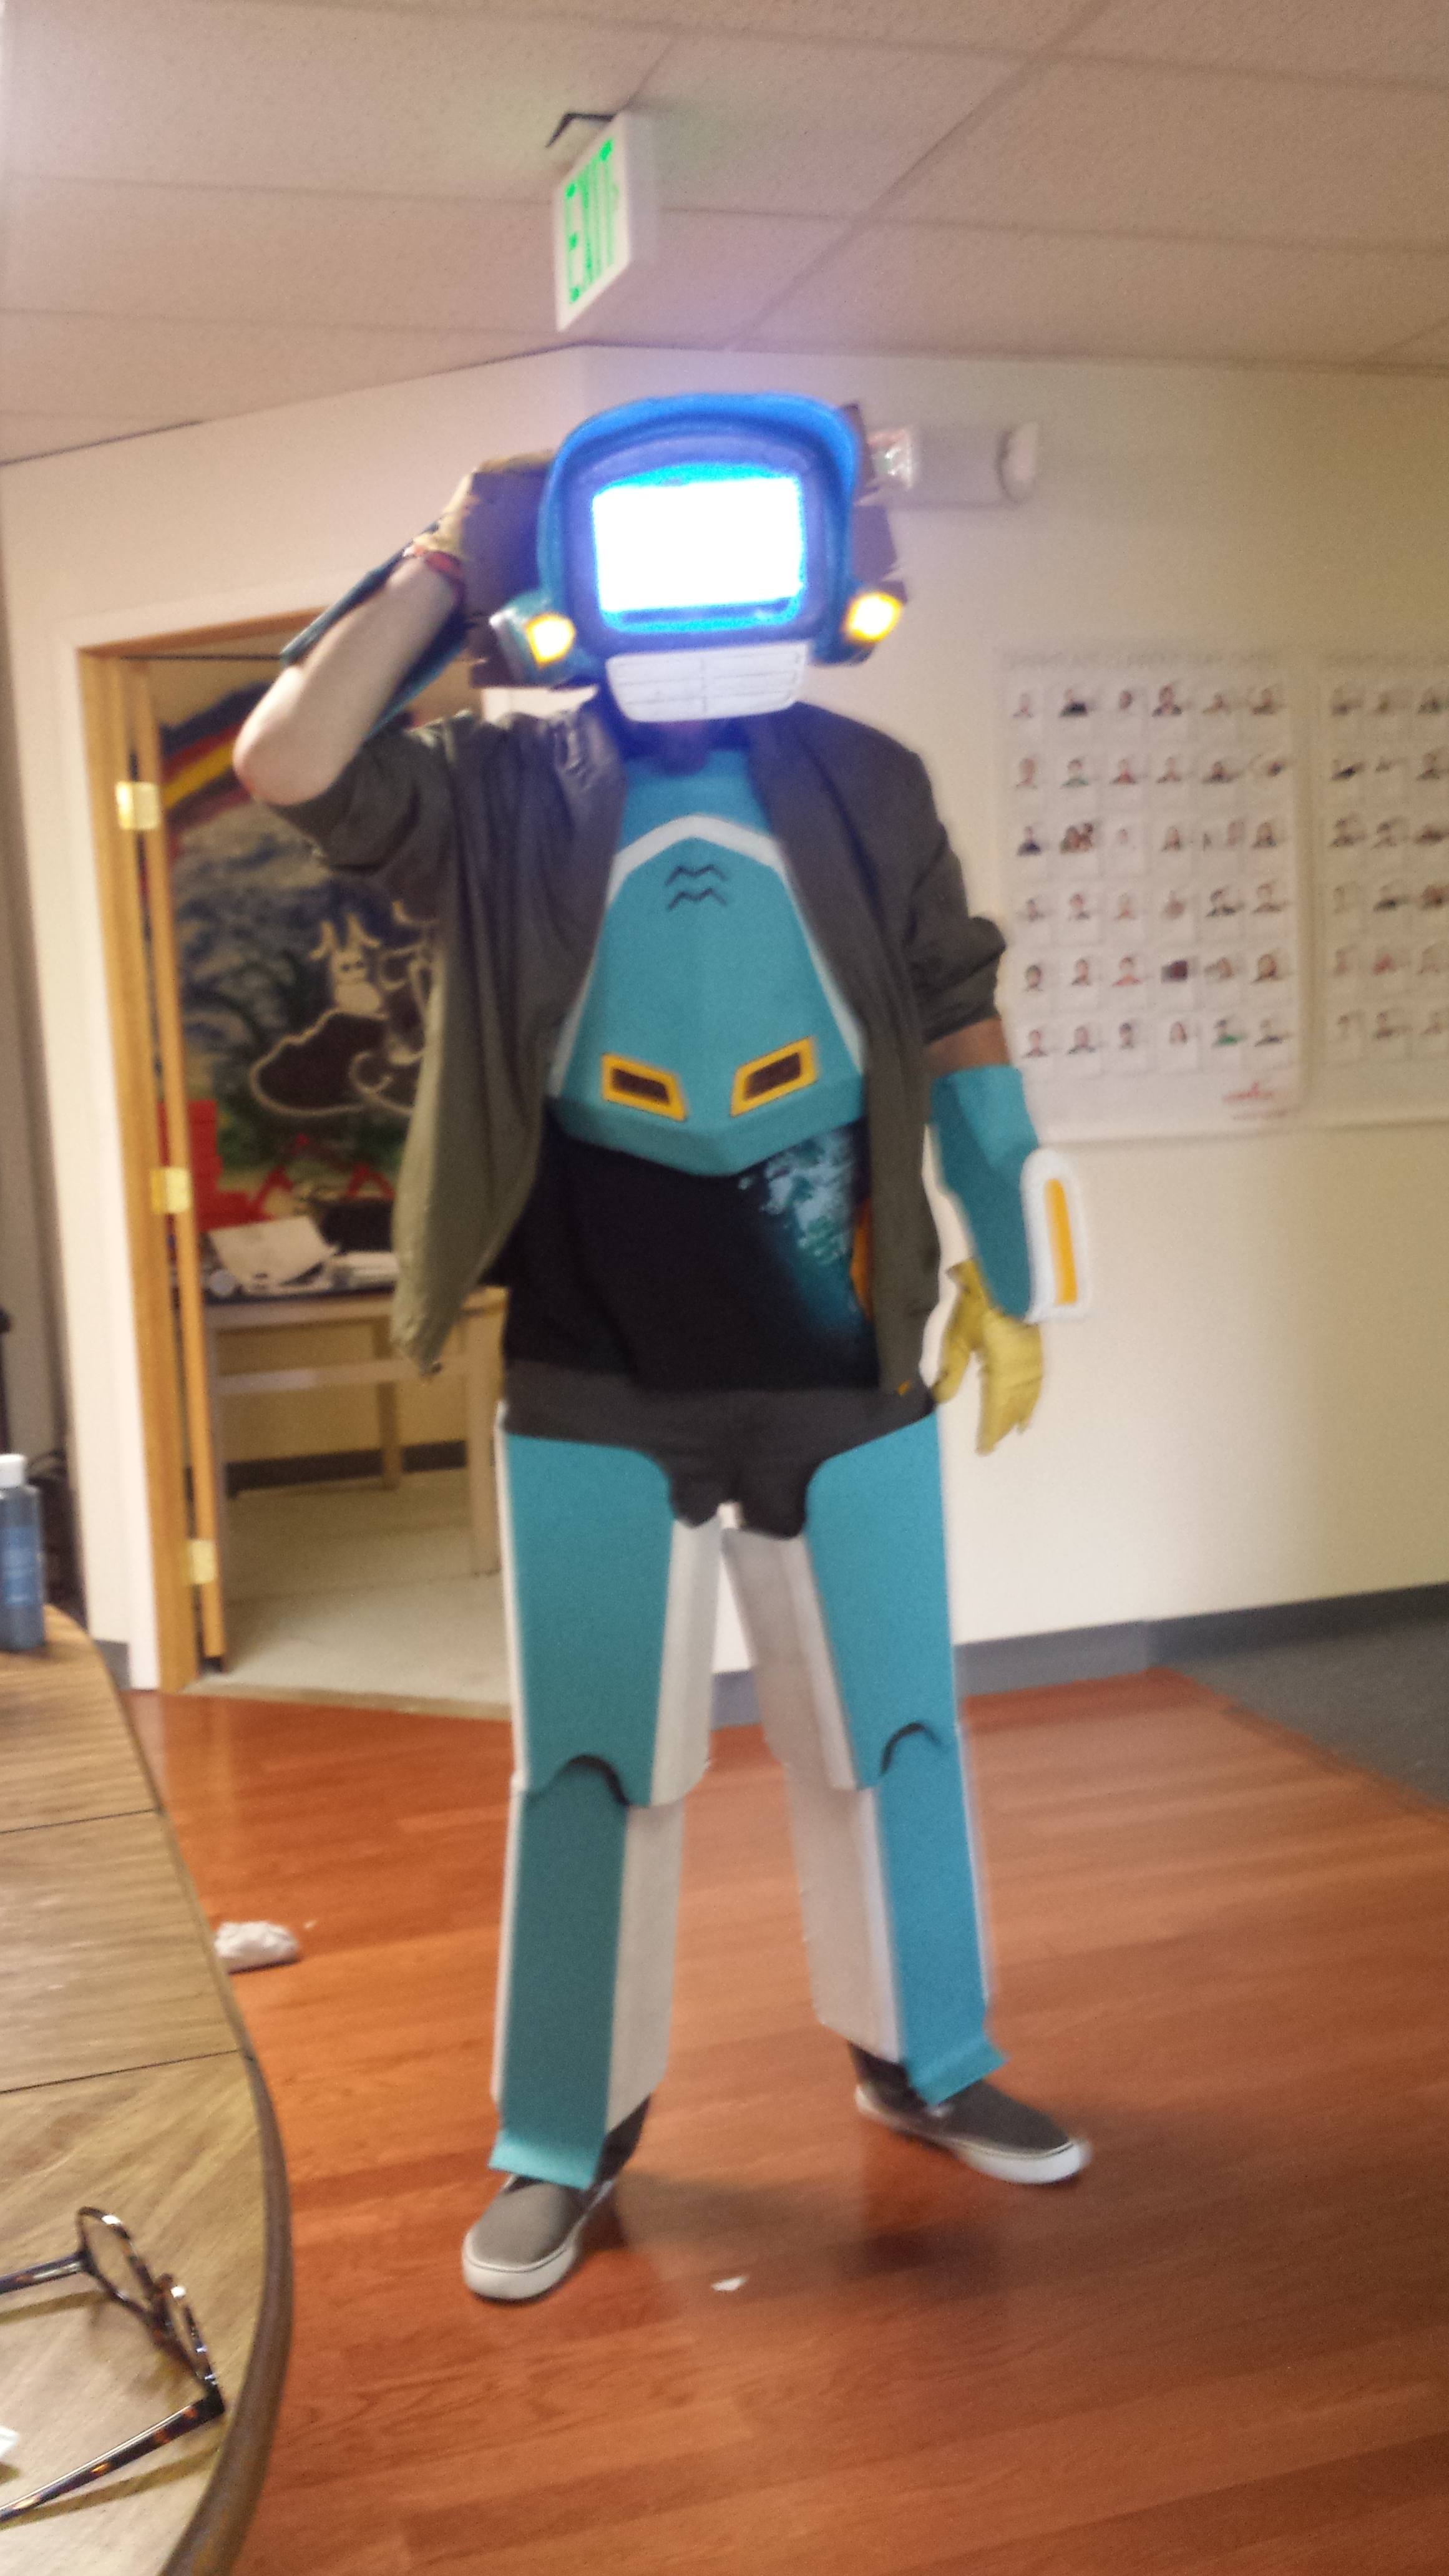
My Canti didn't have a lot of expressive range, but I think I covered the important ones.
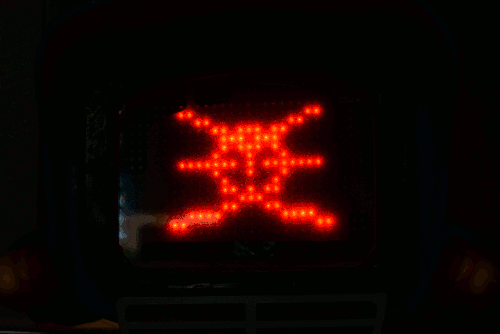
To achieve the screen effect that I was after, I chose to use one of our RGB LED Panels (actually, I used the discontinued 16x32 version). I picked an LED display over something like an LCD or TFT because I knew it would have to be super bright to attract attention. Also, the LED display can be controlled with an Arduino without issue. After installing the display with plenty of hot glue and wiring it to an Arduino Pro I typed up an animation loop for the screen. The code is pretty simple and uses Adafruit's LED matrix library to write simple shapes to the screen. For instance, the color bars look like this:
void colorBars(int wait){

  matrix.fillRect(1, 4, 5, 6, matrix.Color333(0, 0, 0));
  matrix.fillRect(6, 4, 10, 6, matrix.Color333(0, 3, 7));
  matrix.fillRect(11, 4, 15, 6, matrix.Color333(0, 0, 0));
  matrix.fillRect(16, 4, 20, 6, matrix.Color333(7, 0, 7));
  matrix.fillRect(21, 4, 25, 6, matrix.Color333(0, 0, 0));
  matrix.fillRect(26, 4, 30, 6, matrix.Color333(7, 0, 0));


  matrix.fillRect(1, 6, 5, 15, matrix.Color333(7, 0, 0));
  matrix.fillRect(6, 6, 10, 15, matrix.Color333(7, 0, 7));
  matrix.fillRect(11, 6, 15, 15, matrix.Color333(0, 7, 0));
  matrix.fillRect(16, 6, 20, 15, matrix.Color333(0, 3, 7));
  matrix.fillRect(21, 6, 25, 15, matrix.Color333(7, 7, 0));
  matrix.fillRect(26, 6, 30, 15, matrix.Color333(7, 7, 7));


  matrix.fillRect(1, 0, 6, 4, matrix.Color333(1, 1, 1));
  matrix.fillRect(7, 0, 12, 4, matrix.Color333(6, 6, 6));
  matrix.fillRect(13, 0, 18, 4, matrix.Color333(4, 4, 4));
  matrix.fillRect(19, 0, 24, 4, matrix.Color333(2, 2, 2));
  matrix.fillRect(25, 0, 30, 4, matrix.Color333(0, 0, 0));

  delay(wait);

}
And the randomly generated static looks like this:
void gibsonSky(int del){

for(int j=0; j<del; j++){

  for(int x=0; x<32; x++){


  for(int y=0; y<16; y++){

    c = random(0,8);

    matrix.drawPixel(x,y, (matrix.Color333(c,c,c)));


    }}

  }

}
The main loop just iterates over each of these functions from power up to power down. Speaking of power, keeping that many LEDs running for a few hours on the costume floor was going to be rough. I needed something that could be recharged quickly with a common charger, could be swapped on the costume floor, and had decent capacity. Luckily, I didn't need any more than 5 VDC so I used a nice, beefy USB Battery Pack and threw a few of them in my backpack. With the screen operating and the paint finished, the head was in tip-top shape. I'm pretty proud of how it came together:

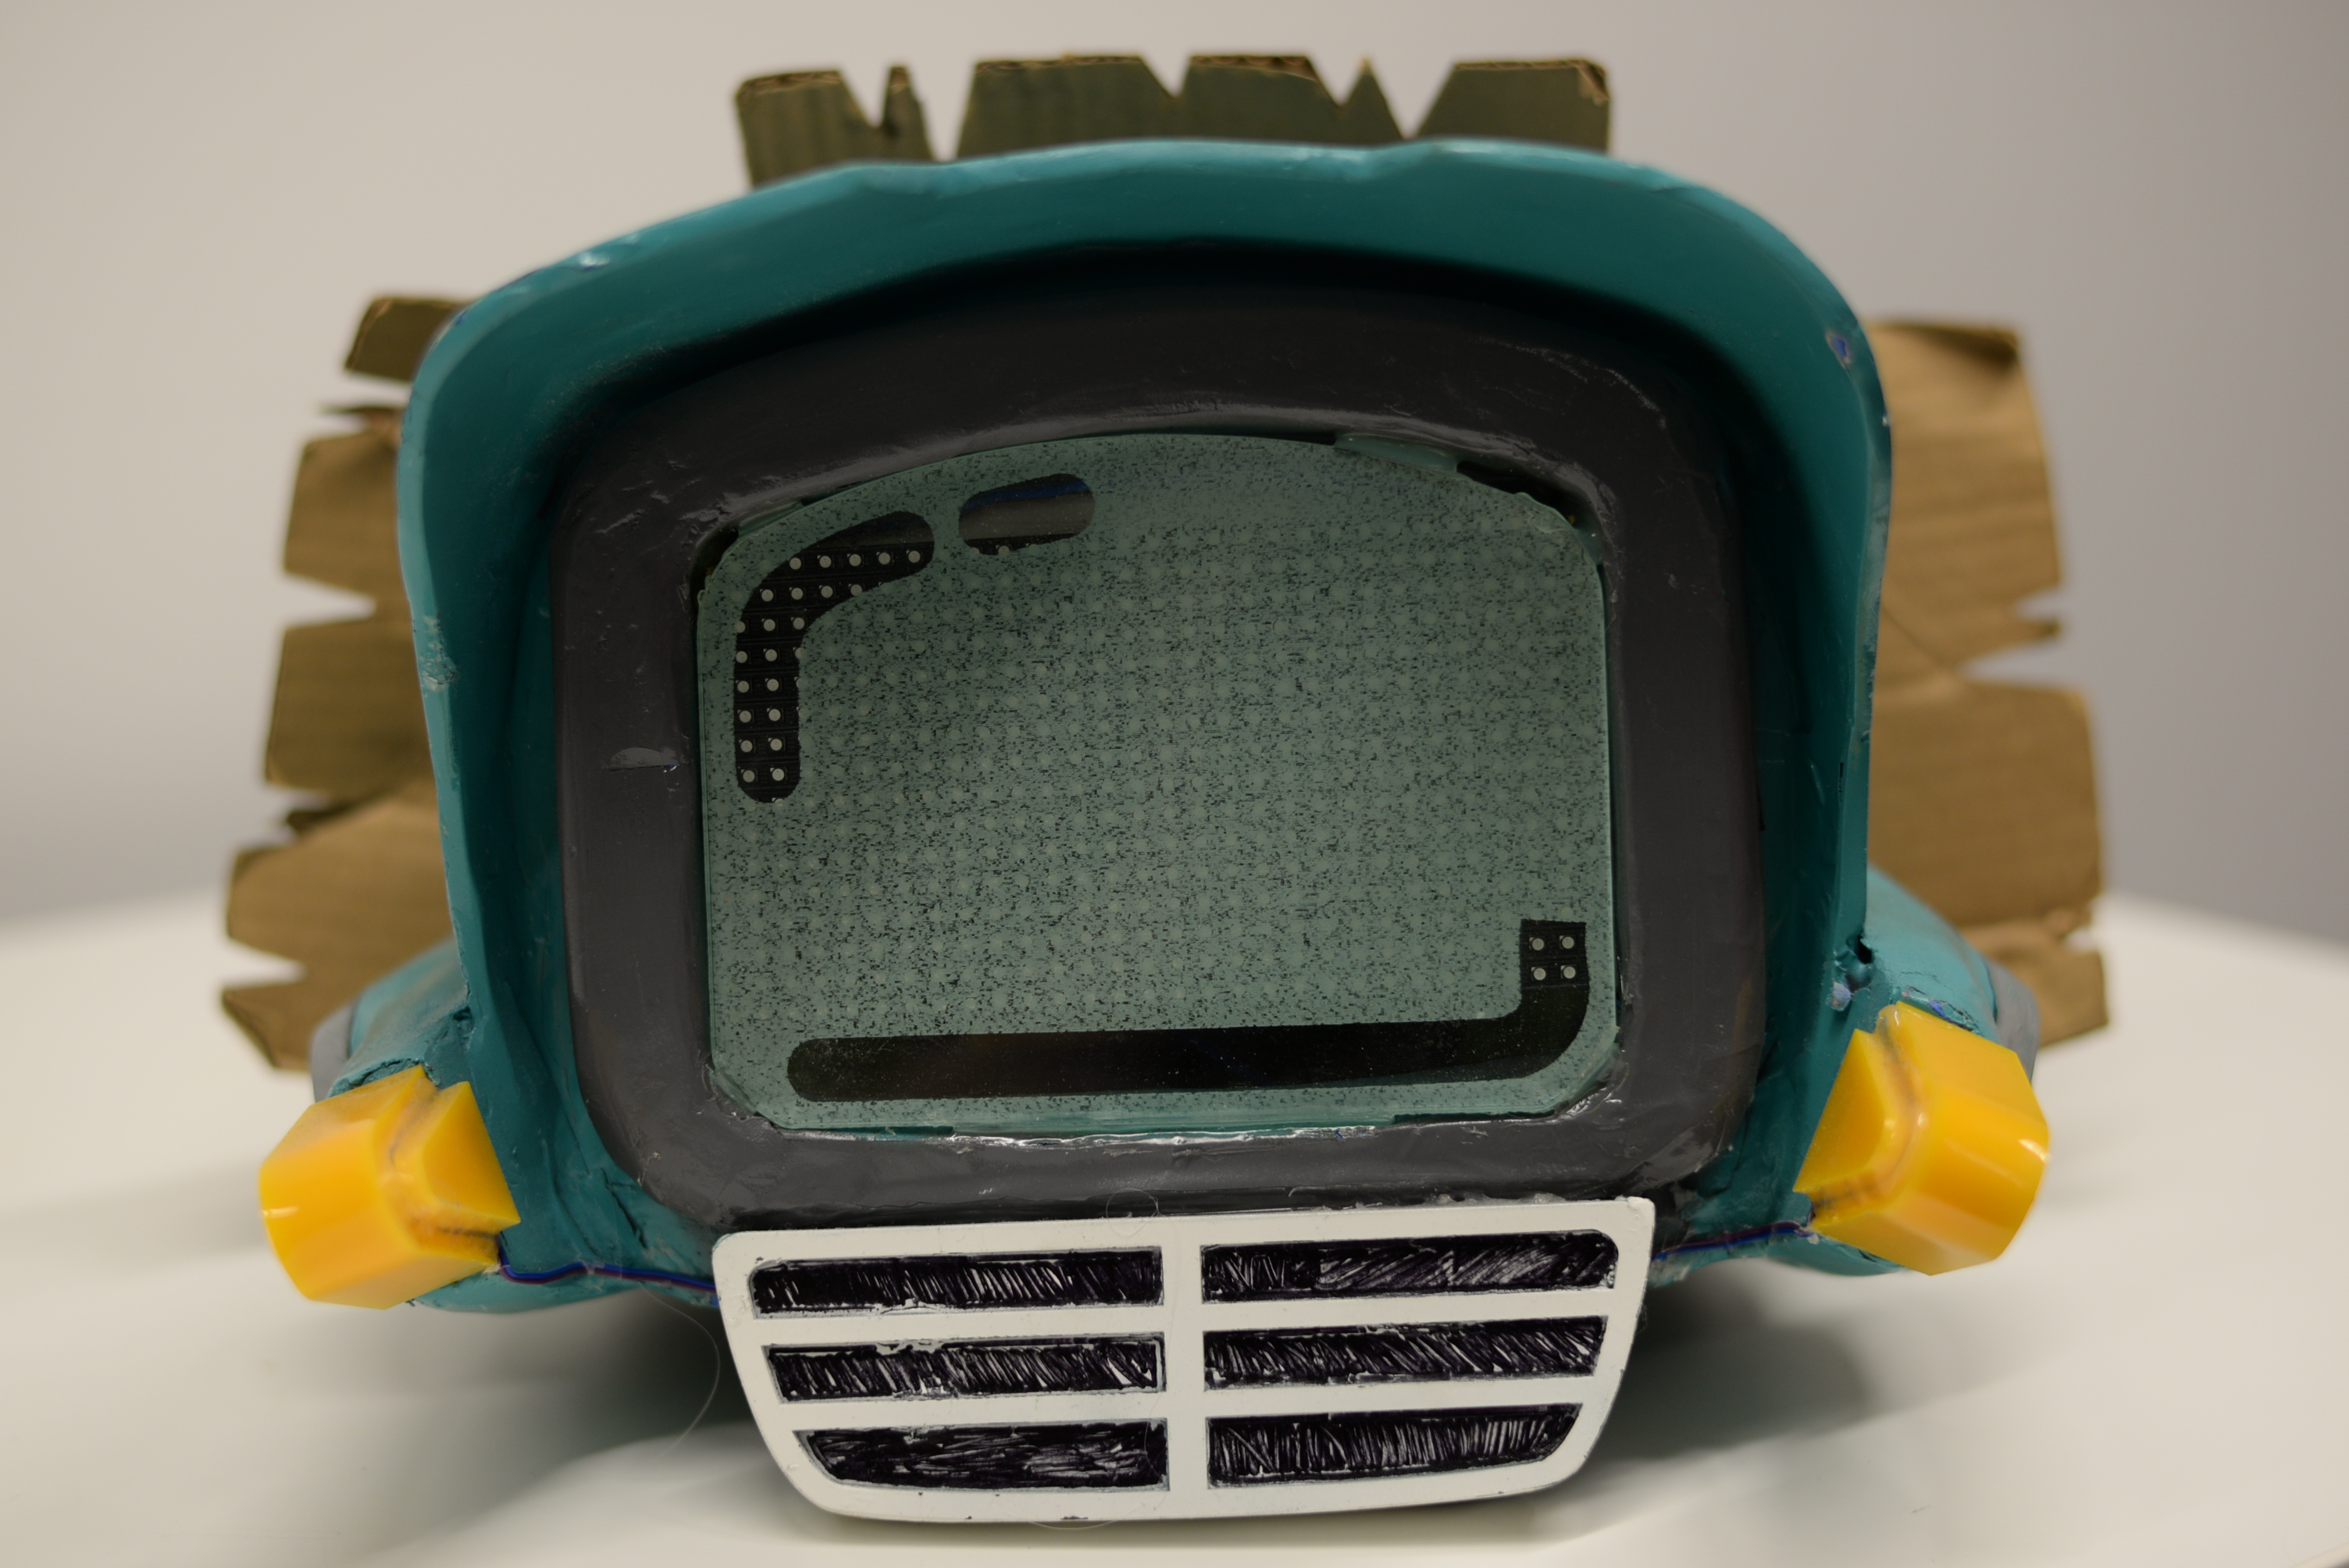
The laser-etched screen in front of the display acted as a diffuser for the LEDs and also hid my eyes. The cartoon-style shine lines around the outside were great camo, and when the display was lit, you couldn't see my eyes below it looking out just above the grill. Of course, in order to get my head to fit I had to fill the helmet with foam:
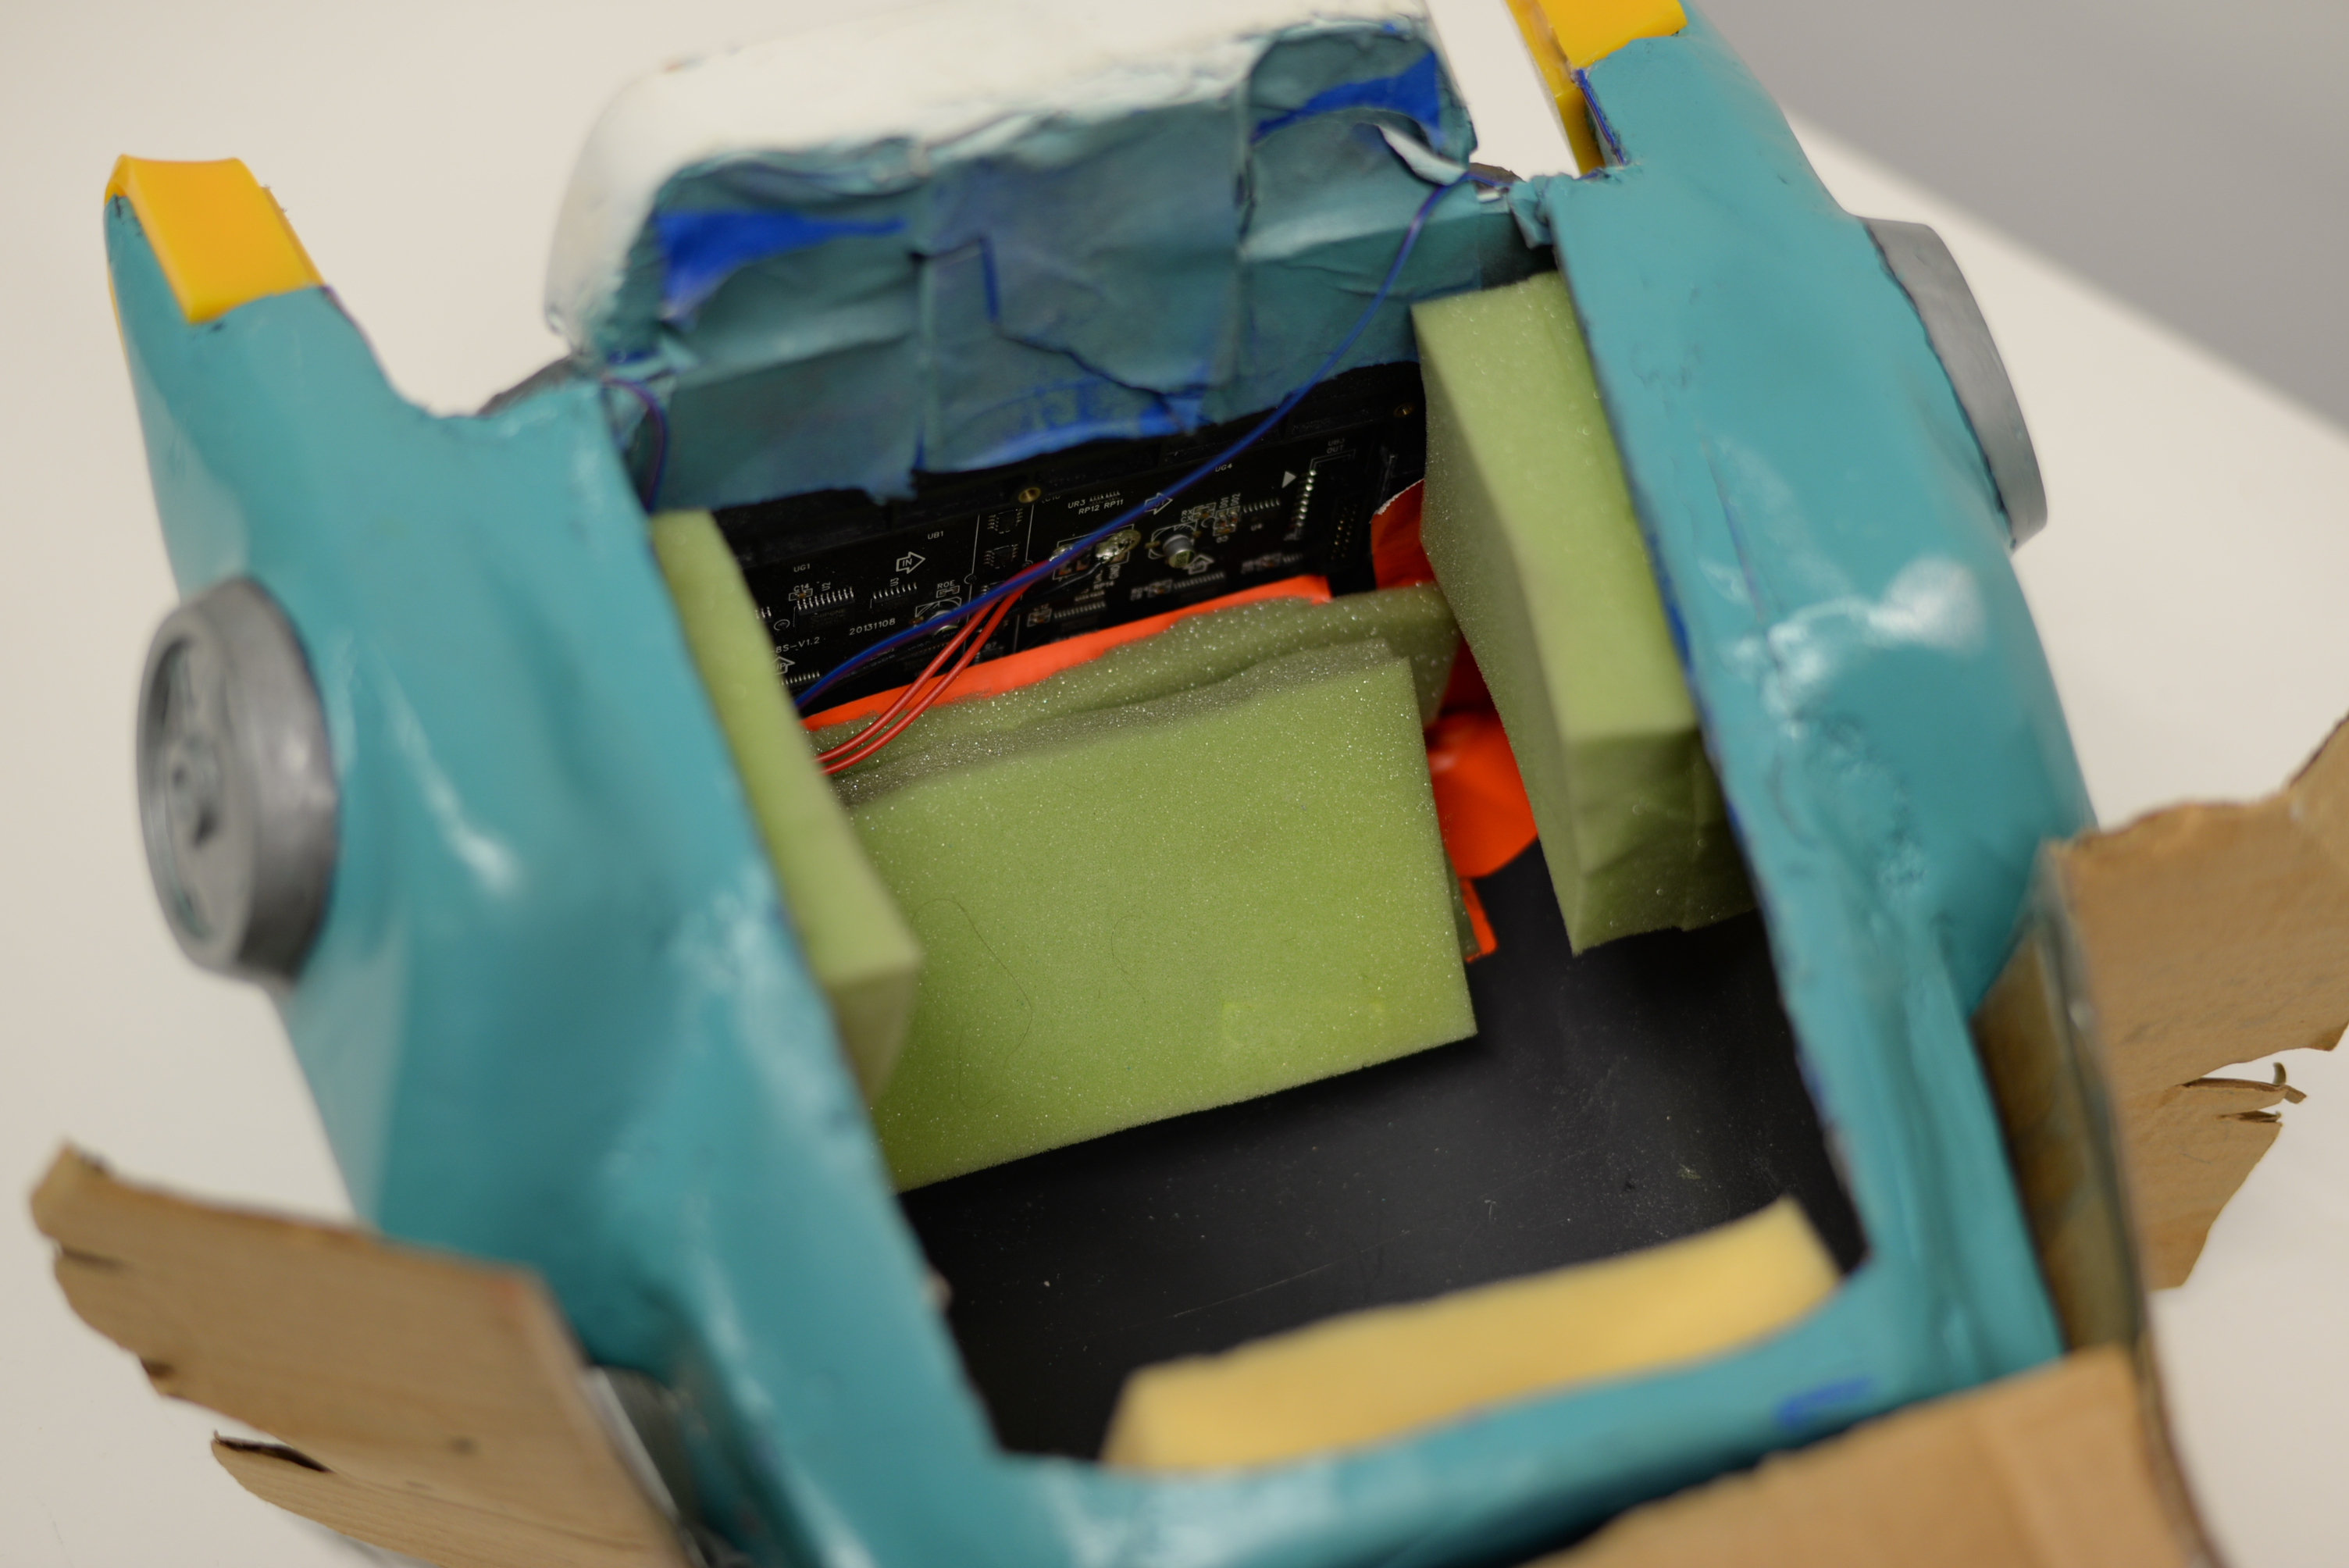
Foam that became disgusting as the night wore on, but that did its job keeping the helmet in place on my sweaty head.
Unfortunately, by the time I had finished the head, I had very little time left to complete the look, so I scrambled to buy the correct colored jacket online and made some quick and dirty "armor" out of foam core that I covered with epoxy resin and painted appropriately. When the look was all put together, it really wasn't too bad:
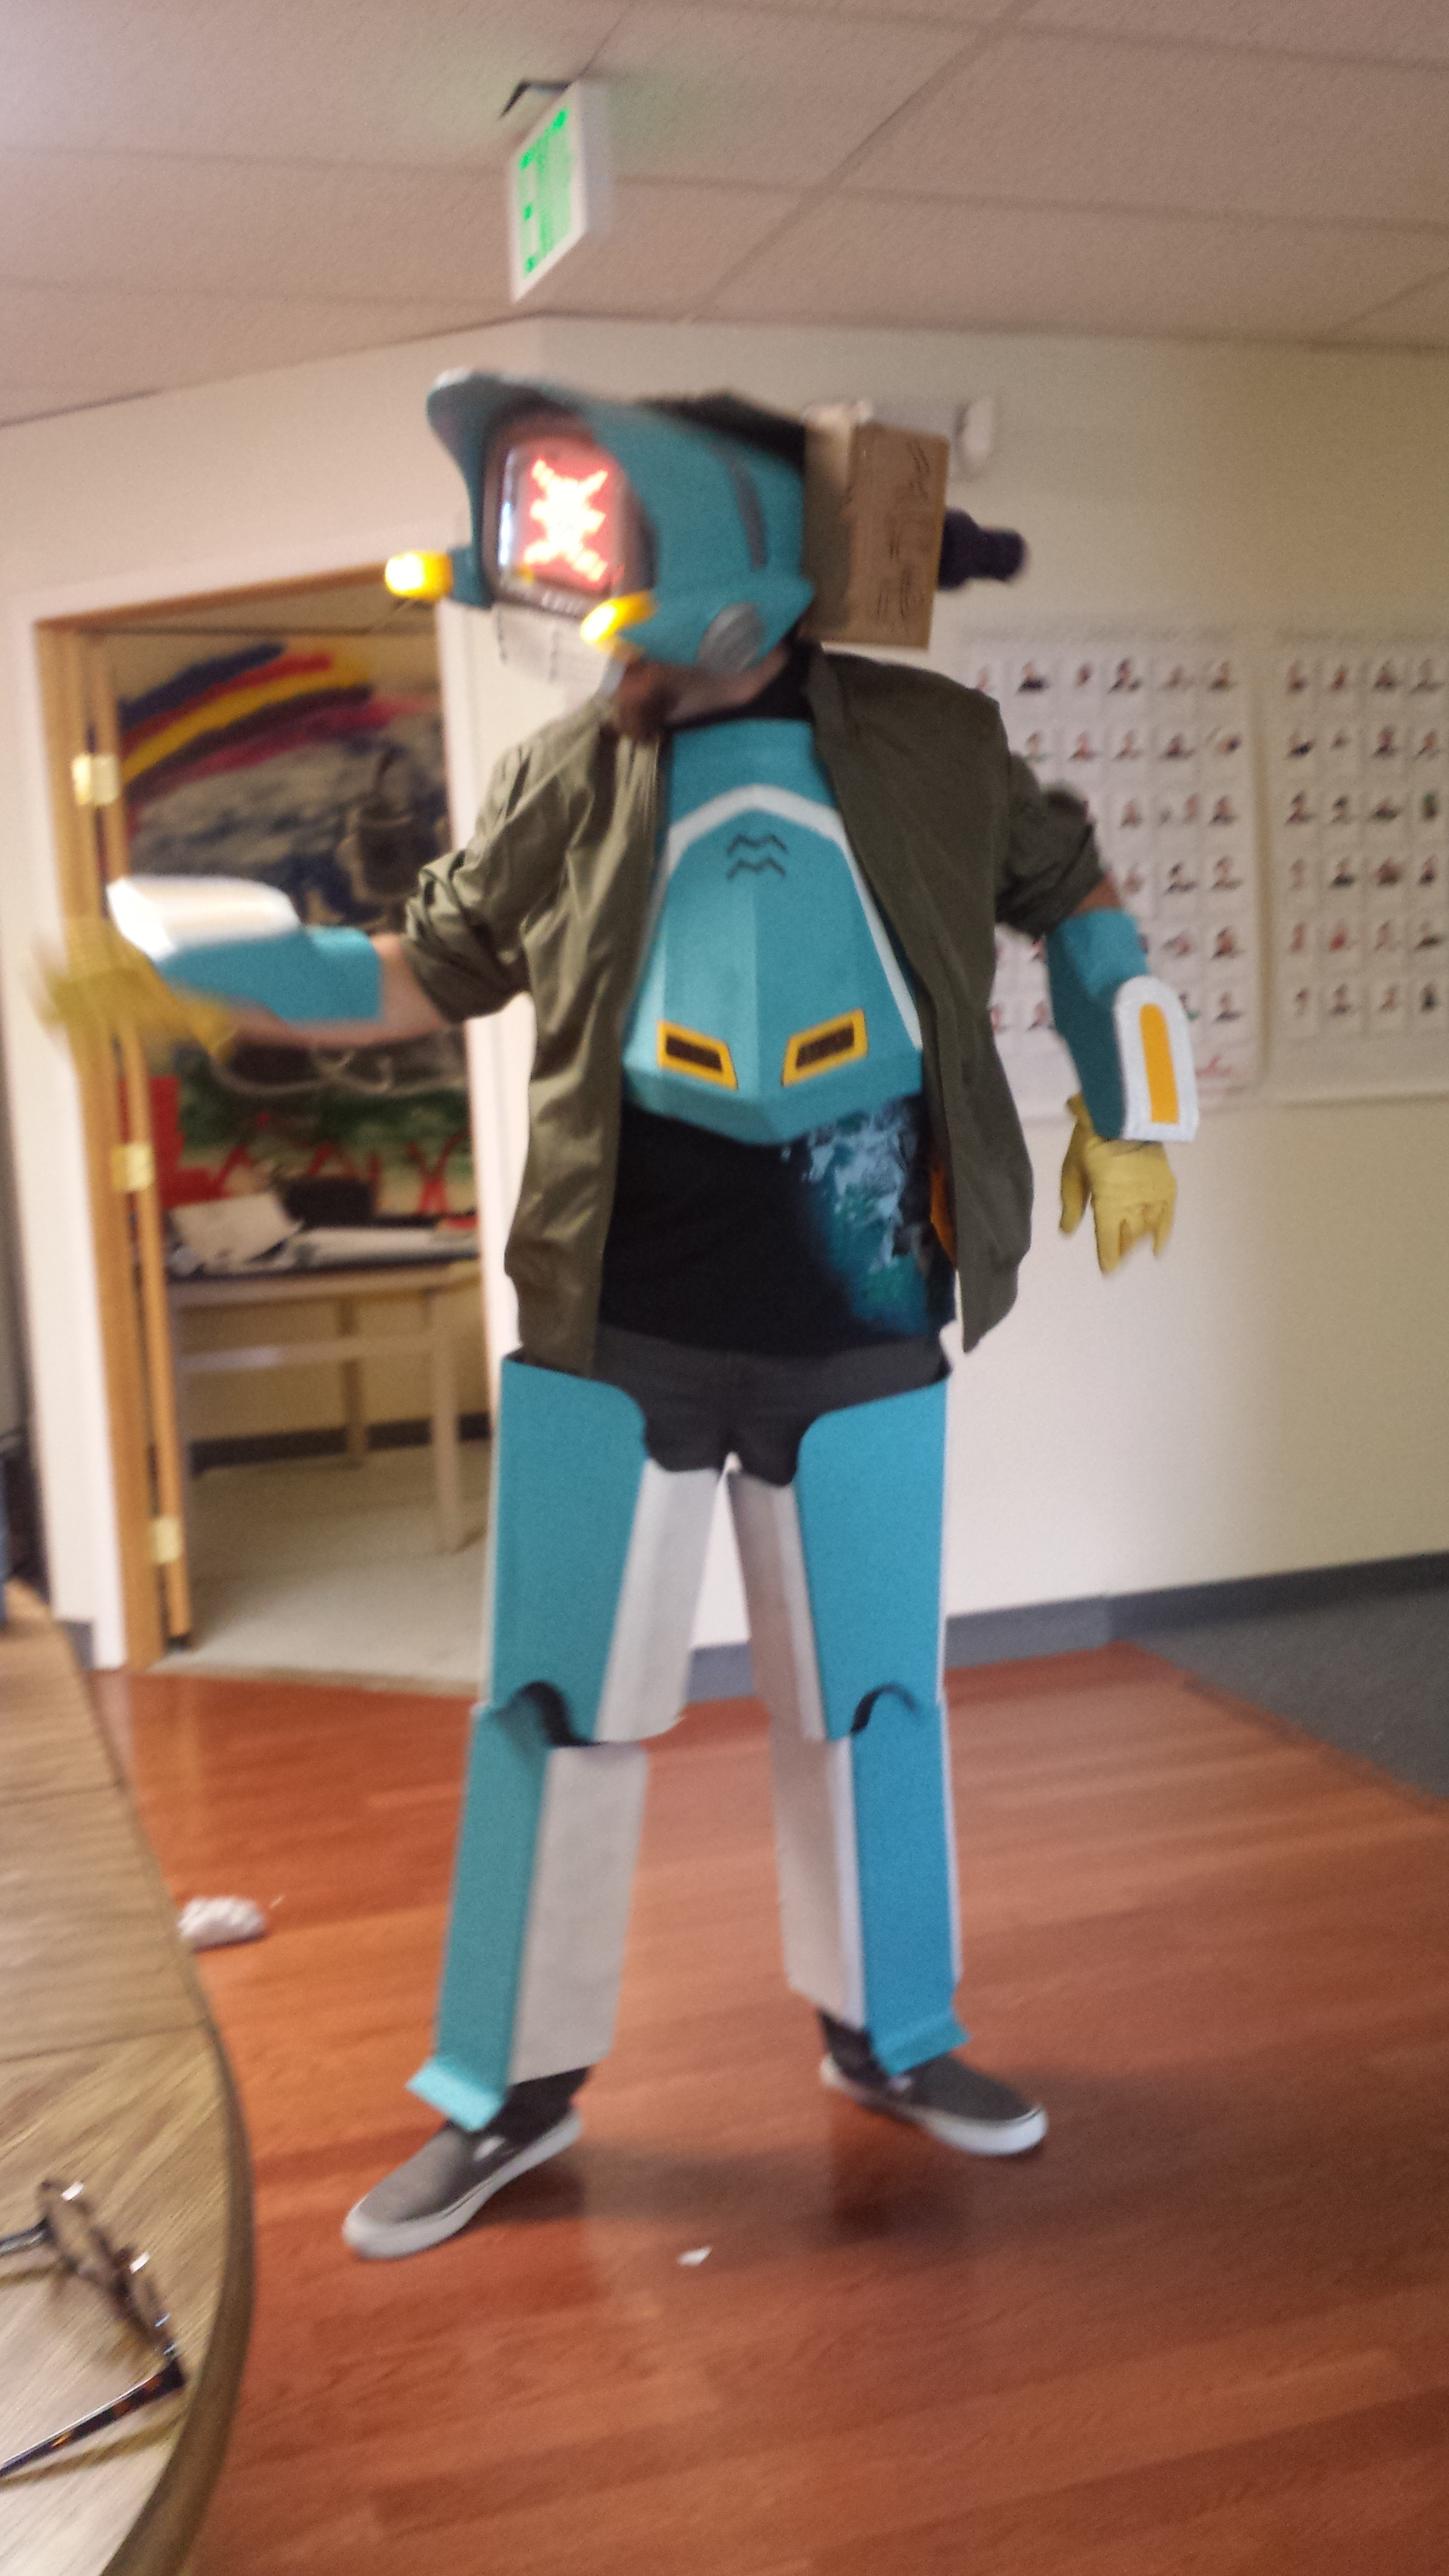
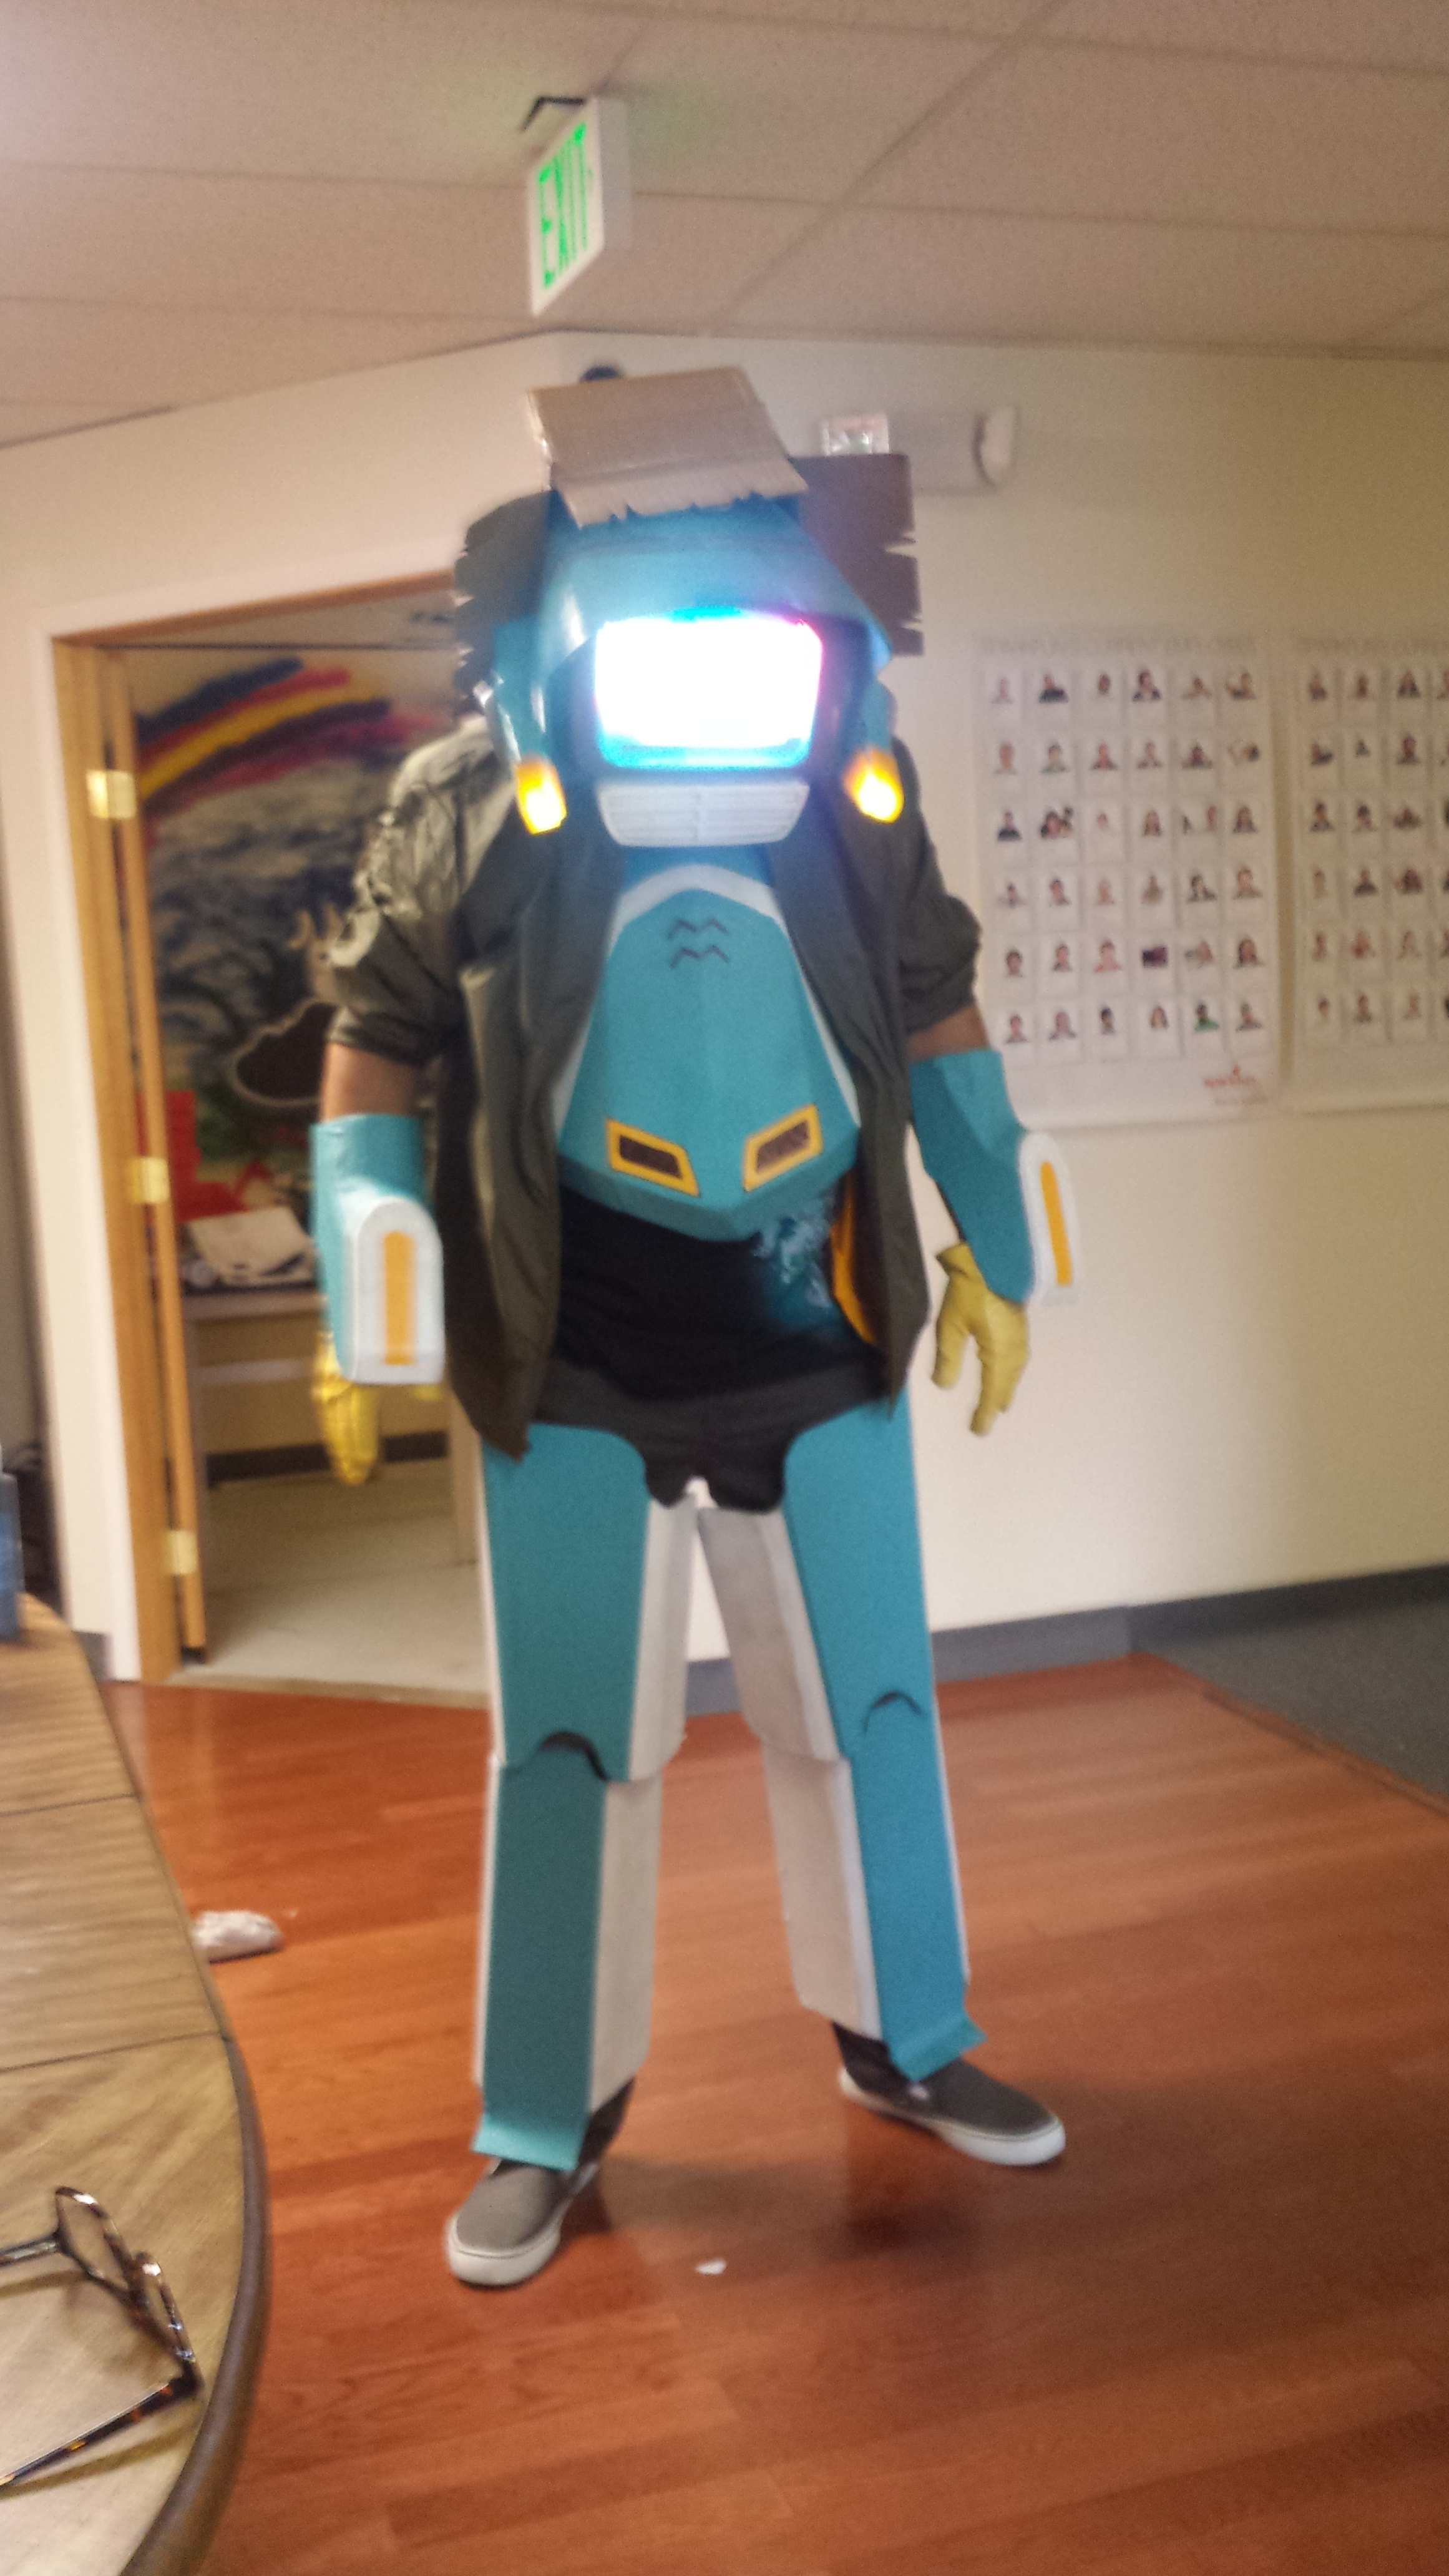
Trying on Canti at the office after finishing the final pieces
If you haven't been out on the costume floor, in cosplay, at a convention, I can't adequately describe it. It's the coolest feeling to walk around, perhaps having a beverage, posing for pictures and bumping into other costumes from the same franchise. It's hot and sweaty and loud, but it's an absolute blast. To give you an idea, here's a picture of the costume floor at DragonCon2014, which I took as I was leaving to cool off for a while:
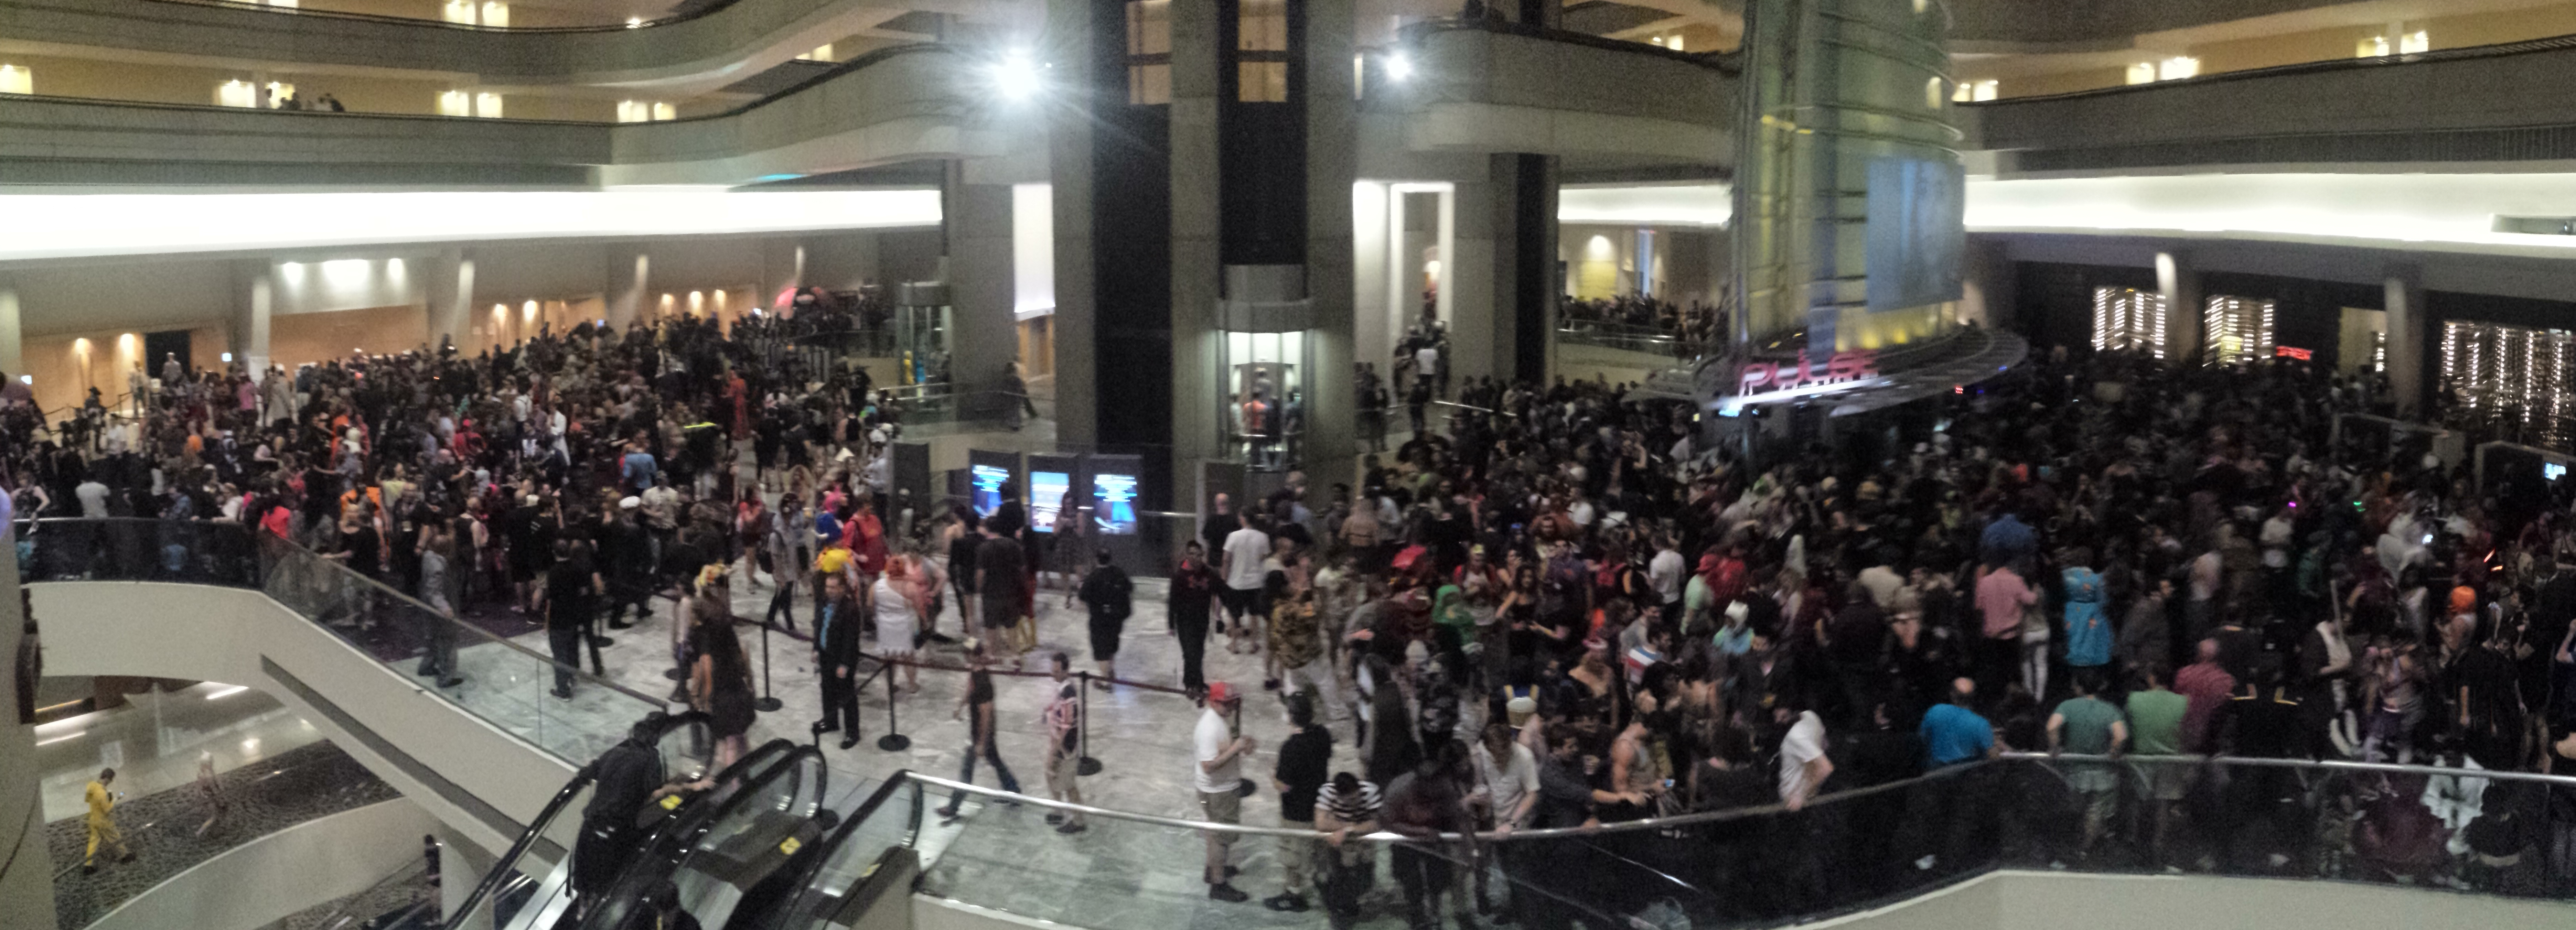
Nerds, Fans, and Otaku... Thousands of them...
I should mention that there was a floor under this that was also crowded and that I took this picture while being crammed against a handrail by an equally huge crowd behind me. It's really hard to believe just how big this thing is. But what's even more impressive is just how cool 99 percent of these people really are. You rarely heard anything aside from compliments and encouragement from this crowd, ranging in age from very young to young-at-heart. If you've ever been at all interested in making your own convention costume, I can't encourage you enough. Just get out there and do it. And it doesn't have to be DragonCon; there are sci-fi and fantasy conventions happening all year 'round all over the world. I was so busy having a good time that I didn't take many pictures of myself, but luckily everyone else was taking pictures, and a little Googling turned these up:

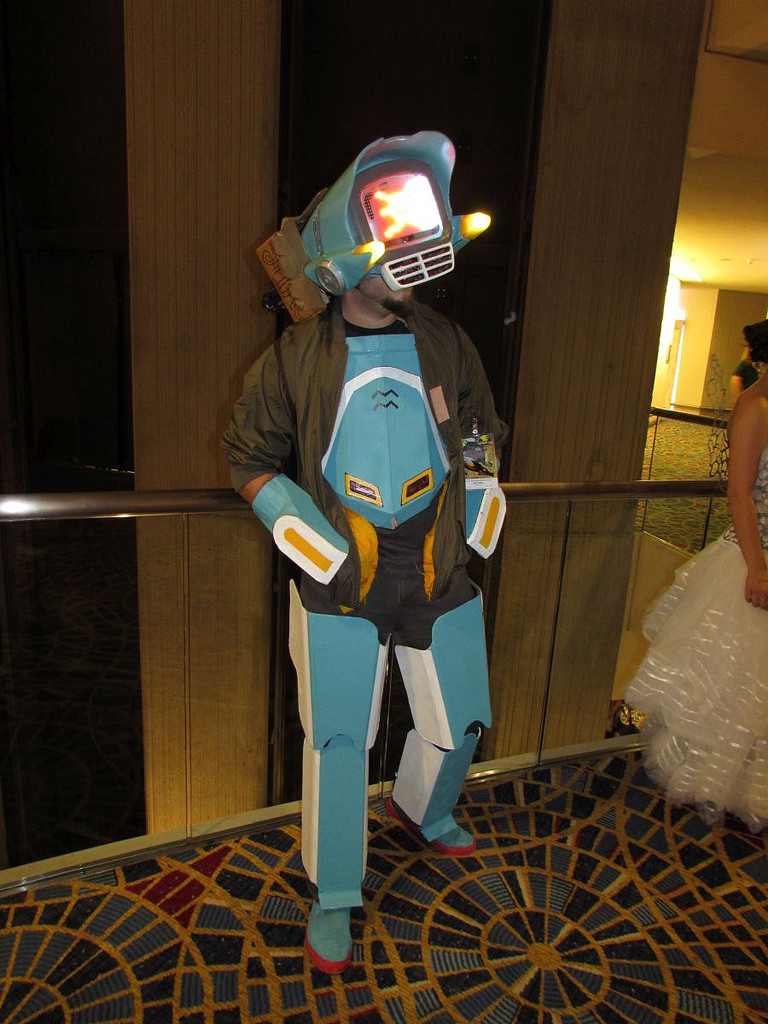
images courtesy of flickr user Loren Armitage
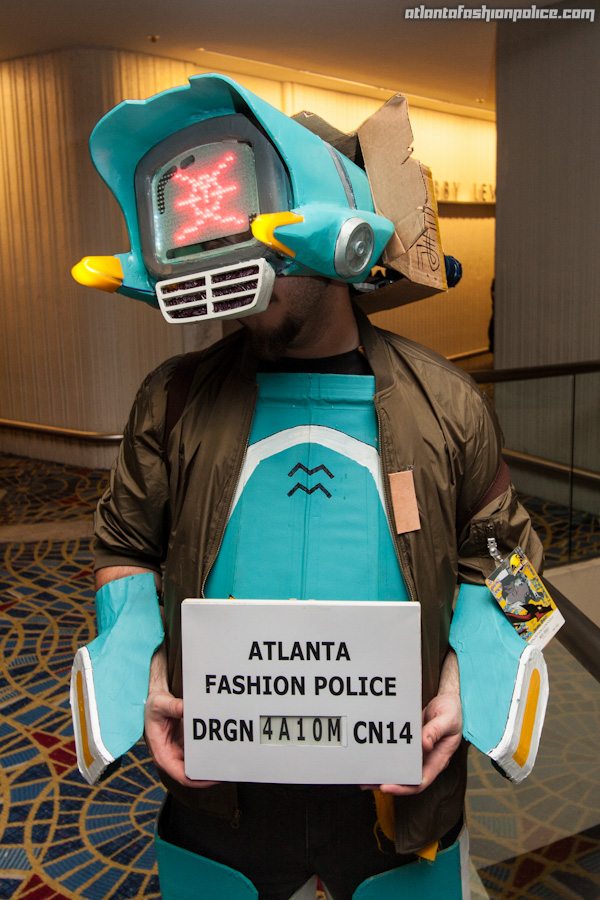
image from the incredibly complete archives of the Atlanta Fashion Police

Meeting an Atomsk-mode Canti! (image by our very own Mike Grusin)
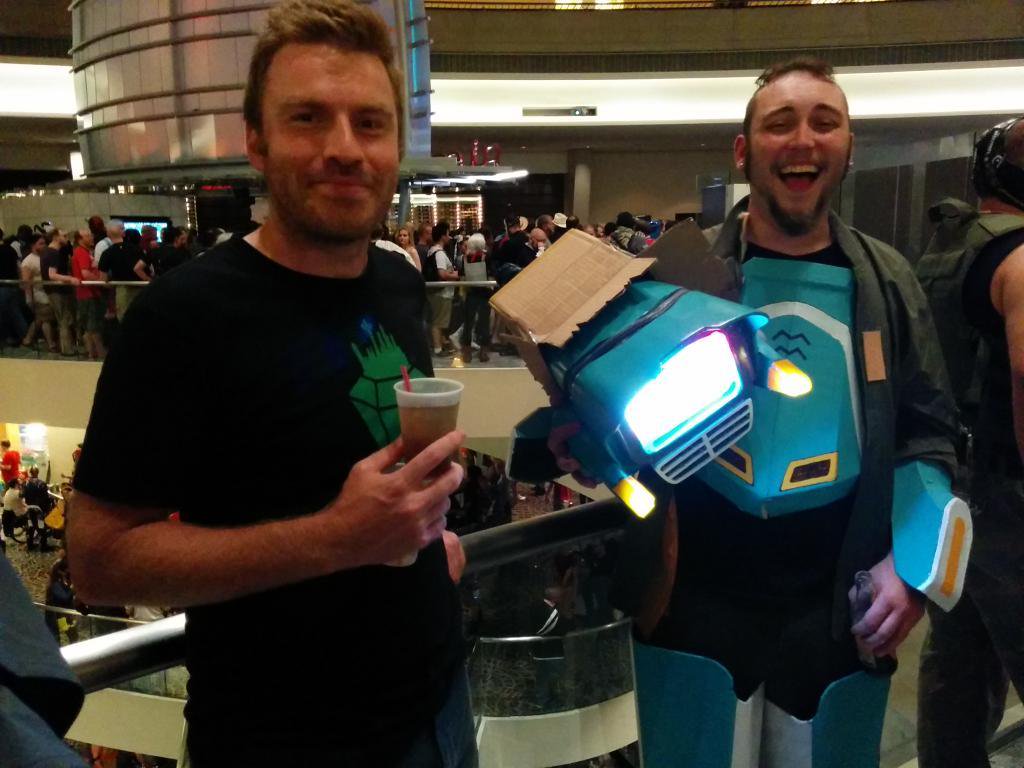
Meeting SparkFun fans and taking a breather (image by our very own Mike Grusin)
Do you have any awesome con stories or costume builds that you'd like to share? Tell us all about them in the comments!


nice info, thank for share
What will you do when you grow up? The robot!
How do you see out of the head? Are your eyes just under the display? We're working on a Sans head using a pair of OLED displays for each pupil, and we'll probably have some vision impairment.
Yep, the section under the matrix where there's no frosting is right at my eye level. It wasn't nearly as claustrophobia inducing as I had imagined it would be.
Dude, Sans, that's awesome. Yeah, you may have a little trouble finding a place to look out of, but if your OLEDs are a little undersized for the eye sockets then you might be able to peek out from under them. Good luck on your build!
I'm using a 1.44" display for each eye. I think we'll be able to peek under that board since the eye opening is ~4". Might even allow the boards swing out of the way when not in use. Now I need to figure out how to make that big cyan ring in the left eye. Maybe a ring of LED's.