T³: Laminating Circuits
Experiments in weatherproofing electronic circuits by forcing them through an unmodified document laminator.

It's my turn once again for Tech Talk Tuesday and I'd like to remind you of the following:
It's okay... sometimes... to be bored.
Because... sometimes... when you're bored you do things which are... inadvisable.
And... again, sometimes... these inadvisable activities become useful techniques.
And... on occasion... these inadvisable activities destroy the office laminator.
This is, mercifully, not the story of how I destroyed the office laminator –
this is one of the useful ones.
-NPoole
Be warned.
A few months ago I was trying to develop a way of fabricating my own text entry keyboard. It was for a traveling project and it needed to be flat, reasonably rugged, and easy to interface to a busy little microcontroller. I explored a number of different solutions from Cherry MX swithces to Capacitive Touch sensors, but ultimately decided to build the keyboard out of SoftPots. If you haven't used our SoftPot Membrane Potentiometers in a project before, they work the same as any standard 10K pot, except instead of varying their resistance by turning a knob, you vary the resistance by pressing down on a strip of conductive material. These devices are meant to be contacted by a spring-loaded wiper and used for detecting the position of mechanical devices, but with the addition of a pull-down resistor they make really nice touch interfaces. If you want to learn more about using SoftPots, check out Jim's excellent SoftPot tutorial.
My theory was that because the SoftPots are so flexible and appear to have been manufactured by lamination, they would probably survive a trip through our "pouch laminating" machine. I would simply position a few of the devices in a laminating sleeve, add a labeled overlay with the keyboard characters over the top, and then laminate it together into a single piece. I started with a small test to see if the SoftPots would still function correctly after they had been laminated:
And it was a success. Not only did the SoftPot not seem to care about being sealed inside a plastic prison, but the touch events were repeatable and reliable. I quickly scaled the concept up to a simple alphanumeric keyboard and was really happy with the way it looked and performed:
After these traveled to an event and worked (mostly) as intended, I put that idea away in my bag of tricks and forgot about it for a few weeks. Later, while cleaning up my workbench, I picked up my test piece and it got me thinking... "What else could I fit through that laminator?" So, naturally, I tried a few things. But first:
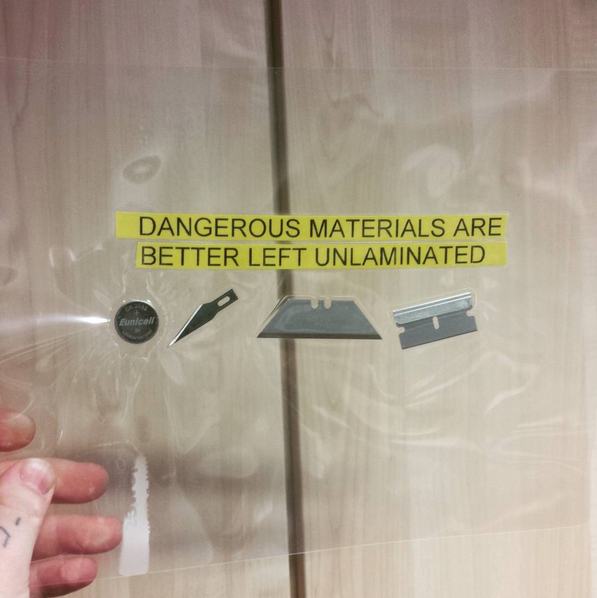
HAZARD:
Before trying any of these experiments, I made sure that I was:
- Near the power cable and ready to shut down the laminator.
- Aware of the location of the nearest fire extinguisher.
- Familiar with the unit and knew how to open the unit and clear a jam.
- Prepared to explain myself while ordering a replacement unit.
And with that out of the way, let's talk briefly about how these things do what they do. A pouch laminator is intended to preserve documents by encasing them in a thin plastic pouch. These plastic pouches are sold in varying thickness from 3mil up to 10mil, and consist of two sheets of polyester coated in a film of hot-melt glue. When you place a document between the two sides of the pouch and feed it through the laminator, the film activates and glues the polyester to both itself and the document. The laminator consists simply of a heating element for melting the glue, and a set of rollers for feeding the lamination pouch through at a controlled rate, and pressing the stack together. The rollers are made from soft silicone rubber, and this is what we're taking advantage of when we send components through that have a slightly prouder profile than a sheet of cardstock.
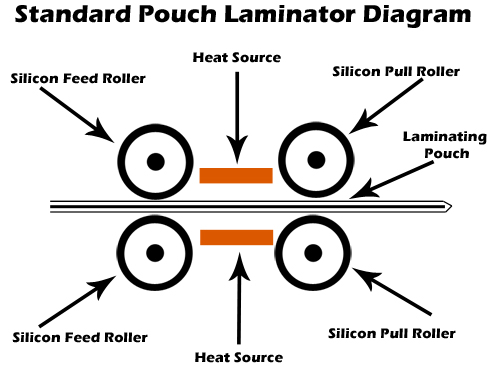
Diagram of a pouch laminator courtesy of abcoffice.com, who surely meant "silicone" and not "silicon"
My first victim was a simple LED throwie. The lithium coin cell battery made me slightly nervous, but the interior of the laminator doesn't have to get very hot for very long to do its job. Also, the soft rollers weren't likely to damage the battery casing. It's also worth noting that the rollers aren't directly heated, so any heat that the subject receives is radiant and not directly conducted. I placed a battery and a color-cycling LED in a lamination pouch, fed it into the rollers, and started imagining what it would be like to clean the burst coin cell out of the disassembled laminator. Luckily, it didn't come to that, and the throwie survived without incident, neatly sealed in polyester:
This was encouraging, so I got a little more fancy. This time, I assembled a simple Pro Micro circuit. The force sensitive resistor modulates how quickly the RGB LED breakout cycles through a rainbow color pattern. Once the circuit was as neatly arranged as I could manage, I sandwiched it into a laminator pouch and sent it through (click for video):
Again, I had challenged fate and won. The circuit came through without a hitch and once I had cut the USB connector free and powered it up, everything worked fine (click for video):
With this victory under my belt, I felt like I could push the complexity one more step before things got too messy. I threw together a simple noise-maker keyboard. I used a medium-sized SoftPot for the main keyboard, a pair of smaller SoftPots for the pitch bend and parameter controls, a number of LilyPad buttons and LEDs for voice selection, and a piezo element as a flat speaker that could be laminated. After everything was assembled and had survived its trip through the rollers of doom, I cut away a section of polyester around the Pro Mini headers and soldered on a connector for the FTDI breakout. (click for video):
Wrapping Up
So that's all very good but why would anyone do this? Well, I can think of a few reasons:
- Weatherproofing - Enclosures that can keep out the elements might be a bit too large for certain projects, and technologies like conformal coating are often expensive. You can get your hands on a pouch laminator for a little as $25 in some shops, and it may not be a bad way to keep your small projects from getting wet.
- Flexibility - Flexible PCBs can be expensive to produce, especially for one-offs and prototypes. If your project is right for this application, you may be able to build it with flexible wires connecting the components and then laminate them together to form a sort of flexible protoboard. Large arrays of SMD LEDs could be fabricated this way, for instance.
- Presentation - Printing an attractive overlay and laminating it together with your circuit could be a fun way to add labels, directions and decoration to your project. Cutting windows in that overlay to reveal the underlying circuitry could make for some interesting and rugged educational materials.
So, what's next for laminated circuits? Well, I'm cooking up a scheme to construct a binder with power and ground rails to power a whole stack of these circuits, which you can flip through like a book. If this project ever comes to fruition, I'll write about it in an upcoming blog post. Also, I'd like to experiment with different ways of providing power to projects that are sealed in laminator pouches, such as inductively charging thin lithium cells, or inductively powering the circuit directly.
What about you? Do you have any thoughts on what this might be useful for? Have you ever broken a piece of office equipment doing something cool? Let's hear about it! Until next time, Happy Hacking!


Please keep in mind that it is now possible to get some reasonably good flat conductors, I even have a nice flat USB cable. When I need to laminate way too thick objects my laminator has a nice reverse switch so that I can bond part of the sheet and back it out, then bond another edge, etc.... for some objects I force air into the packet to act as a pillow, for others I use a small vacuum pump to remove the air to make it more conformant. I also have an attachment for my soldering iron that has a flat disc at the end (10mm) that allows for spot lamination.
As a suggestion for future sampling, maintain the weather-sealing properties through use of the wireless charging coils to power the circuits. Then as you flip through a book of circuits, you could 'wave the magic wand' over the receiver coil to make it come to life.
I think that's a really good idea, I even have a wireless power module on my desk that would probably fit through the laminator... I would have tried it but I only have the one and I didn't want to accidentally ruin it :)
Very very cool write up!
I wonder if you could use a laser cutter to cut out sections of the plastic and then laminate your unsoldered, un-masked, PCB and try and use it as a solder mask. With such a low temperature resistance, I'm not sure how that would hold up.
I should also mention that I've seen this method for covering capacitive touch boards before.
I didn't even think about captouch! I'll have to try that!
Such an inspiring idea! I've recently bought a load of soft pots to make thin interface for photoshop and I'm considering this, thank you.
Question though, not directly addressed I think. When the soft pots are not stimulated with pressure on the track, you get random noise values. In fact, there must be some reading at all times from the component, and as there is no knob or slider, I imagined this would either be random or default to either extreme edge.
You mention that when not used with an actuator, and "with the addition of a pull-down resistor they make really nice touch interfaces" the reading should be stable? I'm very novice at microelectronic FYI, coder by trade ;) Also, I assume you had some additional actuator for the keyboard project, to signal that a key press was being made? I'll probably have to do this too, how did you achieve it?
Your project sounds awesome!
The pull-down resistor actually solves both of the problems that you brought up. If you attach a large resistor between the 'wiper' and ground, it will connect the softpot's wiper to ground whenever you aren't touching it. When you are touching it, the resistance of the softpot becomes low enough that the pull-down resistor basically disappears. Now, since you know that the softpot will always be connected to ground when you aren't touching it, you can write a few lines of code to check if analogRead(softpot)!=0 which would mean that there must be something pressing on the track.
If you're concerned about not being able to use the zero position of the slider, just remember that your program can be made to think that "zero" is anywhere on the device. You can create a new virtual zero slightly in from the extreme edge of the device. For example softpotValue=map(analogRead(softpot), 20, 1023, 0, 50); would give you 50 discrete touch points above the device's actual '0' position. In this case, you would check to see if analogRead(softpot)!=0 and if that's true then you know you have a touch event, then you would run the map function and check softpotValue to get your touch value. If you're not touching it, there's no touch event. If you are touching the very bottom end of the device (where analogRead(softpot)==20) then your softpotValue will be 0
Next step: reflow solder components at the same time
Add a USB port to your ring binder. Locate your wireless charging rings thoughtfully on each page so that when you plug in your ring binder, all of your projects recharge. (Each project having a recharge circuit, of course).
Will the pouch not seal well if you just use a hot air gun (and possibly a squeegee/spatula)? I would think it would make the process a bit easier. Working from one side to another could probably prevent most bubbles.
Instead of using a laminator, could you use a vacuum food saver? If you put a rigid cardboard underneath it will stay flat unless you don't mind a uneven wavy placement.
Really nice idea to showcase and gotta love the safety warnings!
Without a laminator you can do the old school method of a pouch and a clothes iron. Use a cloth between the iron and the plastic and it will seal right up. I like the vacuum sealer idea, I wonder if the iron method could be used to fuse the vacuum sealer bag together like the laminator pouch. Would be useful for non-flat objects that might jam a laminator roller.
If you're trying to seal something that's not flat, you might consider a vacuum sealer for food, like the Seal-a-Meal. It would definitely lack the fun factor of running something through rollers that has no business going through rollers. On the other hand, maybe pouring a nonconductive fluid (canola oil?) around a circuit, evacuating the rest of the air, and sealing it might let it function deep underwater.
I don't even have an intelligent comment, I just think this is awesome. How often does one stumble upon a technique that's both useful and ridiculous?
Did you submerse any of your projects? Color cycling throwies would look awesome in a pool or hot tub at night.
The throwie seems to be completely watertight, the only thing you have to watch out for is the sharp edges of the LED package or leads that might punch a hole in the laminate.