Enginursday: Fiber Optic Light Suit
A wearable fiber optic light suit that responds to user gestures.

Finding a Medium
Seeing people at concerts wearing a few blinky lights here and there made me think I could take the wearable lights from glowing shoes to a whole new level. I decided to create a way to easily design custom fiber optic light projects, based in Arduino or Raspberry Pi. I knew I wanted some sort of glowing fiber around my arms, and I knew I wanted to be able to quickly change the color. (For reasons I will discuss later) I originally looked at electroluminescent wire, or EL wire. EL wire is a thin wire, coated in a phosphor that makes the wire emit light when an alternating current is applied to it. A colored plastic sheath surrounds the wire to give it its color. EL wire is great as a wearable and has been used as such for many projects; however, it doesn't change color, a quality I am really looking for.

So I went and looked at fiber optic wire, a clear plastic wire that works using the concept of total internal reflection. Basically, the light bounces off the inside walls of the fiber and becomes trapped inside the fiber. This suited my purposes, as I'd be able to pipe whatever color light I wanted into the fiber with RGB LEDs and have a glowing rope of whatever color I wanted!
LED and Fiber Optic Mounting
The LEDs and fiber optic are housed in 3D-printed mounts, which grip bundles of fiber optic with a strength that far exceeds what I had anticipated. These mounts are then sewn to handmade armbands to attach them to the body of the wearer. The mounts ensure that the fiber optic is in physical contact with the LED to promote efficiency in light transmission between the LED and fiber optic.
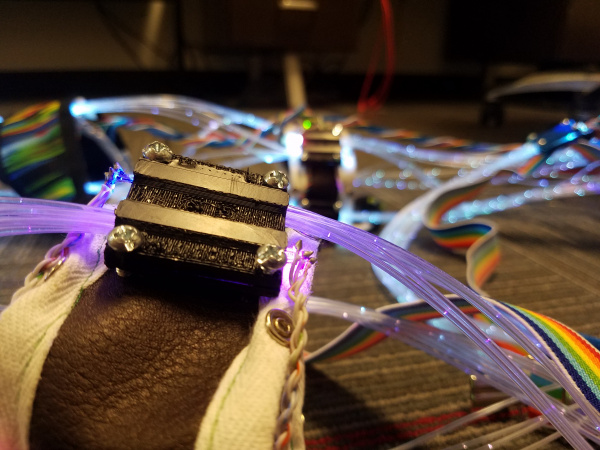
These LEDs are then controlled by a breakout for the TLC5947 Pulse Width Modulation controller, contained in each armband. Having the LED controller inside of the armband prevented the issue of having large bundles of wires to control LEDs traveling down each arm.
Battery Pack/Arduino Housing
What good would a wearable be if you had to be plugged into a wall while you were wearing it? None at all, I tell you! To avoid this problem, you'll need something to house your batteries and, of course, the brains of the operation, your microcontroller. For this solution, I once again went back to the 3D printer to print out some casings for my Arduino Pro Micro and the six 18650 batteries that power the whole thing. The batteries are divided into three sets of two, with one set powering the left arm, one powering the right arm, and one powering the Arduino. An LM317 linear regulator is used to bring the battery voltage down to 5V to power the LEDs, while the Pro Micro has an onboard regulator for this purpose.
Note: When using multiple power sources, ensure they are connected to the same ground to avoid noise.
The battery pack also has a few holes for a power control switch, as well as two buttons, to be used for changing color modes.
Gloves
For the gloves of the light suit, I wanted an Iron Man-esque feel. So I had a friend of mine draw up some quick doodles for me to laser etch into plexiglass circles. I then drilled some LED-sized holes in the sides of the circles and inserted LEDs to illuminate the circles. Each circle sits in the palm of each hand, and the LEDs illuminate the plexiglass such that the laser-etched sections stand out remarkably well against the clear background. However, these circles, as well as the rest of the suit, need some sort of way to control it all. For this, I added flex sensors to the back of each finger. Using these, I can control the brightness or colors of all different parts of the suit.
Code Overview
Without button functionality, you cannot switch between color modes, so a sketch like the one below must be used in conjunction with the suitControl sketch to select the desired color mode.
#include "Adafruit_TLC5947.h"

void setup() {
  start();
}

void loop() {
  fadeControl();
}
colorWheel()--- Fades between different color sequences. For example, it will fade through the rainbow and slowly change to fade through red, white and blue.fadeControl()--- Does thecolorWheel()function with added functionality of flex sensors to control arm brightness.motionFlicker()--- Flashes through the colors quickly so that when still, the fiber looks like a solid color (i.e., white), but when moved around, the constituent colors are visible. (i.e., rainbow)colorControl()--- Attaches flex sensor control to allow the user to change what colors appear on the suit.
Necessary Files
If you are looking to build your own fiber optic wearable using this ecosystem, the necessary files are in the GitHub repository. This includes:
- Example sketch to run color patterns on two sets of four TLC5947s.
- .stl files for battery pack
- .stl file for LED and Fiber Optic Mounts
Interested in learning more about LEDs?
See our LED page for everything you need to know to start using these components in your project.


Thanks! It's nice to see how someone else solved the cable-to-LED coupling problem. It was one of my biggest challenges when I made a fiber optic jellyfish (youtube).