Enginursday: Gesture-Reactive Wearable Fiber Optic
As Andrew finishes up his fiber optic light suit, he's adding in gesture control. Let's see how it works.

As I wrap up this version of the big old wearable light suit, I've decided to add in some extra controls to my audio reactive control system. I've always enjoyed the idea of being able to control the colors very specifically myself, as opposed to being at the whim of the aural environment.
Options
I looked over several different sensor solutions in order to find some effective form of gesture or motion control for my lights. The first one I checked out was a Qwiic Accelerometer, which I got to create some pretty neat colors. But I found that I wasn't able to control them all that well without my hands being forced into certain positions and orientations. In other words, I was unable to simultaneously dance and control colors. I also checked out a TOF Distance Sensor, which worked fantastic. But with one distance sensor in each hand, I was only able to control two colors at once, and when either sensor was facing the sky, these colors would max out. So again, I was unable to move how I wanted and be the color I wanted to be.
Hardware
To enable myself to move and change colors independently, I created a small Qwiic-enabled breakout for a few flex sensors that go into each glove. (Maybe you'll even see it on SparkFun's storefront someday...hint hint, wink wink:-) The board has an ADC-to-I2C that takes the readings and converts them into nice, easy I2C data so we don't have to use any of the analog pins on our microcontroller. This approach was used to save wiring going from the gloves to the microcontroller, as pulling an analog read off of each finger would take quite a bit more cabling.
Software
Now to translate readings from our hands into colors on the suit. This part is relatively simple and involves using Arduino's handy dandy Map function to map the values attainable by the flex sensors (400--800) to values that make sense to an LED (0--255). However, this function "loops" our numbers back around if they get too low or too high. This makes it extraordinarily difficult to completely maximize or minimize a color value, as you'd need to hold your finger perfectly at 0 or 255. To mitigate this, we first pass our value through Arduino's handy dandy Constrain function to keep our values from falling into a range that will cause them to loop around. Then we simply write these values into our LEDs, and we're good to go! A snippet of the example code is shown below, and the library and breakout board used in these gloves will be available soon for all of your gesture-control needs.
#include "FastLED.h"
#include <Wire.h>
#include <SparkFun_ADS1015_Arduino_Library.h>

#define DATA_LEFT_ARM 11
#define CLOCK_LEFT_ARM 13
#define DATA_RIGHT_ARM 0
#define CLOCK_RIGHT_ARM 32
#define DATA_LEFT_LEG 7
#define CLOCK_LEFT_LEG 14
#define DATA_RIGHT_LEG 21
#define CLOCK_RIGHT_LEG 20
#define DATA_BELT 28
#define CLOCK_BELT 27

CRGB leftArm[NUM_LEDS];
CRGB rightArm[NUM_LEDS];
CRGB leftLeg[NUM_LEDS];
CRGB rightLeg[NUM_LEDS];
CRGB belt[NUM_LEDS];

ADS1015 glove;
ADS1015 glove1;

uint16_t red;
uint16_t green;
uint16_t blue;
uint16_t waveFrequency;
uint8_t redMap;
uint8_t greenMap;
uint8_t blueMap;
uint8_t waveFrequencyMap;

void setup() {
    FastLED.addLeds<APA102, DATA_LEFT_ARM, CLOCK_LEFT_ARM, RBG, DATA_RATE_MHZ(8)>(leftArm, 48);
    FastLED.addLeds<APA102, DATA_LEFT_ARM, CLOCK_LEFT_ARM, BGR, DATA_RATE_MHZ(8)>(leftArm, 16);

    FastLED.addLeds<APA102, DATA_RIGHT_ARM, CLOCK_RIGHT_ARM, RBG, DATA_RATE_MHZ(2)>(rightArm, 48);
    FastLED.addLeds<APA102, DATA_RIGHT_ARM, CLOCK_RIGHT_ARM, BGR, DATA_RATE_MHZ(2)>(rightArm, 32, 16);

    FastLED.addLeds<APA102, DATA_LEFT_LEG, CLOCK_LEFT_LEG, RBG, DATA_RATE_MHZ(2)>(leftLeg, 40);

    FastLED.addLeds<APA102, DATA_RIGHT_LEG, CLOCK_RIGHT_LEG, BGR, DATA_RATE_MHZ(2)>(rightLeg, 40);
    FastLED.addLeds<APA102, DATA_RIGHT_LEG, CLOCK_RIGHT_LEG, RBG, DATA_RATE_MHZ(2)>(rightLeg, 8);

    FastLED.addLeds<APA102, DATA_BELT, CLOCK_BELT, BGR, DATA_RATE_MHZ(2)>(belt, NUM_LEDS);
    FastLED.setBrightness(100);
    Serial.begin(9600);
    Wire.begin();

    if (glove.begin() == false) {
        Serial.println("Device not found. Check wiring.");
        while (1);
    }
    if (glove1.begin(Wire, 100000, 0x4A, 9600) == false) {
        Serial.println("Device not found. Check wiring.");
        while (1);
    }
}

void loop() {
    basicGlove();
}

void gloveRead () {
    red = constrain(glove.getAnalogData(0), 500, 800);
    green = constrain(glove.getAnalogData(1), 470, 780);
    blue = constrain(glove1.getAnalogData(0), 500, 815);
    waveFrequency = constrain(glove1.getAnalogData(1), 550, 850);

    redMap = map(red, 500, 800, 0, 255);
    greenMap = map(green, 470, 780, 0, 255);
    blueMap = map(blue, 500, 815, 0, 255);
    waveFrequencyMap = map(waveFrequency, 550, 850, 0, 255);
}

void basicGlove() {
    gloveRead();
    for (int LED = 0; LED < 16; LED++) {
        rightArm[LED] = CRGB(redMap, redMap, redMap);
        leftArm[LED] = CRGB(redMap, greenMap, blueMap);
        rightLeg[LED] = CRGB(redMap, greenMap, blueMap);
        leftLeg[LED] = CRGB(redMap, greenMap, blueMap);
        belt[LED] = CRGB(redMap, greenMap, blueMap);
    }
    for (int LED = 16; LED < 48; LED++) {
        rightArm[LED] = CRGB(redMap, greenMap, blueMap);
        leftArm[LED] = CRGB(redMap, greenMap, blueMap);
        rightLeg[LED] = CRGB(redMap, greenMap, blueMap);
        leftLeg[LED] = CRGB(redMap, greenMap, blueMap);
        belt[LED] = CRGB(redMap, greenMap, blueMap);
    }
    FastLED.show();
}
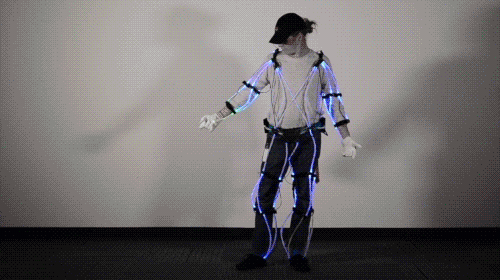
The finished product, with me in control of the colors, is shown below.
Interested in learning more about LEDs?
See our LED page for everything you need to know to start using these components in your project.


Something like this?
Noted ;)
Oooo, I didn't think of using two!! That's a fantastic idea. This is definitely something I'll be trying out.