Interactive Spooky Halloween Cat
Check out this distance sensing Halloween prop designed to spook the willies out of trick-or-treaters.

As we approach the end of October, the spooky Halloween energy is starting to find its way into my world. I'm not much of a Halloween-er myself, but I have always felt that Halloween is an excellent excuse to show off your killer maker skills, creativity and maybe even scare some folks. This week I made a little interactive Halloween decoration that activates when someone walks by.
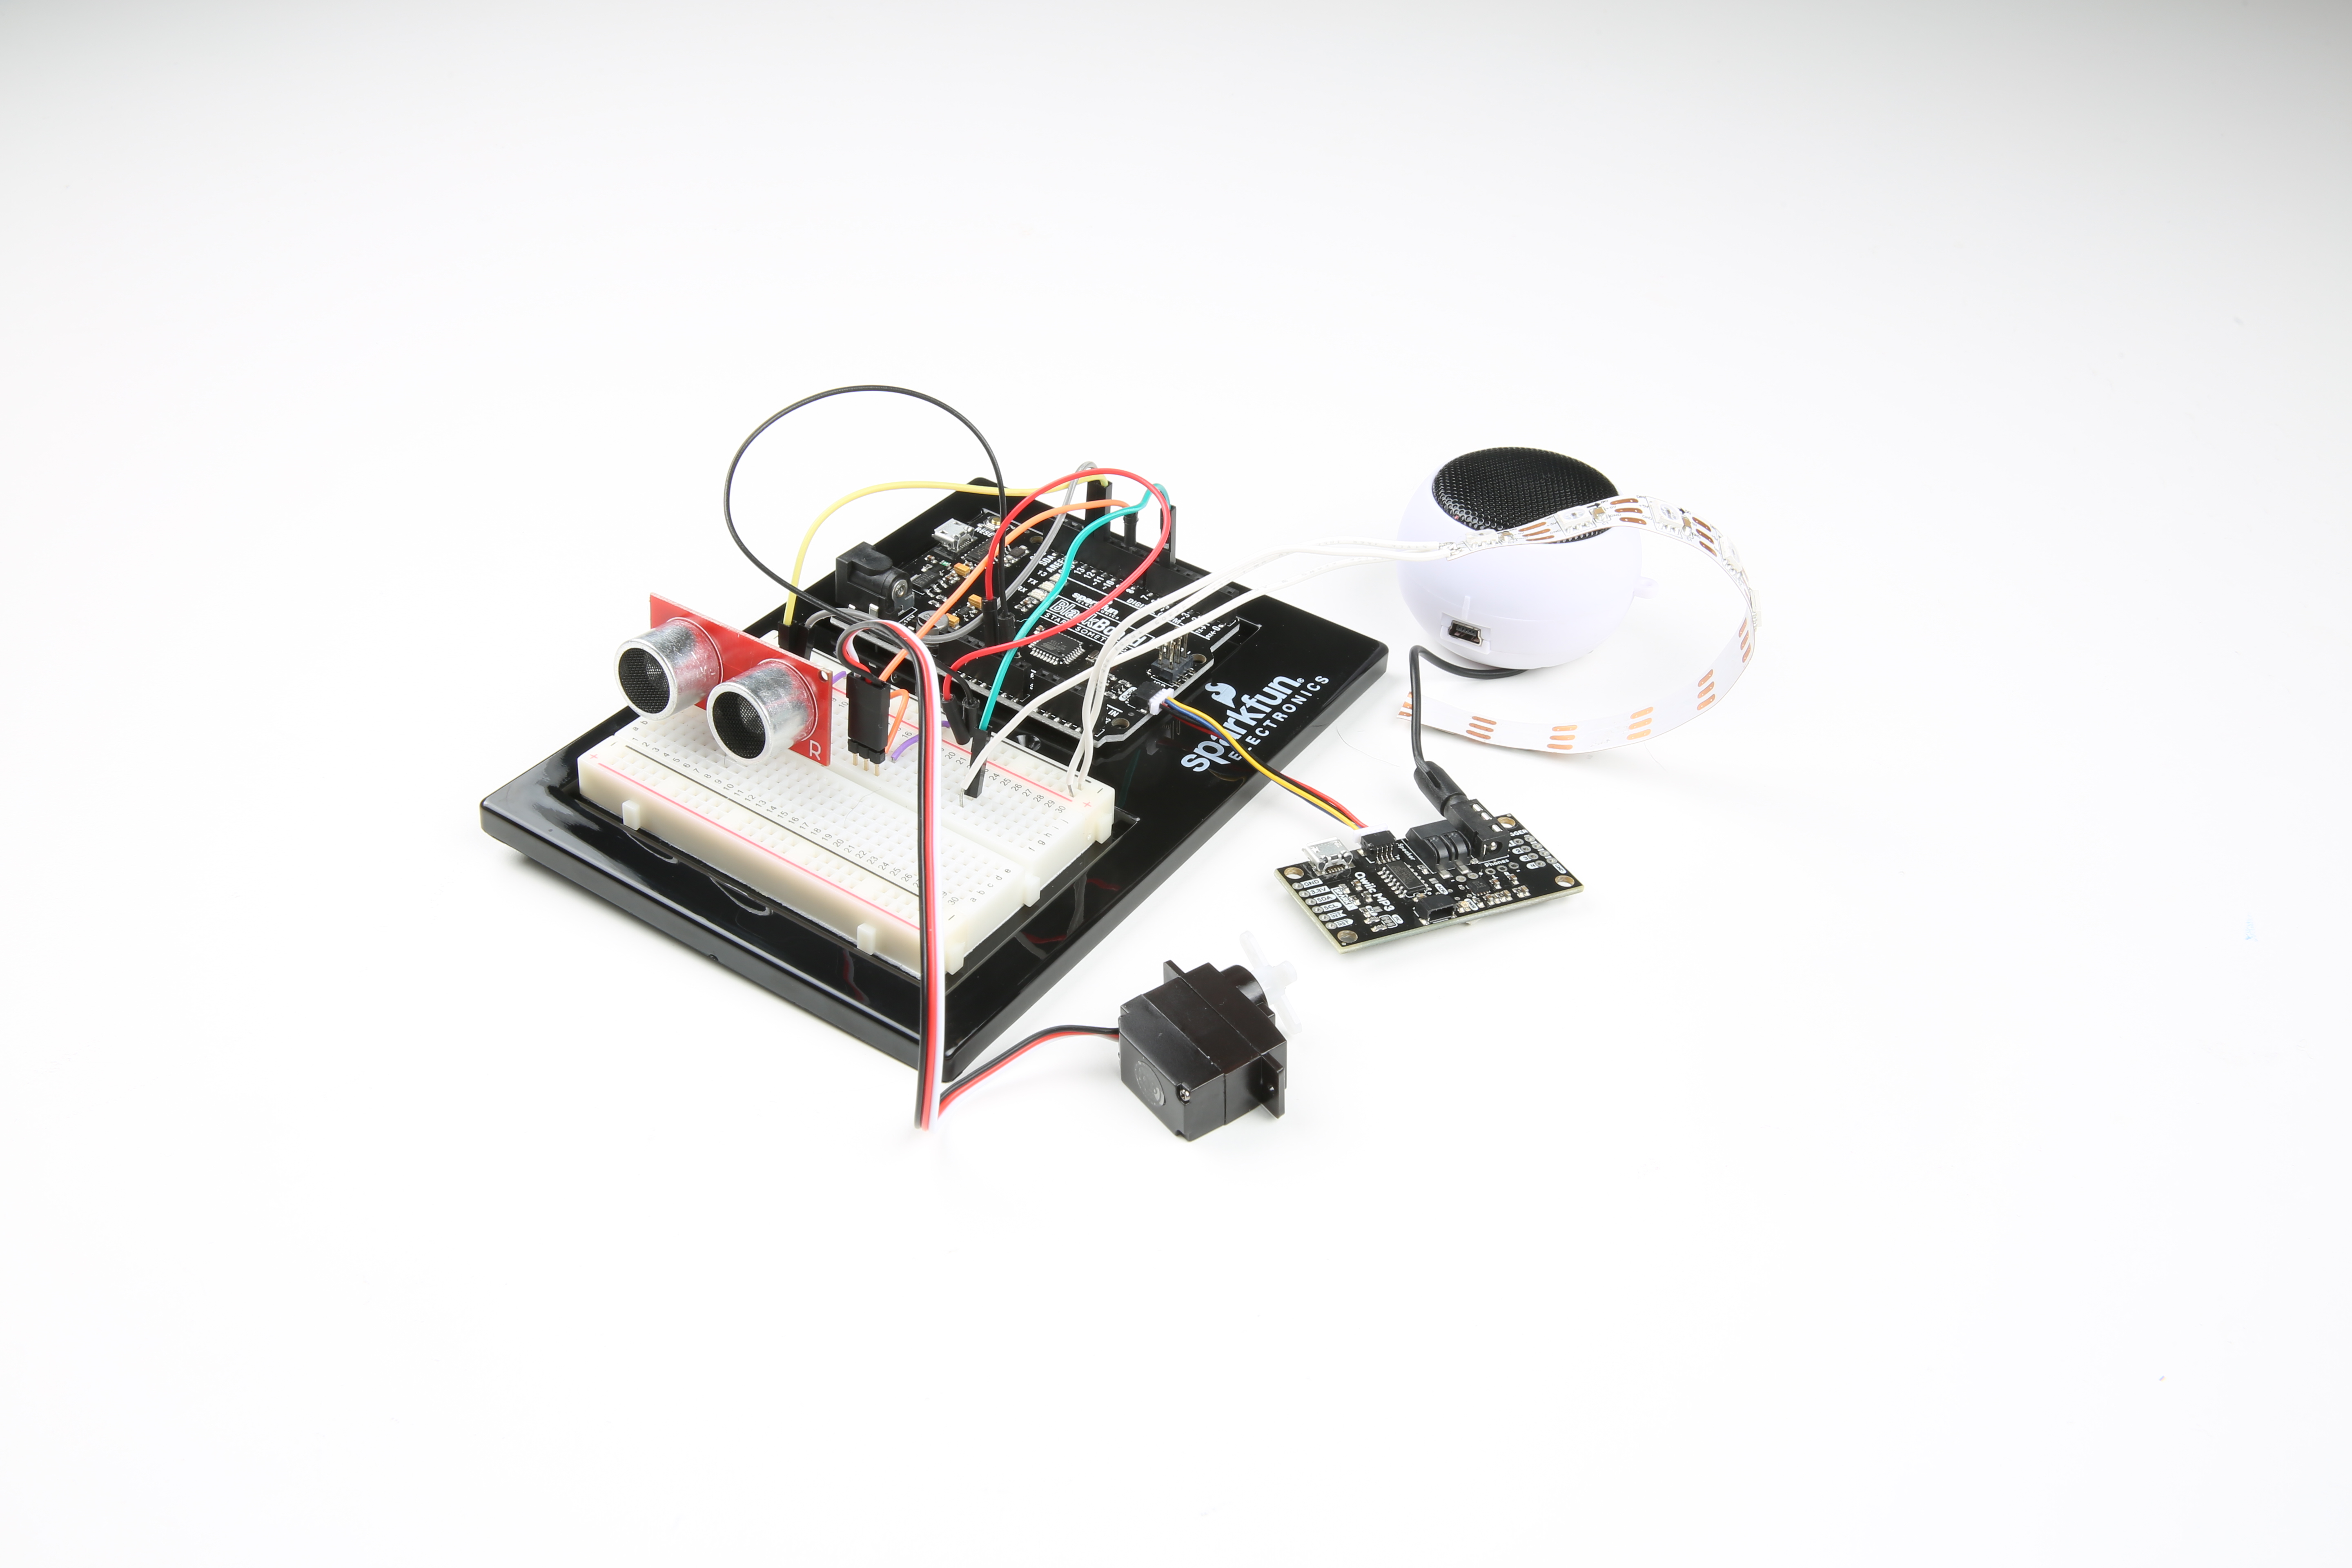
My Interactive Spooky Halloween Cat consists of a plastic skeleton cat I found at Michaels and an enclosure that I laser cut from black acrylic. Inside the enclosure is a SparkFun BlackBoard as the brains of the project, an Ultrasonic Sensor for distance sensing, a Qwiic MP3 Trigger Board to add some hissing sound effects, a small hamburger speaker for the sound, a small servo motor to create motion in the cat's jaw, 16 WS2812 LEDs to create the red light and a small breadboard to make the circuit building quick and easy. A full list of parts used in this project can be found here.
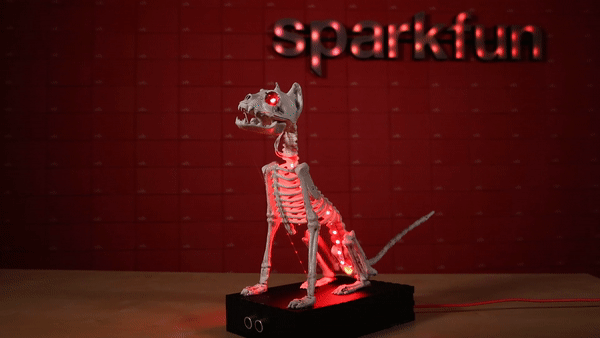
Let's take a look at how this project interacts with the world around it. When a user enters within 100 cm of the ultrasonic sensor, the skeleton and eye sockets light up, it makes a loud, angry hissing sound, and the jaw begins moving up and down.
In order to accomplish this interaction (in addition to the circuitry described further down), the servo motor is connected to a clear strand of fishing line tied to the bottom of the cat's jaw bone, so when the servo pulls back, the jaw opens up. I also added some white elastic tied to the top and bottom part of the jaw, kind of like a rubber band on braces, ensuring the jaw closes when the servo pushes back forward. I cut small sound holes in the enclosure above where the speaker is to get the best out of the sound.
I also made some modifications to the WS2812 LEDs. First, I cut two individual LEDs from the strip and soldered them together with hook-up wire at a distance of about one half-inch. Then, I connected these via hook-up wire to the remaining 14 LEDs on the rest of the strip. I unscrewed the cat's skull to remove it from the body and open it up, then carefully drilled holes in the eye sockets, behind which I glued my two individual LEDs. Then I put the head back together and onto on the rest of the skeleton. Finally, I carefully hot glued the remainder of the LEDs down the inside of the cat's spine.
Below is a photograph of the circuit I used in this project. Because some of the parts I used are not available for frtizing diagrams, and because it is hard to see all the connections, I created the table below the image to outline each connection used in this project.
| PART / PIN | CONNECTION |
|---|---|
| WS2812 Strip VCC | 5V on SparkFun BlackBoard |
| WS2812 GND | GND on SparkFun Black Board |
| WS2812 DIN | Pin 6 on SparkFun BlackBoard |
| Small Servo VCC | 5V on the SparkFun BlackBoard |
| Small Servo GND | GND on SparkFun BlackBoard |
| Small Servo Data Pin | Pin 9 on SparkFun BlackBoard |
| UltraSonic Sensor GND | GND on SparkFun BlackBoard |
| UltraSonic Sensor VCC | 5V on the SparkFun BlackBoard |
| UltraSonic Sensor Echo Pin | Pin 12 on SparkFun BlackBoard |
| UltraSonic Sensor Trig Pin | Pin 13 on SparkFun BlackBoard |
| Qwiic MP3 Trigger | Connect to Qwiic connector on SpakrFun BlackBoard via Qwiic Cable |
| Hamburger Speaker Jack | Audio Jack on Qwiic MP3 trigger |
My program for this project can be found below. You will notice there are two programs included. The first is the program specific for this project's interaction. The second is written for interfacing with the MP3 Trigger Shield and should be pasted into a second tab in your Arduino IDE. The MP3 Trigger code has all been picked up from Nate's example code for this board, which allowed me to add sound incredibly easily!
Interaction Code:
/*Interactive Halloween Cat Sketch by Melissa Felderman for SparkFun Electrnoics October 2018
MP3 trigger control taken from example code by Nathan Seidle:                 https://cdn.sparkfun.com/assets/d/d/e/a/1/Qwiic_MP3_Trigger_Examples.zip */

#include <Adafruit_NeoPixel.h>
#include <Wire.h>
#include <Servo.h>

byte mp3Address = 0x37; //Unshifted 7-bit default address for Qwiic MP3

#define PIN 6
#define numPix 16
#define trigPin 13
#define echoPin 12

bool state = true;


Servo myservo;
Adafruit_NeoPixel strip = Adafruit_NeoPixel(numPix, PIN, NEO_GRB + NEO_KHZ800);


void setup() {
  Serial.begin(9600);
  pinMode(trigPin, OUTPUT);
  pinMode(echoPin, INPUT);

  Wire.begin();
  strip.begin();
  myservo.attach(9);

  myservo.write(180);
  mp3ChangeVolume(31); //Volume can be 0 (off) to 31 (max)
}

void loop() {
  long duration, distance;
  digitalWrite(trigPin, LOW);  // Added this line
  delayMicroseconds(2); // Added this line
  digitalWrite(trigPin, HIGH);
  //  delayMicroseconds(1000); - Removed this line
  delayMicroseconds(10); // Added this line
  digitalWrite(trigPin, LOW);
  duration = pulseIn(echoPin, HIGH);
  distance = (duration / 2) / 29.1;

 if (distance < 100) {  // This is where the LED On/Off happens


    mp3PlayTrack(1);
    for (int i = 0; i < numPix; i++) {
      strip.setPixelColor(i, 255, 0, 0);
    } strip.show();

    for (int i = 0; i < 8; i++){
    myservo.write(90);
    delay(1000);
    myservo.write(180);
    delay(1000);
    }
  }

  else {
    for (int i = 0; i < numPix; i++) {
      strip.setPixelColor(i, 0, 0, 0);
    } strip.show();
    myservo.write(180);


  }
  if (distance >= 100 || distance <= 0) {
    Serial.println("Out of range");
  }
  else {
    Serial.print(distance);
    Serial.println(" cm");
  }
  delay(500);
}
MP3 Trigger Code by Nate:
//These are the commands we can send
#define COMMAND_STOP 0x00
#define COMMAND_PLAY_TRACK 0x01 //Play a given track number like on a CD: regardless of file names plays 2nd file in dir.
#define COMMAND_PLAY_FILENUMBER 0x02 //Play a file # from the root directory: 3 will play F003xxx.mp3
#define COMMAND_PAUSE 0x03 //Will pause if playing, or starting playing if paused
#define COMMAND_PLAY_NEXT 0x04
#define COMMAND_PLAY_PREVIOUS 0x05
#define COMMAND_SET_EQ 0x06
#define COMMAND_SET_VOLUME 0x07
#define COMMAND_GET_SONG_COUNT 0x08 //Note: This causes song to stop playing
#define COMMAND_GET_SONG_NAME 0x09 //Fill global array with 8 characters of the song name
#define COMMAND_GET_PLAY_STATUS 0x0A
#define COMMAND_GET_CARD_STATUS 0x0B
#define COMMAND_GET_VERSION 0x0C
#define COMMAND_SET_ADDRESS 0xC7

//Checks the status of the player to see if MP3 is playing
//Returns true if song is playing
boolean mp3IsPlaying()
{
  mp3Command(COMMAND_GET_PLAY_STATUS);

  delay(20); //Give the QMP3 time to get the status byte from MP3 IC before we ask for it

  //01: play, 02: stop, 03: pause
  byte playStatus = mp3GetResponse();
  if(playStatus == 0x01) return(true);
  return(false);
}

//Plays a given track number
//Think of this like a CD. The user can arrange the order of MP3s
//however. playTrack(4) will play whatever is in the 4th file.
void mp3PlayTrack(byte trackNumber)
{
  mp3Command(COMMAND_PLAY_TRACK, trackNumber); //Play track
}

//Plays a file that has been named specifically.
//For example: passing in 6 will play F006xxx.mp3
void mp3PlayFile(byte fileNumber)
{
  mp3Command(COMMAND_PLAY_FILENUMBER, fileNumber); //Play file number
}

//Stop playing the current track
void mp3Stop()
{
  mp3Command(COMMAND_STOP);
}

//Change the equalizer to one of 6 types
void mp3ChangeEQ(byte eqType)
{
  //0-normal, 1-pop, 2-rock, 3-jazz, 4-classical, 5-bass
  mp3Command(COMMAND_SET_EQ, eqType); //Change equalizer to bass
}

//Get the current status of the Qwiic MP3
byte mp3Status()
{
  return(mp3GetResponse());
}

//Checks to see if MP3 player has a valid SD card
boolean mp3HasCard()
{
  mp3Command(COMMAND_GET_CARD_STATUS);

  delay(20); //Give the QMP3 time to get the status byte from MP3 IC before we ask for it

  return(mp3GetResponse());
}

//Get the 8 characters of the song currently playing
String mp3SongName()
{
  String thisSongName = "";
  mp3Command(COMMAND_GET_SONG_NAME);

  delay(50); //Give the QMP3 time to get the name from MP3 IC before we ask for it

  Wire.requestFrom(mp3Address, 8); //Song names are max 8 chars

  while(Wire.available())
  {
    thisSongName += (char)Wire.read();
  }
  return(thisSongName);
}

//Get the number of songs on the SD card (in root and subfolders)
//Limited to 255
byte mp3SongCount()
{
  mp3Command(COMMAND_GET_SONG_COUNT); //Get current song count

  delay(50); //Give the QMP3 time to get the count from MP3 IC before we ask for it

  return(mp3GetResponse());
}

//Change volume to zero (off) to 31 (max)
void mp3ChangeVolume(byte volumeLevel)
{
  mp3Command(COMMAND_SET_VOLUME, volumeLevel); //Change volume
}

//Play the next track
//Think of this like a CD. The audio files can be in any order. The user
//sets the file order. This plays the next one.
void mp3PlayNext()
{
  mp3Command(COMMAND_PLAY_NEXT);
}

//Play the previous track
//Think of this like a CD. The audio files can be in any order. The user
//sets the file order. This plays the previous one.
void mp3PlayPrevious()
{
  mp3Command(COMMAND_PLAY_PREVIOUS);
}

//Checks to see if Qwiic MP3 is responding over I2C
boolean mp3IsPresent()
{
  Wire.beginTransmission(mp3Address);
  if (Wire.endTransmission() != 0)
    return(false); //Sensor did not ACK
  return(true);
}

//Pause a currently playing song, or begin playing if current track is paused
boolean mp3Pause()
{
  mp3Command(COMMAND_PAUSE);
}

//Change the I2C address
//If you forget what address you've set the QMP3 to then close the
//ADR jumper. This will force the I2C address to 0x36
boolean mp3ChangeAddress(byte address)
{
  mp3Command(COMMAND_SET_ADDRESS, address);
  mp3Address = address; //Change the global variable to match the new address
}

//Send command to Qwiic MP3 with options
boolean mp3Command(byte command, byte option)
{
  Wire.beginTransmission(mp3Address);
  Wire.write(command);
  Wire.write(option);
  if (Wire.endTransmission() != 0)
    return(false); //Sensor did not ACK
  return(true);
}

//Send just a command to Qwiic MP3
boolean mp3Command(byte command)
{
  Wire.beginTransmission(mp3Address);
  Wire.write(command);
  if (Wire.endTransmission() != 0)
    return(false); //Sensor did not ACK
  return(true);
}

//Ask for a byte from Qwiic MP3
//The response depends on what the last command was
//It is often the system status but can be song count or volume level
byte mp3GetResponse()
{
  Wire.requestFrom(mp3Address, 1);

  if (Wire.available())
    return (Wire.read());

  Serial.println("Error: Sensor did not respond");
  return(0);
}

//Returns the firmware version as a float
float mp3GetVersion()
{
  mp3Command(COMMAND_GET_VERSION);

  Wire.requestFrom(mp3Address, 2); //2 bytes for Version

  if (Wire.available() == 0) return 0;
  float versionNumber = Wire.read();
  versionNumber += (float)Wire.read() / 10.0;

  return (versionNumber);
}
I hope you enjoyed reading about this project and that it inspired you to get spooky with your projects this Halloween. Let us know your thoughts in the comments below!
Interested in learning more about distance sensing?
Learn all about the different technologies distance sensors use and which products would work best for your next project.
Take me there!


Help! Trying to build this but it looks like there are some items that weren't on the parts list. Are there more items that are needed that were not on the parts list?
Your electronic cat is unbelievable good,extraordinary looking for LED lighting. I think you have to get an award.
Are the sound file(s) posted? Thx
No they are not. I just googled free cat hiss sounds and picked out the ones I liked!
Can I use a Arduino Uno board?
Yes definitely. The MP3 trigger board here uses the QWIIC connect which is why I chose the BlackBoard. You can either use the solderable connections on this board to interface with your Uno, or use the QWIIC shield, or use the regular MP3 Player shield for Unos.
Ooh - I really like your idea! There's LOTS of room for enhancements without changing the hardware! One is to have "random colors" for the LEDs, or even changing colors during an "event". (You could also base the color on the distance!) Another would be to have multiple tracks, randomly selecting between them each time it gets triggered.
BTW, on the point of scaring the kids, there was an article in (IIRC) Popular Electronics maybe 30 years ago describing a circuit that generated a "weird sound" when the IR beam was broken. I built it up, and hid it in the bushes near the front door on Halloween. It surprised many kids, but then near 10:00 PM I heard a group of girls coming up the walkway. IMHO, they were really too old to be out trick-or-treating, but que' sera, sera. When they triggered the sound effect, you should have heard them screech! It made the effort worth while!