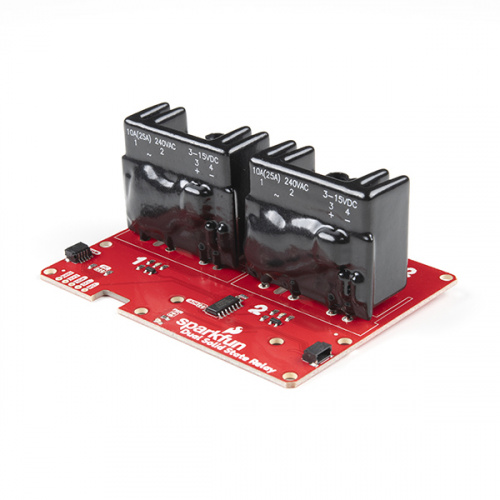
Touchless light show with the Qwiic Dual Solid State Relay
Working from home is not without its difficulties, but with just a couple of proximity sensors and SparkFun's new Qwiic Dual Solid State Relay, you can create a light show with a wave of your hands.

Last week we released the SparkFun Qwiic Dual Solid State Relay, and as is usually the case, I was tasked with learning about it, then scripting and filming a video to tell all of you about it. This happens pretty much every week, and while the varying technologies of each new product come with their own learning curves, recent wrinkles like supply chain issues and the limited time I can spend at SparkFun (for employee safety) have added new wrinkles into the timeline of releasing a new product.
Naturally we keep a schedule of what products we’re expecting to release in the coming weeks. I pore over datasheets, read through the libraries our engineers are building, and try to come up with ideas that might make for an interesting demo build. Of course, working from home is not the same as heading into SFHQ every day. The ideas that race through my mind haven’t changed, but the inventory on hand certainly has. There have been times over the past six months when I have come up with a build idea, only to have my dreams dashed when I dig through my parts drawer and find that I don’t possess the component around which I was planning my build. This week was a good example of that. I knew that I had multiple VL53L1X Distance Sensors on hand, but knowing that they have a hardware defined I2C address, I knew that I would need a Qwiic MUX Breakout to use more than one of these sensors. And it turned out that I didn't have a MUX on hand. So I pulled the Qwiic VCNL4040 Proximity Sensor off of a previous project, and proceeded forward.
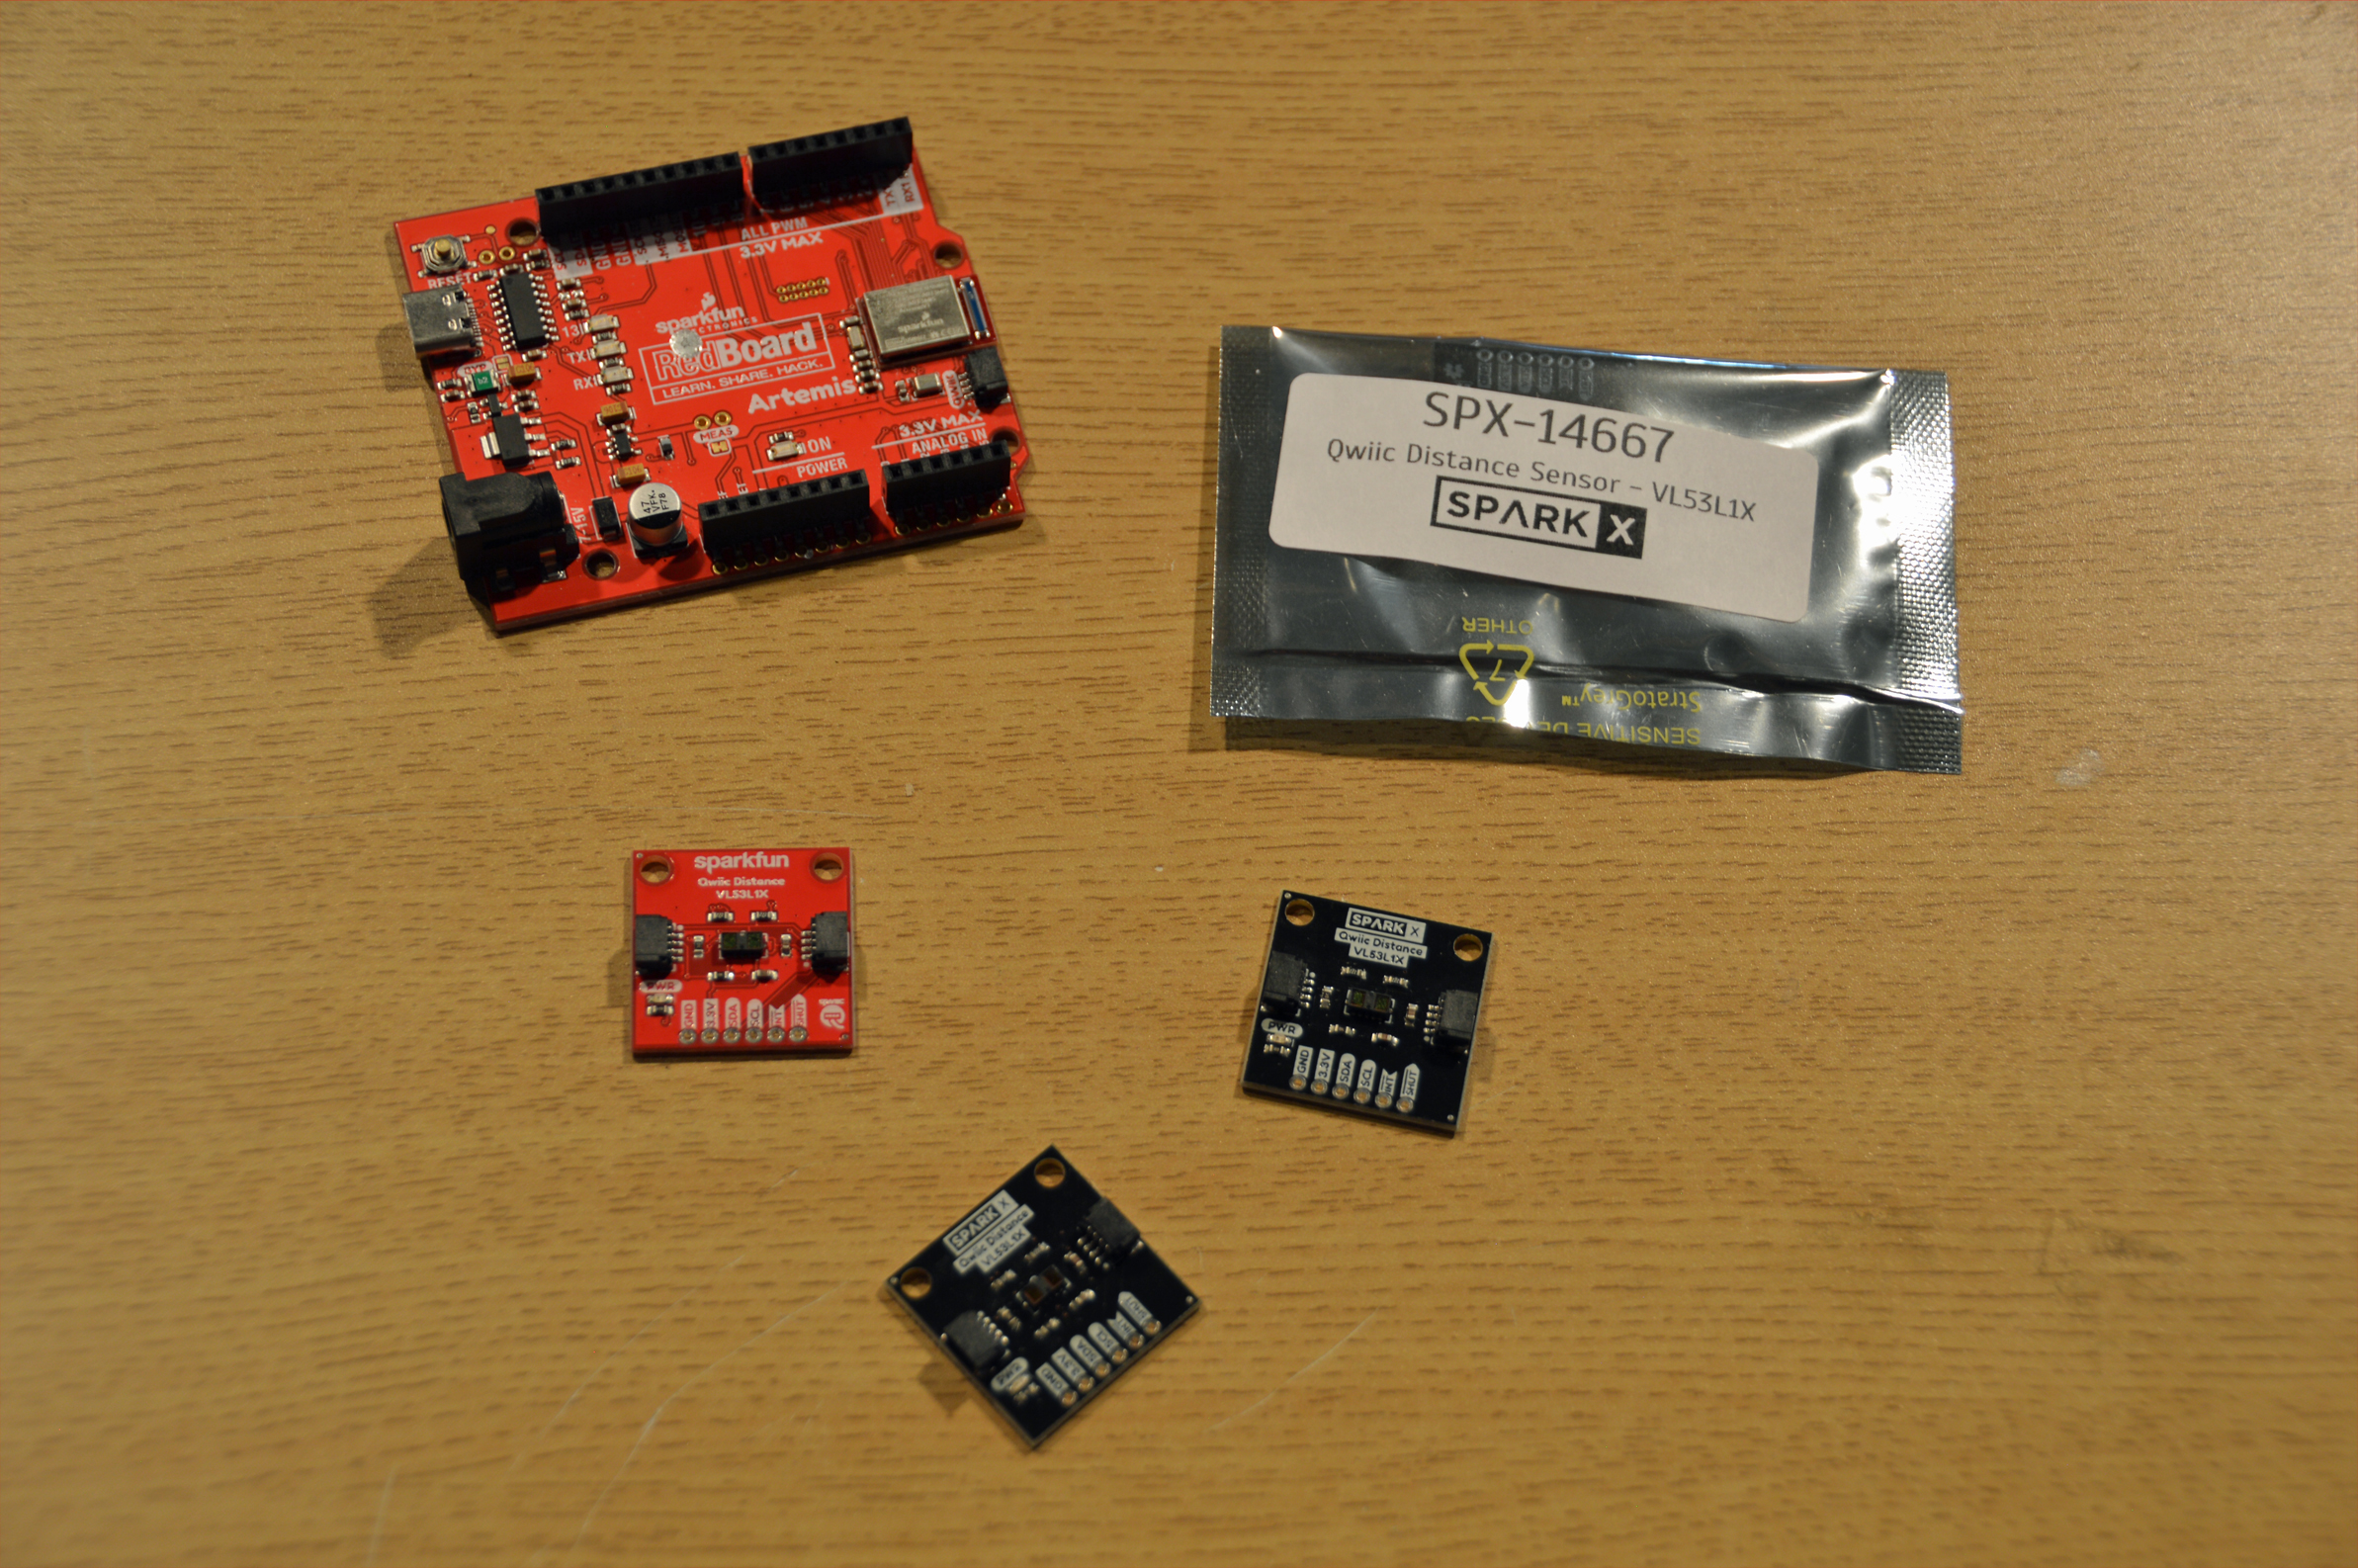
VL53L1X Proximity sensors aplenty, but without a MUX, I'm limited to using only one
Sometimes this theoretical portion of my work week ("this should work...theoretically") leads me right up the moment when I have to start filming the new video. Such was the case this week. I didn’t get my hands on the Qwiic Dual SSR until I arrived at SFHQ to do the filming. Luckily I had completed the outline for the video, as well as the sketch for the demo build, so I figured it would be as simple as connecting the relay board via its Qwiic connector, wiring the load side and watching it work.
That’s not exactly how it happened.
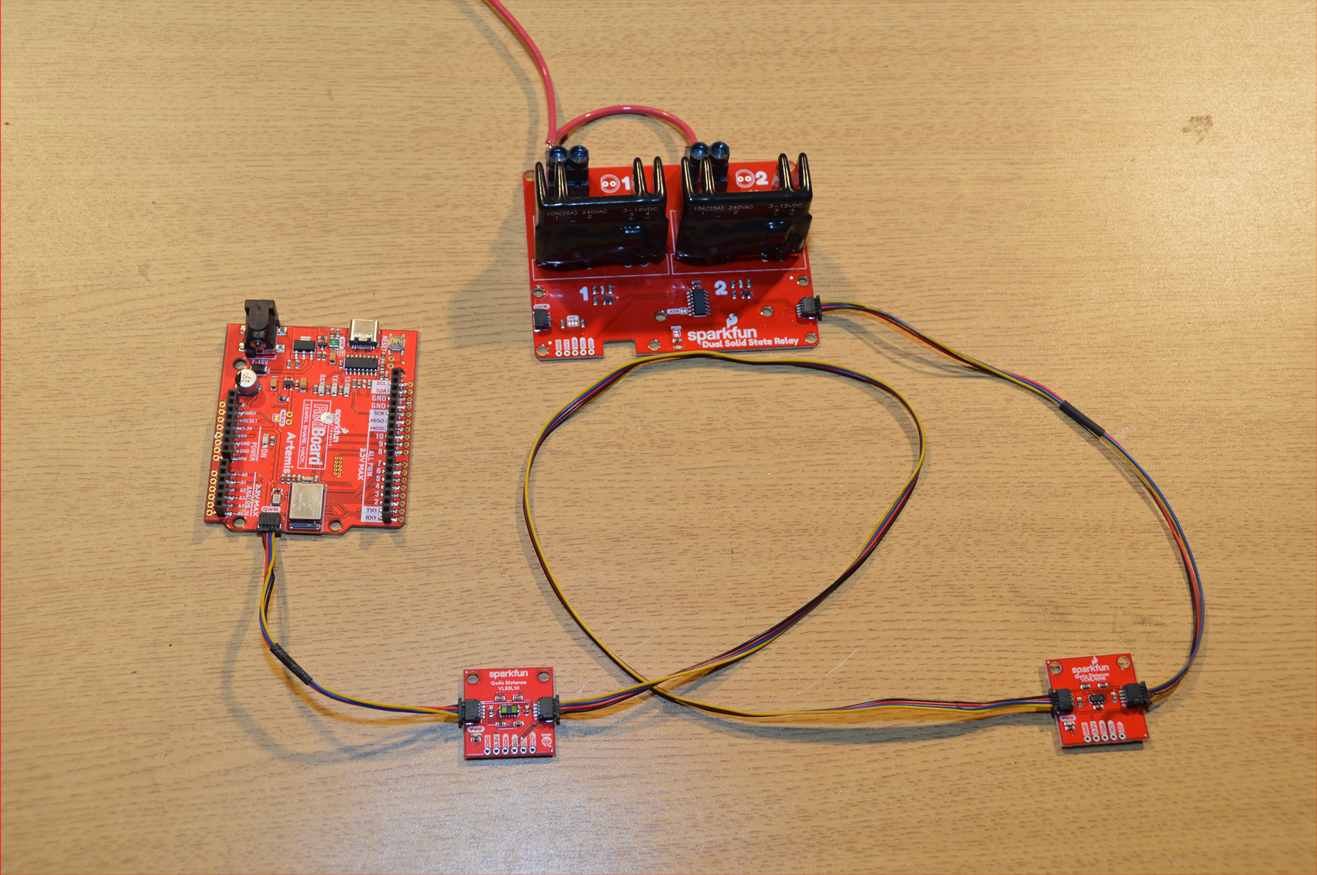
Even though the ranges of the two sensors differ, for this build they were both perfectly suited
I connected everything together and powered it up, and nothing happened. Since I had written and tested the sketch on a different Qwiic relay board, I figured that since our Qwiic Relay Library for Arduino is universal across all of our Qwiic Relay boards, all I’d need to do would be to change the I2C address, and everything would work perfectly – but it didn’t. I checked all of the connections, examined my sketch, looked at the library to make sure I was using the correct I2C address for the new Dual Solid State Relay board, and all of it checked out.
I ran an I2C sniffer, and voila! Even though the board powered up, and I got the status light, I was not receiving an I2C address from the board. With the timeline we impose on ourselves for many of our boards, there will be times when a board will come up to the Marketing department hot off the reflow oven so that our (amazing) photographer Juan can get images of the component and get them to the folks who are putting together the product web page. Sometimes in the process, the components accidentally bypass the firmware flash stage. I simply took the board down to production, they flashed it, I plugged it back into my setup, and everything was Jake!
The code for the project was just a very basic amalgamation of the first examples of each of the VL53L1X distance sensor, the VCNL4040 Proximity Sensor, and the Qwiic Dual Solid State Relay. I added a delay in the void loop so I could watch the proximity digits for each sensor, then used those to set the limits to trigger each of the two relays.
/*
 * Dual Solid State Relay Demo
 * Rob Reynolds, SparkFun Electronics, September 2020
 * Using two separate sensors, this demo
 * toggles the two relays of the SparkFun Qwiic
 * Dual Solid State Relay on and off as you
 * hold your hands over the sensors.
 *
 * SparkFun labored with love to create this code. Feel like supporting open source hardware?
 * Buy a board or two from SparkFun!
 * SparkFun Qwiic Dual Solid State Relay - (https://www.sparkfun.com/products/16810)
 * SparkFun Distance Sensor Breakout VL53L1X - (https://www.sparkfun.com/products/14722)
 * SparkFun Proximity Sensor Breakout VCNL4040 - (https://www.sparkfun.com/products/15177)
 *
 * License: This code is public domain but you buy me a beer if you use
 * this and we meet someday (Beerware license).
 */

#include <Wire.h>

//**********VCNL4040 Setup here***************
//Click here to get the library: http://librarymanager/All#SparkFun_VCNL4040
#include "SparkFun_VCNL4040_Arduino_Library.h"
VCNL4040 proximitySensor;

//*********VL53L1X Setup here***************
#include <ComponentObject.h>
#include <RangeSensor.h>
#include <SparkFun_VL53L1X.h>
#include <vl53l1x_class.h>
#include <vl53l1_error_codes.h>
#include "SparkFun_VL53L1X.h" //Click here to get the library: http://librarymanager/All#SparkFun_VL53L1X

SFEVL53L1X distanceSensor;

//************Here's the Dual SSR section***********
#include "SparkFun_Qwiic_Relay.h"
#define RELAY_ADDR 0x0A // Alternate address 0x6C
Qwiic_Relay dualRelay(RELAY_ADDR);

void setup()
{
  Serial.begin(115200);
  Serial.println("SparkFun VCNL4040 Example");

  Wire.begin(); //Join i2c bus

  if (proximitySensor.begin() == false)
  {
    Serial.println("Device not found. Please check wiring.");
    while (1); //Freeze!
  }

  if(!dualRelay.begin())
    Serial.println("Check connections to Qwiic Relay.");
  else
    Serial.println("Dual Relay Light Show!!");

  Serial.println("VL53L1X Qwiic Test");

  if (distanceSensor.begin() != 0) //Begin returns 0 on a good init
  {
    Serial.println("Sensor failed to begin. Please check wiring. Freezing...");
    while (1)
      ;
  }
  Serial.println("Sensor online!");

  dualRelay.turnAllRelaysOff();

  delay(1000);
}

void loop()
{
  //Get proximity value. The value ranges from 0 to 65535
  //so we need an unsigned integer or a long.
  unsigned int proxValue = proximitySensor.getProximity();

  Serial.print("Proximity Value: ");
  Serial.print(proxValue);
  Serial.println();

  delay(10);

  if (proxValue > 12){
    dualRelay.turnRelayOn(1);
    delay(50);
  }

  else if (proxValue < 12){
    dualRelay.turnRelayOff(1);
    delay(50);
}

  //********VL53L1X section*************
  distanceSensor.startRanging(); //Write configuration bytes to initiate measurement
  while (!distanceSensor.checkForDataReady())
  {
    delay(1);
  }

  int distance = distanceSensor.getDistance(); //Get the result of the measurement from the sensor
  distanceSensor.clearInterrupt();
  distanceSensor.stopRanging();

  Serial.print("Distance: ");
  Serial.print(distance);
  Serial.println();

  if (distance < 400){
    dualRelay.turnRelayOn(2);
    Serial.println("Relay 4 is hot.");
    delay(50);
  }

  else if (distance > 400){
    dualRelay.turnRelayOff(2);
    delay(50);
  }

  //delay(500); //uncomment this delay for testing
}
Again, when working on the high voltage side, make sure that you are knowledgeable and comfortable with that level of potentially lethal voltage. Even though we have built safety measures into this board, like ground isolation between the relay and control circuitry and a milled out area isolating each side of the AC, without proper attention to detail this can be a dangerous product. If you're not quite ready to wire up your own AC lines, the IoT Power Relay is a good solution while you increase your knowledge of high voltage circuits.
If you are planning on creating your own light show, or any other relay-driven project, don't forget that you're not limited to a pair of relays on a single board. Since the ATTiny84A on the Dual Solid State Relay is software configurable, and communicates over I2C, you can daisy-chain over one hundred boards together, allowing you to create an entire light wall that you control by waving your arms around. Yeah, now who's DJ GOAT?!

Choosing the proper music is paramount to feeling like you might actually be able to take over the world


