Rapid Prototype Reflow Oven with A La Carte
Using SparkFun's A La Carte service to bypass a time consuming prototype phase in the development of a home reflow oven controller

I recently had the chance to test drive SparkFun's A La Carte custom board ordering system, and that opportunity came at just the right time to solve an issue for my business. As an artist and electronics consultant working from home I needed a way to solder custom SMT PCBs, and I needed it quickly to support an installation at the Museum of Boulder.
Having been interested in building a DIY reflow toaster oven for some time, and with access to a suitable toaster, the solution was clear: I just needed a control board that would allow for feedback control of the temperature within the toaster.
On Prototyping...
SparkFun products have always helped to accelerated prototype design - soldering headers to a breakout and wiring up your breadboard is certainly faster and more accessible than a totally custom process:
- research individual parts
- designing a custom PCB
- purchase from a myriad of suppliers
- manufacture small batches by hand
So why do I often still find myself carrying out the above steps? In reality, there are a few different levels of prototype between initial concept and a mass produced consumer product. Level one - an amalgamation of breakout boards interconnected by jumper wires - is just the "afternoon" implementation. It can be put together quickly but then it suffers these drawbacks:
- delicate (moving off your desk is treacherous)
- hard to scale/replicate (just as many jumpers to connect the second time)
The next level in the prototype continuum is a custom PCB meant to replace the breadboard and jumper wires from the first level. This solution is definitely more durable and easier to scale up. It is also attractive because typically the only soldering required is the connection of simple PTH headers. At this level you are still faced with a few barriers to entry:
- research pin connections/availability
- design a custom PCB
- order PCBs from a fab house
A La Carte creates a completely different path in prototyping, which eliminates all of the above issues! Anyone with an idea can configure a board with the sensors, actuators, inputs, outputs, connections and controller that they need. The program keeps track of pin capabilities and power constraints, and will warn the user when the requested design is electrically infeasible. It then automatically generates a PCB design which is very similar to an assembly of breakouts, and of course SparkFun will order the PCBs and manufacture as many copies as you need.

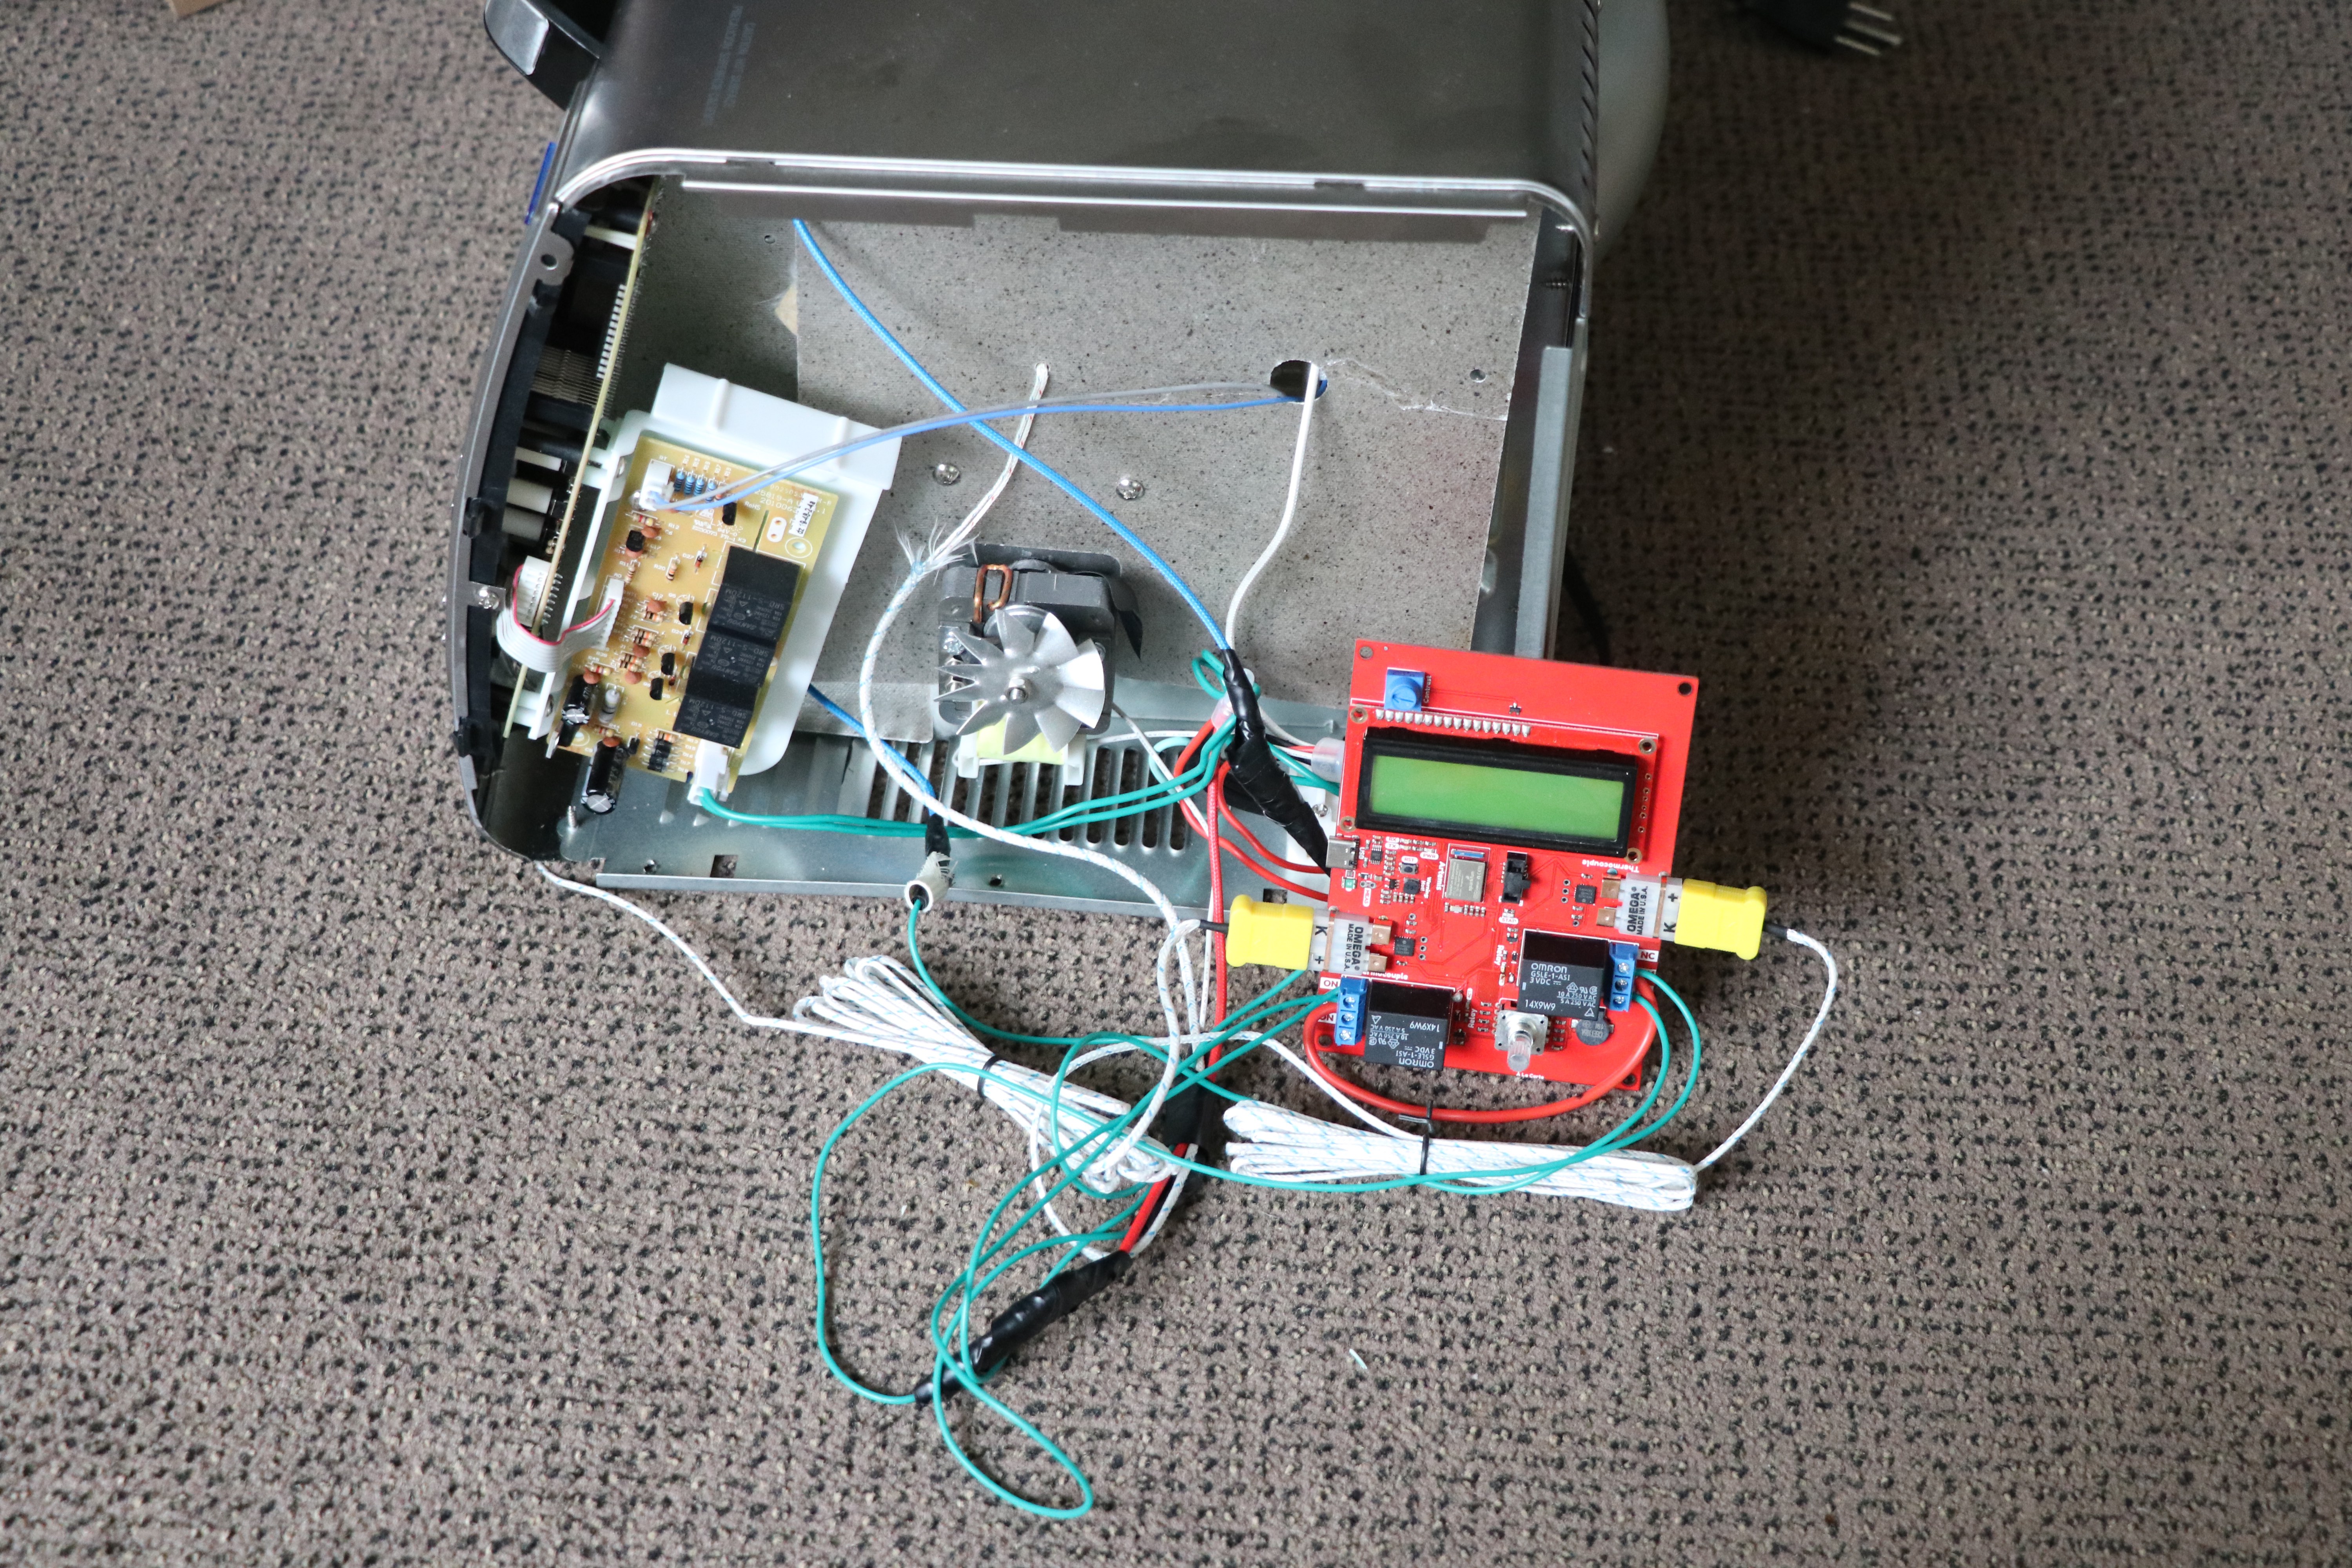
Coming back to the toaster issue, I was facing a few considerations:
- speed - minimize time to working prototype
- durability - work reliably over many uses and in real-life manufacturing environment
- efficiency - develop software quickly and in parallel with hardware
Some things that were not a concern in this design:
- form factor - it did not need to be visually appealing or fit in any prescribed enclosure
Given these needs, A La Carte was a perfect fit.
Using A La Carte
All you need to use A La Carte is a concept. In my case it was simple:
- control two heating coils at ~ 7A 120V AC
- measure pcb and air temperature for feedback
- simple user interface for selecting reflow profiles and starting jobs
On top of that, I thought it would be cool to leave the door open for wireless control in the future.
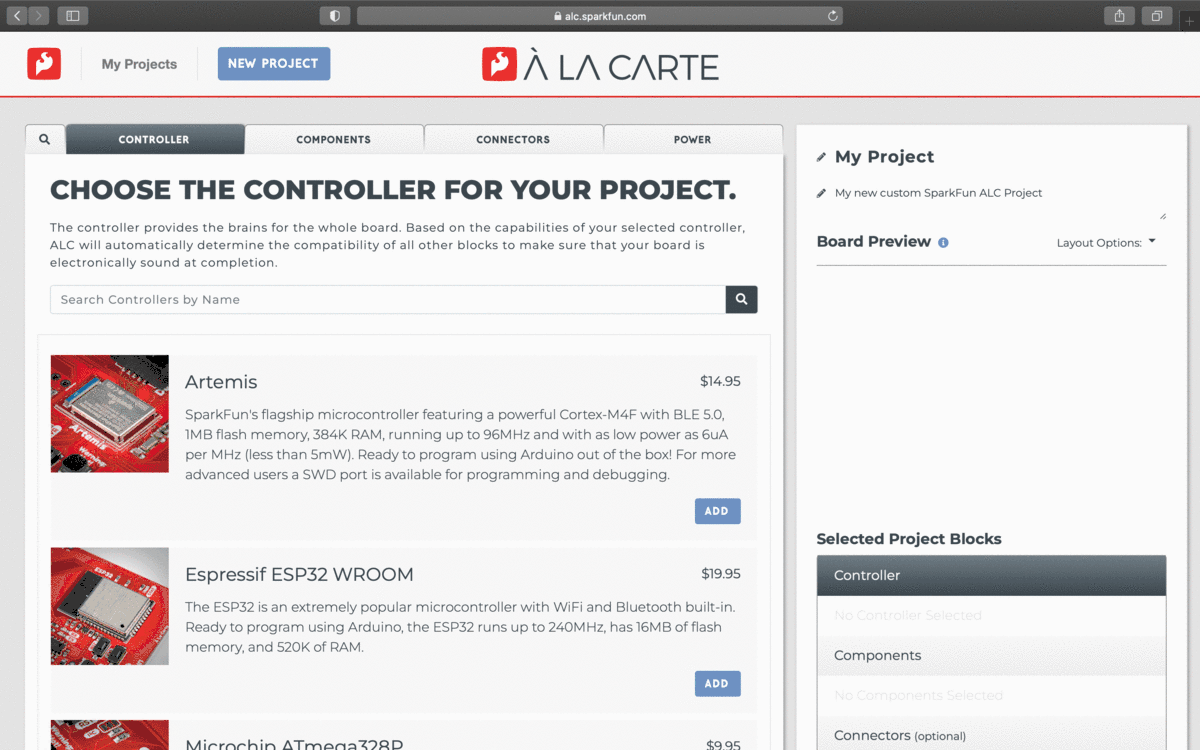
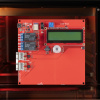
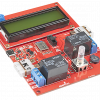
I started by going to the A La Carte designer tool, where I was prompted to choose a controller. Considering the simplicity of this project, my familiarity with the Apollo3 products, and my desire to ultimately use Bluetooth Low Energy for wireless control, I selected the Artemis controller module.
I then searched for an encoder and found one under the 'inputs' section. This would allow the user to navigate menus (scrolling) and make selections (clicking). It also has some LEDs built in, which can be additional output channels.
For displaying information to the user I chose the 16x2 character LCD screen. It was located in the 'outputs' section (if your search says nothing was found, try checking the other categories!). This would allow creation of simple text menus for operation and configuration of the controller.
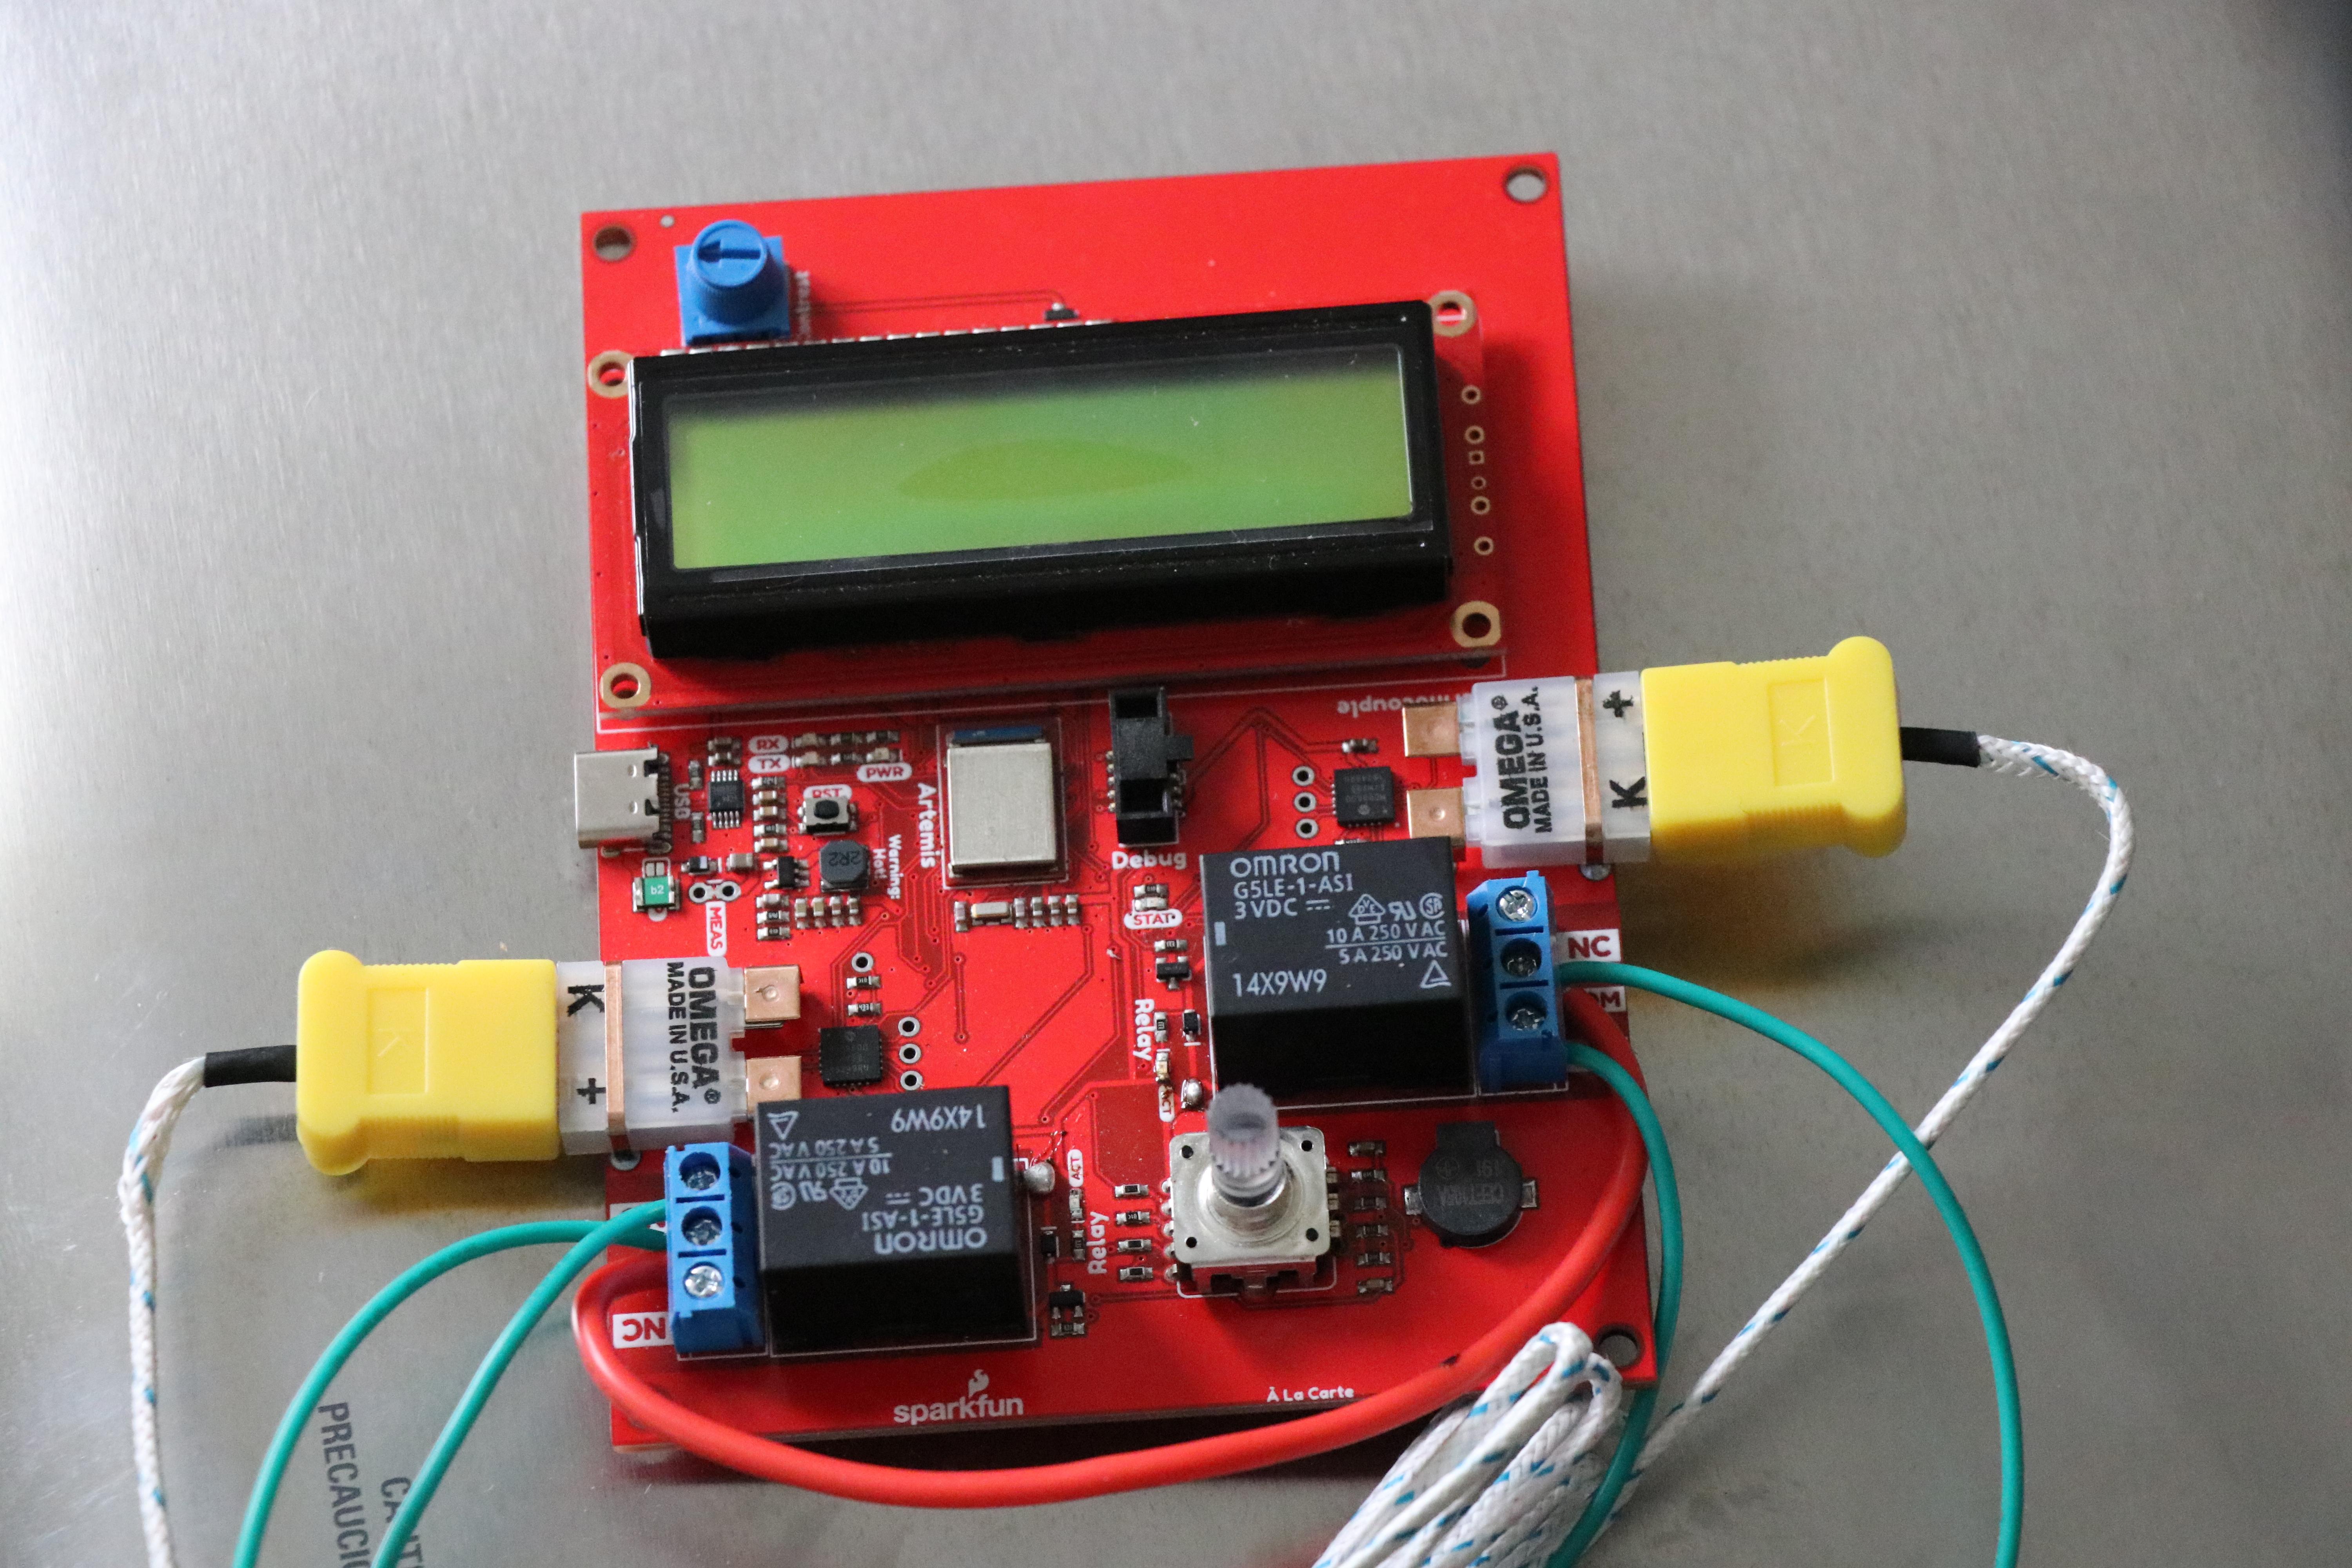
After that, I added two thermocouple amplifiers and two relays to measure and control the oven temperature respectively.
I named my project, added a description, and adjusted the dimensions of the board until I got something that looked pretty good. Overall the process took less than half an hour and absolutely no design experience! I was able to order the board and start working on software immediately.
Software Development
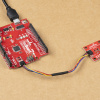
An advantage to using SparkFun products and A La Carte that may be under-appreciated is the support for rapid prototyping in software. Each of the blocks in ALC is based on an existing SparkFun product, the vast majority of which have complete Arduino support. While I waited for my boards to arrive, I was able to start my software development process.
My first step was to install the Arduino libraries for each main component (LCD, thermocouple amplifier and encoder) and check out the basic examples. I then made sure that I installed the core support for the Apollo3 microcontroller and selected the 'RedBoard Artemis ATP' board to take advantage of the direct pin mapping. Finally I assembled the relevant portions of the example code into a simple test sketch, choosing the appropriate pins based on the schematic that was generated from ALC. I checked that the code would compile and then got to work preparing the toaster oven while the boards shipped to me.
The convenience of getting started that quickly can't be understated! I was glad to be able to get this tool running quickly and get back to the other aspects of my business.
// BOARD: SparkFun RedBoard Artemis ATP

#include <SparkFun_MCP9600.h>


#define thermocoupleSDA D9
#define thermocoupleSCL D8
MbedI2C thermocoupleWire(thermocoupleSDA, thermocoupleSCL);

MCP9600 thermo0;
MCP9600 thermo1;


void setup() {
  Serial.begin(115200);
  delay(500);
  Serial.println("toaster oven begin");

  thermocoupleWire.begin();
  thermocoupleWire.setClock(100000);
  thermo0.begin(0x60, thermocoupleWire);
  thermo1.begin(0x66, thermocoupleWire);


  pinMode(17, OUTPUT);
  pinMode(38, OUTPUT);

}

void loop() {
  uint32_t now = millis();

  static uint32_t toggle_relays = 0;
  static uint32_t relays_state = false;
  if(now >= toggle_relays){
    toggle_relays = now + 30 * 60 * 1000;
    relays_state = !relays_state;
    digitalWrite(17, relays_state);
    digitalWrite(38, relays_state);
  }

  if(thermo0.available() && thermo1.available()){
    Serial.print(now);
    Serial.print(", ");
    Serial.print(thermo0.getThermocoupleTemp());
    Serial.print(", ");
    Serial.print(thermo1.getThermocoupleTemp());
    Serial.print(", ");
    Serial.print((thermo0.getAmbientTemp()+thermo1.getAmbientTemp())/2);
    Serial.print(", ");
    Serial.print(relays_state);
    Serial.println();
  }
}
Testing
When the boards arrived in the mail, I had everything else ready to accept them. I simply tightened down the screw terminals on the relay outputs, plugged in my K-type thermocouples, and uploaded my test sketch from Arduino.
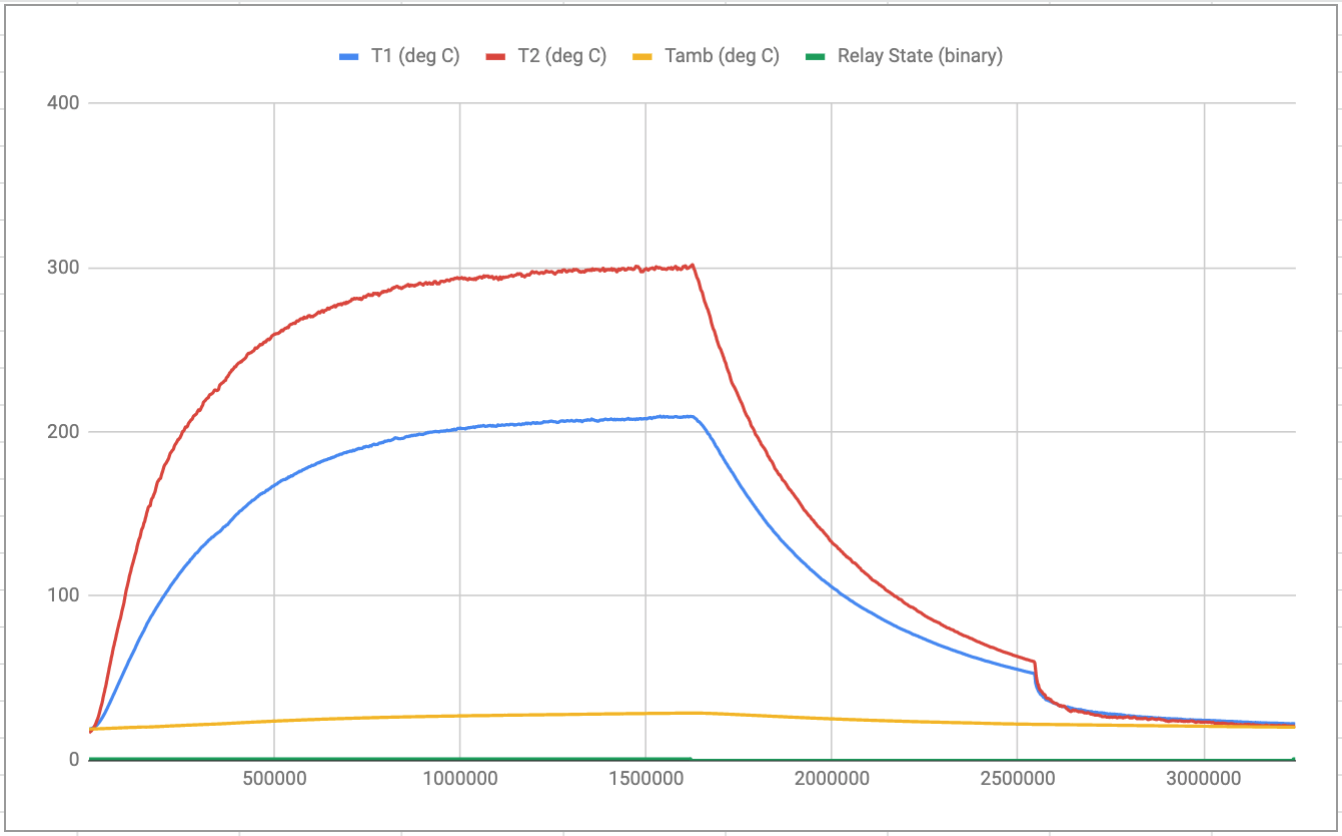
This simple test left the heating elements on for half an hour and then turned them off. The two internal temperatures as well as the board (ambient) temperature were all recorded.
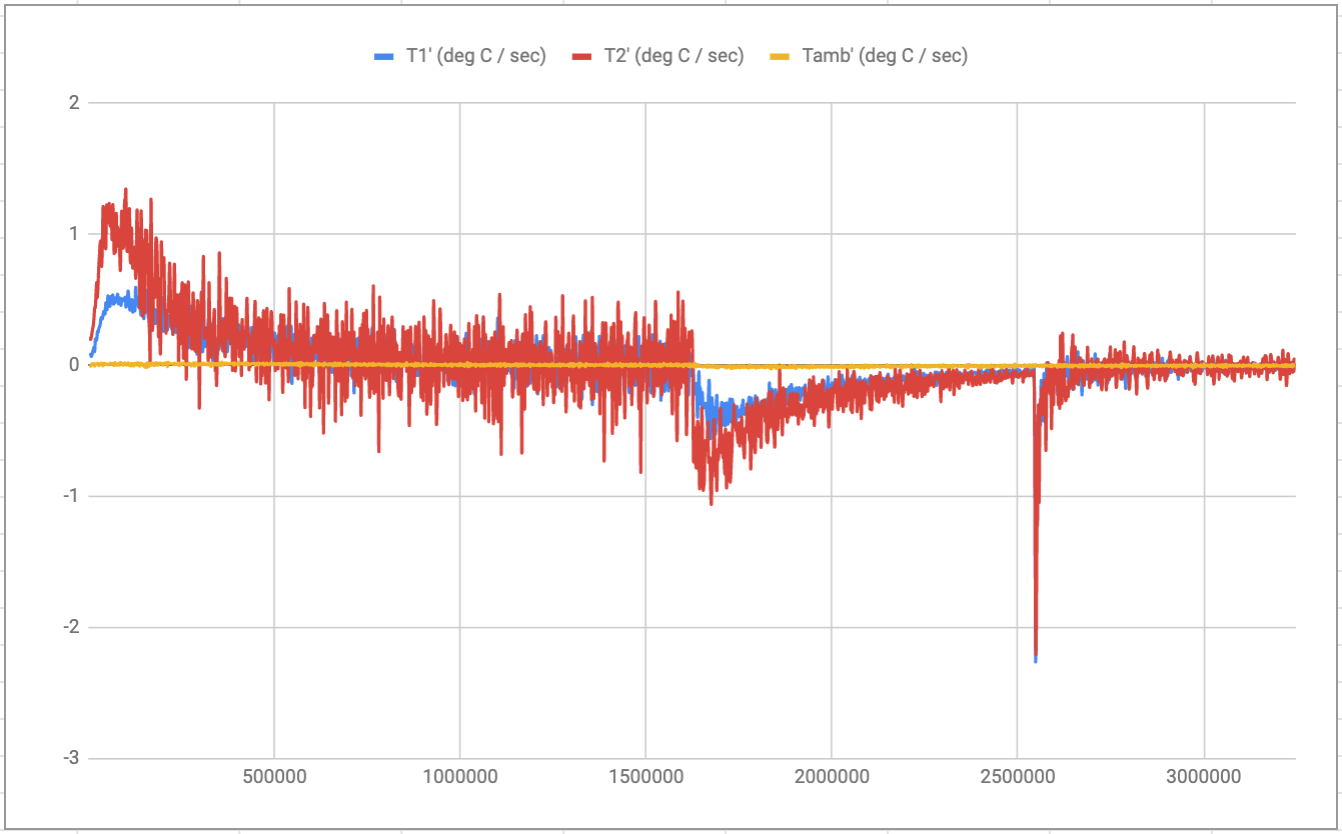
With some simple post-processing I was able to see that the oven could heat up at about one degree Celsius per second maximum. I will add some insulation to increase that slope to between two and three degrees per second. The cooling slope can approach negative two degrees Celsius per second with the door open - this should be sufficient and I plan to add a servo to open the door to help control cooling.
Ultimately...
The value of producing functional prototypes quickly and with little specialized knowledge is priceless. As a stepping stone to a final design, A La Carte will be useful for entrepreneurs and R&D engineers alike.


FWIW, having been an Engineer for a bit over 40 years, the first "breadboard" is generally spoken of as a "proof of concept", which can prove that something is actually feasable. I certainly agree that breakout boards can really help (especially since most of the most interesting parts are only available in SMD packages -- 40 years ago they were almost always in DIPs). The Qwiic system can also be of tremendous help.
I realize that for some projects, such as yours, the hardware is pretty simple, and even if you manage to do something like get the ON/OFF on the relay inverted, you can deal with it in software, but I've seen way too many designs where that's not true, and had they gone directly to a PCB, you'd test the results for maybe 10 or 15 minutes before deciding you'd just generated a thousand-dollar pile of scrap.