Blink RGB LEDs Remotely with MicroMod
This example demonstrates how to create a simple server on your local WiFi network with endpoints that toggle the six RGB LEDs onboard the MicroMod Input and Display Carrier board, while also logging the LED activity (and other endpoint requests) to the TFT display.

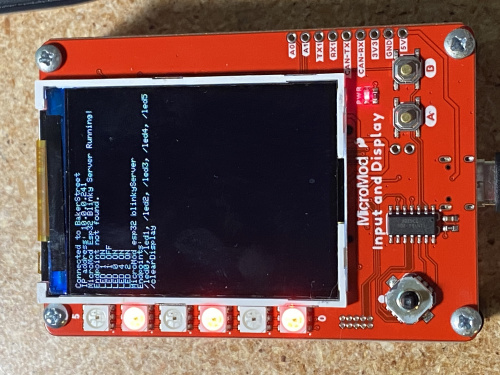
The MicroMod ESP32 Blinky Server in action
Do you want to get started with IOT projects? The MicroMod system makes it easy to get connected and coding, no wires necessary! Just pop the MicroMod ESP32 processor into any of our carrier boards, and you’re ready to go! This example demonstrates how to create a simple server on your local WiFi network with endpoints that toggle the six RGB LEDs onboard the MicroMod Input and Display Carrier board, while also logging the LED activity (and other endpoint requests) to the TFT display.
If you haven’t already, you’ll want to follow the hardware setup instructions for both the MicroMod Input and Display board and the ESP32 processor. Additionally, this sketch utilizes the FastLED library to control the onboard RGB LEDs.
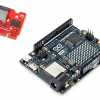
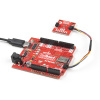
MicroMod ESP32 Processor Board Hookup Guide
A short hookup guide to get started with the SparkFun MicroMod ESP32 Processor Board.
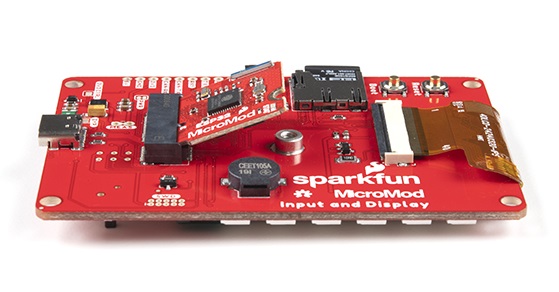
SparkFun MicroMod Input and Display Carrier Board Hookup Guide
A short Hookup Guide to get started with the SparkFun MicroMod Input and Display Carrier Board
Once you’ve got everything set up, enter your WiFi SSID and password into the MMIDesp32BlinkyServer.ino sketch below, and upload it to your MicroMod system. It may take a second, but a confirmation message should pop up on the TFT display once your device is successfully connected. If you don’t see that, try tapping the reset button on the underside of the carrier board. Once you see the message confirming that the server is running, you can toggle the RGB LEDs simply by sending requests to the corresponding endpoint from another device on your network.
/* MMIDesp32BlinkyServer.ino
* Marcus Stevenson @ SparkFun Electronics
 *
 * This example utilizes the Sparkfun MicroMod Iput and Display carrier board
 * along with the MicroMod ESP32 Processor to create a server on your local
 * wifi network. The endpoints of this sever correspond to the onboard RGB
 * LEDs, allowing you to toggle them on and off by sending requests to the
 * endpoints from other devices on the same network. The onboard buzzer
 * will also beep when the server handles requests to each endpoint.
 *
 * --------------IMPORTANT!----------------------
 * make sure to include the ssid and password of your network before uploading!
 *
 * When your device is successfully connected to your WiFi, a message will
 * be displayed on the TFT display indicating the server is running
 *
 * LED activity will be logged on the screen
 * call /clearDisplay to empty the screen
 *
*/
#include <WiFi.h>
#include <WiFiClient.h>
#include <WebServer.h>
#include <ESPmDNS.h>

#include <HyperDisplay_4DLCD-320240_4WSPI.h>

#include <FastLED.h>

#define PWM_PIN PWM0             // Display pin definitions
#define CS_PIN D0
#define DC_PIN D1
#define SPI_PORT SPI
#define SPI_SPEED 32000000

#define NUM_LEDS 6              //RGB LED pin definitions
#define DATA_PIN 25
#define CLOCK_PIN 15
CRGB leds[NUM_LEDS];

LCD320240_4WSPI myTFT;          //TFT display declaration

ILI9341_color_18_t defaultColor; //Color for display

const char* ssid = "YOURWIFIHERE";//<----------your wifi here
const char* password = "YOURPASSHERE";//<-------your password here

WebServer server(80);           //server setup on localhost port 80

//led status:
bool ledStates[] = {false, false, false, false, false, false};

//endpoint handler functions
//ROOT
void handleRoot() {
  beep(250);
  myTFT.println("MicroMod esp32 blinkyServer");
  newLine();
  myTFT.print("Endpoints:");
  newLine();
  myTFT.print("/led0, /led1, /led2, /led3, /led4, /led5");
  newLine();
  myTFT.print("/clearDisplay");
  newLine();
  server.send(200, "text/plain", "micromod esp32 root");
}
//not found
void handleNotFound() {
  beep(250);
  myTFT.print("Endpoint not found.");
  newLine();
  String message = "File Not Found\n\n";
  message += "URI: ";
  message += server.uri();
  message += "\nMethod: ";
  message += (server.method() == HTTP_GET) ? "GET" : "POST";
  message += "\nArguments: ";
  message += server.args();
  message += "\n";
  for (uint8_t i = 0; i < server.args(); i++) {
    message += " " + server.argName(i) + ": " + server.arg(i) + "\n";
  }
  server.send(404, "text/plain", message);
}
//LED endpoint handler functions
void handleLED0(){
  toggleLED(0);
  beep(250);
}
void handleLED1(){
  toggleLED(1);
  beep(250);
}
void handleLED2(){
  toggleLED(2);
  beep(250);
}
void handleLED3(){
  toggleLED(3);
  beep(250);
}
void handleLED4(){
  toggleLED(4);
  beep(250);
}
void handleLED5(){
  toggleLED(5);
  beep(250);
}
//clear display endpoint handler
void handleClearDisplay(){
  for (int i=0; i<6; i++){//turns LEDs off just in case
    offLED(i);
  }
  myTFT.clearDisplay();
  setLine(1);
  myTFT.println("Connected to ");
  myTFT.print(ssid);
  newLine();
  myTFT.println("IP address: ");
  myTFT.print(WiFi.localIP());
  newLine();
  myTFT.print("MicroMod Esp32 Blinky Server Running!");
  newLine();
  server.send(200, "text/plain", "Display Cleared");
  beep(250);
}
//LED
void toggleLED(int ledNum){
  if (ledStates[ledNum] == false){
    String sendStr = "LED ";
    sendStr += ledNum;
    sendStr += " ON";
    myTFT.print(sendStr);
    newLine();
    server.send(200, "text/plain", sendStr);
    onLED(ledNum);
  }else{
    String sendStr = "LED ";
    sendStr += ledNum;
    sendStr += " OFF";
    myTFT.print(sendStr);
    newLine();
    server.send(200, "text/plain", sendStr);
    offLED(ledNum);
  }
}
void onLED(int ledNum){
  leds[ledNum] = CRGB::Red;
  ledStates[ledNum] = true;
  FastLED.show();
}
void offLED(int ledNum){
  leds[ledNum] = CRGB::Black;
  ledStates[ledNum] = false;
  FastLED.show();
}
//Text Cursor helper functions
int currentLine = 1;
void newLine(){
  int yVal = currentLine*8;
  myTFT.setTextCursor(0, yVal);
  currentLine ++;
}
void setLine(int lineNum){
  lineNum --;
  int yVal = lineNum*8;
  myTFT.setTextCursor(0, yVal);
  currentLine = lineNum+1;
}
//buzzer beep
void beep(int btimeMS){
  ledcWriteTone(0, 500);
  delay(btimeMS);
  ledcWriteTone(0,0);
}

void setup(void) {
  ledcAttachPin(12,0); //ESP32 Buzzer setup

  //FastLED setup for RGB LEDs
  FastLED.addLeds<APA102, DATA_PIN, CLOCK_PIN, BGR>(leds, NUM_LEDS);// BGR ordering is typical
  FastLED.setBrightness(25);
  for (int i=0; i<6; i++){//turns LEDs off just in case
    offLED(i);
  }
  //TFT display initialization
  myTFT.begin(DC_PIN, CS_PIN, PWM_PIN, SPI_PORT, SPI_SPEED);
  myTFT.setInterfacePixelFormat(ILI9341_PXLFMT_18);
  myTFT.clearDisplay();
  //set window color to white
  defaultColor = myTFT.rgbTo18b( 255, 255, 255 );
  myTFT.setCurrentWindowColorSequence((color_t)&defaultColor);

  //WiFi connection
  WiFi.mode(WIFI_STA);
  WiFi.begin(ssid, password);

  // Wait for connection
  while (WiFi.status() != WL_CONNECTED) {
    delay(500);
  }
  myTFT.println("Connected to ");
  myTFT.print(ssid);
  newLine();
  myTFT.println("IP address: ");
  myTFT.print(WiFi.localIP());
  newLine();

  //server endpoints
  server.on("/", handleRoot);

  server.on("/led0", handleLED0);
  server.on("/led1", handleLED1);
  server.on("/led2", handleLED2);
  server.on("/led3", handleLED3);
  server.on("/led4", handleLED4);
  server.on("/led5", handleLED5);
  server.on("/clearDisplay", handleClearDisplay);

  server.onNotFound(handleNotFound);

  server.begin();
  myTFT.print("MicroMod Esp32 Blinky Server Running!");
  newLine();
}

void loop(void) {
  server.handleClient();
}
To send a request, open a tab in a browser (the devices must be connected to the same network) and type the IP address listed on your TFT display, followed by your desired endpoint path, into the address bar. Your IP will be different from mine, but for example:
10.0.0.241/led0
If everything is set up properly, the bottommost LED on the carrier board should light up red when you hit enter in your browser. Your browser, and the MicroMod TFT display, should read “LED 0 ON.” To see a list of all available endpoints, simply call the root directory:
YOUR.IP.ADD.HERE/
And to clear the display once it fills up, try:
YOUR.IP.ADD.HERE/clearDisplay.
This simple example can easily be adapted to remotely interact with your projects over your local WiFi network. The provided code can be modified to blink the RGB LEDs different colors, and additional endpoints could be added to return data from Qwiic sensor breakouts or whatever your IOT project requires!


