DIY Halloween Candy Launcher, Part 2
In this follow-up, I’ll show you the (mostly) finished project, talk about what I used, what I learned along the way, and just how much fun it is to have a robot that throws candy bars with unwavering accuracy and consistency.

A couple weeks ago, I started working on a project that would allow me to pass candy out to kids this Halloween without ever actually having to get too close to them. I chronicled my thoughts and initial design ideas in a previous blog post, and wanted to follow up, in case anyone was wondering how it's coming together.

Considering it's not 2 p.m. on Halloween and it already does what it's supposed to, it's coming together great!
From the initial design concept, first testing proved that I needed to make a couple of changes. The big design flaw was my chosen stepper motor. At first I thought that using a 68 oz.in stepper motor would probably work fine. However, with the amount of spring tension I had set for initial testing, that stepper was unable to do the job. I then moved up to the next option in our catalog, the 125 oz.in stepper motor. Since neither the Arduino code not the SparkFun ProDriver care which stepper motor is being used, swapping this out was fast and easy. The only stumbling block here for me was the motor mount. While the smaller stepper motor was a NEMA 17, this larger one is a NEMA 23, and not only do I not have a motor mount of that form factor, neither SparkFun nor Servo City, my usual go-to, had any on hand. In fact, the website indicated that they had been discontinued. Thankfully they still have the technical drawing on the product page, so I was able to design and 3D print a suitable replacement part.
I also moved the chain drive components to the inside of the frame. This just seemed like a good idea safety-wise, and gave a cleaner look to the build.

A solid base in any 3D software program will help you get the most from your 3D printer.
I wanted to keep the code as simple as possible. Since I was using a pair of SparkFun Thing Plus ESP32 boards, utilizing Esspressif's ESP-NOW protocol seemed to offer me the most options in combination with the greatest ease of use. It allowed me low-power 2.4GHz wireless connectivity between multiple boards without the need for a router, so if perhaps I decided at the last minute to spend Halloween at my friends' place, I could bring the entire setup there without having to worry about about last minute code changes to access new networks.
As this was my first foray into ESP-NOW, I relied heavily on the information offered over at Random Nerd Tutorials. They have a great breakdown of what ESP-NOW does and how it works, with several examples. They even have the simple yet compulsory sketch needed to get the MAC address from your board(s). I just went with the most basic Send and Receive sketches. For the Send sketch, the only adjustment I had to make to the example code was to replace the continuous timed data transmission with an if() loop, so that data would only be sent when the button is pushed.
/*
 * Halloween Candy Throwing Robot Button Code
 * Created by Rob Reynolds, SparkFun Electronics, Oct 2021
 *
 * This sketch is only a slight variation of Rui Santos's original sketch.
 * I simply added a button to send that data packet, instead of having it
 * repeat at a fixed interval. The message send doesn't matter, the receiver
 * only looks for whether or not it received a message.
 *
 *Rui Santos
 *Complete project details at https://RandomNerdTutorials.com/esp-now-esp32-arduino-ide/
 *
 * Permission is hereby granted, free of charge, to any person obtaining a copy
 * of this software and associated documentation files.
 *
 * The above copyright notice and this permission notice shall be included in all
 * copies or substantial portions of the Software.
*/

#include <esp_now.h>
#include <WiFi.h>

// REPLACE WITH YOUR RECEIVER MAC Address
uint8_t broadcastAddress[] = {0x94, 0xB9, 0x7E, 0x79, 0xC5, 0xA4};

// Structure example to send data
// Must match the receiver structure
typedef struct struct_message {
  char a[32];
  int b;
  float c;
  bool d;
} struct_message;

// Create a struct_message called myData
struct_message myData;

int redButton = 14;         // input pin for big red button

// callback when data is sent
void OnDataSent(const uint8_t *mac_addr, esp_now_send_status_t status) {
  Serial.print("\r\nLast Packet Send Status:\t");
  Serial.println(status == ESP_NOW_SEND_SUCCESS ? "Delivery Success" : "Delivery Fail");
}

void setup() {
  // Init Serial Monitor
  Serial.begin(115200);

  // Set device as a Wi-Fi Station
  WiFi.mode(WIFI_STA);

  // Init ESP-NOW
  if (esp_now_init() != ESP_OK) {
    Serial.println("Error initializing ESP-NOW");
    return;
  }

  // Once ESPNow is successfully Init, we will register for Send CB to
  // get the status of Trasnmitted packet
  esp_now_register_send_cb(OnDataSent);

  // Register peer
  esp_now_peer_info_t peerInfo;
  memcpy(peerInfo.peer_addr, broadcastAddress, 6);
  peerInfo.channel = 0;
  peerInfo.encrypt = false;

  // Add peer
  if (esp_now_add_peer(&peerInfo) != ESP_OK){
    Serial.println("Failed to add peer");
    return;
  }
  pinMode(LED_BUILTIN, OUTPUT);
  pinMode(redButton, INPUT_PULLUP);
}

void loop() {

  int redButtonState = digitalRead(redButton);
  strcpy(myData.a, "THIS IS A CHAR");
  myData.b = random(1,20);
  myData.c = 1.2;
  myData.d = false;

  // Send message via ESP-NOW
  if (redButtonState == LOW) {
    esp_err_t result = esp_now_send(broadcastAddress, (uint8_t *) &myData, sizeof(myData));
    if (result == ESP_OK) {
      Serial.println("Sent with success");
    }
    else {
      Serial.println("Error sending the data");
    }
    delay(8000); // Basically just like a long debounce so hits don't get backed up whilst the robot is executing a throw
  }
}
The Receive sketch is where I made my changes, without getting too carried away. I kept the basics of Rui Dantos's code, since for my purposes, the receiving board doesn't care what message it receives, only whether or not it has received any message at all. So it sits there listening. Then, once it receives something from the sending ESP32, it spins the stepper motor the throw the candy bar, tilts the servo to load a new candy bar, then settles back down to listen for the incoming message from the next eager trick-or-treater.
CRITICAL KNOWLEDGE ALERT!
The servo library that we all know and love is not compatible with the ESP32. There are a few different ways to deal with this, but I found that the quickest and easiest was to use the ESP32Servo library by John K. Bennett and Kevin Harrington. It can be installed directly from the library manager, it just takes a little bit more work in the setup() loop, but once that's done it codes pretty much just like the original servo library.
/*
  Rui Santos
  Complete project details at https://RandomNerdTutorials.com/esp-now-esp32-arduino-ide/

  Permission is hereby granted, free of charge, to any person obtaining a copy
  of this software and associated documentation files.

  The above copyright notice and this permission notice shall be included in all
  copies or substantial portions of the Software.
*/

#include "SparkFun_ProDriver_TC78H670FTG_Arduino_Library.h" //Click here to get the library: http://librarymanager/All#SparkFun_ProDriver
PRODRIVER myProDriver; //Create instance of this object

#include <esp_now.h>
#include <WiFi.h>

#include <ESP32Servo.h>
Servo feederServo;  // create servo object to control a servo
int servoPin = 23;

int pos = 90;    // variable to store the servo position

// Structure example to receive data
// Must match the sender structure
typedef struct struct_message {
    char a[32];
    int b;
    float c;
    bool d;
} struct_message;

// Create a struct_message called myData
struct_message myData;


void setup() {
  // Initialize Serial Monitor
  Serial.begin(115200);

  myProDriver.settings.stepResolutionMode = PRODRIVER_STEP_RESOLUTION_FIXED_1_4; // Sets resolution to 1/4
  myProDriver.begin(); // adjust custom settings before calling this

  pinMode(LED_BUILTIN, OUTPUT);
  digitalWrite(LED_BUILTIN, LOW);

  // Set device as a Wi-Fi Station
  WiFi.mode(WIFI_STA);

  // Init ESP-NOW
  if (esp_now_init() != ESP_OK) {
    Serial.println("Error initializing ESP-NOW");
    return;
  }

  // Once ESPNow is successfully Init, we will register for recv CB to
  // get recv packer info
  esp_now_register_recv_cb(OnDataRecv);


  feederServo.setPeriodHertz(50);    // standard 50 hz servo
  //feederServo.attach(servoPin, 1000, 2000); // attaches the servo on pin 18 to the servo object
  //***NOTE: Usually the servo would be attached here, but I'm isolating it to attach only
  //during the time it's needed, to avoid jitter and interference, then detaching it until needed
  // using default min/max of 1000us and 2000us
  // different servos may require different min/max settings
  // for an accurate 0 to 180 sweep

}

void loop() {

}


// callback function that will be executed when data is received
void OnDataRecv(const uint8_t * mac, const uint8_t *incomingData, int len) {
  memcpy(&myData, incomingData, sizeof(myData));
  Serial.print("Bytes received: ");
  Serial.println(len);
  Serial.println();

  if (len > 0){
    digitalWrite(LED_BUILTIN, HIGH);
    myProDriver.step(1600, 0); // turn 1600 steps, CW direction
    //delay(1000);
    delay(500);
    len = 0; // Reset incoming data length

    //Here we'll tilt the servo to pick up another candy bar
    feederServo.attach(servoPin, 1000, 2000);
    for (pos = 90; pos <= 135; pos += 1) { // goes from 90 degrees to 135 degrees
    // in steps of 1 degree
    feederServo.write(pos);              // tell servo to go to position in variable 'pos'
    delay(15);                       // waits 15ms for the servo to reach the position
  }
  for (pos = 193; pos >= 90; pos -= 1) { // goes from 180 degrees to 0 degrees
    feederServo.write(pos);              // tell servo to go to position in variable 'pos'
    delay(15);                       // waits 15ms for the servo to reach the position
  }
  feederServo.detach();

    digitalWrite(LED_BUILTIN, LOW);
    delay(100);
  }

}
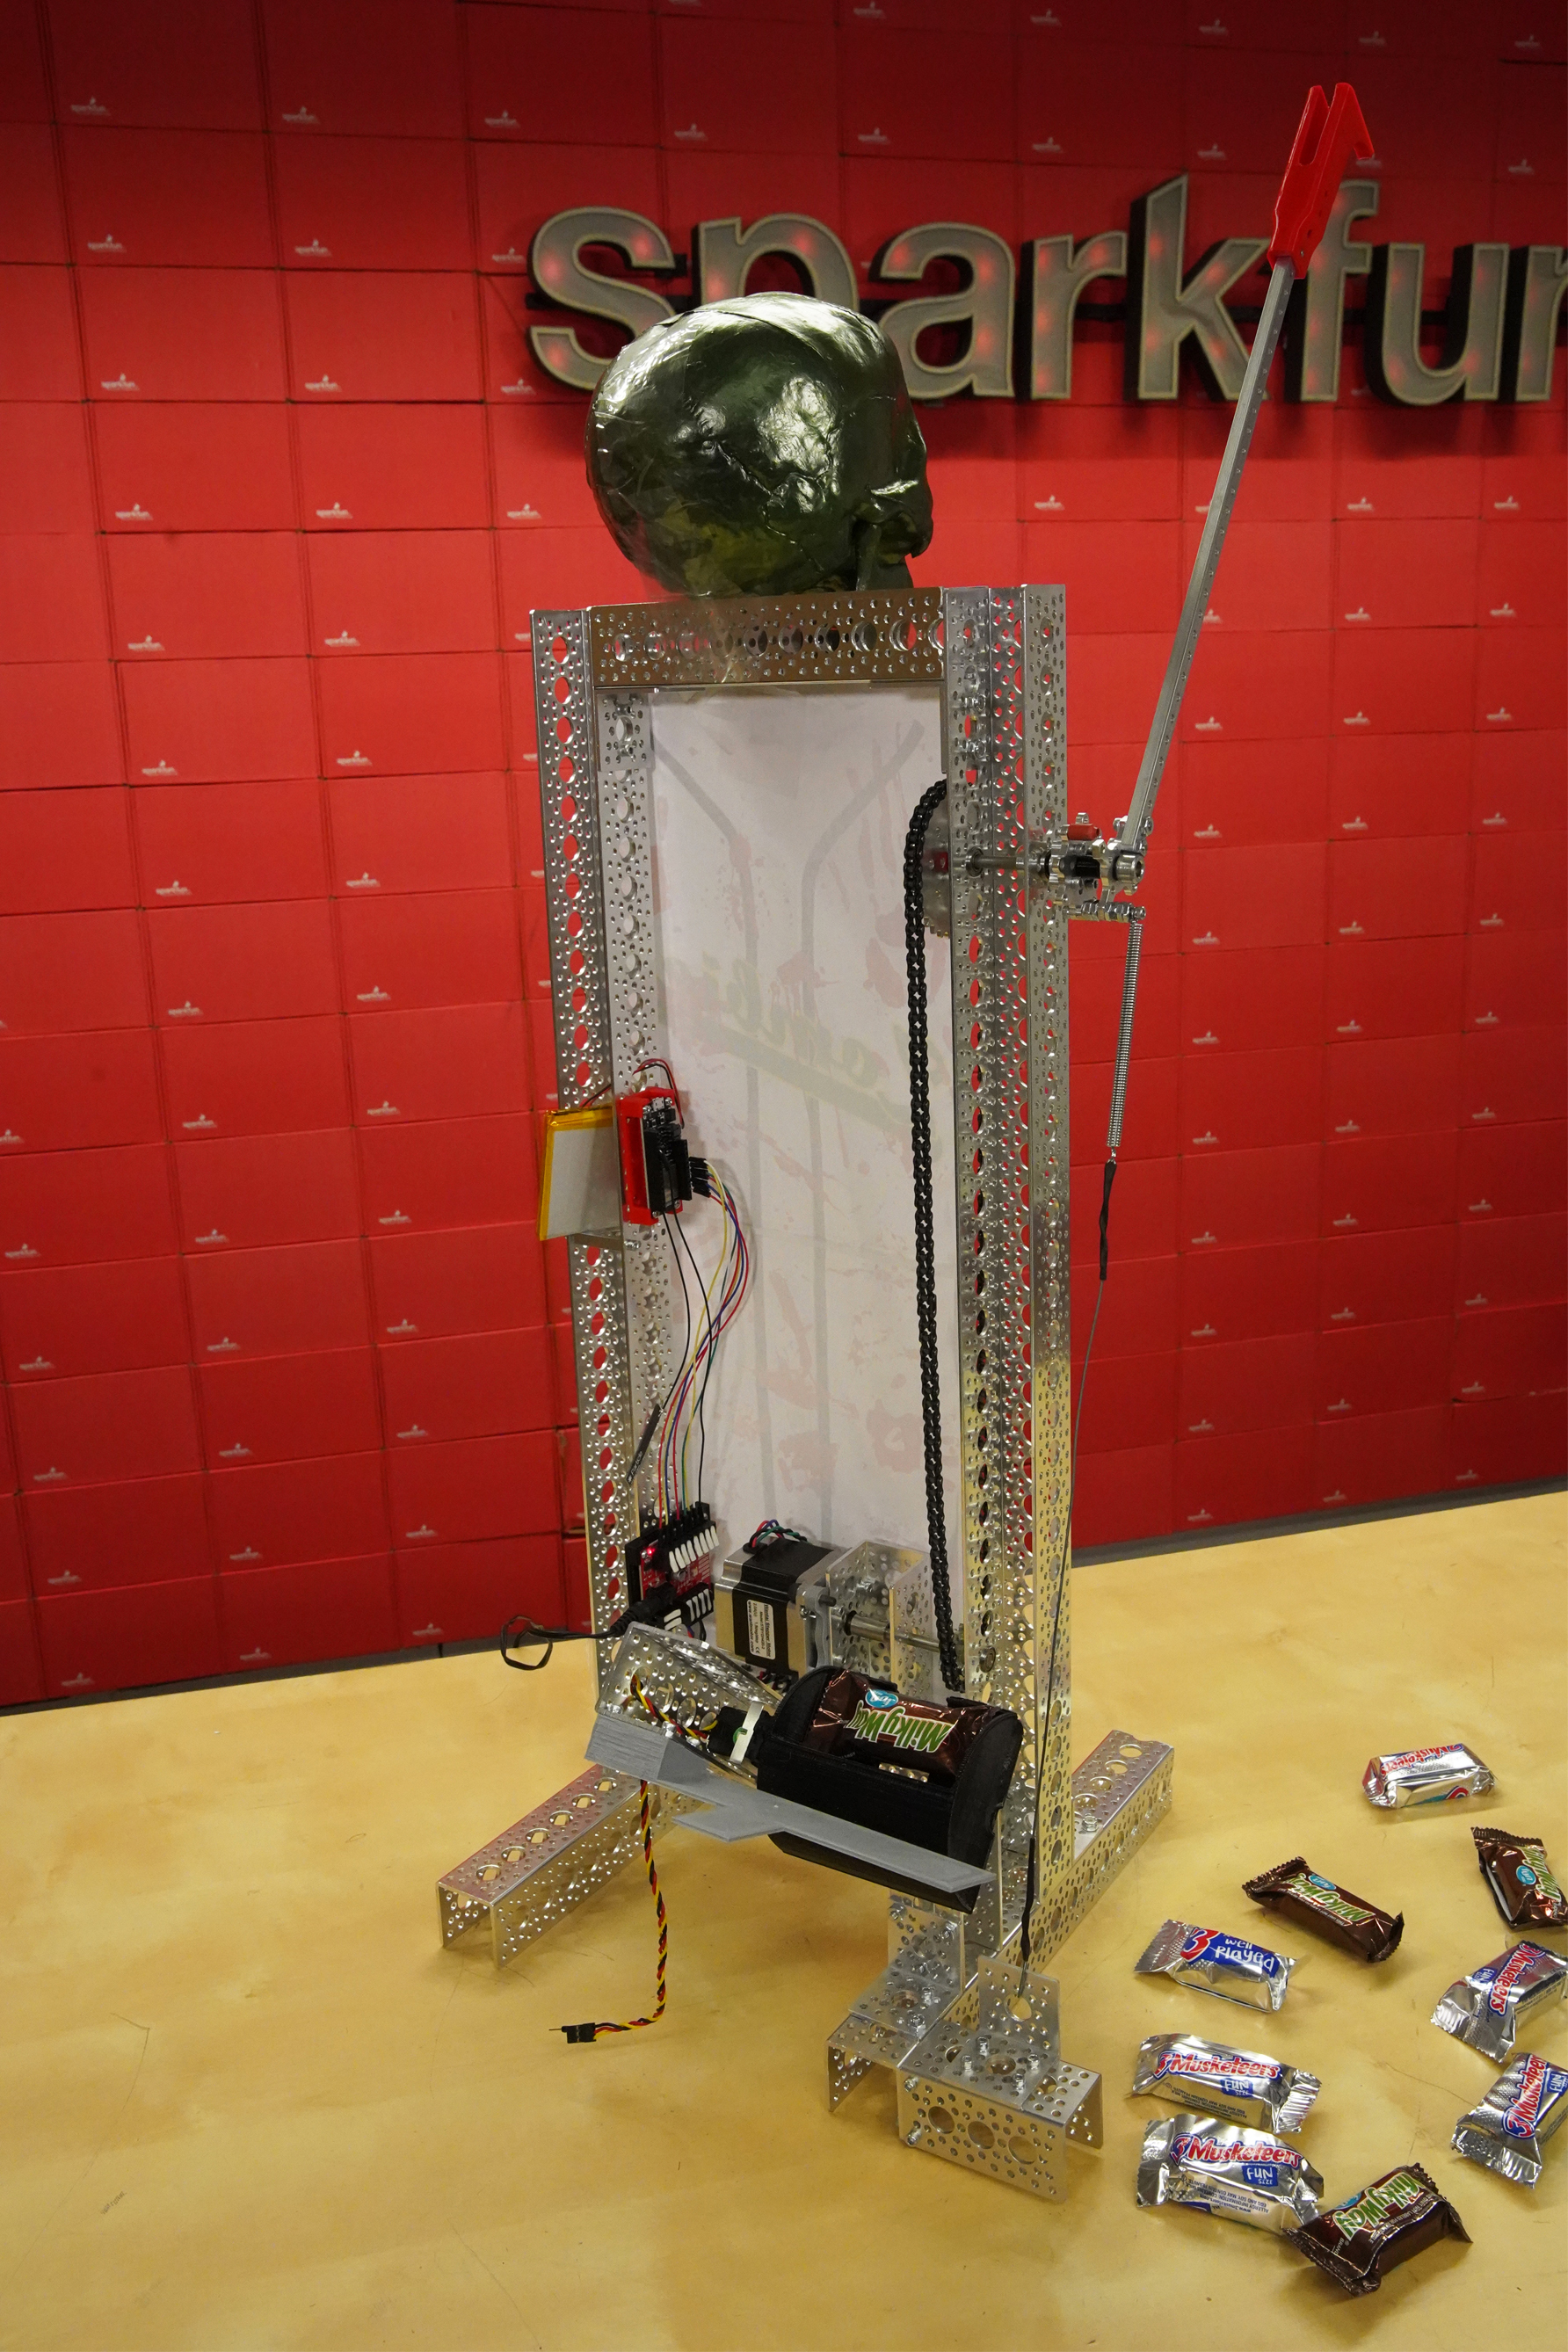
With the chain drive tucked safely inside and the candy feeder working, this rookie phenom is ready to go up to the show!
The only thing I still need to finish up is the hopper. Ideally I would like to be able to simply dump a bag of candy bars into a hopper and let it do its thing. However, candy bars can be disagreeable when it comes to lining up, so I may need to resort to more of a chute than a hopper. Whatever way I wind up going, even if it's hand-feeding the bars into the holder, I know that because of the consistently repeatable movement and tension, those candy bars will all be landing in the same spot.
While I'm extremely happy with the way this build turned out, I'm already working on notes and sketches for version 2.0 next year. By using the ESP-NOW protocol for wireless communication, I can easily expand outward, as this protocol will allow my ESP32 boards to communicate with up to ten encrypted peers. And even if, twelve months from now, social distancing is no more than a fading memory, I think I'll always be able to come up with a good reason to build a robot that throws candy at to children.


There's a comment in the code that needs to be updated:
Clicking that link from within the Arduino IDE should take you to the library manager, directly to the ProDriver library. (It won't take you anywhere if you try to reach it outside of the Arduino IDE.) If that doesn't work, shoot a quick message over to our support team, they'll get you sorted out. https://www.sparkfun.com/support
What? No way! That's an interesting...feature? I almost mentioned the same thing as Bjorn.