Vacuum Forming on the Super Cheap
Build your own Vacuum Molding machine and start making plastic parts in your home shop!

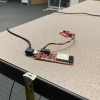
When you're trying to execute a build, sometimes it can be hard to decide exactly what tools will be involved. That's why it's a good idea to become a Jack (or Jill) of all trades and collect an arsenal of skills for any situation. Today you'll learn one more skill to add to your collection as I teach you how to build a desktop vacuum forming machine that won't break your budget.
Vacuum forming is used in all kinds of industries - thick plastics are formed into things like car dashboards, kiosk bodies and medical imaging equipment; thin plastics are used to make bodies for RC cars, all kinds of props for stage and film and even that annoying plastic bubble packaging. A vacuum formed part can be used as a mold for clay or composite materials or can be painted and used in the final product. Because the material is flexible and inexpensive, it's a great rapid-prototyping technique.
Check out the video below and enjoy!
So there it is. Vacuum forming is a really simple process and there are certainly plenty of ways to approach it. Hopefully you can find a clever way to work it into your next build. Go experiment and have fun with it! For more information on this build and links to the design files, check out my original blog post at Fringeneering.com
As always, happy hacking!


VF is really easy to do. That's a nice simple demo. I have to take exception to the use of "on the cheap" here, though. It's cheap if you already have a laser cutter, SMD rework station and a microrax kit. If not, it's kind of pricey. I built a much larger VF unit (12"x12") for about $15. Shop vac that i already had plus a vacuum hose fitting. My base is made of scrap MDF, frame from scrap 1x2 wood and gasket is left over weather stripping. I use a thrift store tabletop fryer for the heat source and chicken wire for the bed. There are lots of web sites showing how to do it with lots of great ideas. Sky's the limit.
One other point, I think you will find that size to be way confining. My 12x12 unit is good for items up 8" or so. I like to have a couple inch border. Especially if your mold is more than an inch high.
Hahaha, that's fair. I had a few things laying around, I guess ;)
Your VF rig sounds great, I've seen people using everything from their ovens to a hacked toaster to soften the plastic. There's at least one video out there where the mold is evacuated by hand using a bicycle pump. There are a lot of different ways to do this, for sure.
What do you use as your working material? HIPS or Acrylic?
Mostly HIPS. I bought some online for fairly cheap. I also tried ABS which makes for a much stronger product but takes a more heating. Haven't tried acrylic yet though it does have some interesting advantages. I've been thinking about building a larger unit to build costume armor (think SW storm trooper stuff). The various plans out there all seem to have flaws so I'm kind of on my own (where I like to be anwyay...).
I've also seen portable electric BBQ grill heating elements used for heat source. That gives you maybe 12 x 16 inches.
Awesome post! I can forsee some custom shaped ice trays in my future....
Funny but true, a lot of what I looked up on vacuum forming online has been a 13 step process, 12 steps making the parts, step 13 is dressing up as a stormtrooper in most of these tutorials. Another thing I would like to add, any shapes you want to mold with the polymorph they sell here, line anything with aluminum foil to make shape, round square or anything else, the foil lets you use ANYTHING as a mold for that.
Hey Nick, is that an Adam Savage bobblehead?!
It is, in fact, an Adam Savage bobblehead. Probably still available from the Mythbusters online store. I got it as a gift a couple years ago. He's one of those people I haven't yet met but would love to have a chat with.
Good tip about the cheap plastic plates, didn't think about it :)
Refreshing to see a demo video without so many edit cuts mid-sentence.
Nice little VF rig. What sort of other materials can be used? For example can we REUSE the blister pack plastic from SparkFun Retail products? Similar stuff is also used by Costco and others. How about plastic bottles?
The problem with recycling stuff like blister pack material is that the mold marks, creases and so on don't really come out so they show up in the final product. Painted material (like cheap signs) is another loser - the paint makes for stretch marks. Virgin material isn't that expensive and worth buying to get great results.
I did have good luck cutting up a 2L soda bottle for the straight sides. It would work fine in small former like Nick's.
For those of us lacking the obvious mech skills that Nick has (not to mention the laser cutter), you might consider a dental vacuum former. These are great for making small items and can be had for a few hundred $'s. It could save you a lot of time and frustration, especially if you want to work with thicker plastic materials.
Nick,
Thanks for the demo.
A question: Your current order of operations is (a) heat the plastic to be molded ("media"), (b) start the vacuum, and (c) slide the media down agains the original ("positive"). It looks like (as in "I haven't tried it myself" ) this would let the media cool a bit, and it wouldn't "form" as well against the positive.
What would happen if you started the vacuum first, slid the media down against the positive, and then ran the vacuum while you heated the media? This would keep the media hotter and more flexible... but what other effects do you think might have, good or bad?
Thanks! Good question:
So Vacuum Forming, near as I can tell, is about draping. You want to drape the plastic so that it creates an even layer against the "buck," or positive mold. The thermoplastics that are used in vacuum forming are rigid and sometimes even brittle before they're heated, so they have to be hot and pliable before they'll even consider draping or stretching. My small rig has the disadvantage of working with small pieces of thermoplastic and, by extension, smaller thermal mass so that the piece cools very quickly. As I understand it, this isn't as big a problem with a larger rig.
As for heating the media against the buck, you don't want to heat the plastic while you exert pressure on it. One reason for this is because the media won't stretch at all before it's warm so there's no practical way to slide it over the buck before heating, all you can do is get it closer. The second reason is because if you actually put the media against the buck, the buck will sink some of the heat. When the buck sits against the media and sinks heat away, you can't heat the piece evenly and end up with hot or cool spots which cause thin spots in the mold and even tearing. It's not uncommon to "re-touch" a mold while it's still under vacuum using a heat gun but you have to do it very carefully and it won't fix really bad webbing or anything like that.
All that being said, definitely experiment with it. It's such a simple process that the possibilities are endless. It works in reverse as well, i.e. "blow molding," which is used to make gascans and plastic semi-spheres. Hope I answered your question!
Would the vacume pump Sarkfun sells be powerfull enought for vacuum forming?
I haven't gotten a chance to play with it yet but I plan to try. It's strong enough, I just wonder whether it's fast enough.
Nice Project!
I am thankful that I grew up at a time when we had toys like this: http://gizmodo.com/5156211/vac+u+form-mold-making-toy-would-never-fly-with-todays-soccer-moms
What an excellent... thing.
This is what I had when I was a kid: http://www.samstoybox.com/toys/WesternInjector.html
It was awesome... it had a heating element in it that melted the plastic so you could inject it directly into the mold. And the plastic was recyclable too... you just chopped it into pieces small enough to reinsert it into the melting chamber and recast it!
I also had rocket engines I was allowed to play with while completely unsupervised. And explosives. I remember wandering down the creek when I was 12 with a box of Silver Salutes looking for stuff to blow up. Good times... good times.
When I was 12 I got my mom to order chemicals for me. Potassium Perclorate, for example. Came in the mail. Was this a great country or what? I made some really great explosives with it. Lucky to have survived childhood!
Once you've tried this and got hooked on it here are some good books on the subject
http://www.lindsaybks.com/dgjp/djgbk/vacf/index.html
http://www.lindsaybks.com/dgjp/djgbk/inject/index.html
They're from Lindsay books, give them a try http://www.lindsaybks.com
Awesome Project! Can't wait to see how many build their own by the end of the week!