- Home
- Product Categories
- Pan/Tilt Brackets
- Pan/Tilt Bracket Kit (Multi Attachment)

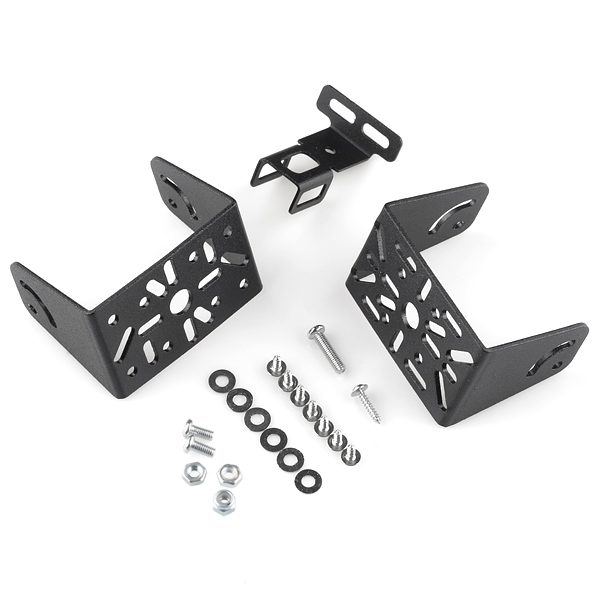
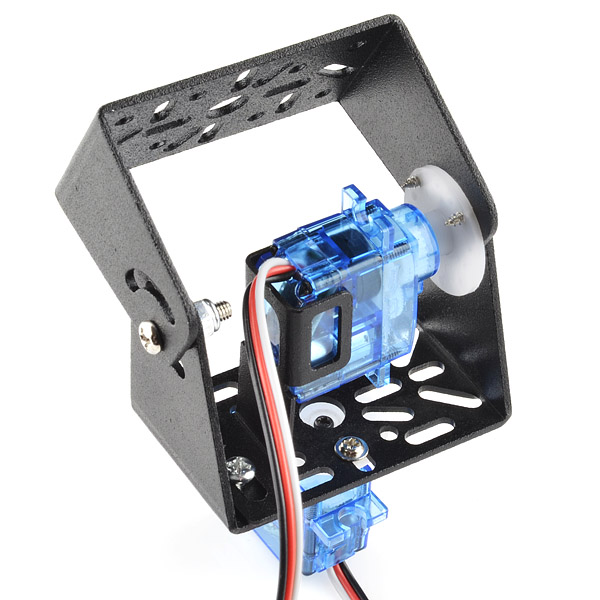
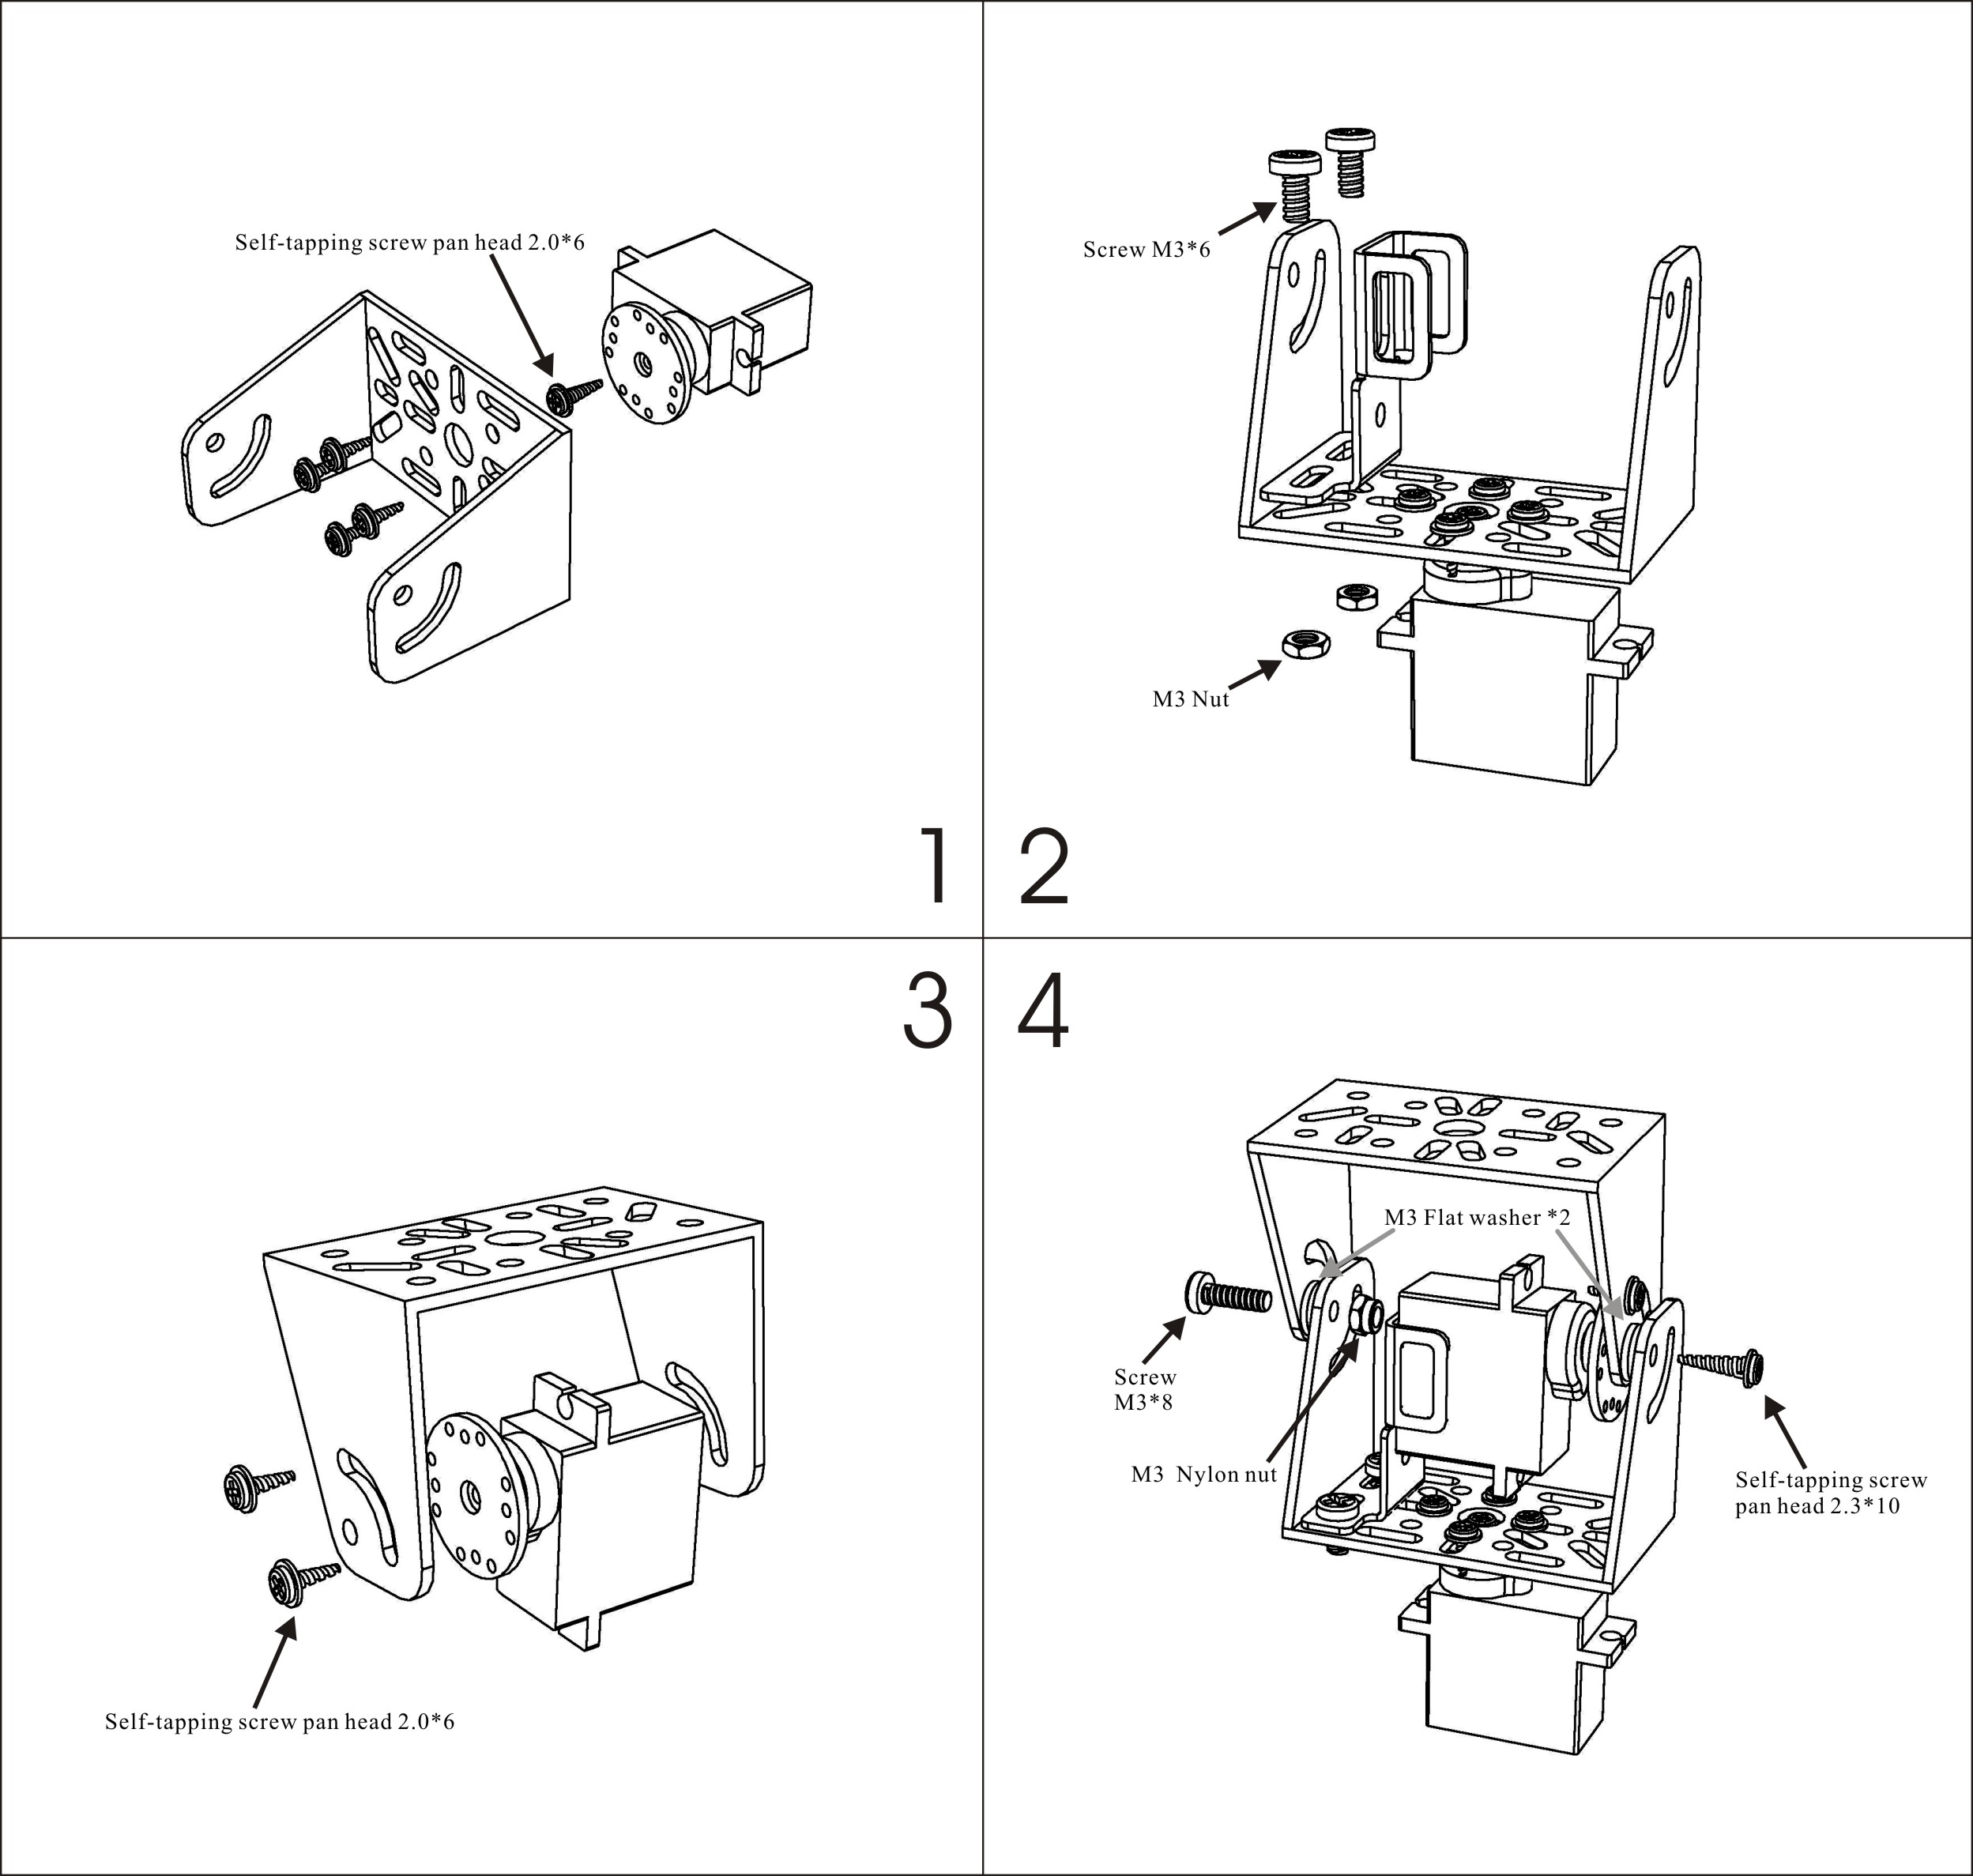
This pan/tilt bracket consists of two brackets and all the hardware you need to attach them to make a pan/tilt mechanism using two servo motors. We recommend our small servo motors listed below.
Note: Servos are not included. The sub-micro servo size works for these mounts.
Pan/Tilt Bracket Kit (Multi Attachment) Product Help and Resources
Basic Servo Control for Beginners
February 25, 2020
An introductory tutorial demonstrating several ways to use and interact with servo motors!
Core Skill: Robotics
This skill concerns mechanical and robotics knowledge. You may need to know how mechanical parts interact, how motors work, or how to use motor drivers and controllers.
Skill Level: Noob - You will be required to put together a robotics kit. Necessary parts are included and steps will be easy to follow. You also might encounter basic robotics components like bearings, mounts, or other hardware and need a general idea of how it goes together.
See all skill levels
Core Skill: DIY
Whether it's for assembling a kit, hacking an enclosure, or creating your own parts; the DIY skill is all about knowing how to use tools and the techniques associated with them.
Skill Level: Noob - Basic assembly is required. You may need to provide your own basic tools like a screwdriver, hammer or scissors. Power tools or custom parts are not required. Instructions will be included and easy to follow. Sewing may be required, but only with included patterns.
See all skill levels
Comments
Looking for answers to technical questions?
We welcome your comments and suggestions below. However, if you are looking for solutions to technical questions please see our Technical Assistance page.
Customer Reviews
4 out of 5
Based on 5 ratings:
2 of 2 found this helpful:
Simple, cheap, and to the point.
It's somewhat brittle. The inset spacer piece (smaller third metal piece) wasn't the right size for the servo I had, and when I tried to bend it a bit, it nearly cracked. I managed to get everything together and it works well, so ultimately no complaints.
3 of 3 found this helpful:
Hard To Assemble!
I had a hard time following the assembly guide partly because it is not specific enough (for example exactly which holes the "self tapping" screws go into the servo horns). I still have not gotten the tilt function just right and it sounds like the tilt servo is being strained. I also found that getting the screws into the servo horns at exactly the right angle is both very important and very difficulty. Use a magnifying lens to help do that!
Overall, I think this product would be very rewarding once assembled. I still have to get there....
1 of 1 found this helpful:
Easier than I thought
I am only given it 4 stars because it is a bit of a pain to assemble. I made sure my servos were center before I started, but because I am all thumbs with small things, my top servo moved a good 20 degrees off center by the time I actually got the top bracket secured.
But at least for me, the movement is great. I am only using it for a kind of art project with a thin plastic mask I bought at Joann's that can shakes its head and nod along with my LeapMotion hand movements. I was able to adjust for my centering mistake by simply bending florist wire to position the mask up right at my 'new' center. I move my hand back and forth and the head shakes its head. I move my hand up and down and it nods. I got it to do double takes and sort of an embarrassed look by moving my hand down and left. It is already freaking my wife out, so I think I am on the right track
The movement is smooth and is not binding or catching on any of the screws.
Is there a trick for centering a servo after the fact?
doesn't work for my application
I am trying to build an obstacle-avoiding vehicle using this pan/tilt bracket with an SR04 ultrasonic sensor and a two small servos (hobby size). And I am following a video online to get it done. But I can't figure out how the servos fit into this bracket--the video seems to have a different bracket. It appears that I ordered the wrong thing. I need a pan/tilt mounting kit.
Hi;
Can you post the sample code for using a joystick to control the pan/tilt bracket? Having finally got it assembled correctly (I think the assembly instructions are dodgy) and working in 2 axes (using Sweep) I'm still having trouble with the joystick control.....
- thanks
I know this is very late, but here is some code that I made up between the joystick quickstart sketch and some servo example code.
Enjoy!
#include "Servo.h"
// Store the Arduino pin associated with each input
const byte PIN_ANALOG_X = 0;
const byte PIN_ANALOG_Y = 1;
Servo pan;
Servo tilt;
long currentX=0;
long currentY=0;
void setup() {
Serial.begin(9600);
pan.attach(8);
tilt.attach(9);
}
void loop() {
currentX = map((long)analogRead(PIN_ANALOG_X), 0, 1023, 0, 180);
currentY = map((long)analogRead(PIN_ANALOG_Y), 0, 1023, 0, 180);
Serial.print("X: ");
Serial.print(currentX);
Serial.print(", ");
Serial.print("Y: ");
Serial.print(currentY);
Serial.println();
pan.write(currentX);
tilt.write(currentY);
}
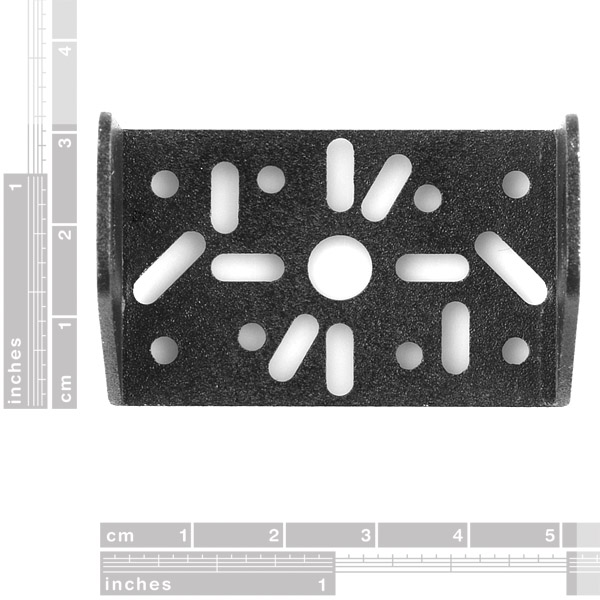
Here is a link for the faceplate template for sparkfun pan/tilt servo bracket. The locations of the holes were not clearly defined in the datasheet so I measured them and made this model. I printed out the part with makerbot and I can confirm that the template aligns with the bracket 1:1.
To see an example of how you could modify this model and add your design on top, take a look at the laser module binding I made.
http://www.youtube.com/watch?v=0DI92Z5AuVc
This project shows how to make good use of this one. First Arduino and then the Solar Follower, I'm so proud to be Italian.
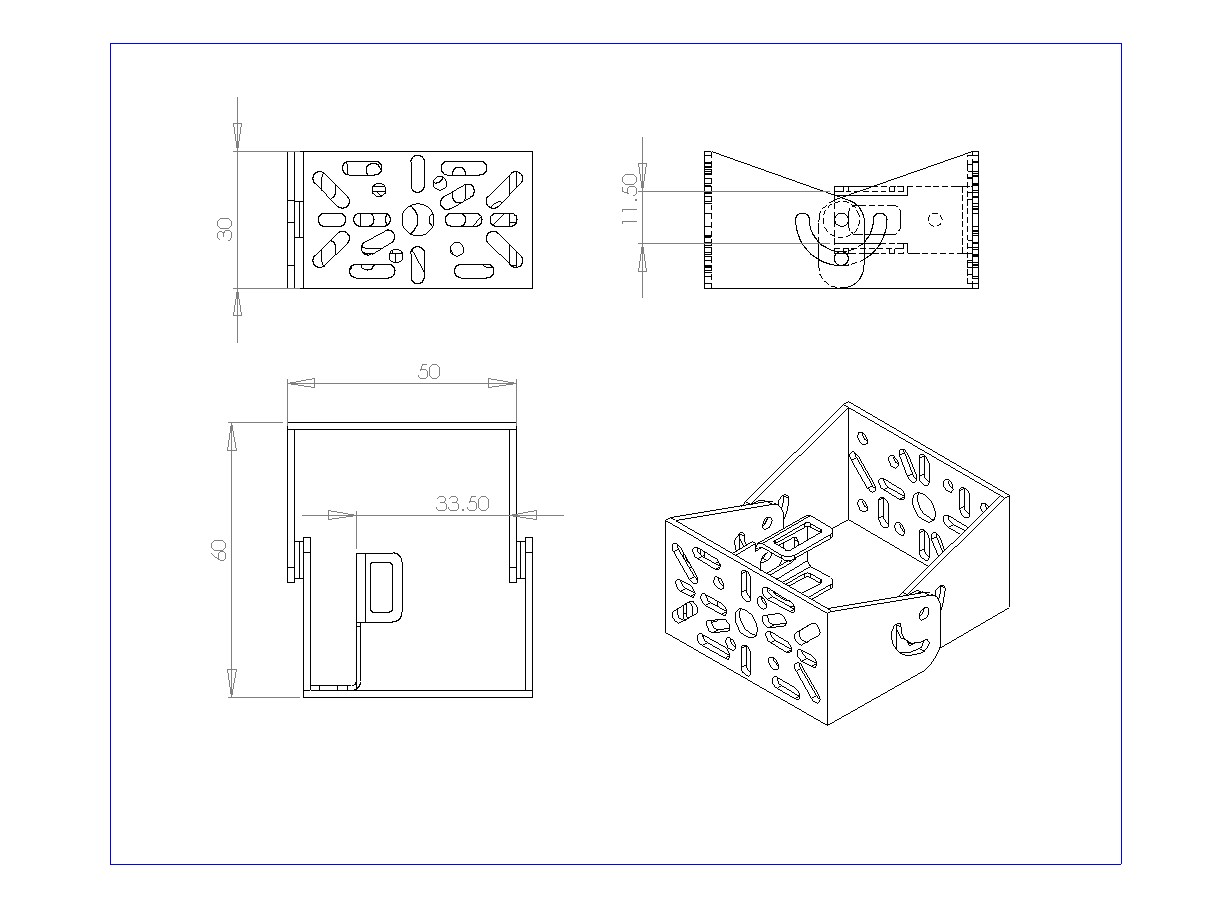
Nice bracket, but units on the dimensional drawing would be very nice to have!
It's measured in miles. Kidding of course, it's in mm.
I was going to say......How would you pack that!? :)
Hello, i have a question about this bracket: How can I mount the brackets to the aluminium channels or the aluminum beans? It´s very important!
Hi, may i know is it this Pan/Tilt Bracket able move and stop in small angle about 10 degree or less than 10 degree? Thank you.
Hi, may i know this Pan/Tilt Bracket is it can move in range about 10 degree or less than 10 degree? Thank you.
Can I use this with this servo: https://www.sparkfun.com/products/10333 ? Thanks!
Hi,
It says they recommend the small servos listed below but I don't see any motors listed. Anyone know if standard size motors will work?
Can the distances to the centres of the holes also be included in the dimensional drawing? I want to fix it to a camera bracket but that is not possible without knowing where the holes are.
I realize your question is old but if you still need it, I made a 3D model of the faceplate:
https://3dwarehouse.sketchup.com/model.html?id=u5f431df3-6c24-49dd-8025-50974190c930
What is the thing holding the servo in the middle called? I would need an extra one or equivalent... Sorry, foreign impaired ;)
Are dimensions in metric or imperial?
The dimensional drawing is in metric, base unit is millimeter. See also the comments just above yours, and the 'ruler' image :)
Yes, I just realized seconds later and I didn't find my post to delete it (due to not having an alias yet)... I'm sorry about that, but thank you for answering anyway :)
I bought 2 of these and 4 high-strength servos only to find out that they didn't fit into the bracket, which apparently only takes the miniature size ones. Fortunately, when I tried a bunch of different odd ways of putting them together, I eventually found a way that works perfectly when you bend one of the pieces a bit and attach the tilt servo sideways to the outside. It stays together tightly, and it doesn't rub against itself.
I've tried this bracket with the recommended servos and the head tilts, but it eventually quirks and the head (tilting part) starts tilting further down, and servo is very hot and keeps making noise. No load. I didn't tighten the screws much, and I've put as many washers as possible.
that doesn't sound good. do the servos operate normally on their own?
This thing comes with some weak screws. Broke 2 of them within minutes of each other. I'm not that strong.
what is the servo used in this video ? and is there an assembly video ?
Can we get some dimensions on the faceplate (i.e. hole spacing)? I need to design a bracket that will screw on to the front of this, and the dimensional drawing provided only gives the outer dimensions of the brackets.
I know your question is old, but just in case you still need to design a bracket here's a template I made that works:
https://3dwarehouse.sketchup.com/model.html?id=u5f431df3-6c24-49dd-8025-50974190c930
can i attach the cmucam v4 (without arduino) to this
Before assembly, how does one know, how to fix/postion the bracket accordingly, for the "off" or powerless status of the servo ?
Can this be mounted onto the end of the robotic servo pan/tilt bracket so I am going to be able to rotate the claw on the end? Also does this require small or medium servos?
Will this work with HS-55 servos? Does anyone know?
Will this work with Sparkfun's small servos?
great tool to have but the screws are easy to strip and its a pain to put together not to happy about trying to assemble it I now have a striped screw and a little ticked otherwise very cool.
Could you link to the servos you are using with the correct brackets?
It IS possible to fit a medium servo in the bracket. You have to bend the metal piece on the inside a bit with some pliers and kind of jerry-rig it together but I just did it and it works fine! Thanks sparkfun
So do you think a servo such as this one would fit? The dimensions are 29x13x30.
http://www.servocity.com/html/hs-85mg__mighty_micro.html
Do you think this will be able to move a 1 lb dome camera up and down?
In case this is useful for anyone else, I made a 3d model of the bracket, which you can download here. It's not meant to be exact, just to approximate the dimensions so you can integrate the bracket into your own 3d-designs for rapid prototyping, etc of components to go around the bracket.
I made the exact replica of the faceplate. You can find it here if you need it:
https://3dwarehouse.sketchup.com/model.html?id=u5f431df3-6c24-49dd-8025-50974190c930
Since both platforms are identical, one bracket doesn't fit inside the other and instead goes over to one side. Add washers for spacing and you'll end up with even more horizontal offset. That means, whatever you mount on the end may be off center (depending on which holes you use).
If you stack these platforms like I did, then the offset will increase with every additional joint. Elongated holes can be used for compensation, or the brackets can be bent to fit eachother better, but it's just an extra hassle I wish I didn't have to deal with.
The last screw - the 3*8 one - get your adamantium screwdriver and unobtanium pliers ready, cause it's gonna mess you up! I got a defective batch (with nuts looking like they were stepped on by an elephant). Tried screwing them in and stripped the thread like it was butter.
Only problem is the small servo you recommend doesn't come with the disc only horns.
The servo you show in the picture above isn't the one you recommend ?
can they work with http://www.sparkfun.com/products/9064 ?
No, it's too big (the servo). It only works with the small one listed below.
Do you perhaps know of any other pan/tilt brackets for that larger servo? :)
Nope, I've never tried to find one for the large servo, sorry.
I finally got this to work, but that was after every possible wrong step taken. Examine the directions VERY carefully. In the end, my stubborness won out over my ineptitude. But it was a close battle.
Construction is a bit more difficult than I expected. The self-tapping screws must be really soft because I keep stripping the drive slot. To anyone trying to follow the directions, I recommend using as many washers as possible, because my bracket does not tilt as the pan head (from step three) gets in the way of the motion (in step four). Will try again and see.
I want to get a 10+ watt RGB led with a narrow beam lens and stick it on here. Disco light!
I got the brackets and a set of HS-55 servos. So far it's a real challenge to follow the diagrams and get things working. I don't see how you mount the servo to the bracket in panel 3 and have enough clearance for panel 4 to allow the bracket to actuate. This will take some hardware hacking
Somehow I managed to buy the Medium servo. As a note to others, the medium servo is too big for the inside servo, so the small is Required. Good news is, I can use the medium for the lower/pan servo.
Whats the max weight this can support?
That's really dependent on the servo as the brackets are pretty actually pretty strong, but meant for lighter loads. In my opinion though, if you can fit a servo into the bracket and the SERVO can hold the weight, the bracket will too.
Yeah, it would take a lot of weight for the bracket to collapse under load. It's more up to the servo you're using.
This pan/tilt kit was designed primarily for lightweight IR and ultrasound sensors commonly available. The two large mounting brackets are interchangeable with each having a different pattern.
It is not intended for heavy loads.
These are made by Dagu, right? I can confirm that this work pretty awesomely with decent servos. Which shouldn't be a problem if you get it from Sparkfun (Unlike me, who got mine from somewhere else and it came with $1 terrible servos that quickly broke)
Recently DAGU changed the servos used for these kits. The teeth on the gears are thicker now. Admittely this is a light weight design for small robots.
What's the weight of this assembly?
can they work with larger servo's then the small?
the decription says they are recommended but not that they are the only size that fits so im not sure.
check the dimensions of each and see if they fit. the small servos work without modification, bigger servos might take some modification.
A bit of modification with large servo for strong 3DOF
http://files.madhak.com/vid/FILE0156.mov