- Home
- Product Categories
- Switch
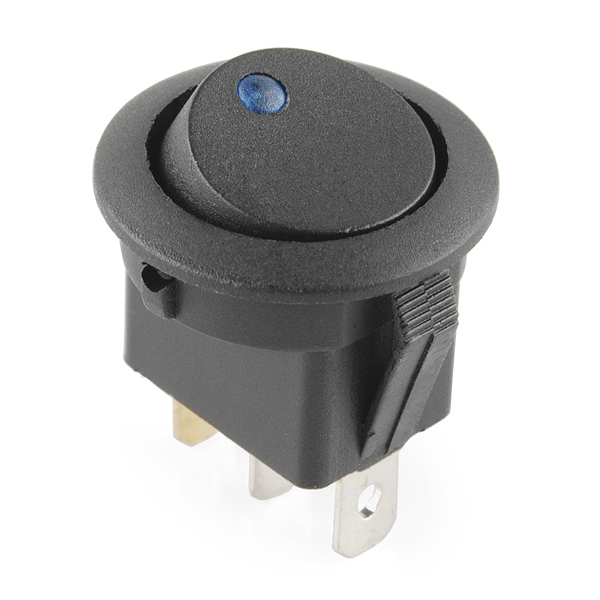
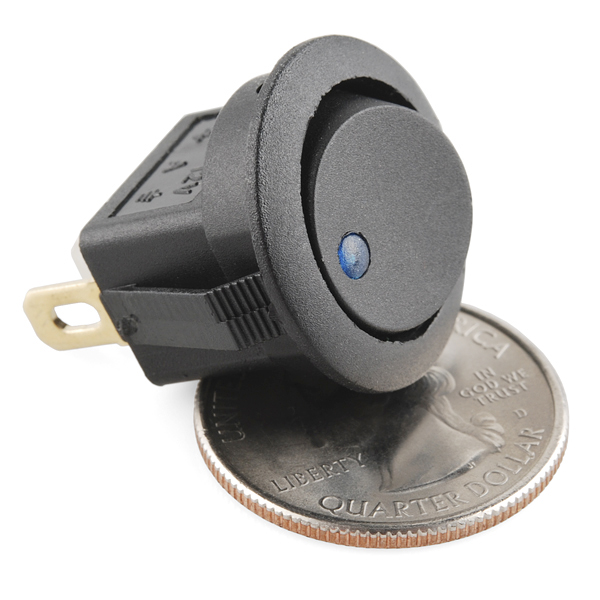
- Rocker Switch - Round w/ Blue LED


These panel-mounting rocker switches have built-in indicator lights to let you know when your switch is engaged. They mount into a 20.2mm diameter hole and are rated up to 16A @ 12v. These simple SPST on-off switches have three terminals, the two that you would normally see plus a ground tab for the blue LED lamp inside. Although these are rated for 12v, the LED works with as little as 5V.
- Blue LED Indicator
- SPST on-off
- Rated up to 16A @ 12v
- 20.2mm Diameter Mounting Hole
Rocker Switch - Round w/ Blue LED Product Help and Resources
Core Skill: Electrical Prototyping
If it requires power, you need to know how much, what all the pins do, and how to hook it up. You may need to reference datasheets, schematics, and know the ins and outs of electronics.
Skill Level: Competent - You will be required to reference a datasheet or schematic to know how to use a component. Your knowledge of a datasheet will only require basic features like power requirements, pinouts, or communications type. Also, you may need a power supply that?s greater than 12V or more than 1A worth of current.
See all skill levels
Comments
Looking for answers to technical questions?
We welcome your comments and suggestions below. However, if you are looking for solutions to technical questions please see our Technical Assistance page.
Customer Reviews
No reviews yet.
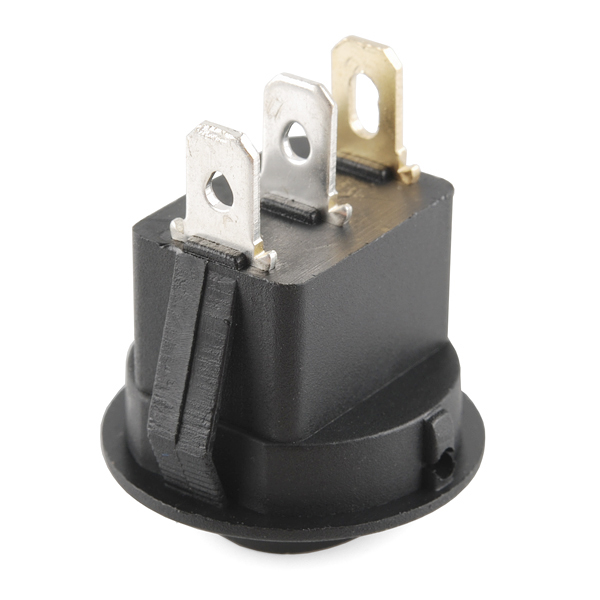
This switch appears to have three terminals, from the photos.
Therefore, I assume that it works just like your common sort of illuminated power switch of this type.
Two of the terminals are silver, and one of them is gold.
The gold one connects to ground, the first silver one connects to your 12V supply (or 5-12V, but not higher, because the resistor in series with the LED internally is designed for 12V) and the second silver terminal connects to your load +12V rail.
Basically, the first two terminals are just connected to the SPST switch contacts, and the LED anode (and resistor) is connected to one side of the switch, with the LED cathode connected to the third terminal which you connect to ground. It's gold plated so you know this is the "odd" terminal which is not connected to the switch.
Question: So i understand that the two silver leads are the actual switch circuit and the gold goes to ground for the LED. However, i'm wanting to use a higher source voltage (24-30VDC). Still a bit of an electronics noob, but can i do a voltage divider (put a resistor between the gold and ground) to reduce the voltage across the LED down to 12V?
Is this available in any other led colors?
Does anybody have accurate dimensions for this switch? Obviously the diameter is slightly lather than 20.2mm, but what is the length from the bottom of the terminals to the bottom of the large plastic ring (where is would sit flush against a surface)?
20.2mm hole = 3/4" paddle bit plus some sanding
Watching the video this switch is very easy to use. The led is very bright. my only negative if you could even consider it that is that the switch takes a good amount of force to switch so take that into consideration when mounting.
Here's how to wire this, based on my own trial and error just now. Power into the switch goes to the silver pin on the end (opposite the gold pin). Power to your project goes from the center (silver) pin. Ground goes to the gold pin. This allows the LED and the project to be powered on and off correctly. Ground only goes to this switch because of the LED. On the two-pin (non-LED) version of this switch, ground would just go directly to your project and the switch would have power-in on one pin and power-out on the other.
We need a datasheet or at least a diagram showing us how to wire this switch. The text description is not that helpful.