- Home
- Product Categories
- Kits
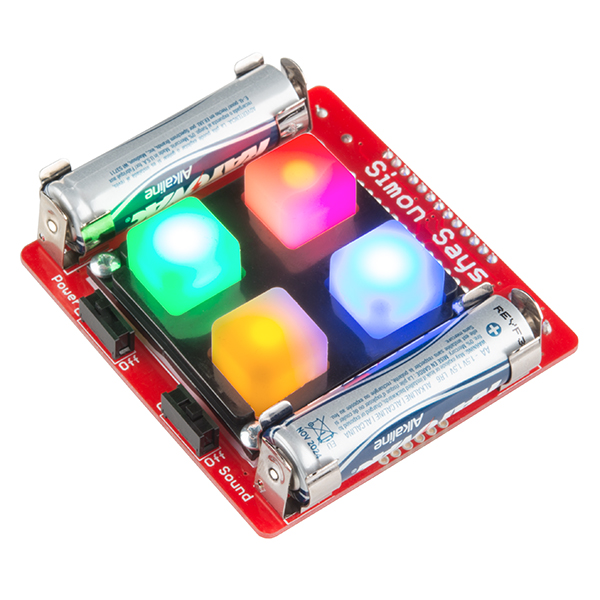
- SparkFun Learn to Solder - Simon Says

SparkFun Learn to Solder - Simon Says
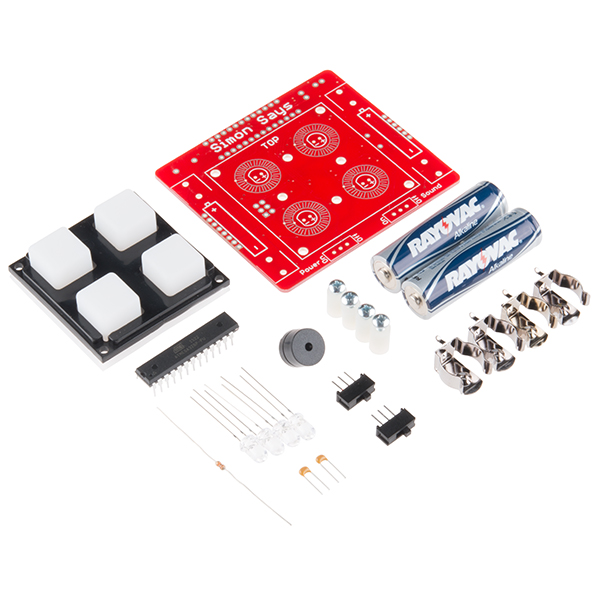
Our through-hole Simon Says Kit is a great beginner's kit and also a pretty fun toy. All components are through-hole, making this kit a great place to start when you're learning to solder. When building this kit, you'll have a chance to solder a 28-pin microprocessor, LEDs, battery clips and more.
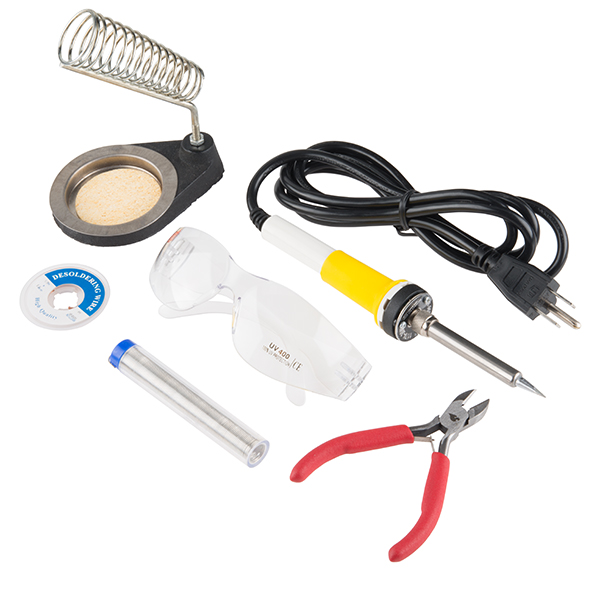
The Learn to Solder version of the Simon Says Kit includes everything that the original kit does as well as the basic soldering tools you need to put it together! This is a great kit for anyone just learning to solder or teaching someone to solder. The Learn to Solder Kit even comes with our Beginning Soldering Handbook which will walk you through the basics of making a solid solder connection.
After you have successfully assembled the kit, you will have a greater knowledge of through-hole soldering and the tools, techniques, and terminology required to populate your own PCB prototype. You will have a development platform with 5 outputs (LEDs and buzzer), 5 inputs (buttons), and serial for debugging. And, of course, you'll have your very own Simon game! Assembly time varies, but for a true beginner with no soldering experience, the kit can take 20-40 minutes to assemble.
SparkFun Learn to Solder - Simon Says Product Help and Resources
Simon Splosion Wireless
February 13, 2014
This is a tutorial demonstrating one of many techniques to "hack" the Simon Says. We will highlight the technique to take your Simon Says Wireless.
Simon Says Assembly Guide
January 20, 2011
No matter what flavor of the Simon Says Through-hole Soldering Kit you've purchased, this tutorial is here to guide you through the entire build process.
Simon Says Experiments
October 21, 2010
So you've built up a Simon Says kit? What next? This tutorial will get you up and running with Arduino software, guide you through a few example sketches, and send you on your way to create your own. Careful, this stuff is highly addictive. :)
Core Skill: Soldering
This skill defines how difficult the soldering is on a particular product. It might be a couple simple solder joints, or require special reflow tools.
Skill Level: Rookie - The number of pins increases, and you will have to determine polarity of components and some of the components might be a bit trickier or close together. You might need solder wick or flux.
See all skill levels
Core Skill: DIY
Whether it's for assembling a kit, hacking an enclosure, or creating your own parts; the DIY skill is all about knowing how to use tools and the techniques associated with them.
Skill Level: Noob - Basic assembly is required. You may need to provide your own basic tools like a screwdriver, hammer or scissors. Power tools or custom parts are not required. Instructions will be included and easy to follow. Sewing may be required, but only with included patterns.
See all skill levels
Core Skill: Electrical Prototyping
If it requires power, you need to know how much, what all the pins do, and how to hook it up. You may need to reference datasheets, schematics, and know the ins and outs of electronics.
Skill Level: Rookie - You may be required to know a bit more about the component, such as orientation, or how to hook it up, in addition to power requirements. You will need to understand polarized components.
See all skill levels
Comments
Looking for answers to technical questions?
We welcome your comments and suggestions below. However, if you are looking for solutions to technical questions please see our Technical Assistance page.
Customer Reviews
4.3 out of 5
Based on 4 ratings:
1 of 1 found this helpful:
Did it's job
This was the first thing that I've ever soldered, and I think that it did it's job. I am currently reprogramming it to play a different game with my 4-year-old. My only complaint is that the schematic and source code for the version that comes installed is difficult to find. There are several versions of each on the site, and to took some digging to figure out which was the correct one.
A good intro to soldering, but you'll want to get more items
Before putting this kit together, I hadn't soldered since I took an electronics class in high school. This kit includes most of the soldering tools I needed, and it gave me something I could use to brush up on soldering before moving on to other projects.
Most of the included tools are quite nice and do their function well. The soldering iron is cheap and a bit clumsy, but it melts the solder just fine. I wound up scorching the PCB on the Simon Says kit a little, but it works fine nonetheless. You'll also need to be careful that the soldering iron stand is aligned and tightened properly. It won't be stable with the iron in it if you screw in the holder part at the wrong angle, and that would be incredibly dangerous. I didn't end up needing the solder wick, so I can't speak to its quality.
Now, I ended up getting a few other items because I expected to need them, and I don't regret that decision. First, the included lead-free solder is harder to work with than lead-based solder. While I can understand that choice--lead is toxic and bad for the environment--I got a tube of lead-based solder as well. You may want to do the same if you think the pros outweigh the cons.
More importantly, I also ordered a third hand. I am very glad I did that. The third hand kept the circuit board off the desk, preventing slips and wobbles and keeping it level throughout assembly. You should get a third hand. I cannot stress this enough.
Third, I already had a multimeter, and I found it fairly reassuring while building. The continuity test helped me know that I had avoided solder bridges, and the diode test let me identify which color the LEDs were. It doesn't really matter where the LEDs go, but I wanted to match the photo on the front of the manual (which, if you look carefully, doesn't match the photo on the product page.) It's not essential by any means, but it'll give you a little extra peace of mind.
Great first soldering project
This was how I was learning to solder. The instruction manual was great, the part on soldering was more informative than some tutorials I had watched. One nice feature about this project was the fact that the controller had a lot of pins that needed to be soldered. Doing ~20 solders in a row put me in a bit of a rhythm that was a nice feeling that probably would not have happened if I did only ~10 solders 2 at a time. I was more than confident enough for my next project, which was two breakout boards for a project that was going to be put in operation.
For Simon Says, my 5yr old plays it. One issue has been mentioned by others, you need to squeeze the battery holder so that it has a good connection when the batteries are put in.
Awesome learning set. Tremendous value for a beginner or someone that loves the game Simon.
Great set. All the parts you need to learn. Super value. Sparkfun is awesome and this set is a great example why.
I noticed that two of the annular rings are actually squares. Why is this? I thought at first maybe it's to mark which ones are ground, but only one of them is a ground. So why are two of them square? And what do you call them? Annular squares? Rectangular rings? I see them in pictures on other boards, too.