- Home
- Product Categories
- LilyPad
- LilyPad ProtoSnap Development Board

LilyPad ProtoSnap Development Board
The ProtoSnap series is a new way to prototype your project without a breadboard. Everything is wired together on a single board, which makes it easy to explore the possibilities of the components before snapping them apart and building them into your project.
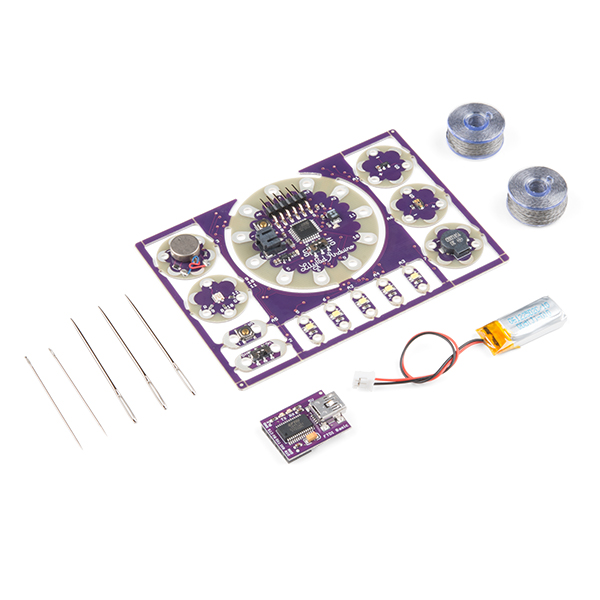
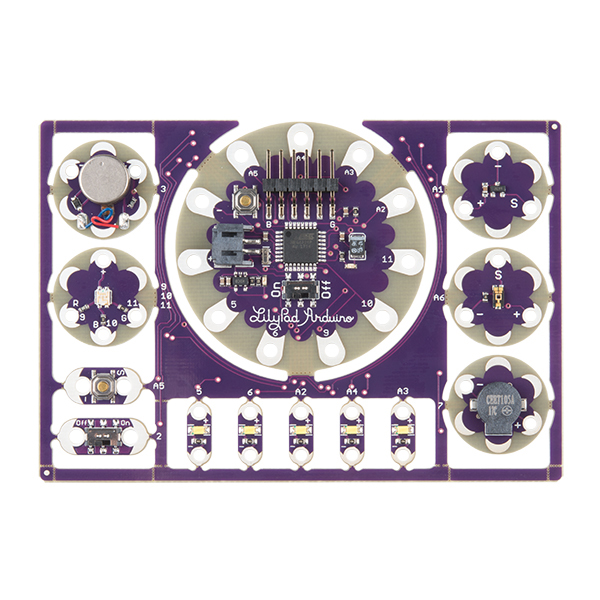
The ProtoSnap LilyPad Development Board is designed to get you started in the world of e-textiles. Combining a LilyPad Simple Board with other LilyPad components like a buzzer, a vibration motor, an RGB LED, a button, a switch, five LEDs, a light sensor, and a temperature sensor, the ProtoSnap LilyPad Development Board lets you dive right into wearable electronics. When you’ve learned how to program the LilyPad Arduino Simple Board, break apart the components and explore the power of the LilyPad platform.
We've made some minor changes since the last revision that make it easier for us to build and easier for you to snap. We haven't changed anything about the way it works though, don't worry! This kit does not include a USB cable. You will need a USB mini-B for the FTDI basic, we offer it in 6ft red, 6ft black, and 2in black. Check below for an appropriate cable if you don't already have one.
Note: A portion of this sale is given back to Dr. Leah Buechley for continued development and education of e-textiles and also to Arduino LLC to help fund continued development of new tools and new IDE features.
Note: Because of the added battery charging circuitry the Simple is unable to power a device from the FTDI header meaning that the Bluetooth Mate, for instance, is no longer plug'n'play compatible. Please use caution when using this battery in wearable projects. When using conductive thread, a short in the thread can create sparks and heat. We recommend using coin cell batteries for beginners.
Note: Due to the requirements of shipping the battery in this kit, orders may take longer to process and therefore do not qualify for same-day shipping. Additionally, these batteries can not be shipped via Ground or Economy methods to Alaska or Hawaii. Sorry for any inconvenience this may cause.
Included on the Board:
- 1 x LilyPad Simple Board
- 1 x LilyPad Button
- 1 x LilyPad Slide Switch
- 5 x LilyPad White LED
- 1 x LilyPad RGB tri-color LED
- 1 x LilyPad Light Sensor
- 1 x LilyPad Temp Sensor
- 1 x LilyPad Buzzer
- 1 x LilyPad Vibe board
Kit Also Includes:
- 1 x LilyPad FTDI Basic
- 2 x Conductive Thread Bobbin
- 1 x Needle Set
- 1 x 110mAh LiPo Battery
LilyPad ProtoSnap Development Board Product Help and Resources
LilyPad Development Board Hookup Guide
July 28, 2011
The LilyPad Development Board is a sewable electronics prototyping board that you can use to learn circuits and programming with Arduino, then break apart to make an interactive fabric or wearable project.
Choosing a LilyPad Arduino for Your Project
October 27, 2015
Not sure which LilyPad Arduino is right for you? We'll discuss the features of each and help you decide.
Adapting LilyPad Development Board Projects to the LilyPad ProtoSnap Plus
May 24, 2018
An overview of the updates made in the redesign of the LilyPad Development Board to the LilyPad ProtoSnap Plus and how to adapt code written for the old board to the new one.
LilyPad Development Board Activity Guide
December 7, 2017
Learn how to program in Arduino with the LilyPad Development Board. This guide includes 11 example activities that use the pre-wired LilyPad boards on the LilyPad Development Board.
LilyPad Vibe Board Hookup Guide
January 16, 2019
The LilyPad Vibe Board is a small vibration motor that can be sewn into projects with conductive thread and controlled by a LilyPad Arduino. The board can be used as a physical indicator on clothing and costumes for haptic feedback.
Powering Bluetooth with Battery Applications
It looks like in the board layout and the schematic that the application circuit for the charger IC does not power the bluetooth through the FTDI header pins. To get the bluetooth mate working with the LilyPad Simple board in the development board, you would need to reroute the pins so that you can provide power to the bluetooth mates https://www.sparkfun.com/search/results?term=bluetooth+mate .
Assuming that you are soldering a 6 pin female right angle https://www.sparkfun.com/products/9429 to the bluetooth plated through holes, you would need to connect the m/f jumper wires https://www.sparkfun.com/products/9140 between the two boards (Tx, Rx, and GND).
For the Vcc pin of the bluetooth mate, you would need to connect it to a power source. Assuming you are using a nominal 3.7V LiPo battery (like the batteries with the silver and yellow packaging - https://www.sparkfun.com/products/339 ), you would just need to connect the Vcc pin to the + pin of the LilyPad Simple. There are a few methods to do this. You could us a m/m jumper wire https://www.sparkfun.com/products/8431 , bend one end to make a sequin, and sew the terminal end to the + pin of the LilyPad . Here is one example of making a sequin using non-standard LilyPad components https://www.sparkfun.com/tutorials/281 .
You can also cut the m/f jumper wire in half, use wire strippers to remove the insulation, and then make an additional sequin out of the wire with the male terminal.
Core Skill: DIY
Whether it's for assembling a kit, hacking an enclosure, or creating your own parts; the DIY skill is all about knowing how to use tools and the techniques associated with them.
Skill Level: Noob - Basic assembly is required. You may need to provide your own basic tools like a screwdriver, hammer or scissors. Power tools or custom parts are not required. Instructions will be included and easy to follow. Sewing may be required, but only with included patterns.
See all skill levels
Core Skill: Programming
If a board needs code or communicates somehow, you're going to need to know how to program or interface with it. The programming skill is all about communication and code.
Skill Level: Rookie - You will need a better fundamental understand of what code is, and how it works. You will be using beginner-level software and development tools like Arduino. You will be dealing directly with code, but numerous examples and libraries are available. Sensors or shields will communicate with serial or TTL.
See all skill levels
Core Skill: Electrical Prototyping
If it requires power, you need to know how much, what all the pins do, and how to hook it up. You may need to reference datasheets, schematics, and know the ins and outs of electronics.
Skill Level: Noob - You don't need to reference a datasheet, but you will need to know basic power requirements.
See all skill levels
Comments
Looking for answers to technical questions?
We welcome your comments and suggestions below. However, if you are looking for solutions to technical questions please see our Technical Assistance page.
Customer Reviews
4.8 out of 5
Based on 5 ratings:
1 of 1 found this helpful:
This is a great little learning tool!
Comes prewired and the example programs worked with very minor changes. We made our first wearable very quickly and it was very fun! Highly recommend.
1 of 1 found this helpful:
Very cool and easy
Good starting point into programming. Very fun to mess around with and see the possibilities.
A fun kit to start with
I had no experience at all in this kind of do-it-yourself-mick-mack before. I knew how to write some code, and I had some appliances in mind I wanted to develop. It took me a few hours to figure out, and less than a week to build a size one solution. Very good indeed!
Very fun way to learn some programming basics.
We found lots of tutorials and even found Star Wars theme and Frozeon theme that we can play on our boards. Getting the lights to sync with the notes was a fun program.
-------------------- Tech Support Tips/Troubleshooting/Common Issues --------------------
Board Definition
You can upload to the board by going to Tools>Board and selecting " LilyPad Arduino w/ ATmega328 ."
Bluetooth Not Powered through FTDI Header
It looks like in the board layout and the schematic that the application circuit for the charger IC does not power the bluetooth through the FTDI header pins. To get the bluetooth mate working with the LilyPad Simple board in the development board, you would need to reroute the pins so that you can provide power to the bluetooth mates https://www.sparkfun.com/search/results?term=bluetooth+mate .
Assuming that you are soldering a 6 pin female right angle https://www.sparkfun.com/products/9429 to the bluetooth plated through holes, you would need to connect the m/f jumper wires https://www.sparkfun.com/products/9140 between the two boards (Tx, Rx, and GND).
For the Vcc pin of the bluetooth mate, you would need to connect it to a power source. Assuming you are using a nominal 3.7V LiPo battery (like the batteries with the silver and yellow packaging - https://www.sparkfun.com/products/339 ), you would just need to connect the Vcc pin to the + pin of the LilyPad Simple. There are a few methods to do this. You could us a m/m jumper wire https://www.sparkfun.com/products/8431 , bend one end to make a sequin, and sew the terminal end to the + pin of the LilyPad . Here is one example of making a sequin using non-standard LilyPad components https://www.sparkfun.com/tutorials/281 .
You can also cut the m/f jumper wire in half, use wire strippers to remove the insulation, and then make an additional sequin out of the wire with the male terminal.
Hi
I'm thinking on buy this kit, but I want to know if I have to use all at the same time? I meant if I could separate all the parts and then just put together one white LED, the arduino and the temperature sensor?
Hi, they come as one PCB with everything connected and working. This is nice way write and debug your code since you don't have to worry about connection errors. But either while together or after snapped apart you can use whatever pieces you want and not worry about the rest. If you are only looking to use a few parts though consider buying those parts separately as all parts on the board are sold individually. If you have any other questions feel free to email techsupport@sparkfun.com.
what is the the Arduino coding software to create an “e-textile”?
It's the exact same code as a standard Arduino, so you can still use the Arduino IDE. E-textile refers to hardware that is designed to be sewn into clothing or other fabrics. It's a thinner pcb, more low profile parts, and generally more rounded to prevent snagging on fabric. Also, you can connect these using conductive thread, instead of having to solder wire to them.
Folks may want to know that the the LilyPad Simple board that comes with this will not power either of the bluetooth mates. It is explained on the page for the LilyPad Simple, but not afaik here, nor on the bluetooth mate pages.
Sorry about that. I just added the note to the description above. Have you been able to get your project working with another power source for your bluetooth device?
How come this is the same price as the retail kit?
Hi, what do you think about a lilypad development board with the "LilyPad Arduino USB - ATmega32U4 Board"?
Does this do anything straight out of the box?