- Home
- Product Categories
- Mux
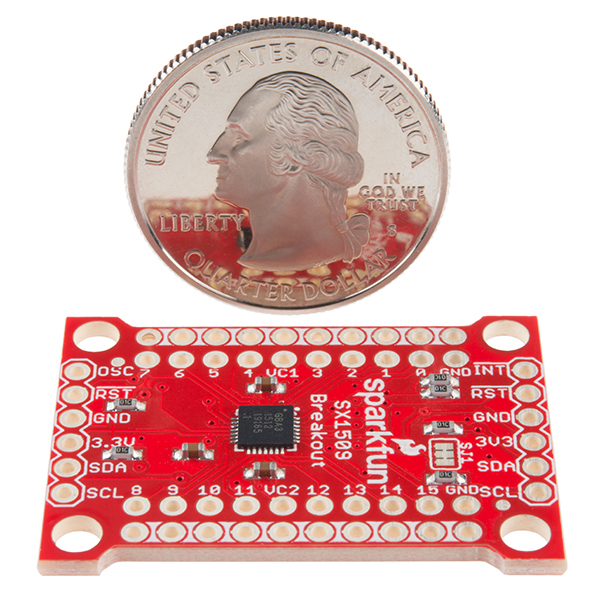
- SparkFun 16 Output I/O Expander Breakout - SX1509

SparkFun 16 Output I/O Expander Breakout - SX1509
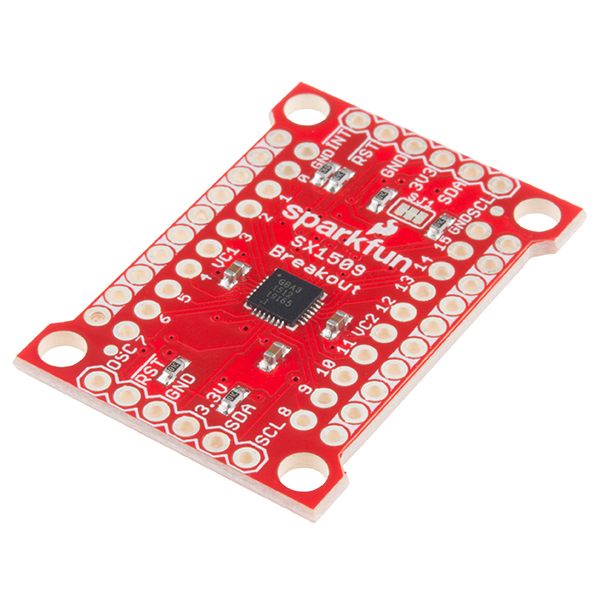
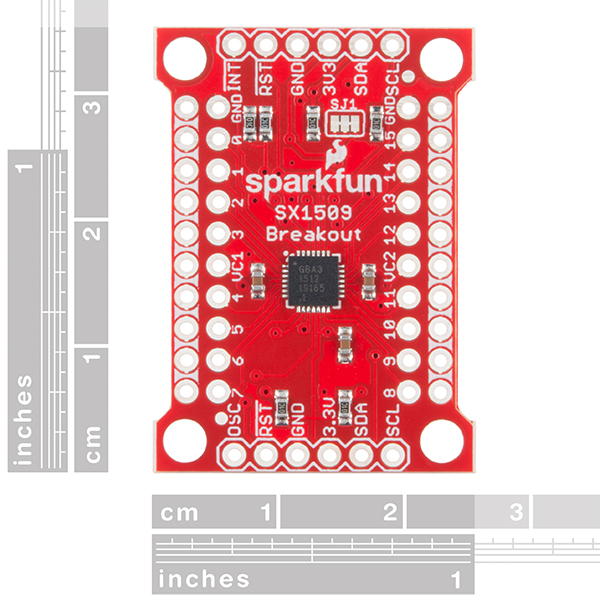
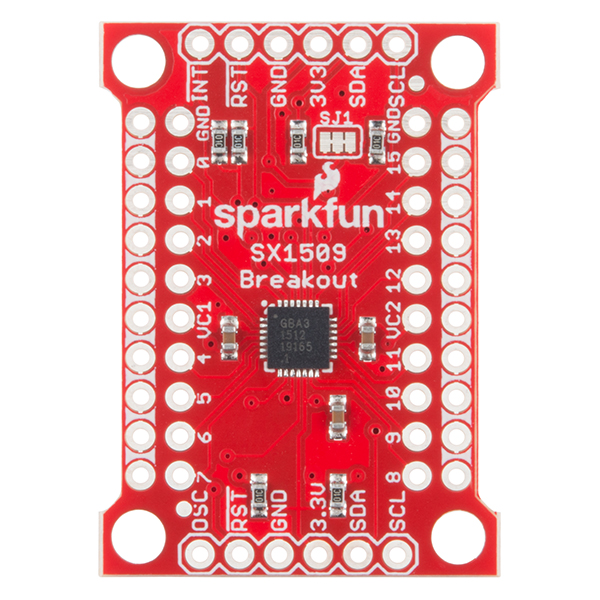
Are you low on I/O? No problem! The SX1509 Breakout is a 16-channel GPIO expander with an I2C interface – that means with just two wires, your microcontroller can interface with 16 fully configurable digital input/output pins. But the SX1509 can do so much more than just simple digital pin control. It can produce PWM signals, so you can dim LEDs. It can be set to blink or even breathe pins at varying rates. This breakout is similar to a multiplexer or "mux," in that it allows you to get more IO from less pins. And, with a built-in keypad engine, it can interface with up to 64 buttons set up in an 8x8 matrix.
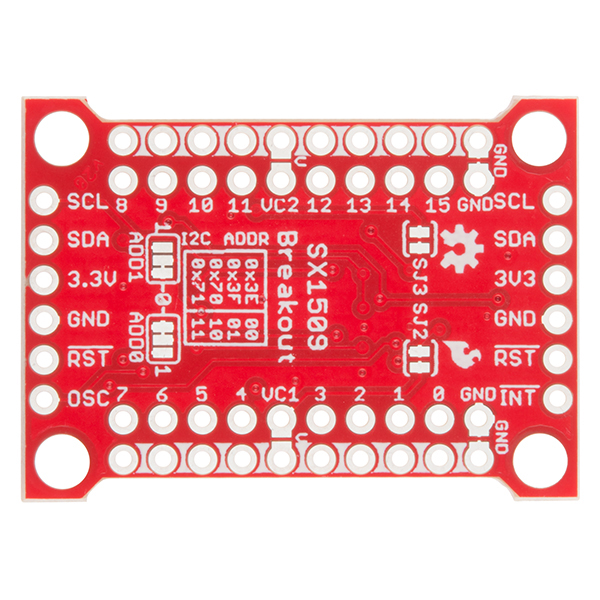
Two headers at the top and bottom of the breakout board function as the input and control headers to the board. This is where you can supply power to the SX1509, and where your I2C signals – SDA and SCL – will terminate. GPIO and power buses are broken out in every-which direction, and configurable jumpers cover most of the rest of the board.
Since the I/O banks can operate between 1.2V and 3.6V (5.5V tolerant) independent of both the core and each other, this device can also work as a level-shifter. The SX1509 breakout makes it easy to prototype so you can add more I/O onto your Arduino or I/O limited controller. We've even spun up an Arduino Library to get you started!
- Enable Direct Level Shifting Between I/O Banks and Host Controller
- 5.5V Tolerant I/Os, Up to 15mA Output Sink on All I/Os
- Integrated LED Driver with Intensity Control
- On-Chip Keypad Scanning Engine Supports Up to 8x8 Matrix (64 Keys)
- 16 Channels of True Bi-directional Style I/O
- 400kHz I2C Compatible Slave Interface
- Schematic
- Eagle Files
- Hookup Guide
- Datasheet
- GitHub (Arduino Library)
- GitHub (Design Files)
SparkFun 16 Output I/O Expander Breakout - SX1509 Product Help and Resources
SX1509 I/O Expander Breakout Hookup Guide
September 24, 2015
Learn how you can use the SX1509 to control 16 LEDs or up to 64 buttons with just two pins.
Core Skill: Soldering
This skill defines how difficult the soldering is on a particular product. It might be a couple simple solder joints, or require special reflow tools.
Skill Level: Noob - Some basic soldering is required, but it is limited to a just a few pins, basic through-hole soldering, and couple (if any) polarized components. A basic soldering iron is all you should need.
See all skill levels
Core Skill: Programming
If a board needs code or communicates somehow, you're going to need to know how to program or interface with it. The programming skill is all about communication and code.
Skill Level: Competent - The toolchain for programming is a bit more complex and will examples may not be explicitly provided for you. You will be required to have a fundamental knowledge of programming and be required to provide your own code. You may need to modify existing libraries or code to work with your specific hardware. Sensor and hardware interfaces will be SPI or I2C.
See all skill levels
Core Skill: Electrical Prototyping
If it requires power, you need to know how much, what all the pins do, and how to hook it up. You may need to reference datasheets, schematics, and know the ins and outs of electronics.
Skill Level: Rookie - You may be required to know a bit more about the component, such as orientation, or how to hook it up, in addition to power requirements. You will need to understand polarized components.
See all skill levels
Comments
Looking for answers to technical questions?
We welcome your comments and suggestions below. However, if you are looking for solutions to technical questions please see our Technical Assistance page.
Customer Reviews
4.5 out of 5
Based on 11 ratings:
1 of 1 found this helpful:
Easy and cheap way to expand your board for more IO ports!
I was skeptical of this at first, thinking it may be overly complicated. I am happy to say my concerns were unfounded. Download the library and make minor changes to your code and everything works great!
1 of 2 found this helpful:
Really bad design for breadboarding
Might be nice for hard wiring, but the same length board could be had much better pin-outs for breadboard. Could have been narrower also.
Incredibly versatile!
This little breakout can seem intimidating because of how versatile it is. It is actually surprisingly easy to use. This has been the perfect addition to my ESP8266 projects. Just make sure you keep your breadboard and circuit boards in mind when soldering headers. For such a small breakout, this is a powerhouse of options. Build quality is exactly what you would expect from Sparkfun; spectacular. You won't be disappointed.
Works as advertised
Works great. Library installed and worked perfectly the first time. Easy to use.
Nice layout and well documented
The pins are clearly labeled and the tutorial explains everything with nice pictures.
16 switches turned into just 4 I2C wires!!!
Turn 16 switches into just 4 I2C wires? Yes please!
I own a ton of these to make custom keypads (12 key switches)
and they are awesome!
Coding is easy.
Useful Board
Makes things easier if you need more GPios than what you got.
So easy to set up and use
Great product with excellent documentation for a beginner like me on how to get it up and running quickly. Absolutely no problems at all with it and delivery was fast. This was my first Sparkfun purchase and I am now eyeing several other things!
Outstanding board !!!
Compact for embedding - very flexible i/o configurations open up many possibilities. Well designed. I only wish the i2c addressing was greater 4,5 even 6 bit.
Used these before. They are great and always work .
I was ordering some parts from another vendor and they listed an I2C expander board. Since I needed on for a current project I ordered those. Turned out they were based on a different chip and took a different library. Could never get them to work so threw them in the scrap pile and determined what I had used before. It was these boards so I ordered them and loaded there library and everything just works.
Useful little board
Does everything I expect and very helpful for adding more digital Input and output to a controller that requires more.
Are there any screw or latch terminals that would work well with this?
What does it mean to "breath" a pin?
It's a fading effect and not super easy to explain but once you see it, it will make sense. Check out this video and you can see what the "breathing" effect looks like.
I'm trying to control the SX1509 using a python program, but I can't find a library that works. I've been using WiringPi, but it doesn't seem to support the SX1509. Is there a library for this that works with python?
Currently, we do not have a Python package for this product. However, I came across this link https://github.com/ATX-Sabine/SX1509-WiringPi-Python searching online.
I had tried that module before and couldn't get it working but I tried again with renewed confidence and got my LEDs up and flashing! Thanks!
Glad it worked!
The hardware is fine but the software library for it is pretty bad. Any time there is an error on the read on the I2C bus, the library hangs forever.
Hi there, it sounds like you might be looking for technical assistance. Please use the link in the banner above, to get started with posting a topic in our forums. Our technical support team will do their best to assist you.
That is correct. As commented in the examples, there is a section of code that is implemented to halt if the sensor isn't detected. You could modify the code from:
to the serial printed error output so you know you are having an I2C communication issue (used in some of the examples):
Otherwise, you could modify that section of code to suit your needs. However, you may run into other issues down the line if you are just bypassing the initial I2C communication error.
This is a great chip and board but how do you shut off a blinking or breathing pin once it starts blinking? I've not found a way.
Is it possible to drive servos from the SX1509? I'm not seeing support for this in the Arduino library.
Is it possible to modify the PWM frequency? I need around a 20kHz PWM
Does this card have a chainable design? How many can I attach together?
Does each pin have its own hardware address? I have 15 I2C-capable OLED displays all with the same hardware address and I can't spare the pins on my Arduino. Still new to all of this. If this board isn't an option, can you suggest another approach? Thank you.
Oh, I see. You don't need to worry about separate hardware addresses, as the SX1509 library will handle the IO for you.
What's the initial state of the I/O's on power up? Looking to use with relay boards that are active low and don't want them engaging on power up.
At power-on, all I/O pins are configured as inputs.
If I connect VDD (Main Supply) to 3.3v and leave VCC1 and VCC2 unconnected, will those banks be powered by VDD? Or does VDD simply power the chip, and without VCC1 or VCC2 directly pulled up to a voltage, the banks will be unpowered?
The SX1509 breakout is back! YES! (And with mounting holes too!)
Seriously, I was really disappointed when the previous version was retired. This is such a cool and useful chip, and SparkFun was the only company that made a breakout board for it. (One individual did make some and sell them on Tindie, IIRC, but only because they were no longer available from SparkFun.)
If being driven by a 16Mhz Arduino Teensy, does anyone have a "good" guess about how frequently either all inputs or all outputs can be monitored or modified?
I'm guessing no faster than about once a millisecond.
The SX1509 goes up to 400kHz I2C rate, so you'll be more limited by the I2C bus than your MCU clock. Even though it's only 400kHz, the I2C read/write operations are quite small (Think 3-4 bytes typically). Theoretically, you should be able to do an operation every 0.1ms or less as long as conditions are good (and as long as the SX1509 can keep up - I've noticed that some operations cause a small [~1ms] delay). That said, this module also has some very useful features that let you set a PWM, Blink, or Fade effect so if you for instance need to flash an LED at 5Hz you could start it with a couple of setup commands and and stop it with another. This minimizes the total number of I2C operations required for a lot of common tasks. I have used a couple of SX1509s (with an RPi master) to control a multi-zone heating and humidification system for a reptile habitat - it worked out quite well for PWM control of the fans and heating elements.