- Home
- Product Categories
- Arduino Shields
- SparkFun MIDI Shield

SparkFun MIDI Shield
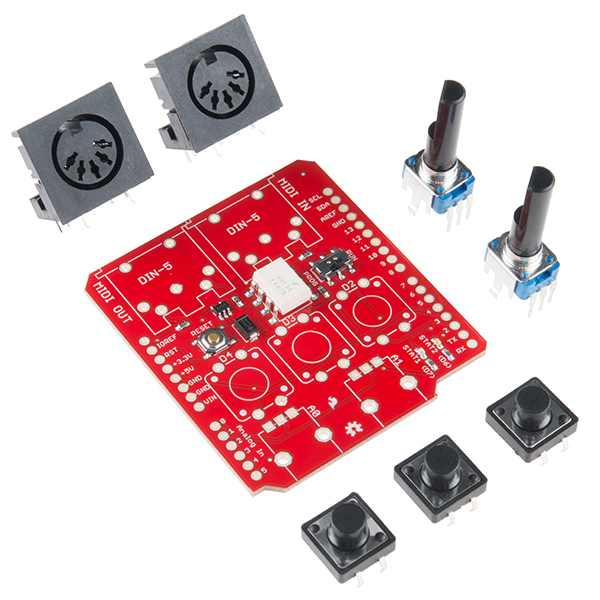
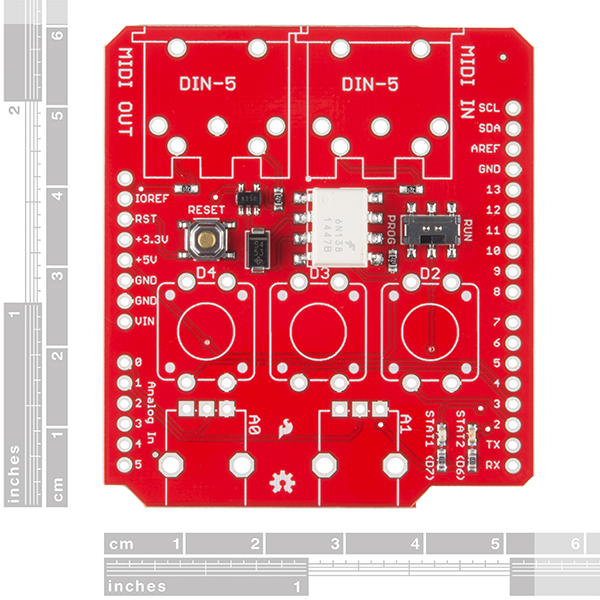
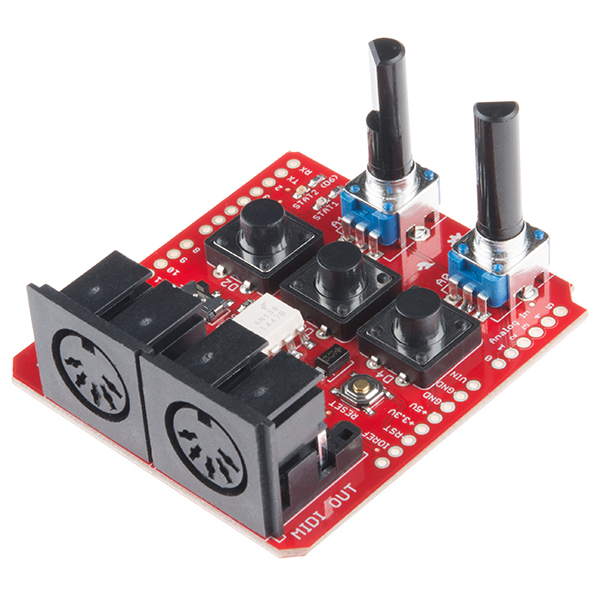
The SparkFun MIDI Shield board gives your Arduino-based device access to the antiquated, but still widely used and well supported MIDI communication protocol, so you can control synthesizers, sequencers, and other musical devices. The MIDI protocol shares many similarities with standard asynchronous serial interfaces, so you can use the UART pins of your Arduino to send and receive MIDI's event messages.
The SparkFun MIDI Shield provides an opto-isolated MIDI-IN port as well as a MIDI-OUT port. The MIDI Shield can be mounted directly on top of an Arduino, connecting the MIDI-IN to the Arduino's hardware RX pin and the MIDI-OUT to TX. Potentiometers are connected to analog pins 1 and 2, and can be used to control volume, pitch, tone or anything else you'd like. The shield also comes with three momentary push buttons, a reset button, and green and red stat LEDs. The RUN/PROG switch allows you to program the Arduino over serial without having to remove the shield.
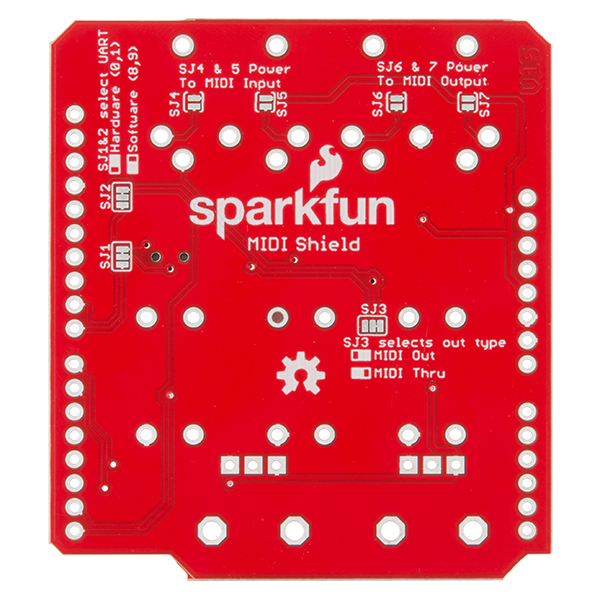
This revision of the SparkFun MIDI Shield also adds several configurable features, such as converting the MIDI output to a MIDI thru, and the option to use a software serial port for MIDI, leaving the hardware serial for programming and debugging. It also buffers the output, making it compatible with the Arduino Pro without needing to circumvent the protection resistors on the serial TX and RX lines.
Note: The MIDI Shield does not come with all parts soldered on. Two MIDI connectors, two trimpots, and three pushbuttons are included with the product and will need to be attached by the end user.
- SparkFun MIDI Shield PCB
- 2x 5-pin DIN conectors
- 2x 10K rotary potentiometer
- 3x 12mm tactile pushbutton switches
SparkFun MIDI Shield Product Help and Resources
MIDI Shield Hookup Guide
October 8, 2015
How to assemble the SparkFun MIDI Shield, plus several example projects.
MIDI BLE Tutorial
February 22, 2018
Developing a bidirectional MIDI-BLE link with the nRF52832 Breakout.
Core Skill: Soldering
This skill defines how difficult the soldering is on a particular product. It might be a couple simple solder joints, or require special reflow tools.
Skill Level: Rookie - The number of pins increases, and you will have to determine polarity of components and some of the components might be a bit trickier or close together. You might need solder wick or flux.
See all skill levels
Core Skill: DIY
Whether it's for assembling a kit, hacking an enclosure, or creating your own parts; the DIY skill is all about knowing how to use tools and the techniques associated with them.
Skill Level: Noob - Basic assembly is required. You may need to provide your own basic tools like a screwdriver, hammer or scissors. Power tools or custom parts are not required. Instructions will be included and easy to follow. Sewing may be required, but only with included patterns.
See all skill levels
Core Skill: Programming
If a board needs code or communicates somehow, you're going to need to know how to program or interface with it. The programming skill is all about communication and code.
Skill Level: Rookie - You will need a better fundamental understand of what code is, and how it works. You will be using beginner-level software and development tools like Arduino. You will be dealing directly with code, but numerous examples and libraries are available. Sensors or shields will communicate with serial or TTL.
See all skill levels
Core Skill: Electrical Prototyping
If it requires power, you need to know how much, what all the pins do, and how to hook it up. You may need to reference datasheets, schematics, and know the ins and outs of electronics.
Skill Level: Rookie - You may be required to know a bit more about the component, such as orientation, or how to hook it up, in addition to power requirements. You will need to understand polarized components.
See all skill levels
Comments
Looking for answers to technical questions?
We welcome your comments and suggestions below. However, if you are looking for solutions to technical questions please see our Technical Assistance page.
Customer Reviews
4.6 out of 5
Based on 13 ratings:
1 of 1 found this helpful:
Suffers from some deficiencies: good for a simple hobby, but not for anything more advanced
I have purchased a number of Sparkfun MIDI Shields for a project I developed (https://cs.gmu.edu/~sean/projects/gizmo/). The Shield is unique in providing both an interface (two knobs, three buttons) and a MIDI In/Out, so it's the best option for me. It does just what it says on the tin, and it's easy to assemble and code for. But it has a number of deficiencies, which force me to give it less than a stellar review.
First off: the parts are low quality. The provided buttons are really spectacularly bad: from the start they are wobbly and easily mis-trigger, and in my experience they usually start going south after a mere 5000 presses each! Do not install these buttons: buy some better ones. The pots are pretty noisy: this is a problem because for MIDI applications you want at least 7 bits of reliable accuracy, and ideally 10 bits. With a combination of tricks I can squeeze maybe 8 bits out of them. Last, the MIDI ports themselves are a cheap, bendy plastic. Mine haven't died on me yet, but I'm just counting the days. Sparkfun would do well to provide better quality parts for this kit.
Second: there are some unfortunate design flaws on the board. The board supports software serial, but that is basically worthless. MIDI applications are very timing sensitive (google for "MIDI lag"), and run at about 31K bps. Software serial cannot reliably support this, not if you're planning on doing anything else on the board at the same time! An alternative would be to upgrade to an Arduino Mega, which has four UARTs, but so far as I can tell the shield cannot be moved to a different UART: you can disable MIDI via the PROG switch but you don't have the option to shift it to some other RX/TX lines that could then be wired to some other UART on the Mega. You're stuck sharing the UART with the USB chip or going software serial. Thus if you were planning on doing USB MIDI as well, you're out of luck. Also I have no idea why the buttons are between the pots and the MIDI ports, making them hard to reach. Why in the world are the buttons not out in front?
If you need a MIDI shield with buttons and pots, this is your one and only option, besides going a more costly route such as that offered by e-licktronics. But it could have been a much better offering.
Perfect for my MIDI Project
I use it on an Arduino Uno to connect a Roland PC-100 keyboard to a Roland CM-32L sound module. I would advise against changing the default hardware serial configuration. I tried software serial for MIDI but noticed dropped data, plus I almost destroyed the shield trying to desolder and change the jumpers back to hardware serial communications.
0 of 1 found this helpful:
You are the Best
It worked pretty well. Am so happy with the product. I hope to do more business with sparkfun in Future
Easy arpeggiator
I bought this to create a little standalone MIDI arpeggiator using Brendan Clarke's code found here: http://brendanclarke.com/2014/04/23/arduino-based-midi-sequencer/. It works great (I used the default jumper settings), and the shield was a very simple build. I have another Arduino that I use as a USB host for USB MIDI controllers (the controller's USB output is converted to DIN MIDI via a non-Sparkfun MIDI shield). The controls on the Sparkfun could be really useful in that application, too.
Great gift for my son's birthday
I got this for my son's 15th birthday, he is really into MIDI stuff and python programming for MIDI, and arduino. I was amazed how fast he had this kit soldered up, we barely had finished the cake and ice cream and he had it attached to his m-audio keyboard and making sounds. Thanks for a great product.
Straightforward build
This was my very first kit that I built on my own. I was able to build this and it worked on the first try using the documentation. I learned how to solder by watching Youtube videos and that was enough to solder this up in about an hour.
Great little Midi Device
Easy to assemble and test it. The main purpose is to manage my Looper with all drum machines and DAW to synchronize to a midi clock. I may need to add an additional port to control a Digitech JamMan looper since it does not have a stander midi port. Worked great and would like that the new version include a numeric display to indicate the tempo, perhaps adding a circuit to show that. Great product.
Works great!
This is the second one I've purchased, and it works exactly as described/expected.
Before I bought the second one, I didn't notice there were LEDs on it; I've used them as a makeshift debugging tool so I don't have to fiddle with softserial libraries.
One minor thing to whine about, and it's partly on me, is that I forget to keep switching the toggle back and forth when iterating my code. Again, I don't want to weigh my code down with softserial libraries, so I put up with that.
All said and done, it's fantastic to use this to invent my own MIDI devices, and I'm likely to buy more in the future.
Great shield!
I used this for my Halloween project - a sidewalk keyboard. The MIDI shield made the music-making part easy. I didn't think I'd use the pots and buttons but they came in handy, too, for controlling LED blink rates and MIDI program changes.
Good little board
Great product, it is working well for me. A couple of things I would suggest. Include the headers required to mount the shield on the arduino with the kit - the ones with receptacles on top so that more wiring or shields can be added to the pins. And, make it more clear that the pushbutton switches need pull-ups to function properly. It took me a while to figure that out, although I agree that not including them on the board is the right thing to do, in case people want to use those pins for something else.
One problem I ran into is that we can't use this board together with the SparkFun Music Instrument Shield (DEV-10587), which uses UNO Pins D3 and D4 for RX and RESET. The MIDI Shield (DEV-12898) uses these pins for switch inputs (if installed). This means that piggybacking both shields can result in the switches shorting the data output lines to ground -- not good!
One option is to open up SJ1 and SJ2, and re-route the signals to other pins -- but there are no convenient pads to do this with.
A better workaround is the following: cut header pins 2, 3, 4 on the 12898, jumper the switches to unused i/o lines, e.g., D10, D11, D12, then stack the 12898 above 10587.
BTW -- Not clear which shield came first, but the latter designer should have paid attention to this.
Has anyone successfully stacked two of these on any of the Arduino models that provide enough serial ports? I'm looking to create a MIDI switcher/router where a single in & out is insufficient...
Works great! I tried it with arduino uno and arduino leonardo.
Can anyone point me to a resource on how to use this with a 3.3v micro? i want to use it with arduino due. Thanks
The first thing to try is just hooking it up. Sometimes it'll just work at 3.3V.
Since the Due has regulated 5V available, you could use a logic level converter to step the 3.3 up/down to 5V.
A typical MIDI current loop circuit puts about 5 mA into the LED of the input optoisolator. So we can scale the resistors on the output port to get more current from a 3.3V supply. If you make Rs and R4 each 80 Ω, then it'll still put 5 mA into the receiver.
Since the LED in the input port is part of the sender's current loop circuit, the 220 Ω should be fine there (R1), as long as the opposing port is driving it with 5V.\
Update: I just took a closer look at things. The Due should be providing 5V to the shield, but the documentation states the following:
The concern here is the incoming signal which comes from the optocoupler that is powered by the 5V line: it'll try to drive the RX line to 5V. You can insert a logic translator (or even a resistor divider) there, or cut the VCC trace that leads to pin 8 of the optocoupler, and tie it to the 3.3V rail instead.
The output side should be OK, since there's the 741g125 transmission gate that can perform the 3.3V to 5V stepup, if the 5V line of the shield is indeed powered by 5V from the Due..
Thanks for the fast reply Byron. Can confirm it's working well with the due. I just needed a custom initialization on the fortyseveneffects library.
MIDI_CREATE_INSTANCE(HardwareSerial, Serial, MIDI);
I used another library and ran well, so i figured theres probably something i can do with the fortyseven one, wich is great by the way.
Curious if this shield will work with an Arduino Mega? Thanks
I flashed my Arduino UNO with the MocoLUFA USB-MIDI firmware, making it a class-compliant USB-MIDI interface that can be used with my iPad. I am using the Arduino Midi Library in my sketch.
When I set the Midi Shield's RUN/PROG switch to the "RUN" position, midi-in from the shield's DIN port transfers to the USB-MIDI port, and I can record midi to my iPad, but midi-out from my iPad through the USB port does not get transferred to the midi-out DIN.
When I set the RUN/PROG switch to "PROG", the opposite is true. I can send midi-out from iPad USB and it will transfer to the shield's midi-out DIN port, but midi-in from the shield's DIN port does not work.
Is there way to have both? I would like midi-in from the DIN to go to the USB-MIDI out, and midi-in from USB-MIDI to go to the shield's midi-out DIN port, at the same time, without having to flip a switch and choose between exclusive in or out.
I am trying to download the midi library suggested in the hook up guide. When I try to add it I get an arduino error message "specified folder/zip file does not contain a valid library". Checked some user groups and some say arduino can't handle the special characters (underscore) and some say it can. Any ideas on what else to try.
I don't know if the 47 Effects library is up to date with the latest automatic Arduino library manager format. You might have to install it manually. I installed it by copying the contents of the /src/ directory into my Arduino library directory:
C:\Users\byron.j\Documents\Arduino\libraries\MIDIAfter that, when I start Arduino, MIDI simply shows up in the 'sketch->include library' menu. You don't need to 'add...' or 'manage...' the library.
It's building in Arduino 1.6.5, running under Windows 7.
Perusing my libraries directory, I see a number of other libraries with underscores in the directory and file names, so I'm not sure that's the problem.
Make sure you're nesting the library properly. If you manually add it to Arduino but nest in too many directories, it won't read properly. Your structure should look like the following: arduino>libraries>Midi_Library>src/examples