- Home
- Product Categories
- Capacitive
- SparkFun Touch Potentiometer

SparkFun Touch Potentiometer
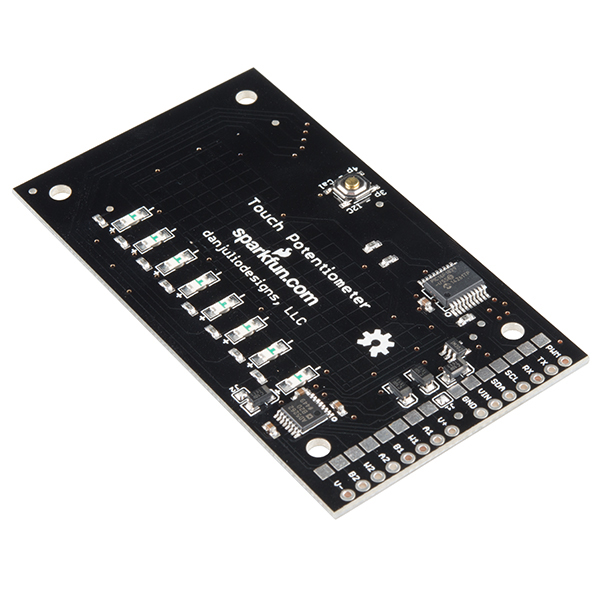
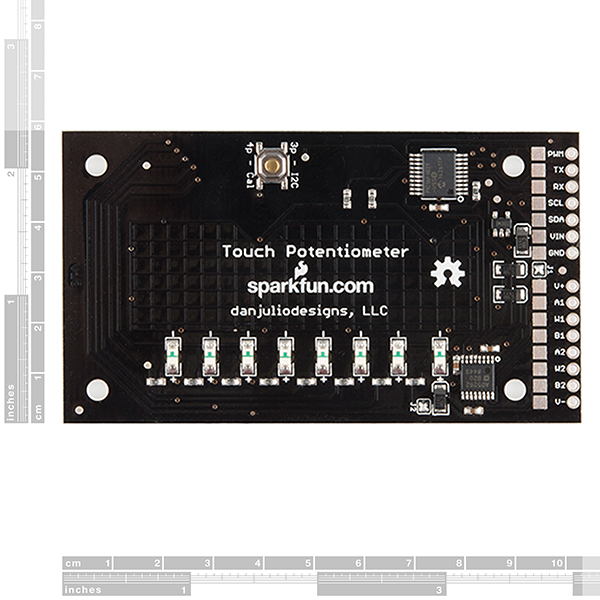
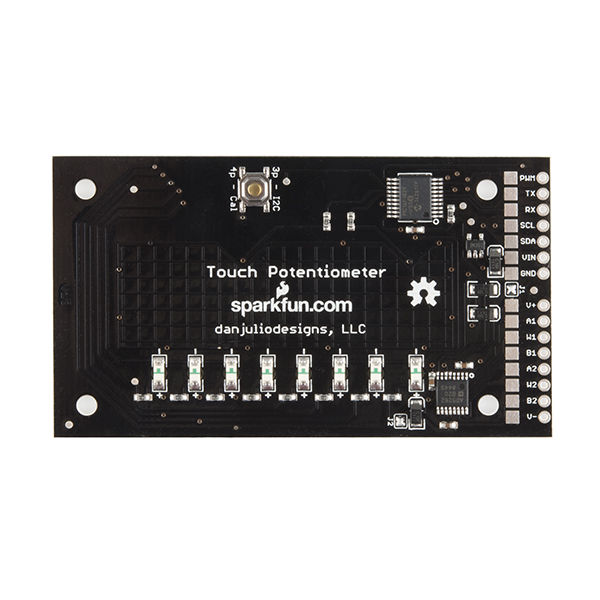
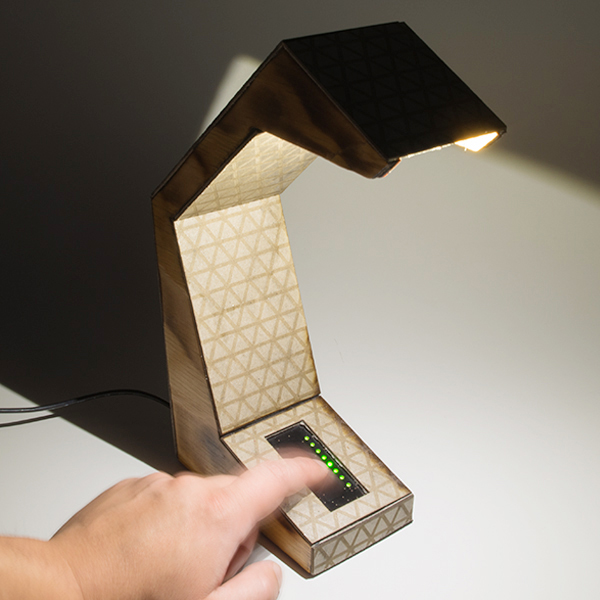
The SparkFun Touch Potentiometer, or Touch Pot for short, is an intelligent linear capacitive touch sensor that implements potentiometer functionality with 256 positions. It can operate as a peripheral to a computer or embedded microcontroller or in a stand-alone capacity. The Touch Potentiometer provides both a dual-channel analog and PWM output for direct control of other circuitry. Configurable analog and PWM transfer functions support a wide variety of applications such as volume control and LED dimming.
The Touch Potentiometer is controlled by a Microchip PIC16F1829 8-bit micro-controller that provides the host interface, LED control, capacitive sense and peripheral control functions. A built-in low-dropout voltage regulator allows operation over a range of input voltages up to 12V and breadboard friendly connectors make it easy to play with. A desktop application has been created by our collaborator, Dan Julio, that communicates with the Touch Pot over a serial connection. From this utility app you can change configuration settings, alter LED behavior, calibrate the capacitive touch sensor, view current readings in jabber mode, and much more.
Note: This product is a collaboration with danjuliodesigns. A portion of each sales goes back to them for product support and continued development.
- Dual host interfaces: Logic-level serial and I2CTM
- Dual 8-bit 20 k-ohm 3-terminal digitally controlled variable resistor outputs
- PWM output
- 8 LED display with multiple display modes and intensity levels
- Option for interpolated (soft) changes between touches
- Configurable touch sensor parameters for a variety of PCB covers
- Easily configurable I2C address to allow multiple devices on one bus
- Configurable linear or non-linear PWM transfer function
- Configurable linear or simulated logarithmic variable resistor transfer function
- Variable resistor supports single- or dual-supply operation
- Simple register interface with jabber option
- Programmable power-on default operation
- Built-in calibration procedure
- User-accessible EEPROM data storage
- Built-in 5V LDO voltage regulator
- Through-hole and SMT connectors
- Schematic
- Eagle Files
- User Manual
- Hookup Guide
- Datasheet (AD5262BRU)
- Touch Pot Utility Application
- Source Code
- GitHub (Design Files)
- Product Page
- Product Video
SparkFun Touch Potentiometer Product Help and Resources
Touch Potentiometer Hookup Guide
October 22, 2015
Learn how to use the SparkFun Touch Potentiometer to control lighting, volume or other inputs in your daily life.
TSH82 Configurable OpAmp Hookup Guide
November 2, 2018
The TSH82 Configurable OpAmp board offers the designer a great balance of performance and flexibility. We'll show you how to get the very best out of your board!
Core Skill: Soldering
This skill defines how difficult the soldering is on a particular product. It might be a couple simple solder joints, or require special reflow tools.
Skill Level: Noob - Some basic soldering is required, but it is limited to a just a few pins, basic through-hole soldering, and couple (if any) polarized components. A basic soldering iron is all you should need.
See all skill levels
Core Skill: Programming
If a board needs code or communicates somehow, you're going to need to know how to program or interface with it. The programming skill is all about communication and code.
Skill Level: Competent - The toolchain for programming is a bit more complex and will examples may not be explicitly provided for you. You will be required to have a fundamental knowledge of programming and be required to provide your own code. You may need to modify existing libraries or code to work with your specific hardware. Sensor and hardware interfaces will be SPI or I2C.
See all skill levels
Core Skill: Electrical Prototyping
If it requires power, you need to know how much, what all the pins do, and how to hook it up. You may need to reference datasheets, schematics, and know the ins and outs of electronics.
Skill Level: Rookie - You may be required to know a bit more about the component, such as orientation, or how to hook it up, in addition to power requirements. You will need to understand polarized components.
See all skill levels
Comments
Looking for answers to technical questions?
We welcome your comments and suggestions below. However, if you are looking for solutions to technical questions please see our Technical Assistance page.
Customer Reviews
3.7 out of 5
Based on 3 ratings:
1 of 1 found this helpful:
Plug and play
Great little dimmer switch. It responds well to touch, and always does what I expect. Well Engineered.
Super easy to hook up to an led driver that takes pwm, just solder 4 wires, and it works!
2 of 2 found this helpful:
Don't buy if you want to set and forget
I rarely leave bad reviews. Almost never. But this product has pushed me to leave the worst review I can give.
A little backstory: I purchased this product to put into a movie replica gift to someone who is not very tech savvy. I bundled it up in a case with the touch strip exposed, and started testing. I couldn't get it to stay steady, and my tap detection was not working well. I was using the I2C interface directly into the microcontroller, and I just couldn't get a solid touch detection without reoccurring false positives. I managed to use the calibration routine just right, just once out of the 20 or 30 times I tried, and it finally worked... for about 3 months. Now the calibration is off again, and the gift receiver is not savvy enough to calibrate it (I'm apparently just savvy enough to get the calibration to work once...).
So, I entered a support request into Sparkfun... 2 months ago. I got the confirmation, I waited, I sent a follow up, I waited and still nothing to this day. Usually Sparkfun has great support, except apparently for this part.
So in summary: 1. Won't stay calibrated (Power-up calibration appears to do nothing) 2. Terrible calibration routine makes it hard to use advanced features. 3. Non-existent support
It might work well for a breadboard project, but will not work for a design which requires longevity. Overpriced and definitely not worth it.
1 of 1 found this helpful:
Works very well!
Used one for light control and works excellent almost 2 years after the purchase
waited to see this product for so long to implant it in my synthesiser! but why so expensive????
This product look great. I would love to see another version with through holes for you to connect it to other materials, instead of having to use the back of the pcb!
Are you able to set the position remotely. Like if I wanted to have two of these interface with aonother microcontroller so they both would control the same lights would it be possible to feed the position of the one being adjusted to the other so the feedback would stay in sync?
The Touch Pot can communicate over Serial and I2C. You could send the current settings of one touch pot over UART or I2C to the other micro and have it set the other Touch Pot to the same value so long as both micros have a means of communicating with one another. So yes, that is possible.
Is there anything that I could cover the touch-sensitive part with that would still let the pot work? The lettering kind of reduces the elegance of a design.
Check out the "Operation" section in the manual. It gives a small description of how to cover the touch pot PCB. Essentially you want a high dielectric, fairly thin cover to minimize the effect on capacitive sense. You can use professional cover materials and laminates or stuff you can find at a good hardware/hobby store. I have successfully used thin double-sided carpet tape and polystyrene sheets (from a hobby store) with a total stack-up thickness of about 0.4 mm. As Joel says, run the calibration procedure to adjust for the new sensitivity.
You can cover the Touch Pot with numerous plates and enclosures. Just be sure to re-calibrate afterwards to get the best results.
Awesome product! I'm using it in a home LED installation. It's the only microcontroller I needed for a single color setup, and it's upgradeable and expandable. I'm impressed with the native configuration software and config options. Now my LED setup sports a customized UI! Also the board design/concept and layout is one of the most advanced of any SF board I've seen. I doubt that one is enough for me.
Is there a link to the source code in the PIC chip? I want to implement this in an arduino.. Is it possible? Just need the position detection, not the potentiometer part.
The User Guide link appears to be broken.... (connection refused)
Sorry about that. It's up now.
Is there a link to the PIC micro source code. If so it would be really great!!!
The collaborator has chosen to keep the source code closed source for the time being. Sorry for any inconvenience.
Should the OSHW logo be removed for the time being?
You are correct. The final board files managed to make it out with the logo still in the silk. We have a revision ticket in the queue to get it removed.
Anyway way to make this digital touch pot work at, say, 200 ohms?
Unfortunately, no, not directly. The AD5262 chip that provides the resistive potentiometer function is a 20 k-ohm device. If you are willing to live with a non-linear transfer function, you can parallel another resistor between the W- and A- pot signals to change the effective resistance. Please refer to Appendix C in the user manual. Note that adding a low-resistance bypass like 200 ohms means you probably need to account for the wiper resistance in the chip, which is nominally about 60 ohms (see the AD5262 chip spec, section "RDAC Structure").