- Home
- Product Categories
- Particle
- SparkFun Photon Weather Shield


SparkFun Photon Weather Shield
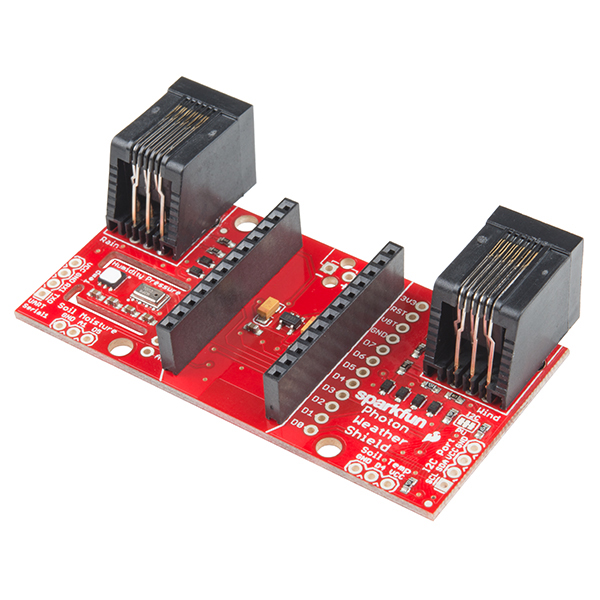
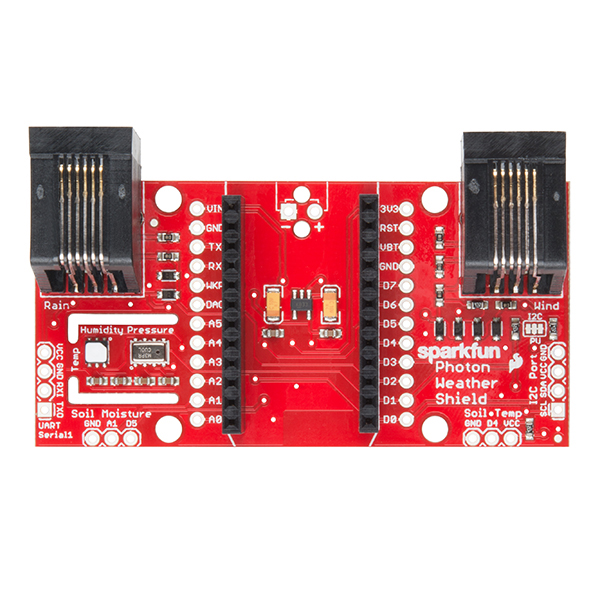
The SparkFun Photon Weather Shield is an easy-to-use add-on board that grants you access to barometric pressure, relative humidity, and temperature. There are also connections on this shield to optional sensors such as wind speed, direction, rain gauge and soil readings!
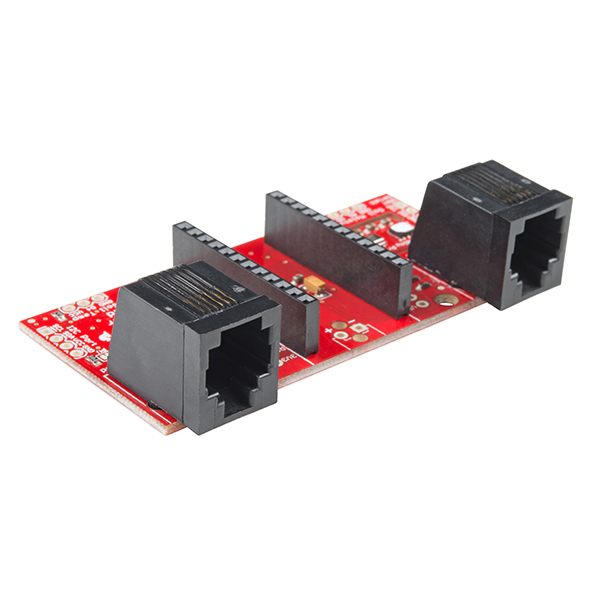
These Weather Shields utilize the Si7021 temperature/humidity and MPL3115A2 barometric pressure sensors. Each shield comes with two RJ11 connectors (for optional hookup of rain and wind sensors) and a 3-pin soil temperature and moisture hookup. Finally, each Weather Shield can attach effectively and easily to your Photon in no time at all!
The Particle Photon is a tiny WiFi development kit for creating connected projects and products. Sporting a 120MHz ARM Cortex M3 and built-in WiFi, the Photon is not only powerful but easy to use. The small form factor is ideal for IoT projects with cloud connectivity.
- Humidity/Temperature Sensor --- Si7021
- Barometric Pressure --- MPL3115A2
- Headers and Connectors Pre-Soldered
- Compatible with the Photon and the Core
- Schematic
- Eagle Files
- Hookup Guide
- Photon Development Guide
- Datasheets
- GitHub (Design Files)
- GitHub (Library)
SparkFun Photon Weather Shield Product Help and Resources
Photon Development Guide
August 20, 2015
A guide to the online and offline Particle IDE's to help aid you in your Photon development.
Adjusting for Altitude
If you are finding that the barometric pressure readings you are getting are off, you may need to correct pressure for altitude. For instance, In Denver, if the pressure is measured by NOAA 29.92"Hg it's already been corrected for altitude. The weather shield is going to read actual pressure, not pressure that has been corrected for altitude and you should expect to see a reading of about 24.73"Hg. Below is a link to a calculator that will give you a correction factor for whatever altitude your station is at. Link to calculator
Comments
Looking for answers to technical questions?
We welcome your comments and suggestions below. However, if you are looking for solutions to technical questions please see our Technical Assistance page.
Customer Reviews
4 out of 5
Based on 1 ratings:
neat--- but, I need to update my weather station to a 4g cell connection
This works with the Particle.io Photon (wifi) and Electron (3G cellular) . As you are aware 3G service is going away . The Particle.io 4g Boron is not pin compatible with this this board. Yes it can be used but it requires a lash up of jumper wires and small changes to the pin out assignments of my code. It would be nice if it were updated!
What size screw terminals will fit on the Soil Moisture and Soil Temperature connectors? Is it the 2.54mm ones?
I designed a case for this guy available here: https://www.thingiverse.com/thing:4693294 Hope it's useful!
X-post from my comment on the hookup guide tutorial:
Hi there, it sounds like you are looking for technical assistance. Please use the link in the banner above, to get started with posting a topic in our forums. Our technical support team will do their best to assist you.
That being said, if i understand what you are doing... you are powering both the photon and the shield with their respective inputs. In that case, you might be having an issue on the 3.3V line where you have 2 voltage regulators (one on the photon and one on the shield) fighting each other, which could strain and damage one of the voltage regulators (making it appear that it is in thermal shutdown).
Hello! I will look into the forum, however, to clarify: I am only powering the photon/shield combo with a 9V AC wall wart (through the added barrel jack connector on the shield. The documentation appears to suggest that if this is the only power source, no alterations are needed to the Power Select or 3.3V Disable jumpers...is this not the case?
I'm testing the weather station and getting temperature readings that are about 8 degrees (F) too high from both the Si7021 temperature/humidity and MPL3115A2 barometric pressure sensors. My code is based off the SparkFun example code. Any suggestions? I've heard some people have luck with putting the photon into deep sleep mode, but I want to be able to get readings more often from the other sensors.
I recently joined the club of people building a weather station using this board. I got the board sampling the onboard sensors and sending them to the internet in less than an hour! (That never happens.) Then, I soldered on a barrel jack to the bottom of the board and used an external LiPo battery to power the board (with the USB unplugged). The Photon wouldn't boot. However, it did boot fine when I unplugged the battery and powered it from USB instead. I then checked the power lines when it was powered by the battery, and they were a correct 3.3 V. Any ideas as to why it works from the USB power, but not from the barrel jack? I also have an issue with the wind/rain data. I am re-using the code from the Arduino-based example, and I verified that the pin assignments are the same (per the schematic), and it works on my Arduino shield. However, I'm getting wind speeds of ~70 mph when it's not spinning, which I think means the IRQ is triggering at every sample. Any ideas on how I can try troubleshooting this issue? Thanks!
If you are connecting the battery to the barrel connector on the weather shield, you need at least 5V to run the 3.3V regulator on the shield. With the USB connected to the Photon, you power the onboard 3.3V regulator on the Photon itself, and that 3.3V powers the weather board. Also, I notice the shield regulator is only good for 150mA; it may not provide enough transient current to boot the Photon, especially when the WiFi section comes up. I think the regulator on the Photon is good for 500mA or so.
Can I use this shield with Particle Asset Tracker?
Is there a way for me to measure the voltage being supplied to VIN like with the Arduino version of this shield? Looking at the schematics nothing seems to be connected to A2 & A3 (The pins used on the Arduino version)
There is not a way to directly measure the voltage on the VIN by default on the Photon Weather Shield. You can however grab an SparkFun Photon Battery Shield which has a battery monitoring IC and can tell you battery voltage as well as battery percentage, all over I2C. When stacked together, they make a great combo.
I'd like to provide another comment on this, regarding reliability in extremely humid conditions.
Last night through to this afternoon, we experienced extremely dense fog blanketing our city. I awoke to crazy temperature readings from the Si7021: -47ºC temp / -6% humidity; at this time, the on-chip condensation-preventing "heater" is ON. Conditions are simply way too far outside the range of this sensor, and it has trouble coping.
But then, I noticed something I hadn't seen before: the MPL3115A2 also had trouble. Absolute pressure readings are -9.99, and its onboard temperature sensor is reading a mind-boggling -999ºC. This chip does not have a heater. I am at the mercy of the IC now, and its ability to recover from such extreme exposure.
I may venture to start using replaceable sensor break-outs, instead of the on-board units. Long-term life of permanently mounted sensors can be drastically shortened by the environment they are meant to measure.
Worked like a champ for me. Also had the Battery Shield, big-boy LiPo, nice size Solar Panel, and of course the weather gizmos'. The Photon sends the data to the cloud and my local html reads the data and populates some really cool controls and indicators. Extremely fun project. I call it MANFRED for ...
Monitoring
Apparatus
Networked
For
Reading
Environmental
Data
--- MANFRED ---
Hello SparkFun, I see you switched from the HTU21D (without protective cover) to the Si7021 (with protective cover). I made the same switch on my old-version Photon Weather Shield when the HTU21D died, too. I desoldered the chip and installed a Si7021 w/cover. An excellent choice, and it definitely helps to keep this board running more reliably.
But I would like to also inform users that both of these chips have a built-in heater that exists solely to prevent excessive condensation on the sensor in extreme humidity conditions. I deduced that what actually killed my HTU21D was a combination of 1) not being shielded/protected by the cover that the Si7021 has and 2) an extended period of fog - which caused sensor readings in excess of 110% humidity for a few days in a row, non-stop. The sensor could not cope with this condition.
My code, which was—at that time—based off the code provided by SparkFun, also did not make any use of the heater to prevent this sort of damage, although the provided library does have methods to turn it on and off.
I suggest using the SparkFun library's
heaterOn()when the humidity rises above 100%, andheaterOff()when the humidity comes back down to something reasonable, like 95 or 98%. Also make sure that you turn the heater off insetup(), just to make sure that you put it in a known state when the unit boots up.This also means that you will see temperature fluctuations on the Si7021 of up to two degrees Celsius while the heater is on. For that reason, I suggest switching your primary source of temperature data to the barometric pressure sensor's built-in temperature sensor, as it is unaffected by the heating element (it's on a separate IC).
Very good advice. Thank you for that information. I will look into adding that functionality into the library example.
Oh cool I'm going to try that. My HTU21D failed and unfortunately I just bought a new board last week, wish I knew about the new change. I was going to try putting Teflon tape over the HTU21D, but now I'll try both. Also I was going to try to replace the bad HTU21D on the old board. It sounds like the Si7021 is footprint compatible and perhaps I can install an Si7021 on my bad board without any other changes?
You are correct, the Si7021 is a drop-in replacement for the HTU21D. You should be able to hot-air the HTU off and add the Si7021 no problem.
Awesome, I've needed a reason to blow the cob webs out of my hot air nozzle :)
Also, from the new Library code it looks like the only difference is the ID value from the ID register, other than that they work the same, is that correct?