- Home
- Product Categories
- Stepper Motor Driver
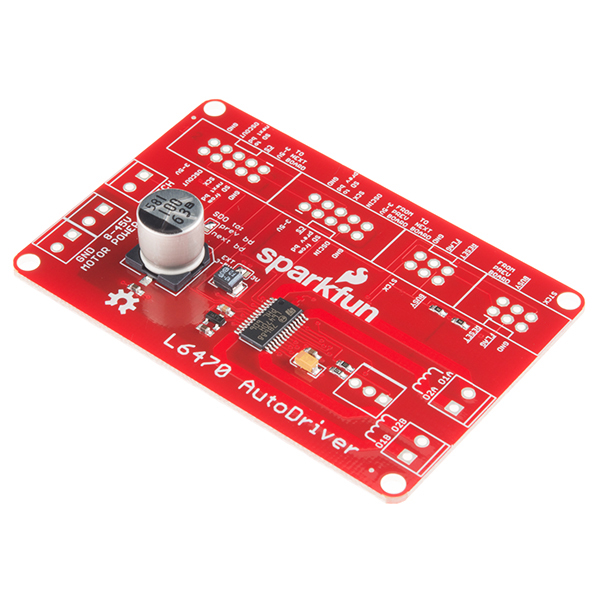
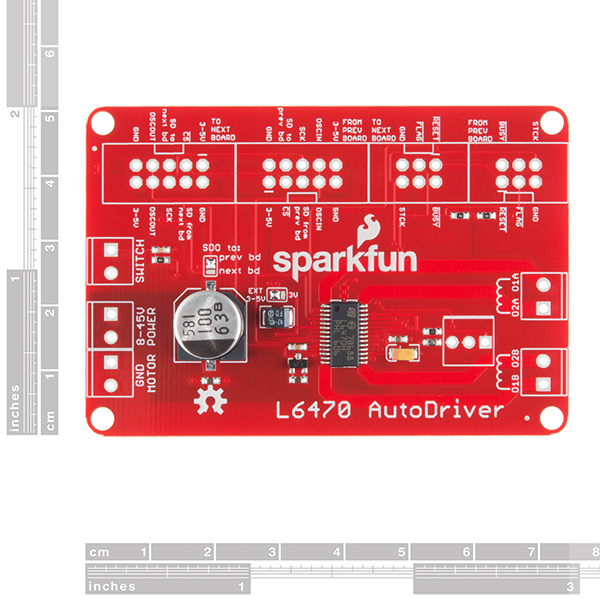
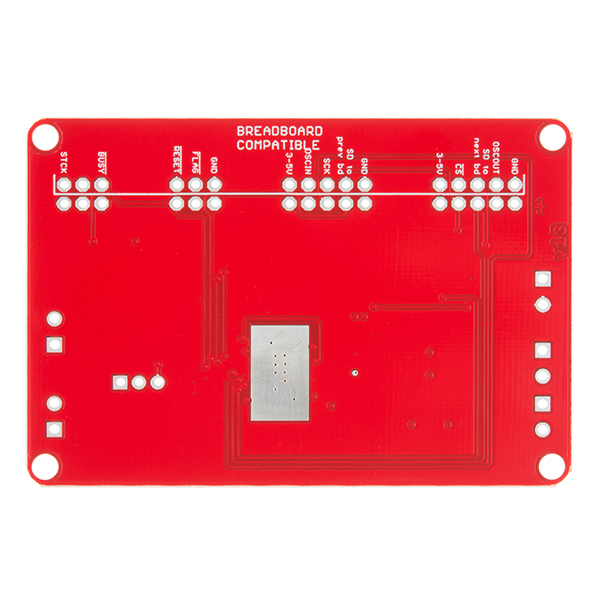
- SparkFun AutoDriver - Stepper Motor Driver (v13)


SparkFun AutoDriver - Stepper Motor Driver (v13)
The SparkFun AutoDriver board is based on the STMicro L6470 dSPIN stepper motor driver. This powerful chip allows you to control a stepper motor with a voltage from 8 to 45V at 3Arms over an SPI connection. The AutoDriver board has been designed to be easily integrated into a project, even with multiple boards. Just connect your motors and your SPI-capable microcontroller and get steppin'!
STMicro's L6470 is a 3A, 8--45V bipolar stepper motor driver. It has built-in overcurrent detection, undervoltage detection, overtemperature detection, stall detection, a 5-bit ADC, and a switch input that can be used for either user jog control or as a hard stop function. As if that weren't enough, it also features microstepping support (up to 128 microsteps per full step) and PWM drive voltage limiting. Please keep in mind that the L6470 requires a great deal more configuration and adds software complexity to your system.
Unlike most stepper motor drivers, the dSPIN is controlled over an SPI link. It has an onboard 16MHz oscillator, which allows it to autonomously execute movement commands. That means no more counting steps in your code! It also supports customized acceleration and deceleration profiles to prevent jerky starts and stops. Onboard registers track current speed and location.
This new version of the SparkFun AutoDriver's hardware is slightly different from the previous revision. It has been modified to make it easier to daisy-chain multiple boards together with simple 10-conductor ribbon cables for data and 6-conductor ribbon cables for control. The library has been updated as well, with more information found in the Hookup Guide below.
The logic supply voltage supports both 3.3V and 5V I/O levels.
- Supports up to 128 Microsteps per Full Step
- Daisy-Chain Capable
- Over-Temperature Detect
- Over-Current Detect
- Under-Voltage Detect
- PWM Drive-Voltage Limiting
- SPI Controlled
- Onboard Oscillator and Speed/Location Registers
- Stall Detection
- 5-bit ADC
- Schematic
- Eagle Files
- Hookup Guide
- Datasheet (L6470 dSPIN)
- AutoDriver Library
- GitHub
SparkFun AutoDriver - Stepper Motor Driver (v13) Product Help and Resources
Getting Started with the AutoDriver - v13
September 15, 2016
SparkFun's AutoDriver is a powerful tool for controlling stepper motors. Here's how to use it.
Core Skill: Soldering
This skill defines how difficult the soldering is on a particular product. It might be a couple simple solder joints, or require special reflow tools.
Skill Level: Rookie - The number of pins increases, and you will have to determine polarity of components and some of the components might be a bit trickier or close together. You might need solder wick or flux.
See all skill levels
Core Skill: Robotics
This skill concerns mechanical and robotics knowledge. You may need to know how mechanical parts interact, how motors work, or how to use motor drivers and controllers.
Skill Level: Experienced - Your experiences should include working with stepper motors and feedback system. You may need to understand how encoders and more complex control systems work.
See all skill levels
Core Skill: Programming
If a board needs code or communicates somehow, you're going to need to know how to program or interface with it. The programming skill is all about communication and code.
Skill Level: Competent - The toolchain for programming is a bit more complex and will examples may not be explicitly provided for you. You will be required to have a fundamental knowledge of programming and be required to provide your own code. You may need to modify existing libraries or code to work with your specific hardware. Sensor and hardware interfaces will be SPI or I2C.
See all skill levels
Core Skill: Electrical Prototyping
If it requires power, you need to know how much, what all the pins do, and how to hook it up. You may need to reference datasheets, schematics, and know the ins and outs of electronics.
Skill Level: Experienced - You will need to consult a datasheet for calculations to determine a components output format, linearity, and do a little math to get what you need. You will be using a datasheet or schematic beyond basic pinouts.
See all skill levels
Comments
Looking for answers to technical questions?
We welcome your comments and suggestions below. However, if you are looking for solutions to technical questions please see our Technical Assistance page.
Customer Reviews
3.8 out of 5
Based on 9 ratings:
1 of 1 found this helpful:
Re: "Doesn't Work As Described"
I purchased the AutoDriver several months ago and just now got around to working with them. I also ran into the behavior described by member 891015. After some experimenting with the example programs, I discovered higher voltage power supplies can be used by setting up KVAL and OverCurrentThreshold parameters. These need to be tailored to the voltage and resistance specs of the motors. For example, given a 42v supply and 3V, 1.8 ohm motor, set OCThreshold to 3000mA or higher and all KVAL values at or below 19 or 20. If OCThreshold is set higher than 3000mA, I imagine the driver chip will get hot and possibly shut down after a time. I'm still puzzling that out.
1 of 1 found this helpful:
Challenging for a novice, but works perfectly
I was prompted to write this review because I feel the poor ratings are not deserved. This product works exactly as it should -- but it's not a toy for beginners!
You need to have a lot of things just so to get this chip (ST L6470) to work correctly, but once you have that right, it can boost the quality of your project tremendously -- it is a hugely capable small stepper driver!
Some things to look out for:
The 3-5V input MUST be powered unless you modify the board jumper to use the 3V internal.
The SPI interface will not work unless BOTH the 8-45V power input is powered AND 3-5V input is powered.
The RESET# pin must be connected, otherwise the chip will hold itself in reset
If the chip is communicating but the motor does not move, make sure the coil wires are not mixed up. The two coils are electrically independent, so mixing them up will make it seem like nothing works.
If the motor is vibrating but not moving, reverse one of the coil's wires.
There are MANY settings that control motor power (KVAL) and overcurrent limits that can affect how your motor will perform. If you have never used this chip before, you will probably want to write a function that checks the STATUS register a few times a second and decodes and prints out those statuses. This will help keep you informed as you go about tuning the configuration parameters for your application.
Oh and don't do like I did and forget to buy connectors and screw terminals to make things more convenient!
1 of 3 found this helpful:
Doesn't Work As Described
I purchased this as a cheaper alternative to the Gecko Driver. While i do understand it's a $40 item, when i try running a stepper motor with it, once the voltage is above 22V, it stops working. Note I am not exceeding the rated 3A. I have tested the same motor setup with a different (industrial grade) driver and it works up to the motor's rated 48V driver input.
Works Great! [Edited]
I have to finish other parts of my project first. I am building a tracking telescope mount, controlled by a Teensy 3.5, with 2 stepper motors.
But the Autodriver has a number of interesting features. First, you can "set and forget" so the Teensy can go back to other tasks. Second, you can use an external oscillator source. I plan on using a GPS disciplined oscillator to provide precise timing.
Edit: This thing works absolutely great if you have it hooked up correctly.
A word of warning, though. Depending on what microcontroller you use you may see an unusual problem. I am using a Teensy 4.0, and found that the Teensy was sending commands too fast for the Autodriver, causing erratic behavior. I had to hack the driver and put delay statements in the library function that sends the commands. Worked perfectly after that.
Very good Stepper Motor Driver
As a beginner, it might take a little bit of time to use this driver. But overall, it is still user-friendly and provides different functions that other board cannot
0 of 4 found this helpful:
Don't waste your time
The provided library zip file won't install properly. All I get is errors stating that the intended folders do not contain any valid library files. I've messed with this thing for days and can not get any of the example sketches to work. None of the sketches provided by others work either. I bought this for a project I needed to finish quickly, and now that project is way behind due to trying to get this thing to work.
Sorry you're having problems with the library. If you're going to the above Github link, and downloading that ZIP file, the Arduino IDE won't be able to add it as a ZIP library. You need to follow the AutoDriver Library link, and download that one. I just tested it on two different machines running two different versions of the IDE, and both worked fine. If you're still having issues getting the library to load, I would recommend contacting our tech support team. They should be able to help you get up and running.
Nice But...
WAY too expensive for a $6 chip, PCB and a cap.
Nice Stepper Driver
The L6470 is a very nice driver, allowing the microcontroller to send it motion commands instead of step pulses. The board seems to break out everything necessary to get up and running. I haven't stacked boards yet, so I can't attest to how well that works. I also didn't bother with the Arduino library.
Best stepper driver
The dSpin driver offloads acceleration / deceleration profiles, step counting, limit switch homing, and power management, so you don't have to worry about a thing from your code. Library interface is fairly straightforward.
Adjustable Parameters: Max / Min Speed, Accel / Decel Rates Microstepping (1 through 128) K-Vals (seperate settings for Accel, Decel, Run, Hold) Overcurrent threshold Edge slew rate Homing / limit switch setup
The sparkfun hookup guide is great in it's explanation of the software setup and parameters. The wiring portion, however, lacks a simple straightforward diagram. The two fritzing diagrams are pretty ~nasty~ as far as they go. Especially considering that connections are meant to be made with the ribbon cables, it's pretty un-intuitive that the tutorial shows diagrams with a ton of cris-crossing and inconsistently routed wires.
I'll preface this by saying that I don't own the AutoDriver, but I'm a physics graduate student that just finished building something that required precise, reproducible, automated control of some stepper motors so I have some perspective on the topic. I originally bought an Arduino stepper motor shield from another company because it was cheaper and looked easier to use, but if I had to do things over I would without a doubt go with the AutoDriver.
The AutoDriver can only control a single motor, which makes it much more expensive at $37 each, but you get a lot for your money. This board keeps track of your current position, allows you to set a "home" position, tells you when the motor is moving (via the "busy" pin), and lots of other advanced features. A lot of these things I had to implement in my own C++ library for the Arduino using the shield I bought. Did I mention it has stall detection? When you're using a beefy stepper motor with a ton of torque, you don't want to worry that a bug in your hastily thrown together code will let the motor blow through it's home position and destroy the delicate insides of your scientific equipment that's "ask for a quote first" level expensive.
Another benefit of this guy is that it can handle 3A continuous, whereas the motor shield can handle 3A for ~20ms before you're visited by the blue smoke monster. Even if you don't need 3A continuous, it buys you some security if you screw up.
It sounds like I'm a shill for SparkFun here, but I really think the AutoDriver is a cool product. The motor shield you can buy from another company is probably quicker and easier to use, but if you're doing something that requires precision or a current-hungry motor just buy this instead. The motor shield is probably better for hobbyists who just want to get up and running, but the AutoDriver is the better product for someone who knows what they want and knows what they're doing.
Very nice product! I wired 2 boards up to Arduino Due and connected 2 stepper motors, worked like a charm.
I know this is a bit out of context but I would ask for your help if you have experiance with running steppers very fast with this breakout board. I need to control the stepper motor KH56QM2-951 (http://www.nidec-servo.com/en/digital/pdf/KH56Q.pdf). This motor is rated at 4V, so I used 33% KVAL settings for 12V 3A power supply. This works ok for lower speeds but motor starts stalling as low as 900steps/s at this settings. I would need 10k or more.
So I tried increasing ACC/DEC KVAL settings but same happens. Any idea which settings are recommended for very high RPM? (Maybe I am missing something in advanced settings).
I would like to fine tune the board to account for BEMF. I'm using the ROB-13656 stepper (125 oz.in). Does anyone know the electrical constant of this particular motor (Ke)? There is a method for measuring it in STMicroelectronics application note AN4144 (page 14) relating to the L6470 IC. It would be a great value add for sparkfun to put a validated number on the web site under their specs (HINT).
Contest: I own J&L Distilling Company 10 minutes down the road from your headquarters. Anyone from sparkfun that gets me that electrical constant (this week) will get their name in a drawing for a free bottle of our tasty booze. It only takes an oscilloscope and the motor. I probably could have measured it in the time it took me write this but isn't a contest and free booze more fun? I love the whole idea of your company. Great products, great creativity, (a little pricy BUT worth it). Rock on!
Cheers,
Seth
sjohnson@jldistilling.com
Let me start by saying that I am a long time user of this board. I have chained 6 of them to control a bunch of step motors in a robotic application. However I just saw that you have created a new version now (v13). I have a suggestion for the next version and that is to please consider either selling a potentiometer that fits into the footprint or sell the board pre-mounted with the potentiometer. Controlling current is crucial and I don't understand why the potentiometer is not there by default.
Current control can also be realized using the KVAL parameters, which can be accessed via the library. When a KVAL setting is N, the current for that mode of operation (run, hold, accel or decel) will be effectively (N/255) * V / R, where V is the supply voltage and R is the motor winding resistance.
I've had good luck using the KVAL settings to control current.
Are there any example codes that use the "Position Commands" of the SparkFunAutoDriver.h library?
I'm having trouble understanding how to use these position commands.
I'm afraid not; however, it's not too tough to understand. The AutoDriver maintains a count of the number of steps it has taken since it started up. This is stored as ABS_POS, and returned by the getPos() command. You can cause the motor to turn to an absolute location using the move() command; simply feed it a direction to turn and a location to reach and it will move to that location.
Is anyone able to provide an example code of how to set positions, and get the steppers to go to those positions (without using the "delay" function). There are no example sketches of how to do this included with the library.
The only examples that are provided with this library are "how to make your stepper play music" and "how to control a five-axis gantry system".
There needs to be an example that shows the use of: busyCheck(); setMark(long newMark) setPos(long newPos) goTo(long pos) stepClock(byte dir); goUntil(byte action, byte dir, float stepsPerSec);
This driver is not for users that are new to stepper motors-- There isn't enough example support for the software.
I would not buy this again. The library files provided for it won't install correctly. All I get whenever I try to include it in any of the sketches written for this board is a fatal error stating that the sketch folders can not be created and the none of the folders created by the zip loader file contain any valid library files ..... even though I can look and see that they are there! And the instructions for this board are horrible! Even the examples are difficult to decipher, and of course, don't work because they can't find any valid library files.
Hi there - please reach out to techsupport@sparkfun dot com and send them a copy of the errors you are seeing. They should be able to help you debug the issue, and will help us improve the documentation to make it clearer for users.
Hi there,
I've got a problem when using a 12V Lipo to power my Arduino Mega2560. A move command gets executed, when the Arduino Mega is connected via USB and the Lipo is hooked up to the AutoDriver and Vin of the Arduino.
The move command doesn't get executed however, if I power up the project only via the Lipo (connected to Vin and the stepper Driver). When that is the case, the Arduino 5V reads 5V, also on the Stepper Driver.
And now the weird thing. When powering up while USB and Lipo connected, my example code waits 3 seconds for the stepper command. In that time I quickly unplug the USB and the move command works.
I am using a buzzer tone before and after the move command which means that the code doesn't get stuck anywhere I guess.
Any ideas?
Arduino boards take a noteable amount of time to boot before executing a command. Is it possible that somehow in that time, your board is rebooting? Disconnecting the USB, or connecting it, causes the board to reboot.
Hi,
I'm using a buzzer to indicate before and after the command. If I plug in the battery first and then the USB (before the command), the Arduino doesn't reboot, as the first buzz doesn't repeat. The motors then turn.
Hi,
solved the problem, but don't understand the cause. I used digital pins for the autodrivers 5V and GND. Once I use the mega's 5V pin however, the autodriver works properly.
Even though the pins are pulled first thing in the software, followed by a 3 second delay.
Any idea why this happens?
Both the AutoDriver library and GitHub links above are 404
Apologies; we'll get that fixed.
Minor errata: 3Arms => 3A or 3 amps
The formatting on that is a bit weird, but it is 3.0 A r.m.s. according to the datasheet (2nd bullet point on the first page).