- Home
- Product Categories
- Enclosures
- SmartiPi Touch

SmartiPi Touch
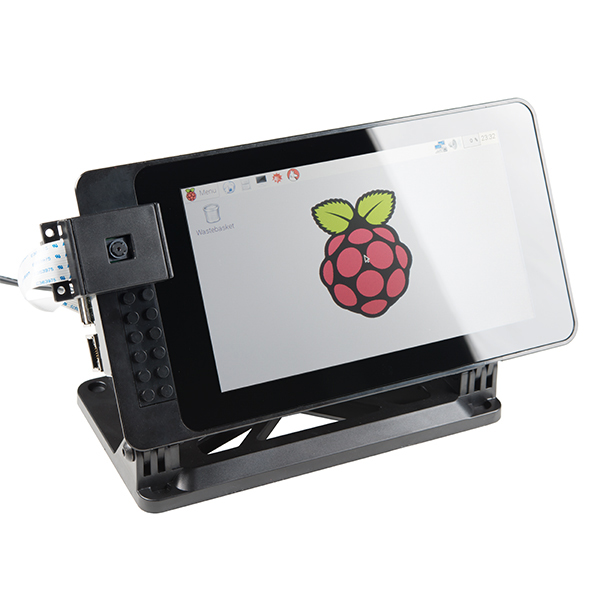
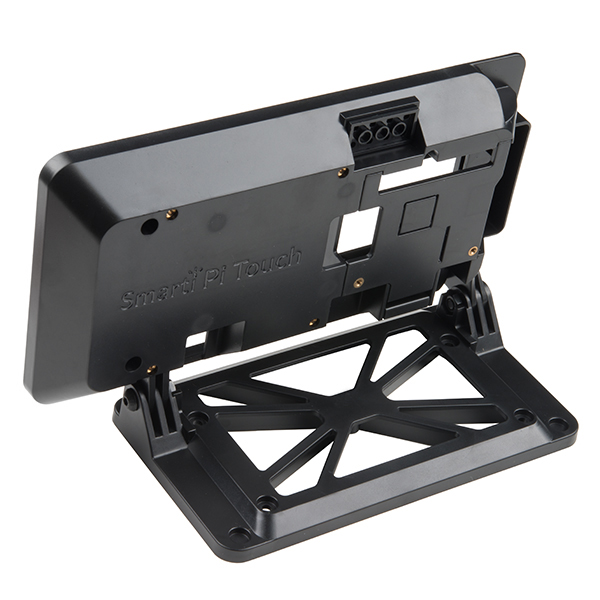
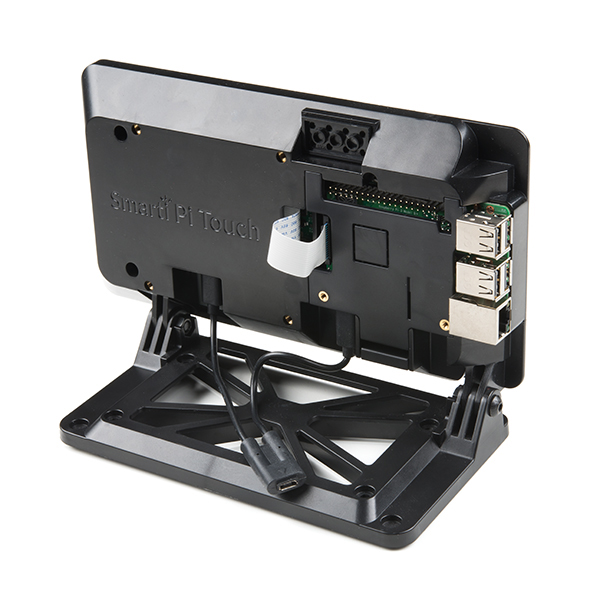
The SmartiPi Touch is a case and stand for the official Raspberry Pi 7" Touchscreen LCD. The display securely fits into the case with four screws, while a Raspberry Pi 2, 3, B+ or A+ is enclosed in the compartment on the back with a simple door. A ribbon cable that comes with the display connects into the Raspberry Pi DSI port. The stand has a pivot that allows you to adjust the angle of the screen for better viewing, as well as mounting points to affix it to a certain location.
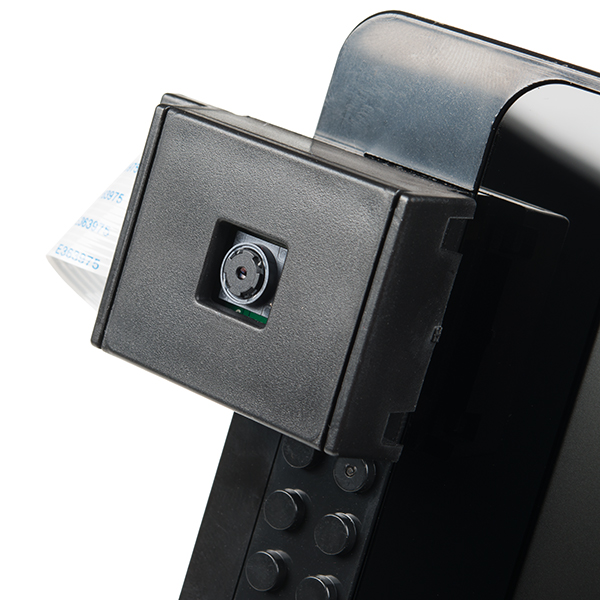
The SmartiPi Touch also includes a small case that houses your very own Raspberry Pi Camera Module, which can be attached via LEGO-compatible studs on the front or the back of the display case. Additionally, if you are looking to attach any HATs to the Raspberry Pi, you are in luck! The door to the Raspberry Pi has been cut to accommodate access to all of its GPIO pins. There is even a dual micro USB splitter cable included, which allows you to use a micro USB power supply to power the display and the Raspberry Pi at the same time!
Note: As of May 25th 2018, the SmartiPi Touch's back panel has been updated to accommodate the POE pins on the Raspberry Pi 3 B+.
Note: The SmartiPi Touch does NOT include an LCD, camera, Raspberry Pi or any other electronics. This product only contains the case and additional assembly parts.
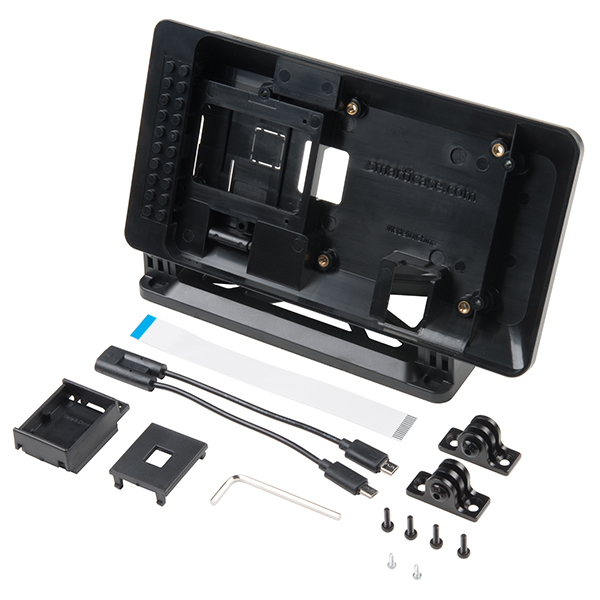
- 1x SmartiPi Touch Case
- 1x Adjustable Stand
- 1x Raspberry Pi Camera Module Case
- 1x Micro USB Splitter Cable -- 10cm
- 1x DSI Ribbon Cable
- 2x Wall Mount Bracket
- 1x Assembly Screw Bag
- 1x Allen Wrench
SmartiPi Touch Product Help and Resources
Python GUI Guide: Introduction to Tkinter
August 13, 2018
Tkinter is the standard graphical user interface package that comes with Python. This tutorial will show you how to create basic windowed applications as well as complete full-screen dashboard examples complete with live graph updates from matplotlib.
Core Skill: DIY
Whether it's for assembling a kit, hacking an enclosure, or creating your own parts; the DIY skill is all about knowing how to use tools and the techniques associated with them.
Skill Level: Noob - Basic assembly is required. You may need to provide your own basic tools like a screwdriver, hammer or scissors. Power tools or custom parts are not required. Instructions will be included and easy to follow. Sewing may be required, but only with included patterns.
See all skill levels
Comments
Looking for answers to technical questions?
We welcome your comments and suggestions below. However, if you are looking for solutions to technical questions please see our Technical Assistance page.
Customer Reviews
4.4 out of 5
Based on 8 ratings:
1 of 1 found this helpful:
Totally Awesome!
This enclosure for the display and Pi is really well made. Seriously, this doesn't feel like a knock-off, everything fits so well.. Even room for Pi Hats/Shields/etc.!
1 of 1 found this helpful:
Love the case but one issue.
This thing is great but the one issue I find that I need to cut out is the ability to use the HDMI port when needed. This case blocks the port. You can go into the boot config.txt and add the line Display_default_lcd=0 to disable or 1 as enable. So why it's blocked is a mystery.
1 of 1 found this helpful:
Great Form Factor!
This enclosure and base are perfect for packaging the Pi and the Touchscreen. As-is, it turns the Pi into a convenient-to-locate control pad for whatever you need. I'm buying several more!
1 of 1 found this helpful:
Very cool case overall
This case is the perfect setup for housing my Raspberry Pi 3 with the LCD touchscreen. I absolutely love the configuration. My one gripe was that even after fully tightening down the Raspberry Pi with the included mounting screws, the snap-on back plate of the case didn't sit right. It was bulging out where it made contact with the mounting screws. I ended up getting out a file to shave away some of the plastic on the back plate, and then everything fit together nicely.
1 of 2 found this helpful:
This stand heavily interferes with the WiFi
With my Raspberry Pi screwed into place, I can barely see my WiFi access point, let alone connect. If by some miracle I do connect (with it 3 feet from my router), I can't access any websites. However, the moment I unscrew my Pi from the back and give it some 'breathing room', I can see all the various WiFi nodes that are in my area, connect to my access point, and surf as much as I desire. While connected to my access point, I risked re-screwing my Pi into place - and everything came to a screeching halt. I unscrewed it and let it dangle free, and I was able to surf again. I'm using the official touch screen, so I'm attributing the failure to the fact that the stand "butts up" the Pi to the back of the screen and causes interference.
Compact, useful, simple package for RPi
This is a very nicely designed container for you Pi and touchscreen. Compact, tilt-able to almost any angle, your Pi goes in back and the touchscreen in front. Even includes extra power cable "Y" and display flat flex cable, so there is nothing you need to add. Flexibility includes nice touches like knock-out to allow CPU heat sink to be added, and cute Lego (r) studs on back and front for accessories like the camera. Others note that the screws interfere with the cover for the Pi, but instructions say it is not intended to be used that way. Either/or. I use the plastic snap cover so I can easily replace the micro-SD card and snap it back in place. No more tangle of wires, this is how you will want your Pi Packaged.
Great fit for the display - Solild stand for the Pi
I use this with a Pi3. I used a piece of double-sided tape to attach an RTC to the back panel. The fit of the display to the case was flawless, and the stand is robust. It is exactly what you see here, and a good companion for the 7" touchscreen.
The Lego studs give the case a bit of "toy" feel, but they had to go with something. The black color was a good choice. This is the best self-contained case I have seen yet for the RasPi and touchscreen.
Perfect fit!
This is the perfect fit for the 7" display. Assembles nicely. It includes several mounting options, threaded 75mm VESA mount holes so you can use nearly any smaller vehicle, wall, or ceiling mounting brackets.
Be aware this this is not compatible with the Pi 3 B+ (although the Pi 3 B fits fine). This is due to the new 4-pin PoE header, which interferes with the door that holds the Pi in place. It fits and works fine if you desolder the PoE header from the Pi.
What is the screw type and size on the hatch that covers the raspberry pi? it is used to hold the hats in place, but I cannot find stand offs that screw into them
I tried a few sizes after seeing your comment yesterday. M2/M3 are definitely too small/big. The "Goldilocks" threading size for the two spots on the hatch seems to be M2.5. That's the same size as the screws that attach the monitor's circuit board to the back of the monitor; so, you probably already have screws that you can test-fit on the hatch before buying some. Hope that helps.
Great case but one big drawback is the flat ribbon cable that comes with the touchscreen is too short. They must have switched things up and started shipping with a shorter cable. Most all videos I see show to have a cable about an inch or so longer than what came with mine. It just barely is able to be connected and has a strain on the connector on the pi.
This little case is seriously cool and well thought out. The only minor down side is that the HDMI port is inaccessible
I snagged this from Adafruit before (they've been selling it a little longer). Can't recommend it enough - it's well thought out and the parts fit together well. They even include little spacers so you can still fasten down HATs with the Pi compartment closed. A great, affordable way to make a self-contained Pi so that you don't have to tie up a TV every time you want to use the GUI.