- Home
- Product Categories
- Lumenati
- SparkFun Lumenati 90R

SparkFun Lumenati 90R
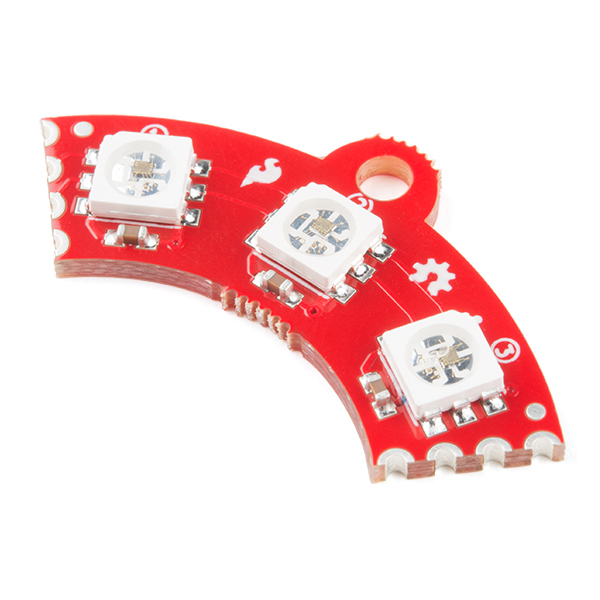
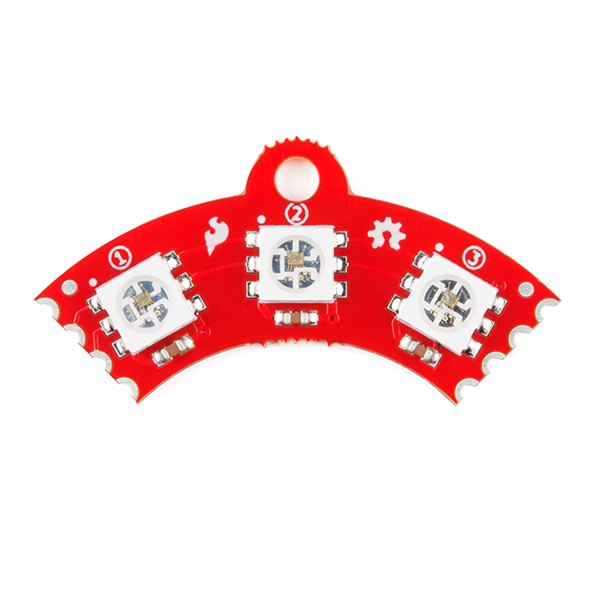
The SparkFun Lumenati 90R is a small quarter-circle board equipped with three APA102C LEDs and a single mounting position that has been designed to give your projects an edge in their lighting capacity. The 90R board has been specifically designed to be daisy-chained with other Lumenati boards, thanks to the castellated edge connectors at each end allowing for multiple design options and formations. Additionally, we have labeled the APA102C LEDs on each board with numbers indicating their position in the sequence to help you write code more easily. We especially love using the Lumenati boards to give our flying race drones a bit of style and panache.
The Lumenati 90R gets its name from the 90° angle it takes and the direction the signal and power flow. Combining four of the 90R boards creates a 12-LED ring with enough space in the center for a Lumenati 8-pack board. If you want to create more than just a small ring, you can also solder on 8-stick boards to the 90R to create outlines of different shapes and sizes.
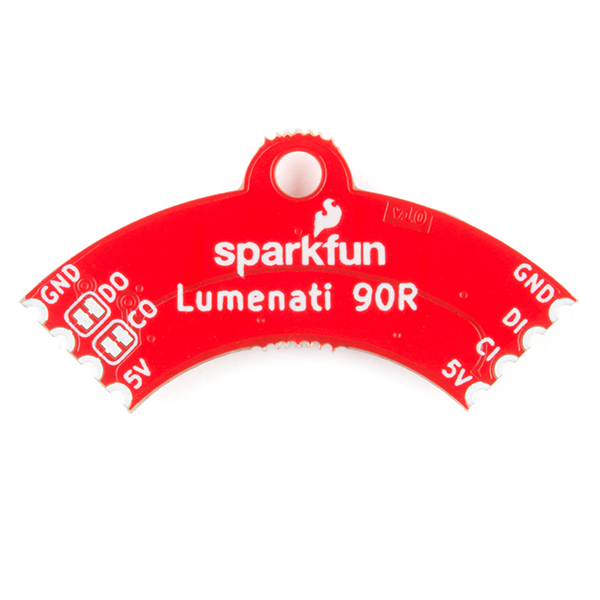
The APA102C addressable LEDs operate on +5V power input, as well as 0--5V logic levels for clock and data, and employ a 2-wire communication protocol consisting of a clock line and a data line. While this requires one more wire than standard WS2812B LEDs, the advantage is that the communication with the LEDs becomes somewhat timing-independent, allowing you to run these directly off of a Raspberry Pi or other single-board computer that doesn’t normally allow for a long, precisely timed data stream without the use of additional hardware.
Note: There are two solder jumpers on the back of the 90R labeled CO and DO (clock out and data out) that can be cut to interrupt those signals in case you make a closed-loop design where you don’t want the clock and data from your last LED to interfere with the clock and data to your first. It is critical that you cut the traces in the jumpers of the last board in the loop before you power up your LEDs if you’ve put together a continuous loop of Lumenati boards. Otherwise, it is likely that you’ll burn out a couple of LEDs.
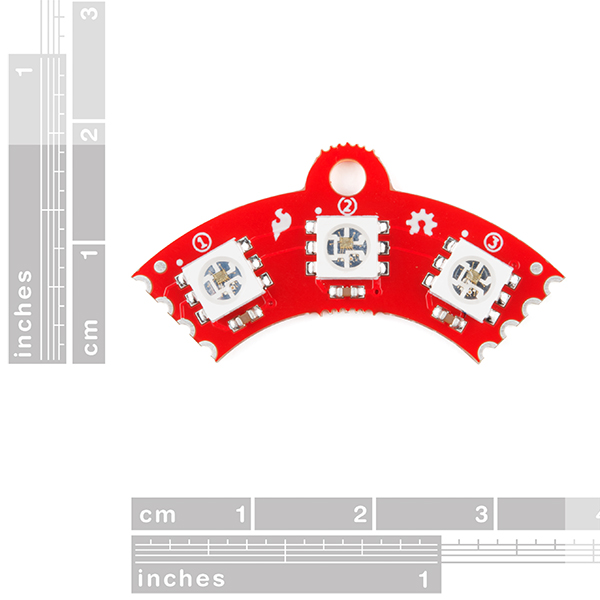
- Dimensions: 35.7mm x 17.7mm x 3.2mm (1.4" x 0.7" x 0.12")
- Weight: 1.4g
SparkFun Lumenati 90R Product Help and Resources
How to Solder: Castellated Mounting Holes
May 12, 2015
Tutorial showing how to solder castellated holes (or castellations). This might come in handy if you need to solder a module or PCB to another PCB. These castellations are becoming popular with integrated WiFi and Bluetooth modules.
APA102 Addressable LED Hookup Guide
October 8, 2019
Connect, power, and control your APA102 addressable LED strip!
Lumenati Alien Garden
November 3, 2017
Use Lumenati LED boards to add glow to your own alien garden.
Lumenati Hookup Guide
October 12, 2017
Lumenati is our line of APA102c-based addressable LED boards. We'll show you how to bring the sparkle to your projects!
Core Skill: Soldering
This skill defines how difficult the soldering is on a particular product. It might be a couple simple solder joints, or require special reflow tools.
Skill Level: Competent - You will encounter surface mount components and basic SMD soldering techniques are required.
See all skill levels
Core Skill: Programming
If a board needs code or communicates somehow, you're going to need to know how to program or interface with it. The programming skill is all about communication and code.
Skill Level: Rookie - You will need a better fundamental understand of what code is, and how it works. You will be using beginner-level software and development tools like Arduino. You will be dealing directly with code, but numerous examples and libraries are available. Sensors or shields will communicate with serial or TTL.
See all skill levels
Core Skill: Electrical Prototyping
If it requires power, you need to know how much, what all the pins do, and how to hook it up. You may need to reference datasheets, schematics, and know the ins and outs of electronics.
Skill Level: Rookie - You may be required to know a bit more about the component, such as orientation, or how to hook it up, in addition to power requirements. You will need to understand polarized components.
See all skill levels
Comments
Looking for answers to technical questions?
We welcome your comments and suggestions below. However, if you are looking for solutions to technical questions please see our Technical Assistance page.
Customer Reviews
No reviews yet.
A couple of questions about the 90L/R and Lumenati in general.
1) I assume to make a full circle, that you want 4 90L's or 4 90R's (i.e. you want them all in the same direction). Is this correct?
2) If you make a circle, what is the inside diameter of the circle that is open, and what is the outside diameter? I would suspect that it is roughly the same size as the Adafruit 12 LED neopixel ring, which has an outer diameter of 36.8mm / 1.5", and an inner diameter of 23.3mm / 1", but it would be nice to be sure before ordering these.
3) In terms of sizes, would the 8-pack or the 4-pack fit inside of the ring made by 4 90L's?
4) While 12 LED rings are useful, do you have plans for slightly larger 90L/90R variant that has 4 LEDs inside to make a 16 LED ring, which tends to be the right size for mounting on goggles.
5) Some of the WS2812B/neopixel and APA102/dotstar variants have 4 LEDs inside (red, green, blue, and white). Do you have plans for RGBW leds?
6) With WS2812B/neopixels, it is often recommended that you put a beefy capacitor between ground and 5v just before the first LED to smooth over timing issues from external power supplies. Is this recommended for the Lumenati as well?
7) Similarly, another recommendation for WS2812B/neopixels is to put a resistor between the data pin and the microprocessor. Is this needed for the clock/data pins on the Lumenati? I assume that it is less needed, since APA102's use a clock wire instead of having to have a fixed timing sequence, but it doesn't hurt to ask.
8) In your write up it says the data pins are 0-5v. I assume this means that if I'm using a 3.3v board, I have to use a level shifter. Is this correct? Or can I feed it 3.3v data/clock signals without having to use a level shifter?
9) Due to the fixed timing window of WS2812B/neopixels, it isn't useful to use them with POV (persistence-of-vision) applications, because the timing window was to slow. Can the Lumenati be used with POV assuming you have a fast enough processor?
10) The spec for WS2812B/neopixel says that it works for 3.5 - 5.5 volts, which means for a 3.3v microprocessor, I can use VIN to power the LEDS and use the data pin without having to do level shifting. If I'm running off of a single cell lipo battery with a nominal current of 3.7 volt and using a 3.3 volt processor like the Teensy, can I skip the level shfiter?
11) What is the maximum power draw for each LED if I put all 3 colors at 255?
1) That is correct.
2) inside diameter is about 30mm, outside is about 50mm. But these numbers will depend a bit on how well you can solder.
3) The 8-pack fits very nicely. In fact, if you check the hookup guide, you'll see that's exactly what we did for the example.
4) Other variants are definitely being considered, but I'm not sure that a 4-LED 90 degree piece is necessarily gonna happen. I'd probably go for something concentric to what we've already done.
5) Not at this time, no. White is fairly achievable with RGB, although the current consumption will be different...
6) I would consider this a case-by-case scenario. Will it hurt? Not really, no. Is it absolutely necessary? Also no. But if I were running a long string (like 50-100 or more), I might consider putting a big electrolytic at the front. And it will become more critical with longer strings.
7) Nope, don't need that.
8) Strictly speaking, you're supposed to use a level shifter. The datasheet says a 'high' must be 0.7*VDD, or 3.5V. That said, I've been running these right off of a SAMD21 Breakout for weeks without issue. YMMV.
9) I don't have direct experience here, but these are definitely fast. If your string is short (like maybe 10-20 LEDs) I'm pretty sure you could get away with it.
10) Well, the datasheet specifies 5V for power, and I try to stay close to that for best brightness. But they might run down to 4 volts. As to the shifter, see #8.
11) Per the data sheet, each LED die within an APA102c can draw up to around 25mA when fully on (so 255), which makes the total current consumption around 75mA per APA102c. So, 5V*75mA=375mW per APA102c.
Thanks for the answers.
2) Hmmm, at 50mm, that is a little bigger than the 16 LED neopixel ring (44.5mm), so for goggles, you probably would want to use the 90L/90R.
3) I don't recall the hookup guide being live initially, but I probably just missed it.
4) Yeah, you can do white by mixing RGB, but with the RGBW you get white a specified color temperture. One of the things I want to do is use the LED ring as a light for a camera, and it helps if the light source is a known temp, but in the grand scheme of things, I can just do color balance in post processing.
8) I know with neopixels/ws2812b, I can sometimes get it to work with 3.3v signal and 5v power (particularly with the older ones), but it is better to do the shifting if it isn't guaranteed, since you might get a new LED string that is pickier.
10) If the datasheet says 5v (and not 3.5-5.5v), then I guess I would need a boost circuit if I was using a LIPO battery (or just use a USB battery instead).
11) In terms of power draw, it is a little more than neopixels/ws2812b (16-20mA per LED, or 50-60mA for the pixel, depending on the source, and when the source was written).