- Home
- Product Categories
- Arduino Boards
- SparkFun RedBoard Edge

SparkFun RedBoard Edge
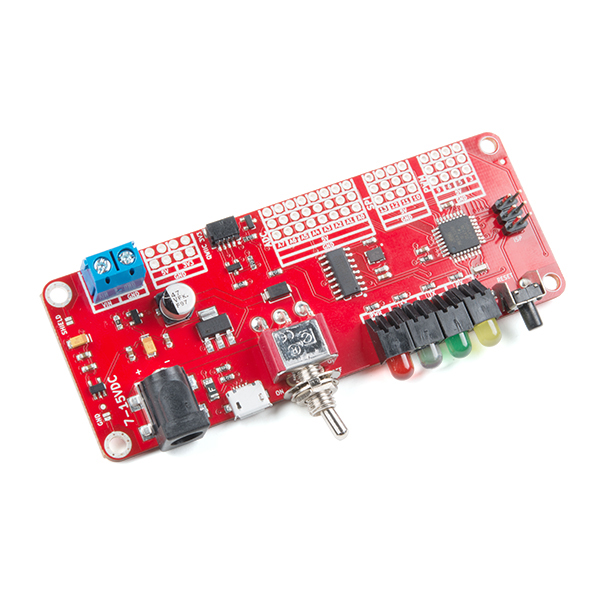
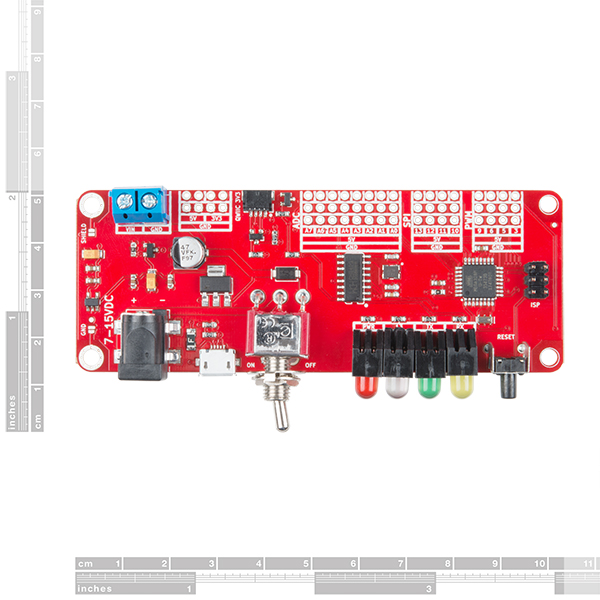
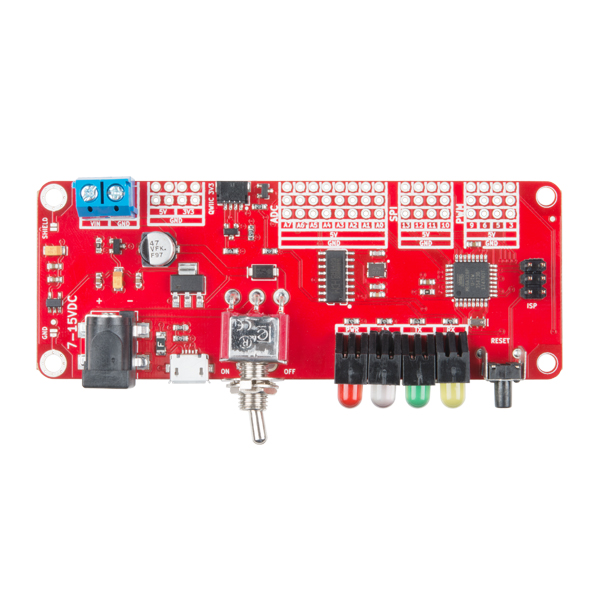
The SparkFun RedBoard Edge is a nifty little rework of the SparkFun RedBoard designed to be panel mounted in your custom project enclosure to allow for an easy way to make a clean, finished looking product. It has all the features of a normal RedBoard and is just as easy to use, even allowing you to prototype on a RedBoard and easily move your project over to a RedBoard Edge without complication. If you want an excellent learning platform for physical computing the SparkFun RedBoard Edge is still a cutting-edge choice!
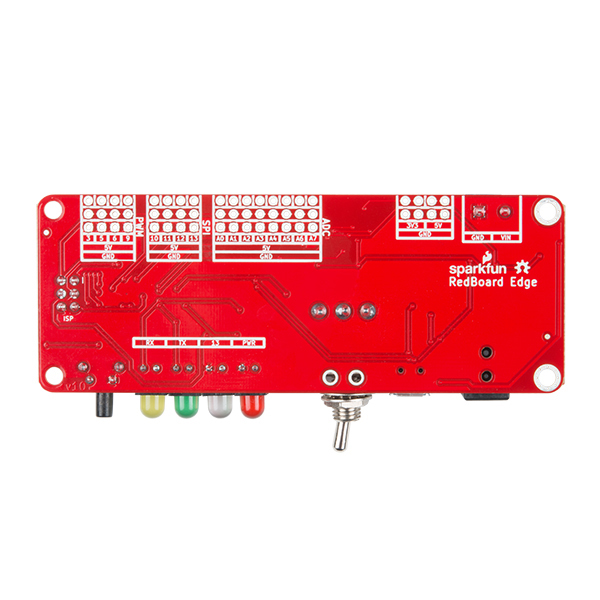
With the RedBoard Edge, we’ve rearranged the original RedBoard to include everything “user-facing” on one side of the board and everything “project-facing” on the other side of the board. On the user-facing side, you will find the 2.1mm barrel jack, a micro USB port, a right angle power switch, four status LEDs (RX, TX, Pin 13, & PWR), and a reset button. Meanwhile, on the project-facing side there is a two port screw terminal, a Qwiic connector, as well as pins that have been grouped by function (PWM, ADC, SPI), with power rails for 5V and Ground running parallel to each grouping. There are also 4-pin power rails for 5V and 3.3V right next to the 5mm 2-pin screw terminal which is connected to VIN through the Toggle Switch on the front of the board. One of the coolest things about the RedBoard Edge is the ability to ground the board to your enclosure through the standoffs next to the barrel jack and screw terminal. You can choose to connect your enclosure ground to either the USB shield or the board’s ground, or both!
Like the SparkFun RedBoard, The RedBoard Edge can be programmed over a micro USB cable using the Arduino IDE: Just plug in the board, select “Arduino UNO” from the board menu and you’re ready to upload code. The Edge can handle anything from 7 to 15VDC and you can still power it over USB or through the barrel jack.
- ATmega328 microcontroller with Optiboot (UNO) Bootloader
- Input voltage - 7-15V
- 0-5V outputs with 3.3V compatible inputs
- 14 Digital I/O Pins (6 PWM outputs)
- 6 Analog Inputs
- ISP Header
- 32k Flash Memory
- 16MHz Clock Speed
- Panel Mount Design
- micro USB Port
- Qwiic Connector
SparkFun RedBoard Edge Product Help and Resources
How to Install CH340 Drivers
August 6, 2019
How to install CH340 drivers (if you need them) on Windows, Mac OS X, and Linux.
Core Skill: Soldering
This skill defines how difficult the soldering is on a particular product. It might be a couple simple solder joints, or require special reflow tools.
Skill Level: Rookie - The number of pins increases, and you will have to determine polarity of components and some of the components might be a bit trickier or close together. You might need solder wick or flux.
See all skill levels
Core Skill: DIY
Whether it's for assembling a kit, hacking an enclosure, or creating your own parts; the DIY skill is all about knowing how to use tools and the techniques associated with them.
Skill Level: Noob - Basic assembly is required. You may need to provide your own basic tools like a screwdriver, hammer or scissors. Power tools or custom parts are not required. Instructions will be included and easy to follow. Sewing may be required, but only with included patterns.
See all skill levels
Core Skill: Programming
If a board needs code or communicates somehow, you're going to need to know how to program or interface with it. The programming skill is all about communication and code.
Skill Level: Rookie - You will need a better fundamental understand of what code is, and how it works. You will be using beginner-level software and development tools like Arduino. You will be dealing directly with code, but numerous examples and libraries are available. Sensors or shields will communicate with serial or TTL.
See all skill levels
Core Skill: Electrical Prototyping
If it requires power, you need to know how much, what all the pins do, and how to hook it up. You may need to reference datasheets, schematics, and know the ins and outs of electronics.
Skill Level: Competent - You will be required to reference a datasheet or schematic to know how to use a component. Your knowledge of a datasheet will only require basic features like power requirements, pinouts, or communications type. Also, you may need a power supply that?s greater than 12V or more than 1A worth of current.
See all skill levels
Comments
Looking for answers to technical questions?
We welcome your comments and suggestions below. However, if you are looking for solutions to technical questions please see our Technical Assistance page.
Customer Reviews
3.8 out of 5
Based on 4 ratings:
0 of 1 found this helpful:
Handy.
This product is ideal for verifying the software application of new devices for my robot development. It is helpful to isolate disappointments in designs to smaller code; albeit isolated; apart from the target application. This product encourages the exploration into applying IR sensors, gyros, accelerometer devices into more complex applications.
Wow this is an awesome idea , I love it, it does make it easier to mount, everything is in the right place, very well thought out. , I will probably order another one for future projects. Thanks
Great Board - now make it better.
I put my project together in nothing flat. I used the layout drawing for the front panel, it looks really good. For my purposes, I would have preferred the power header before the power switch and the blue LED is a little to bright but other than that its perfect. Now make the same thing in a Mega. (Please)
Micro usb port easily detaches
I never got to use the board because the micro usb port detached while i was plugging the cable. Very disappointed at the board's workmanship.
Sorry to hear that your board had a component detach. If you want to fill out a return ticket we will get you taken care of: https://www.sparkfun.com/returns
"Tactical" power switch? That's a new one on me. Tactile? I find it hard to believe that either of those terms applies to a toggle switch though. The latter might apply to the Reset switch though (if it is tactile).
I cannot get the board even to be seen by Arduino IDE. Not sure if my board is defective...I can use the same cable and version to talk to STEM. So so a bit frustrated by this board.
This is a great board! I particularly like the 3-contact "SVG"-style ports - installing female headers allows plug-and-play with Vex robotics sensors/devices. And the Qwiic port is great for all my I2C devices.
A few minor suggestions for future revisions: (1) add a pin-1 indicator to the 2x3 ISP header. (2) Figure out a way to get pads for the missing I/O ports, even if they can't follow the SVG header layout exactly. (3) Add a pad and cuttable-trace-jumper to each of the LEDs and the reset switch, so they can be repurposed if desired. (4) Add a 3rd contact to J1 wired to un-switched VIN - allows power from the back but still switchable, and the existing switched-VIN terminal lets the board power other off-board devices.
Is there a panel file that gives dimensions?
There is a zipped folder in the documents tab that should have the files you need. The link is called "Panel Mounting Files." Hopefully, this helps!
Thank you for the reply, sorry it has been so long. Is there a fully dimensioned file for the entire part? Or even a .step file available?
Are IO 2/4/7/8 missing?
This little board could be even more awesome if the MC switch could be jumpered to an Input rather than Reset. e.g. Short presses could cycle the LEDs thru up to 16 different Modes, and a Long press could select that Mode.
A 'tactical' power switch? I guess you probably mean 'tactile'... Although that doesn't really apply either (to the power switch, at least). 😀
This board would be even more useful if the LED's could be connected to any GPIO.
The "Get Started with the SparkFun RedBoard Edge Guide" button links to "https://learn.sparkfun.com/tutorials/redboard-edge", but that page gives a 404 error.
Also, are there drawings for this board available? I'm looking for the schematics and pin layouts.
The guide should be working now, sorry about that!
You can find the Schematics, KiCad files, and more in the Documents Tab under the "Add to Cart" button. Hope this helps!
The guide is still not working (neither is the "Hookup Guide" link under Documents). Thanks for the document location.
Shoot, sorry about that! It looks like we noticed something wrong with it before it went live. It should hopefully be working soon!
https://learn.sparkfun.com/tutorials/redboard-edge-hookup-guide For now, give this a try