- Home
- Product Categories
- Switch
- SparkFun Qwiic Joystick

SparkFun Qwiic Joystick
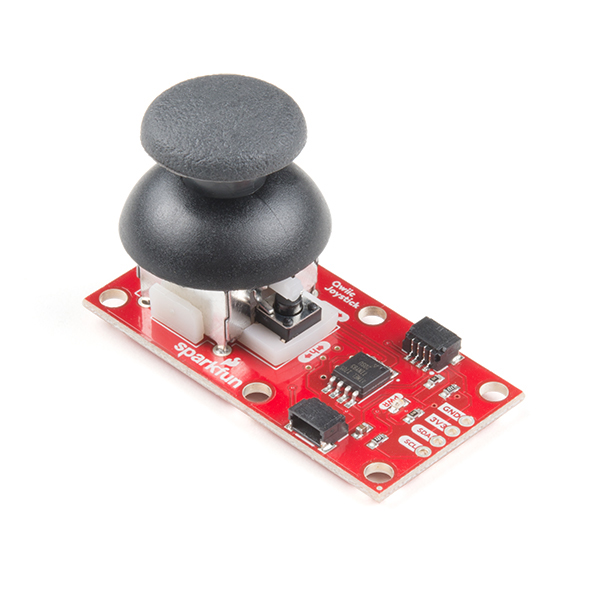
Now, you can easily add an HID/controller to your project! The SparkFun Qwiic Joystick combines the convenience of the Qwiic connection system and an analog joystick that feels reminiscent of the thumbstick from a PlayStation 2 controller and for that reason it's become a favorite of ours. The only thing that could make it better is a "smart" version, so we made one! With the pre-installed firmware, the ATtiny85 is acts as an intermediary (microcontroller) for the analog and digital inputs from the joystick. This allows the Qwiic Joystick to report its position over I2C. Utilizing our handy Qwiic system, no soldering is required to connect it to the rest of your system. However, we still have broken out 0.1"-spaced pins in case you prefer to use a breadboard.
The joystick is similar to the analog joysticks on PS2 (PlayStation 2) controllers. Directional movements are simply measured with two 10 kΩ potentiometers, connected with a gimbal mechanism that separates the horizontal and vertical movements. This joystick also has a select button that is actuated when the joystick is pressed down. The SparkFun Qwiic Joystick's I2C address is also software selectable so you can plenty of them to the same bus without any risk of collision!
Note: The I2C address of the Qwiic Joystick is 0x20 and is software configurable. A multiplexer/Mux is required to communicate to multiple Qwiic Joystick sensors on a single bus. If you need to use more than one Qwiic Joystick sensor consider using the Qwiic Mux Breakout.
The SparkFun Qwiic Connect System is an ecosystem of I2C sensors, actuators, shields and cables that make prototyping faster and less prone to error. All Qwiic-enabled boards use a common 1mm pitch, 4-pin JST connector. This reduces the amount of required PCB space, and polarized connections mean you can’t hook it up wrong.
Need a custom board? This component can be found in SparkFun's À La Carte board builder. You can have a custom design fabricated with this component - and your choice of hundreds of other sensors, actuators and wireless devices - delivered to you in just a few weeks.

- Qwiic Compatible
- Software Selectable Slave Address
- Low Power ATtiny85 Microcontroller
- Reports X and Y Joystick Position + Button Press
SparkFun Qwiic Joystick Product Help and Resources
Qwiic Pro Micro USB-C (ATmega32U4) Hookup Guide
February 6, 2020
An overview of the ATmega32U4-based Qwiic Pro Micro USB-C, how to install it, and how to use it with Arduino.
Qwiic Joystick Hookup Guide
February 21, 2019
Looking for an easy way to implement a joystick to your next Arduino or Raspberry Pi project? This hookup guide will walk you through using the Qwiic Joystick with the Arduino IDE on a RedBoard Qwiic and in Python on a Raspberry Pi.
MicroMod Qwiic Pro Kit Project Guide
September 29, 2022
The MicroMod Qwiic Pro Kit was designed to allow users to get started with Arduino without the need for soldering or a breadboard. We've included three inputs (a joystick, accelerometer, and proximity sensor) and one display that can be daisy chained to the MicroMod SAMD51 Processor Board.
Qwiic Pro Kit Project Guide
November 7, 2019
The Qwiic Pro Kit was designed to allow users to get started with Arduino without the need for soldering or a breadboard. We've included three inputs (a joystick, accelerometer, and proximity sensor) and one display that can be daisy chained to the RedBoard Turbo (SAMD21) Development Board.
Core Skill: Programming
If a board needs code or communicates somehow, you're going to need to know how to program or interface with it. The programming skill is all about communication and code.
Skill Level: Competent - The toolchain for programming is a bit more complex and will examples may not be explicitly provided for you. You will be required to have a fundamental knowledge of programming and be required to provide your own code. You may need to modify existing libraries or code to work with your specific hardware. Sensor and hardware interfaces will be SPI or I2C.
See all skill levels
Core Skill: Electrical Prototyping
If it requires power, you need to know how much, what all the pins do, and how to hook it up. You may need to reference datasheets, schematics, and know the ins and outs of electronics.
Skill Level: Rookie - You may be required to know a bit more about the component, such as orientation, or how to hook it up, in addition to power requirements. You will need to understand polarized components.
See all skill levels
Comments
Looking for answers to technical questions?
We welcome your comments and suggestions below. However, if you are looking for solutions to technical questions please see our Technical Assistance page.
Customer Reviews
4.7 out of 5
Based on 3 ratings:
Still being developed
This point I have not had the opportunity to try the SparkFun QWIIC joystick. I purchased it partly, as a supply item, and hopefully will find some fantastic use for in the near future. As a resident of Fort Collins Colorado, I am trying my best to purchase parts and supplies from a company that is local to me. Recently I had to order some SparkFun parts from a distributor in England, Pimoroni. I am very impressed with the quality and assortment of boards for temperature, light, environmental values and date and time. I'm still trying to figure most of them out. Please keep up the fantastic work in delivering these parts to those like me who just want to play. Thank you Dick Burkhartzmeyer
Nice thing to build own Video game device
I’ve wrote a Linux driver for this joystick which waits for code-review: https://patchwork.kernel.org/project/linux-input/patch/20210528084421.24869-1-oleg@kaa.org.ua/
I’ve tested it with Raspberry Pi, works perfectly!
Easy to connect and use
Easy to connect if you have the Qwiic cable to connect to SCL, SDA, VCC & GND. SparkFun Joystick Serial Output project ran fine without any modifications. Joystick axis values range from 0 to 1023. Button value is either 0 or 1.
I'm here after learning the hard way that the thumbsticks sold on amazon for the Xbox or other controllers use non-standard, funky potentiometers. Provided these use standard pots, this should work for me- I just have to remove it from the PCB. That way I don't have to re-invent the thumbstick mechanism. So.. normal pots, right?
Can this work with a ESP32? I got compile errors trying to upload.. but when I chose something like an UNO it allows the compile
Board is a ESP32 Thing Plus with a QWIIC connection
Hi there, it sounds like you are looking for technical assistance. Please use the link in the banner above, to get started with posting a topic in our forums. Our technical support team will do their best to assist you.
Just a heads up, the ESP32 uses a different library for its I2C communication (I think it was "TwoWire" or something like that). Make sure you are modifying the example code to account for the board you are using.
can i just plug this in to a windows pc and use it as a controller with only a joystick?
No, you cannot. However, you could possibly use a microcontroller to emulate an HID device similar to this tutorial.
There is a CircuitPython library now available for the Qwiic Joystick and the Raspberry Pi. The source code, examples, installation information and documentation are available on GitHub.
https://github.com/fourstix/Sparkfun_CircuitPython_QwiicJoystick
Why do some boards have a power LED and some don't? To be clear, I don't like power LEDs without disable jumpers.
I can't speak to the engineer's choices of to include a power LED or not, but I notify them that users are requesting for a jumper to disconnect power to the "power LED" for future boards and revisions. Thanks for the input.
404 ??? i can't see these products
Just FYI, the Example Code link in the documents is a 404
Oops sorry. It should be live right now. =)