- Home
- Product Categories
- Audio Boards
- SparkFun Qwiic Speaker Amp


SparkFun Qwiic Speaker Amp
The SparkFun Qwiic Speaker Amp includes the Texas Instruments TPA2016D2 stereo, filter-free class-D audio power amplifier. What distinguishes this audio amplifier from others is that it features volume control (i.e. gain), Dynamic Range Compression (DRC), Automatic Gain Control (AGC), enable/disable amplifier, and its ability to be configured through software via I2C. Its efficient class-D operation also means low heat and long battery life when driving 4Ω speakers at up to 2.8W in stereo, and 8Ω speakers at up to 1.7W in stereo. This is quite a bit more power than the mono amplifier (TPA2005D1) or Noisy Cricket stereo amplifier (LM4853). It won't shake a stadium but it will provide plenty of volume for your audio projects.
The DRC and AGC is unique compared to other audio amplifiers. This is a powerful feature that allows you to "even out" the loud and quiet sections from your audio input. It also allows you to maximize the volume of your speakers. By fine-tuning the settings, you can get the most volume to prevent distortion of the audio signal. Using the DRC, AGC, and/or the limiter alone allows you to protect your speakers from getting damaged by extremely loud playback. We've written an extensive Arduino Library that allows you to easily control all of the amplifier's features from simple gain control to advanced AGC. Note that you will need to send the configuration to the TPA2016D2 upon every power cycle.
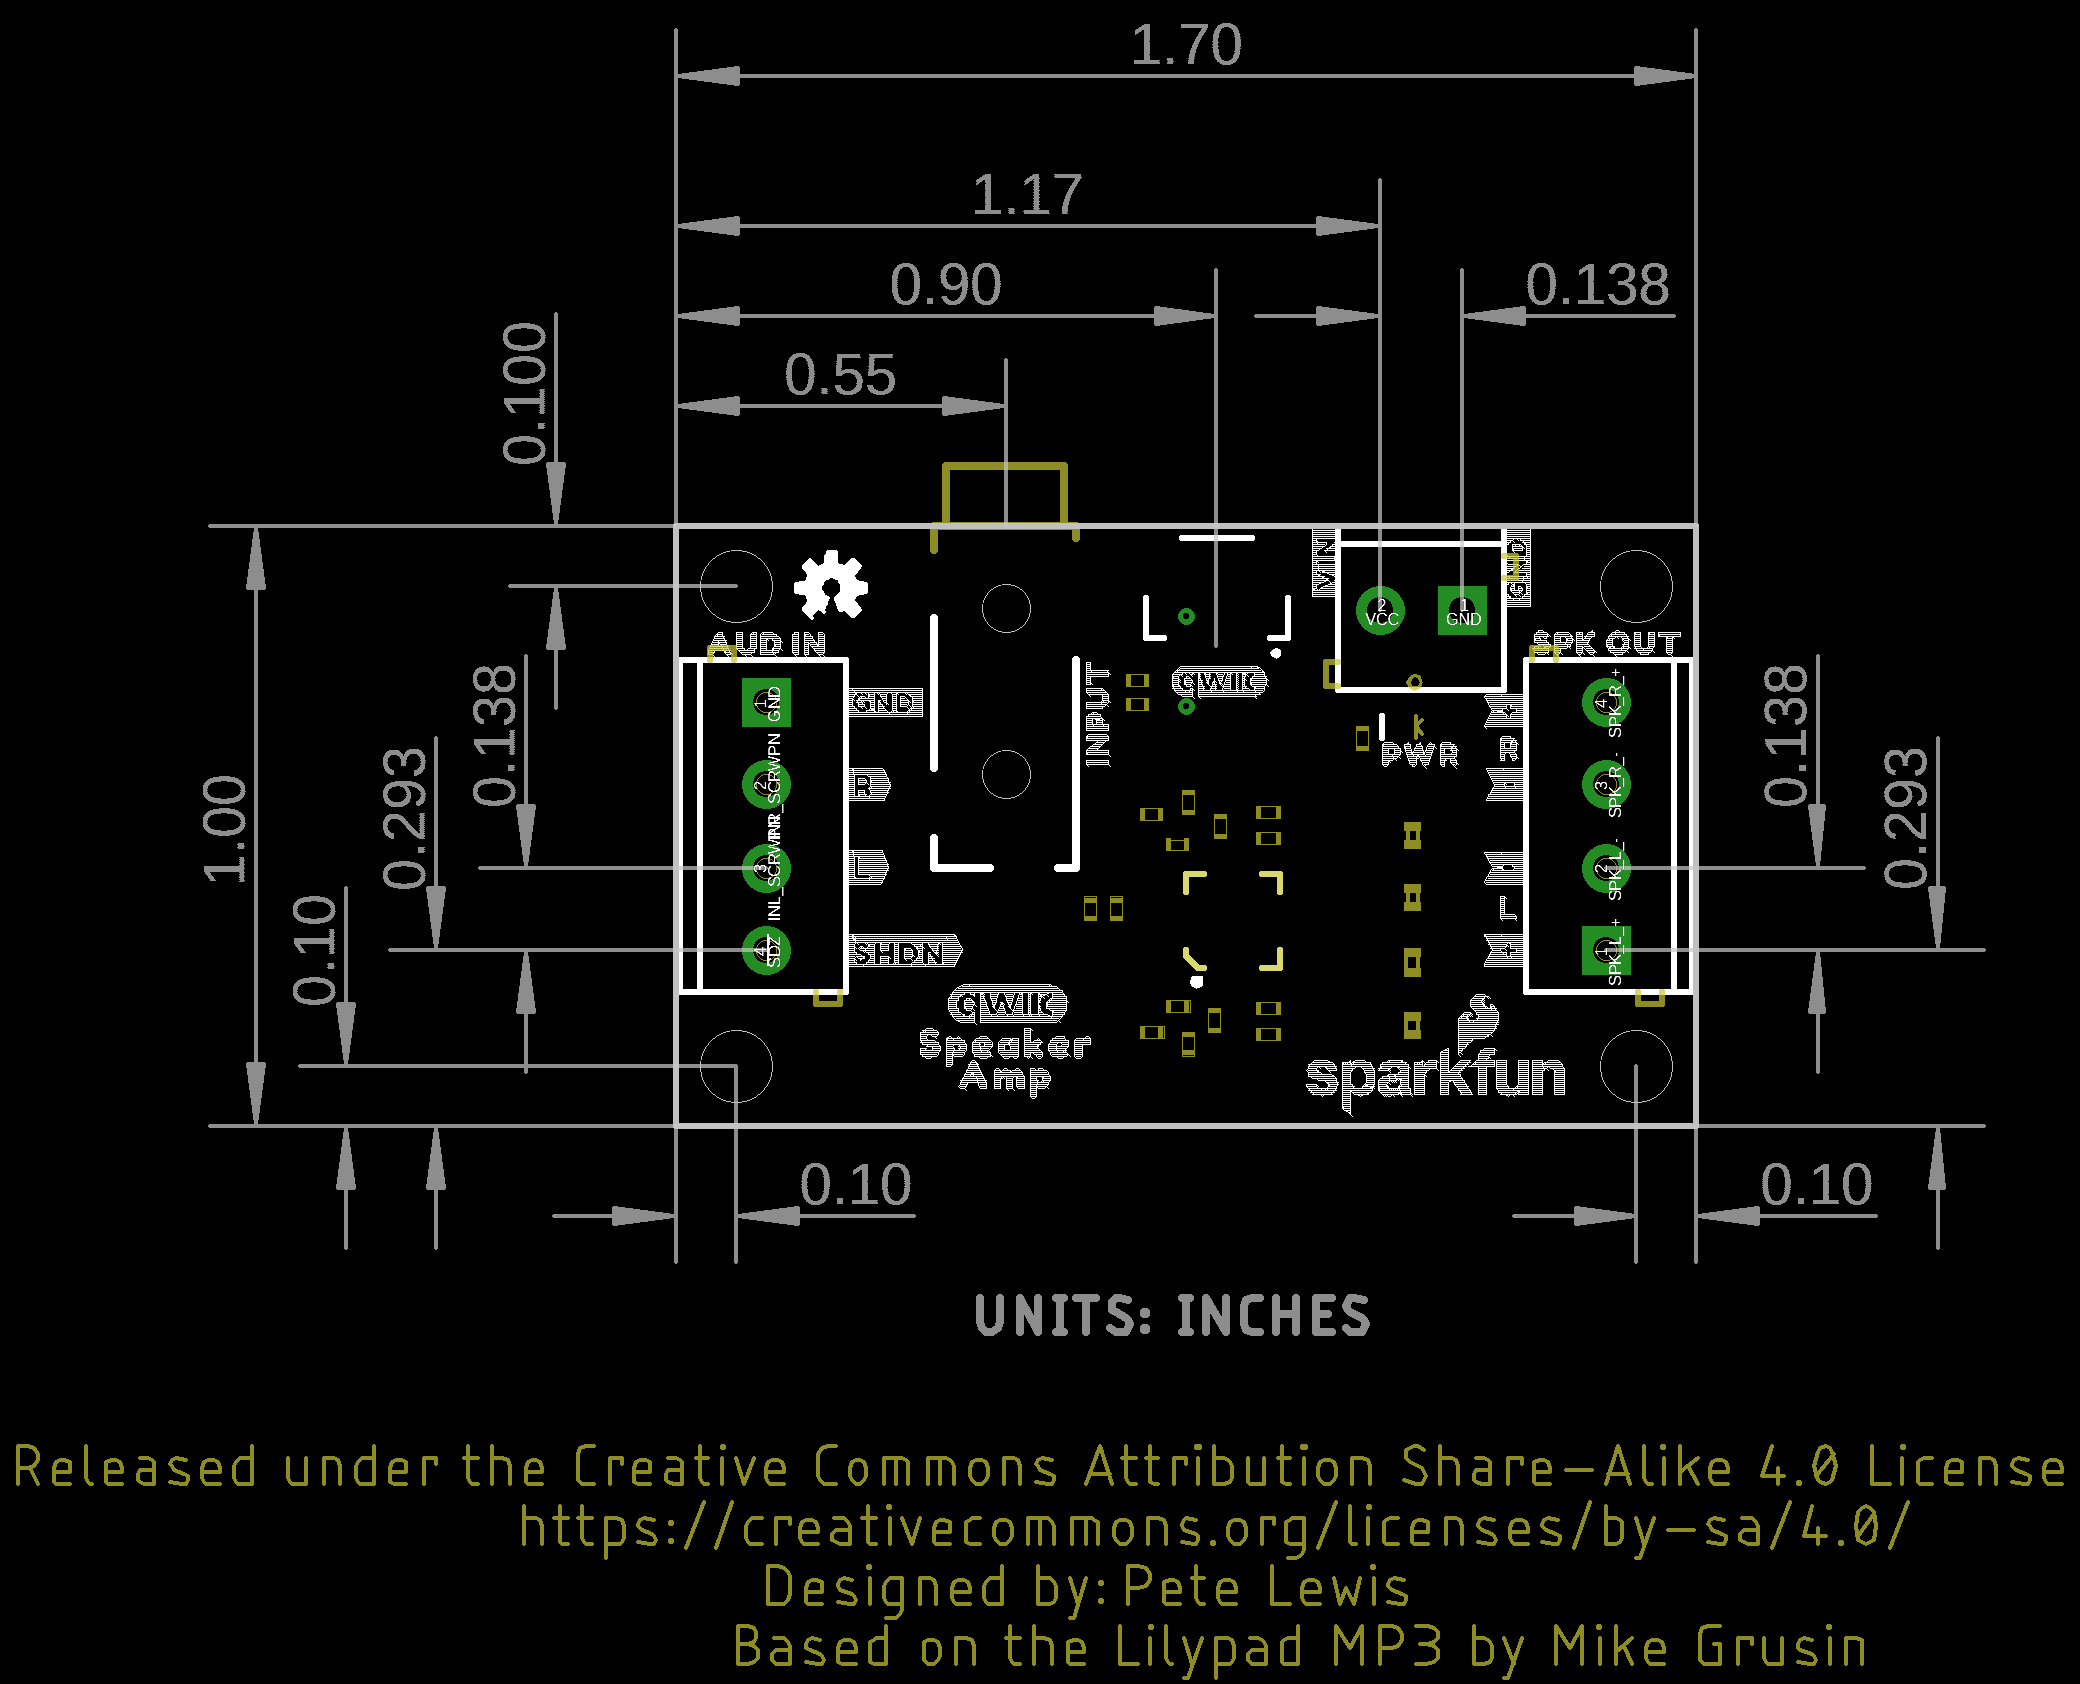
The board has been designed to be user friendly! Screw terminals are provided for the audio input, power, shutdown, and speaker output. A 3.5mm TRS connector is included as an alternative to easily insert an audio cable. Utilizing our handy Qwiic system, no soldering is required to connect it to the rest of your system when configuring the amplifier's settings. A power LED (PWR) is included on the board to indicate when power is applied to the amplifier through VIN. It can be disabled by cutting the LED jumper on the bottom side. For users that do not want to power the board with a separate power supply, you can close the JP1 jumper and use the same power supply as the microcontroller via the Qwiic connector's 3.3V pin.
This board is great for projects that require you to amplify an audio signal for small, differential speakers. This breakout is also great when pairing it with your smartphone, computer, portable digital player, or any audio boards (such as the MP3 Trigger, Tsunami Super WAV Trigger, MP3 Player Shield, or Music Instrument Shield to name a few)! Add the Qwiic Speaker Amp in your next portable projects such as sound effects for your spooky Halloween pumpkin, wearable costumes, props, talking greeting cards, or USB speakers.
The SparkFun Qwiic Connect System is an ecosystem of I2C sensors, actuators, shields and cables that make prototyping faster and less prone to error. All Qwiic-enabled boards use a common 1mm pitch, 4-pin JST connector. This reduces the amount of required PCB space, and polarized connections mean you can’t hook it up wrong.
- Texas Instruments TPA2016D2 Stereo Class-D Audio Amplifier
- Filter-free Class-D Architecture
- Flexible Operation with/without I2C
- Programmable Dynamic Range Compression (DRC) Parameters
- Programmable Automatic Gain Control (AGC) Parameters
- Programmable Volume Control
- Selectable Gain from –28dB to 30dB in 1-dB Steps (When Compression is Used)
- Selectable Attack, Release, and Hold Times
- 4 Selectable Compression Ratios
- High PSRR: 80dB
- Fast Start-Up Time: 5ms
- AGC Enable or Disable Function
- Limiter Enable or Disable Function
- Short-Circuit and Thermal Protection
- I2C Address: 0x58 (unshifted)
- Voltage Input
- 2.5V to 5.5V via 2-pin Screw Terminal
- 3.3V via Qwiic Connector, when JP1 closed
- Low Supply Current
- 3.5mA @ 2.5V
- 3.7mA @ 3.6V
- 4.5mA @ 5.5V
- Low Shutdown Current
- 0.1µA @ 2.5V
- 0.2mA @ 3.6V
- 0.3mA @ 5.5V
- Stereo Output
- 1.7W per Channel into 8Ω at 5V
- 750mW per Channel into 8Ω at 3.6V
- 2.8W per Channel into 4Ω at 5V
- 1.5W per Channel into 4Ω at 3.6V
- 1x 3.5mm TRS Jack for Audio Input
- Screw Terminals
- 1x2 for Power Input (PWR, GND)
- 1x4 for Audio Input (GND, R, L) and SHDN
- 1x4 for Speaker Output (R+, R-, L+, L-)
- 1x 4-pin Qwiic Connector
- Built-in I2C Pull-Up Resistors (2.2kΩ)
- LED
- PWR
- Jumpers
- LED
- I2C
- JP1
- Board Dimensions: 1.70" x 1.00"
SparkFun Qwiic Speaker Amp Product Help and Resources
Qwiic Speaker Amp (TPA2016D2) Hookup Guide
September 29, 2022
The SparkFun Qwiic Speaker Amp includes the Texas Instruments TPA2016D2 stereo, filter-free class-D audio power amplifier. This tutorial will help you get started and configure the amplifer settings using an Arduino microcontroller.
Core Skill: DIY
Whether it's for assembling a kit, hacking an enclosure, or creating your own parts; the DIY skill is all about knowing how to use tools and the techniques associated with them.
Skill Level: Noob - Basic assembly is required. You may need to provide your own basic tools like a screwdriver, hammer or scissors. Power tools or custom parts are not required. Instructions will be included and easy to follow. Sewing may be required, but only with included patterns.
See all skill levels
Core Skill: Programming
If a board needs code or communicates somehow, you're going to need to know how to program or interface with it. The programming skill is all about communication and code.
Skill Level: Competent - The toolchain for programming is a bit more complex and will examples may not be explicitly provided for you. You will be required to have a fundamental knowledge of programming and be required to provide your own code. You may need to modify existing libraries or code to work with your specific hardware. Sensor and hardware interfaces will be SPI or I2C.
See all skill levels
Core Skill: Electrical Prototyping
If it requires power, you need to know how much, what all the pins do, and how to hook it up. You may need to reference datasheets, schematics, and know the ins and outs of electronics.
Skill Level: Competent - You will be required to reference a datasheet or schematic to know how to use a component. Your knowledge of a datasheet will only require basic features like power requirements, pinouts, or communications type. Also, you may need a power supply that?s greater than 12V or more than 1A worth of current.
See all skill levels
Comments
Looking for answers to technical questions?
We welcome your comments and suggestions below. However, if you are looking for solutions to technical questions please see our Technical Assistance page.
Customer Reviews
0 out of 5
Based on 0 ratings: