- Home
- Product Categories
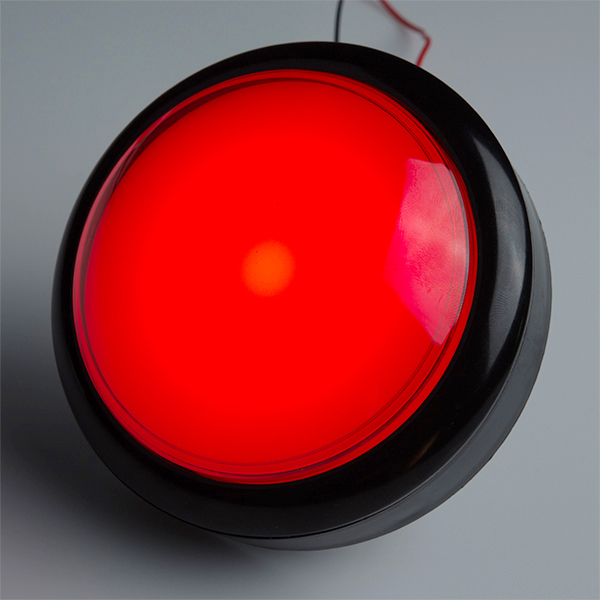
- Button
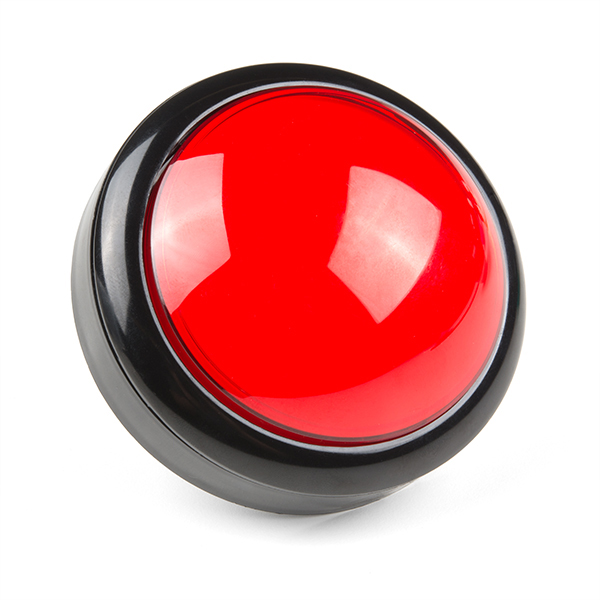
- Big Dome Pushbutton - Red

It's the end of the world, and you need a button to press. This is it. A 100mm diameter (outside diameter) dome illuminated push button comes with an LED, securing nut and a pre-installed long life horizontal microswitch. Button can also be adjusted to a low profile button by removing the middle ring.
- LED indicator light runs at 12VDC
- Bulb holder is easy to install or remove
- 3 Terminals Button Actuator microswitch included
- Microswitch reliability tested to 10,000,000 cycles
- Microswitch can be replaced
- Polycarbonate lens cap for optical clarity* 100 mm Diameter x 72 mm Height
- Net weight: 100grams
- Mounting hole diameter: 24 mm
Big Dome Pushbutton - Red Product Help and Resources
Adding a Timed Button to a Project
July 29, 2015
This tutorial will walk you through making a timed power controller for interactive projects. You will learn how to add an on button that will provide power to your project for an amount of time and then turn off again.
Connection Help
In case you have never used a microswitch or this push button before, here are some links to some tutorials that will help get you started.
Additional Example Tutorials
Modifying the Big Dome Pushbutton's LED
To find information on modifying the Big Dome Push button with other LEDs, I recommend checking out this tutorial:
Core Skill: DIY
Whether it's for assembling a kit, hacking an enclosure, or creating your own parts; the DIY skill is all about knowing how to use tools and the techniques associated with them.
Skill Level: Noob - Basic assembly is required. You may need to provide your own basic tools like a screwdriver, hammer or scissors. Power tools or custom parts are not required. Instructions will be included and easy to follow. Sewing may be required, but only with included patterns.
See all skill levels
Core Skill: Electrical Prototyping
If it requires power, you need to know how much, what all the pins do, and how to hook it up. You may need to reference datasheets, schematics, and know the ins and outs of electronics.
Skill Level: Noob - You don't need to reference a datasheet, but you will need to know basic power requirements.
See all skill levels
Comments
Looking for answers to technical questions?
We welcome your comments and suggestions below. However, if you are looking for solutions to technical questions please see our Technical Assistance page.
Customer Reviews
4.5 out of 5
Based on 15 ratings:
1 of 1 found this helpful:
Great robust design
Sturdy design and simple implementation. Great for any project with people (kids especially) who are going to be hard on it.
5 of 6 found this helpful:
Sample photos need side image/photo
These are nice looking and seem very sturdy. However, do not expect to flush/surface mount them unless you cut a hole where these will sit. The switch and assembly stick out the bottom about 1/2 inch. Please include a side photo showing how assembly sticks out further than the outside black plastic.
Also, one of the product photos seems a bit misleading as it appears wires are coming out of the bottom making us think these could just sit flush on a table.
1 of 2 found this helpful:
Best. Button. Ever.
This is by far one of the coolest buttons I own. It has a great click to it, and the LED lights the button very nicely.
1 of 2 found this helpful:
A great deal
I had ordered 10 dome buttons for a project I was doing for school. All worked fine but one was missing the LED inside. When I let the company know, they replaced the whole switch! Good job, Sparkfun!!
1 of 2 found this helpful:
Great Button!
I've probably used a hundred of these over the years, and 99.9% of the time they've worked great. I did have one of them get worn out at a tradeshow after two years due to people repeatedly pounding on it, but besides that, they've been totally solid.
0 of 1 found this helpful:
Pretty great big red button
Everybody likes this button. It's solid, has different mounting options, comes with a good switch. I've been swapping the resistors on the LEDs for use with 5v. Lights up nice and bright.
0 of 1 found this helpful:
It works as expected.
Im am very happy with this device, it works fine in a toy I designed for my granddaughter. Although to make the light brighter, I took all parts apart, changed the LED and covered the inside bottom with aluminum, big difference. For the purpose of a toy makes it much more attractive.
0 of 1 found this helpful:
Works perfectly.
Suits our application for game show buzzer.
0 of 1 found this helpful:
Great button
This worked perfectly for what I was building. I 3D printed an enclosure for it and published it here: https://www.thingiverse.com/thing:2831058
0 of 1 found this helpful:
Great big button!
I've gotten a few of these for different projects like a panic button for the home alarm, Lap timer, dog treat dispenser, etc. It has a good click and an LED to illuminate it. You can change the LED if you want a brighter button.
Big & Dim
The button is giant and clicks well. Seems like it's sturdy and well made. Unfortunately the light is pretty dim. Also wish it came with directions. There are 5 terminals and it took some trial and error to figure out which 2 went with the button and which 2 went with the light. Also, had to look online to figure out how to take it apart to fit into the hole. Overall, pretty happy though.
0 of 1 found this helpful:
Big dome push buttons
Bought a red and green one. Made a podium for a family fued game at a Christmas party. They worked great. Good light from LEDs, add a few relays and you have an inexpensive board that the first button hit locks out the other. No arguments on who was first
0 of 2 found this helpful:
Solid construction
I used it as a prop for a video shoot so I needed to disassemble and reconfigure to suit my needs. It literally took a "pounding" and held up nicely (for the 10 hour shoot-day anyway)
World's Most Satisfying User-Interface.
Built a device using this that automatically mutes the tv for 15 seconds then unmutes it. Great for killing the most annoying commercials. Very Satisfying to mash the button and kill the buzz.
Because I couldn't find it on here - the LED sizing is a T10 size LED bulb. I couldn't find any on sparkfun, but there are lots on eBay, walmart etc. These are the small bulbs with the wedge base commonly used for car interiors, license plates etc. So it's basically just plug and play.
Just thought I'd throw that up here, finally got around to wiring this up after a year or two, and one of the LEDs wouldn't light up, took me an hour to figure this out :(
In case anyone is interested, I designed a 3D printable enclosure for this. One option provides brackets for a pair of 8 ohm speakers and a slide switch on the bottom: https://www.thingiverse.com/thing:2831058
Hello, Is it possible to put any pictures in the button ? Like a smiley for example ? Thank you, best regards.
Question what is the size of the button's low profile? I'm trying to make a box and turn it into a push for a game show but can't figure out how to make the 3D Printer layout.
Does anyone know if this item is ROHS compliant?
Can anyone offer a few more details on changing out the resistor? I can see that the removable mount has a lead from the LED wrapped around one "wing" and a lead from the resistor wrapped around the other. How are the LED and resistor connected inside the mount? Can a not-that-dextrous hobbyist really hope to remove and fit everything back in there neatly?
Is there a way to turn this push button in a latching one? I would like to turn on/off the LED without micro controller. Thanks!
Is there a datasheet for this button?
Would it be possible to swap out the incandescent bulb for an LED?
I just got this switch and it came with an LED installed instead of a lamp. Just an FYI. Maybe they need to update the description unless I got a fluke? :-)
Yeah, I just ordered two and they both came with red LEDs. I hope it's as bright as the 12v bulb, which I did eventually get to work right from my board, and was very bright. They definitely need to update the description.
I have done this before (in my car actually, having the same bulb) just choose the correct resistor and solder to the LED directly and match sizes.
I too would like to see this in LED form, so that I can power it directly from my board, and program it to do fun stuff and have it all be powered on one USB cable.
How did they test it for 10 million cycles? They probably just wired it up to make a noise and left it with an easily-entertained guy.
This is a very good button for its price. It has NC and NO contacts. The internal resistance is 460 Ohm, the forward voltage is ~2V so in 12V it draws ~20mA. There are separate contacts for the button and the led. Totally there are 5 contacts (1x Common, 1x NO, 1xNC, 1xLED+, 1xLED-)
I have an arduino Leonardo and want to use 3 of these dome buttons with it. I am a begginer at the electronics side of things. Can anyone tell me or point me in the right direction as to how to wire these up?
They're basically just a SPDT (Single Pole, Double Throw) switch and an LED. You can consider these separately.
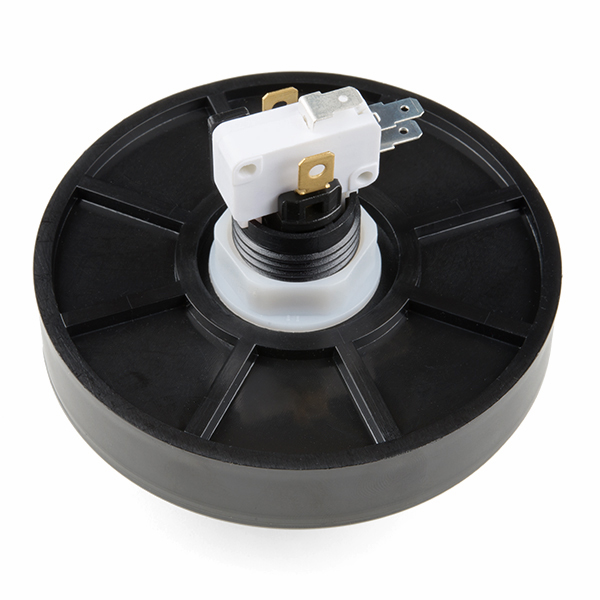
The switch part is the white microswitch depicted in this product image: https://dlnmh9ip6v2uc.cloudfront.net/images/products/9/1/8/1/09181-01.jpg
If you look closely at the markings on there, you'll see the function of each of the quick disconnect tabs. One is the 'common' pin, and the others are the NC (normally closed - i.e. this pin is connected to the common pin when the button is not pressed) and the NO (normally open - i.e. this pin is connected to the common pin when the button is pressed).
That NO pin you can liken to a typical push button, so Arduino.cc: Examples > Digital I/O > Button and Arduino.cc: Examples > Digital I/O > Switch and others apply.
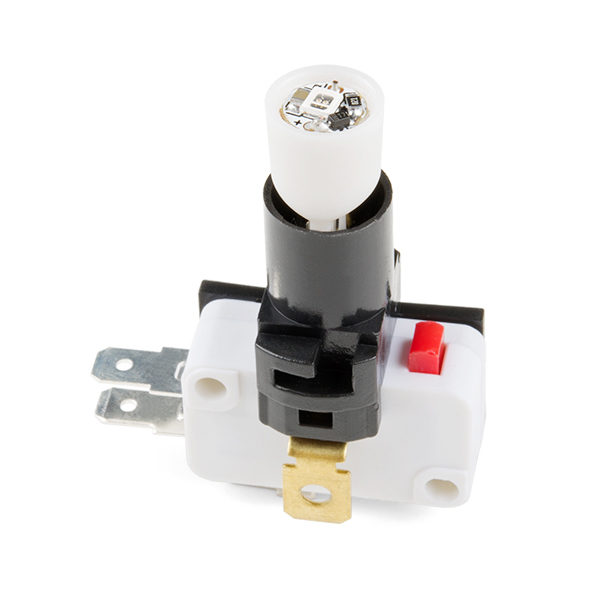
The LED is a slightly different beast. The two examples above mention turning an LED on/off, but you can't use this button's LED directly for this. If you look at the product image the black part on the left just has 2 component leads bent around a piece of plastic, which gets inserted into the black part on the top. The two tabs on that part are the anode and cathode. Here's the tricky part. The black part the LED actually resides in has a resistor snuck into it. You can just barely see it in the product image for the Big Dome Push Button Blue. That resistor is set up so that the LED can be used with 12V. Pretty common in industrial control system, automotive applications, etc. Pretty annoying for you.
My suggestion there would be to just modify that part to bypass the resistor, or even replace it with one more suitable for typical Arduino voltages. There's several ways you could do this, so I won't get into that here.
Once the resistor has been bypassed or replaced, you can just use it as any other LED in any of the Arduino examples dealing with LEDs.
That leaves you with actually having to connect things. The quick disconnect tabs seem to be of two sizes, 0.25" and 0.2". You can get an assortment with both, and of both the male and female variety), from SFE. But if you don't anticipate needing a lot of them, just enough for this button, then you could pick up a few piecewise at a hardware store, or solder some wire directly to the tabs instead (be careful not to melt the plastic).
First of all,thanks for your reply.
I have wired it up and it (kinda works thanks again). The problem is that when press the button and it executes my uploaded code (which imitates a keystroke of a keyboard), it outputs multiple keystrokes. Some times 3 sometimes 4. I just want one. Can you shed any light on this?
You'll want to look at debouncing - this applies to many mechanical switches :) The link points to one method for debouncing, but there are many. Hit up Google for other methods and code examples.
Does the button have a current-limiting resistor for the LED, or we need to provide one externally (and if so, how large)? Thanks!
EDIT: yes, it has a 470 ohm resistor packaged next to the led, if you look closely enough. Kind of a shame, as if we had picked our own resistor, we could have sized down the supply voltage.
It's easy enough to replace the resistor with an appropriate one if you want to work with a different voltage. I'm making a gameshow buzzer for my brother and didn't want to use 12V. I replaced it with 100 ohm and it works from the 3.6V Vcc of my MSP430 Launchpad.
How about posting the code for the whack-dome game?
Wow! No way the pictures do this justice! It's HUGE!! Seriously, it's bigger than the palm of my hand. It's 3.75" across the outer diameter, 3" across for the red dome (see pix above with ruler.) It's the Crocodile Dundee of push button switches (That's not a push button switch, mate. THIS is a push button switch!)
As a note, the switch/bulb section comes out as a unit via a bayonet mount. You have to take that out to disassemble for mounting and it looks like the switch is a press fit that you pop out, but don't! Give it a push in and a counter-clockwise twist. The notes above state that the switch is replaceable, but it feels like the mounting could crack around the switch if you pry it incorrectly. But, really, how often do you have to replace a microswitch?
I was skeptical, but now that I have it in hand, it's totally worth the price.
Maybe I missed where this was documented, but I didn't see any indication of which contact was the LED+ and which was the LED-, so I thought I'd let people know. There are 5 contacts total. 3 contacts (COM, NO, & NC) are for the microswitch - they all protrude from the white housing of the microswitch assembly. The 2 contacts for the LED come out of the black housing.
If you hold the button upside down, so that you're looking at the microswitch assembly not the red dome, and then rotate it so that the 3 contacts for the microswitch are all pointing to your right, then the LED+ is the contact furthest from you, and the lug closest to you is LED-. Said another way, if you orient the 3 switch contacts so they are at the 3 o'clock position, the LED+ is at the 12, and the LED- is at the 6. Hope this helps if anyone is confused about hooking up the LED.
Also, if you're not sure, the bulb will light with only 5V across (in fact it will light with about 1.5V), so you can start with much lower voltage to figure out which way the LED is oriented, then ramp up to 12V for brightness.
Hi, I was wondering of you could directly power the LED with a Raspberry Pi GPIO?
Hi there,
I'm trying to use these for a MAME controller (the game is Bishi Bashi!) - is there any way to replace the springs on this, or any suggestions for spring replacements?
The action is kinda sloppy and I'd like to tighten it up as the game basically requires smacking the button as fast you can... buttons can't be pushed as fast as a regular button :(
I am adapting a power wheels ride on toy for a child with special needs. I need a large button like this for the child to push to make the car go. All the adapted button switches are $40-60 which makes projects much more expensive. I am a novice at electronics, so I was wondering if this would work to activate a toy so that as it it pushed, it would continue to make the car go.
If you look at around page 20 of this manual, it explains what I need it to do.
http://www.udel.edu/PT/About%20Us/People/Galloway/GoBabyGo_Manual.pdf
Any help is greatly appreciated!!!
http://www.udel.edu/PT/About%20Us/People/Galloway/GoBabyGo_Manual.pdf
Here is the full link
I came up with an excellent use for this product and its other color variations. This guide teaches tinkerers how to wire these buttons for use with computer gaming applications:
http://www.instructables.com/id/Affordable-Keyboard-Encoder-and-Divekick-Controlle/
Is there any chance of getting an RGB edition of these buttons?
Hey, awesome whack-dome game you made there, is it possible to buy such a set? Regards Jens Peter
We don't sell it as a set, but you can buy all of the components individually.
How exactly would I hook this up to a battery/spark plug igniter to initiate the spark in the spark plug?
How can I hook this up to a basic 6 outlet power strip? I also need the LED to work when turned on. I'm good at soldering, but a novice at electronics, so I need all the help I can get!
That's a little vague, but if what you want is to set it up to turn the power strip on when you push the button, you're gonna need a relay or transistor(relay would be easier) because this switch will not be able to handle the amount of current that a power strip will draw. As far as what happens when you press the button, you have some options, if you wanted the powerstrip to turn off when you pushed and held the button, you would connect one side of the battery to one side of your relay, the other side of the relay to the NO(Normally Open) contact of the switch, and finally the common contact of the switch goes back to battery. Then wire the relay into the powerstrip cord. There are four contacts on a relay, when you power two of them, it acts like a heavy duty switch for the other two contacts. This setup would leave the power strip on until you pushed the button, which would turn the power strip off for as long as you held it down(like a kill switch); that will only work though for as long as the battery is charged, once the battery dies it would turn off your power strip so you would want something like a small wall wart (with a resistor to keep the current down) instead of a battery. If you want to have a setup where you don't have to hold it down to turn it off. Because this is momentary switch, that would require a microcontroller,(arduino) and some code to to turn the relay on or off when you pushed the button. That's still do-able, but you're going to need a lot of things you probably don't already have. It might be easier to use a locking button, or a rocker switch, or maybe even a misile launch switch. They don't really have the wow factor of this switch, but they will be easier to use. Actually, lots of power strips have switches built right in(all mine do), it might be better to just buy one of those instead(relays can wear out if you leave them on for a long time, and my example circuit left it on indefinitely). Hope that's helpful.
[I ordered the green button, but I'm adding it here as well]. I'd like to add that the LED will also light at 5V. I measured the built in current limiting resistor at 464 Ohms matching what others said below. Current at 5.7V was 6mA, indicating the forward voltage of the LED was 2.9V. It even lit dimly at 4V, drawing 2.8ma, meaning 2.7V forward across the LED.
My particular 5V Arduino can source or sink 40mA per pin (200mA total), so conveniently these work directly connected to my Arduino's pins.
Ok I have two questions, they are very basic:
1) How do I hook this up to my arduino so that I can control the LED inside the button, without frying my board due to the 12v battery running the LED? This might be really obvious, but I don't the procedure.
2) What kind of connecters should I use on the switch terminals rather than soldering directly to it?
Oh and just an edit:
How do I modify this to run off just 5v? In case I can't figure out how to run it at 12v. Also why does this thing even need 12v?
Thanks!
bout 6 of these.
the plastic fixings will degrade before the 10,000,000 button presses.
i have this attached to a unit that the public can hit for a photo, the machine has taken 1.6 mil photos in 18 months, and with 5/6 extra hits per photo, the microswitch has never been replaced.
the plastic housings albeit have been replaced a couple of times now. the light (led) isn't as bright as would have hoped, so replaced for a 10mm ultrabright and opaqued the lense.
I just want to get one and push it like a million times.
Hi, this one could be used for outdoor applications?
You'd have to work out some kind of internal protection for the electrical connections, but otherwise, yea, you shouldn't have any issue with using this outdoors.
Hi Toni. We're looking at potentially using these in an outdoor play area in the UK, so lots of rain! Do you think there's a way we can make these waterproof? I wonder if you know where we can get an engineering drawing of these or maybe an IP rating? We'd love to have these on our products!
Generally for waterproofing stuff like this, I'd recommend checking out using silicon molding. Check out this Instructable for an example of this. I can see about us getting a CAD file of this put together and up on the site if that would help. I don't know if these have an IP rating at all though :/
I found a really great use for these. Possibly... the best use??? http://youtu.be/f9CN5YiTgSI
This feels like a silly question but I'm a beginner... but how many of these buttons can the Arduino Uno's pins handle? One button connector to the ground and the other on a digital pin per button?
You got it! So however many digital pins you have available (if you are throwing in additional parts to the project) is the number of buttons you can use. Just keep in mind you can't power the LEDs in the Big Dome buttons off of the Arduino. You'll need a separate power line for that.
Great, many thanks for that Toni!
I want to use these buttons in a project for young children (under 5s); do they require an amount of strength to activate? Do you have to really bash them?
It doesn't take a lot of pressure to activate these, and my guess would be that even exceptionally young children could activate this as well.
What about exceptionally old children?
They should know better than to push the big red button. NEVER PUSH THE BIG RED BUTTON!
Great, many thanks Toni!
Does anyone know if it's possible to remove the red plastic dome so you can put your own custom marking inside? For example, the button might say "STOP" on a game like Tower of Power (http://skeeball.com/top.htm).
See here for some modifications: http://stuffandymakes.com/2011/01/08/hack-the-sparkfun-big-red-dome-button/
I just took one apart. It is possible to get to the plate under the dome to print on a word or insert a label.
One of the pictures shows a wire. Does each button come with a length of wire? Is it 3 element? 4 element?
That was only used to light it up for the picture; the button does not come with any wire.
What's the contact current/voltage rating on these switches please?
I have this button. I want to wire it to a 12V power source. It will also be used to send a signal to start a process on a computer, using a DB9 computer connecter with an adapter to a USB port on a laptop. I am wiring the pins on the DB9 adapter to the switch to start a process for a photo booth sequence.
First question - how do you get it apart? I don't want to break anything. 2nd - which terminals are wired for power and which are wired to affect the process to the computer?
Thanks for the help.
The switch fits nicely in a 4" Schedule 30 PVC End Cap in the high profile configuration. Use blade connectors with a right angle or the wire will bend too tight.
http://www.highimpedanceairgap.com/projects/game-buttons
Beware of soldering directly to the switch terminals! By the time you get them hot enough to solder to, the plastic body begins to soften and allow them to wiggle loose. I also had to de- and then re-solder them to correct an error I made, and after that one of the poles wouldn't conduct at all until I opened it up and cleaned off the contacts. My guess is the hot plastic outgassed and deposited a non-conductive film on the contact.
What's the internal resistance?
Duders, when will this be in stock again?
First, THANK YOU SparkFun, I received mine few days ago with LEDs YAYYYY!!!
I made a Large Simon using four of these
Just wanted to chime in with a comment on a durability of these buttons.
I just finished tearing down a project that ran in a high-traffic area in the middle of the Mall of America for a month. We had kids smacking the bejeesus out of this button (and on more than several occasions kicking it).
I bought 4 just to make sure that we'd have replacements for when they broke. I'm shocked to say that after over 5,000 violent activations of this thing, we only had to replace a burned out bulb once, but never had to swap out the button or microswitch. Far more durable than what I was expecting. Plus they just look cool.
Use a separate ~$2 12V power supply to run the light, and a transistor of some sort (I used an optoisolator because I'm paranoid that way) to switch the 12V on and off from your microcontroller.
The microswitch can be wired to your uC like any other switch; the 12V light and switch circuitry are completely separate.
Any idea when these will be back in stock?
Any chance of getting those in different colors?
Anyone know where I can order a replacement bulb for this button? Mine has unfortunately burned out.
I've heard automotive supply stores carry them. Check with an auto parts store.
At last! I can build my history eraser! Who can resist pushing the big red button? The jolly candy-like button? :)
I love this button! Slick and fun. I posted on my blog how I upgraded it using three 3-LED SMDs and some adhesive foil to re-light the underside of the dome. It's easy to upgrade that button and put your own label on it. http://stuffandymakes.com/2011/01/08/hack-the-sparkfun-big-red-dome-button/
This is a high quality button. It has a nice feel to it.
We added a small little tutorial showing the interface to the arduino/Comet(Indian Arduino) as well as a little processing sketch to visualize the same.
http://tenettech.com/comet/?page_id=101
Also provided below is a link for the video
http://www.youtube.com/watch?v=NHZwuQqUKpY&feature=player_embedded
Ram
There are other colors or just redones? looking some white and blue, could anyone recomment where to find?
Thanks a lot.
I completely agree with this, if this had more colors it would be perfect. For my project this is exactly what I need and pretty much impossible to find elsewhere, but it's only offered in red instead of in green, or other colors, too.
Hi!
It's the first time that I will use a pushbutton like this, Could you tell me how to connect it, please?
Thank you
Hi,
Thanks for checking with us on this. It is a very simple switch, with a very large cover. Nothing hard at all to do. Actually there is a bit of a diagram on how the switch works molded into the plastic of the switch, have a look.
http://static.sparkfun.com/images/products/09506-01.jpg
You'll need 12V for the light. But that connects to different terminals than the switch, so that shouldn't be hard.
Hope this helps.
Thanks,
Timothy
Hi Single T !!!
Thanks for the information, it's easier than I thought.
Thanks!!
Can i change the color?
Is the bulb red or the surface red?
I want it blue.
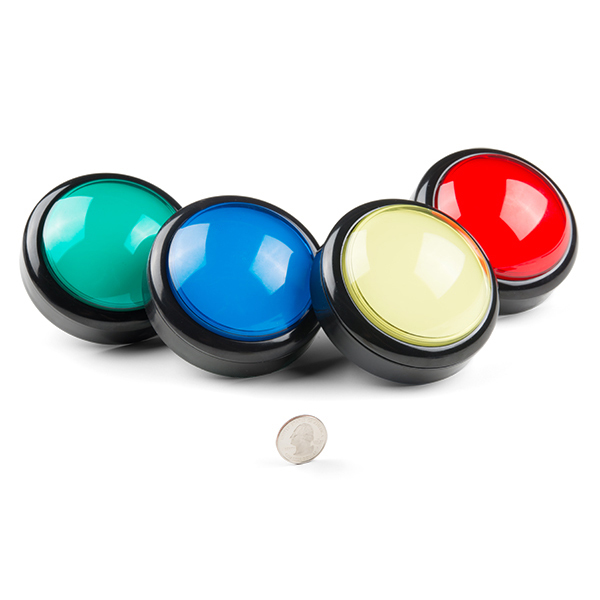
There are different colors available from an arcade and casino parts distributor. Red, White, Blue, Green, Yellow, and Amber.
http://na.suzohapp.com/pushbuttons/954002xxxxz.htm
We carry Yellow, Blue, Red, and Green of the big dome push buttons. http://www.sparkfun.com/search/results?term=big+dome+push+button&what=products Hope that helps!
robacarp @ IRC: "ventolinmono: the plastic cover is actually red itself."
I ran into this as well. Same with the 33mm arcade-style buttons. They're still great components, but you need a surprisingly deep enclosure to use them.
A lower-profile version of some of these parts would be great.
Worth noting that the central pillar (kind of shown in the 4th image) extends down a reasonable distance, especially with the microswitch added. You need a fairly large container to panel mount this too.
Hi, I would like to attach such a button to my pc and like start a sound or use it with a jeopardy game. Does anyone know what you need for that (usb connection seems logical?). Thx in advance.
Use the PICAxe 08M protoboard.
That's funny. I've ordered some because I'm making a Jeopardy game too. Software is done; planning on 8 wireless transmitters and a receiver (XBee) that sends keystrokes to the computer.
These buttons are big, durable and hard to find. One thing that is hard for battery applications is the 12VDC light, so I ordered 6V bulbs (elsewhere) for it which I hope will be bright enough.
Nice thing about this button is that it adapts to low profile, most of the large casino machine buttons have a depth of 2.5-3.5".
I used this exact button to make a homemade LAI Stacker (http://www.laigames.com/products/stacker_GIANT01.jpg) complete with a real LED board i was able to salvage and an Arduino.
Its a nice solid button that can take alot of frustrated bangs. But even after building my own clone I still haven't managed to win the damn thing! =[
I imagine this is a momentary switch? If not I'll take a couple!
Yep, just a momentary microswitch. What are you looking for? These are really meant for hitting (hard) and then having the control system light up the bulb. I'm working on a Jeopardy type game system at the moment.
Did you complete this? Is there a tutorial somewhere? I'm curious the best way to wire it up such that an Arduino or some other control system can turn a 12V light on and off (i.e., can a 5V Arduino control a 12V light somehow?) I'm still new to a most of this so i'm piecing it together as I go. :)
I'm halfheartedly looking for something like the big honking red anodized PANIC buttons you often see in sci-fi or military movies that launch the missile/close the blast doors/ activate self destruct/ etc.
This might work though, I will have to do more noodling.
This is a bit late, but you can look inside those "as seen on TV" tap lights for a toggle-based mechanism for these.