- Home
- Product Categories
- Buttons and Switches
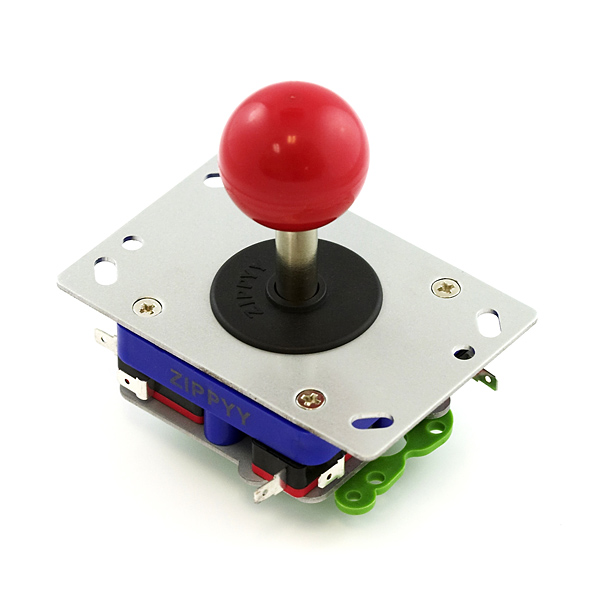
- Arcade Joystick - Short Handle

4-way Pacman type arcade joystick. Heavy duty design gives this joystick a great feel!
- ABS plastic and solid alloy construction
- Uses 4 microswitches to detect on/off position
- Unique handle design
- Spring return to center
- Very rugged construction
- Rated 5A @ 125V, 3A @ 250V* Overall height: 101mm
- Base: 97x65mm
- Joystick height: 60mm
Arcade Joystick - Short Handle Product Help and Resources
micro:arcade Kit Experiment Guide
July 21, 2017
We love games! We love writing games, building games and yes, even building game consoles. So we want to introduce to you the micro:arcade kit for the micro:bit!
PiRetrocade Assembly Guide
October 28, 2016
Build your very own retro gaming controller with a Raspberry Pi using the SparkFun PiRetrocade Kit!
Button and Switch Basics
May 7, 2013
A tutorial on electronics' most overlooked and underappreciated component: the switch! Here we explain the difference between momentary and maintained switches and what all those acronyms (NO, NC, SPDT, SPST, ...) stand for.
Core Skill: DIY
Whether it's for assembling a kit, hacking an enclosure, or creating your own parts; the DIY skill is all about knowing how to use tools and the techniques associated with them.
Skill Level: Noob - Basic assembly is required. You may need to provide your own basic tools like a screwdriver, hammer or scissors. Power tools or custom parts are not required. Instructions will be included and easy to follow. Sewing may be required, but only with included patterns.
See all skill levels
Core Skill: Electrical Prototyping
If it requires power, you need to know how much, what all the pins do, and how to hook it up. You may need to reference datasheets, schematics, and know the ins and outs of electronics.
Skill Level: Noob - You don't need to reference a datasheet, but you will need to know basic power requirements.
See all skill levels
Comments
Looking for answers to technical questions?
We welcome your comments and suggestions below. However, if you are looking for solutions to technical questions please see our Technical Assistance page.
Customer Reviews
4 out of 5
Based on 3 ratings:
1 of 1 found this helpful:
Quality Construction, Minor Design Issues
Overall I would say that this is a generally high quality joystick. The motion is smooth and repeatable and all parts seem pretty durable with one exception. The limit switches are cheap and the tabs can break off. It is easy to fix and even easier to replace, but it is a problem. The problem is compounded due to the fact that the limit switches hang off the side and are greater than the necessary hole size. Also various components exceed general perimeter and make mounting difficult.
2 of 2 found this helpful:
Surprisingly sturdy for the price
I was skeptical when I first looked at it, but in reading around it appears that this "Zippy" brand joystick as actually pretty well regarded in the fighting game/MAME/arcade cabinet communities as a decent budget stick.
I took a leap of faith, and while I haven't used it yet in its intended configuration in the fight stick I've been building, it has impressed me.
Though, I will say this: It doesn't say on the product data sheet, but the stick needs a ~28mm hole for actuation. I ruined a sheet of acrylic plate because the necessary measurement wasn't on the schematic. My fault for not waiting, but learn from my mistake.
For anyone curious, it's a clone (or otherwise very heavily inspired by) of the Semitsu LS-32 stick. As such, restrictor plates and switches intended for the LS-32 will fit on this.
Pretty solid joystick
Used one of these to turn an old unused lap desk into a lap joystick platform to use with an Atari 2600. Works great, easy to wire up, and has a nice satisfying joystick feel to it.
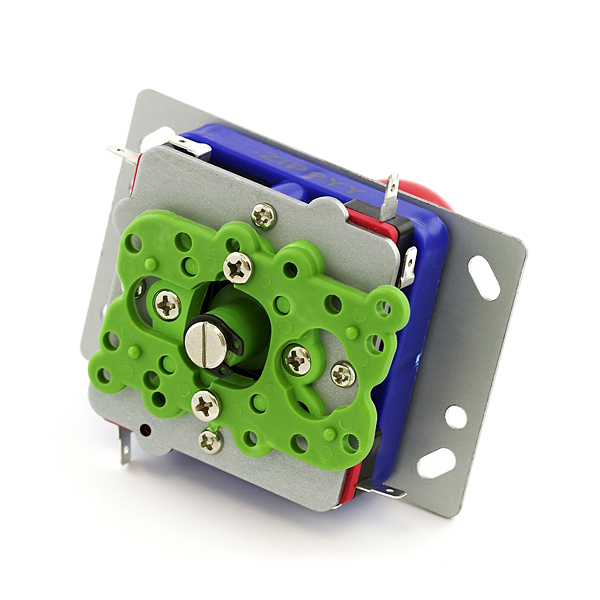
The green plastic at the bottom is a restrictor plate for 4 or 2 way operation. Put it on 4-way for Pacman, so you don't hit diagonals and go the wrong way, put it on 2-way for Galaga. Leave it in the centre for 8-way.
Mine just came in the mail (I love the clunky/clickyness of it!) and I could not figure that out. Thank you! I'm changing it now for a pac-man controller! :D
what's the hole size to be drilled for the shaft? I can't find it in the spec - I know it may depend on material thickness, but I couldn't find max-pitch angle or shaft diameter to compute it. thoughts? could anyone who has one on hand measure it?
Typically, the best thing to do would be to cut a large hole (a bit bigger than the black piece), and then mark where the holes in the metal plate fall on your panel. Just drill small holes where you marked and secure it with nuts, bolts, and some washers. If you really want a tight hole with a beveled edge or somthing, your probably gonna have to buy it. I'd measure it for you, but I don't have one.
but, aren't you supposed to mount the stick through the hole from underneath, with the black ring covering the hole you've drilled in what ever you've mounted it on? I, for one, don't want the grey plate and screws on the outside of my arcade cabinet.
Great product... I've mounted it like so:
https://trandi.wordpress.com/2011/06/28/random-project-box/
And now I'm looking for a great idea of what to do with it... ! :)
dan
Have it send messages over serial to a Perl app or something, then have that control the arrow keys to have an instant MAME joystick!
Or just pop in an AVR w/ V-USB and have a straight-up plug and play joystick. Here's mine (still needs paint)
This joystick is nearly identical to the Seimitsu LS-32 joystick. This stick will take standard Seimitsu or Sanwa Ball tops. I think this stick can be used as a replacement part for Mad Catz SE and TE Arcade controllers.
I did look and you be hard pressed to find a lower price "Japanese style" joystick.
having recieved mine, I would like to add a few interesting notes about this item - the ball on top seems to be mounted with 1/4-20 threads, and the blue plastic unit is 4-way radially symmetrical - this means it can be mounted in any orientation, there is no defined 'up'.
I also found a suggestion on a forum to use tool-handle dip-rubber for added traction against the handle.
Any chance you carry this in different colors? I've found them elsewhere but your price is excellent :-)
I'm thinking white or black would be good.
Probably the elsewhere you were thinking of, but worth mentioning for others -- haven't tested myself, but these parts (including ball tops) look like they're compatible with this joystick.
The instruction sheet doesn't mention how to hook it up to say, an Arduino. From the other switches for sale here, it looks like the longer connector should be the COM, and then the other connector tab goes to an Arduino pin and a 5V?
It looks like this is basically just 4 switches. Generally with a switch you have 2 connections and when the switch is pressed those 2 connections get shorted together (sometimes you will have a 3rd connection which is shorted when the switch is not pressed, this is usually called a NO or normally open contact). Usually when hooking a switch up to an Arduino you connect 1 end to GND and the other to an input pin. This allows you to check if that input pin is connected to ground. You also want to make sure that when it is not pressed that it shows up as high. Generally this is done with a pullup resistor (a resistor, usually around 10k, that is connected to VCC). The Arduino does provide internal pullup resistors on pins if you want to use them, just make sure they are turned on. You do not want to connect this directly to VCC! If you do when you press the switch you have just connected VCC directly to GND. If you have any other questions feel free to post a new topic on the SparkFun forums.
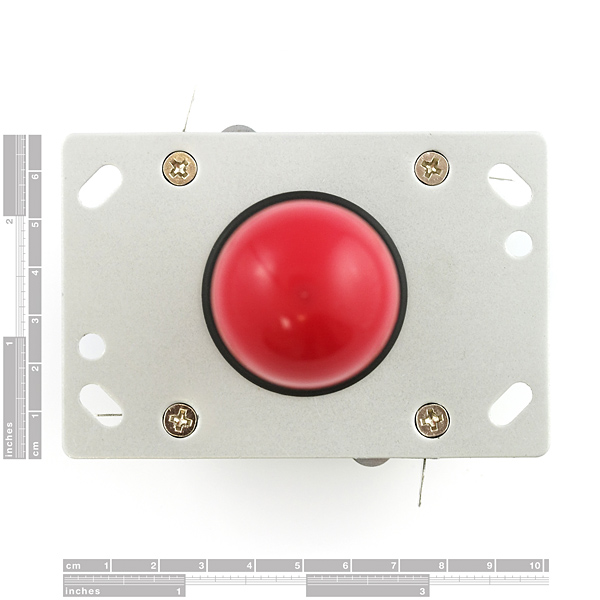
I want to point out that the joystick mounts under the panel. The Red Ball top unscrews, and the "black disk" the dust washer goes above the panel. It covers the opening in your panel and keeps dirt and dust from falling inside and jamming your joystick. The opening for the Joystick lever or shaft should be about 24mm or approx 0.94 inches.
Very strange, I was going to place an order and had a bunch of stuff in the shopping cart but looks like they sold out. Instead of this unit, can you get some traditional arcade joysticks in?
Just my two cents:
1.) You can take off the restrictor plate (that green semi-rectangle) if you need extra space or something, and are going to use it with, say, fighting games. I just put the screws back into the holes and haven't had any problems. YMMV.
2.) This will fit Sanwa balltops (I used: http://www.focusattack.com/sanwa-lb-35-balltop-white/). The fit on mine was a little loose for my taste (You can hold the shaft with pliers and get a tighter fit, but I didn't want to mar the shaft) so I used a bit of teflon tape on the threads. Works like a charm.
3.) This is supposed to fit .250" quick-disconnects, but like czarvargo said, they are a bit loose. Solder works well.
I really like this stick. Kudos Sparkfun.
What is with the extra holes and the bumps?
-Link to what i'm talking about-
Check out the top comment on this page - you can remove and rearrange the bottom plates to restrict the movement of the stick if you wish.
I realize that, but the holes I showed in the link would not be used by the 2 screws or the 4 alignment studs in any of the 3 positions...
Most of them provide the various attachment orientations. As for the extras, perhaps the manufacturer uses the same part on other products.
Would be need, if instead of screws locking the restrictor plate, another mechanism (mounted to those holes and bumps) could -- and then based on an external lever you could switch between 2, 4, and 8 way motion, without having to break out the screw driver...
I just received mine and thought I would post a few of notes:
(1) The displacement of the disk over the surface when the stick is fully tilted is small. I drilled a 1.125 in. (29 mm) hole and that has worked just fine. The stick is mounted to the under surface of a thin plastic project box lid. If you were using something like 0.5 in. MDF you may want a slightly smaller hole. I used the same 1.125 in. bit to drill out the holes for the arcade buttons.
(2) The microswitch metal tabs are more fragile and are thinner than the ones found on the arcade buttons. None of the crimp connectors I have will stay in place. One connector fell off taking the tab with it, so be careful. I am ordering some switches that I hope will be better replacements.
(3) The restrictor plate needs a bit of space off to one side if mounted in the two-way configuration. I would like to see Sparkfun carry the plate as a separate piece so I can take small saw to mine without trepidation.
I'm trying to install this in my car. Are there any good replacment micro switches that run off DC instead of the AC microswitches that come with this controller? By the way very pleased with this product
Excuse me, but WTF?
A microswitch is a switch. When you press it, it connects the two terminals. It would be quite dangerous to connect any power supply directly to the terminals of a switch. In modern digital logic systems switches are often used by connecting one terminal to ground and the another one to a logic input and a pull-up resistor to supply voltage.
Anyways, I can see no reason why the switch wouldnt switch AC or DC power up to some current limit, but why? It is a joystick FFS...
I was wondering, what type of microswitch does this use, the kind with actuators, or the kind with a little button. I know sparkfun sells both. YYou can't tell by the pic
The switch is similar to one of these: http://www.sparkfun.com/commerce/product_info.php?products_id=9414
Does anyone know if there is a datasheet for this part? How should it be interfaced? Is it like a potentiometer?
From my reading of the features, it only has four on/off switches. One for each cardinal direction.