- Home
- Product Categories
- Button
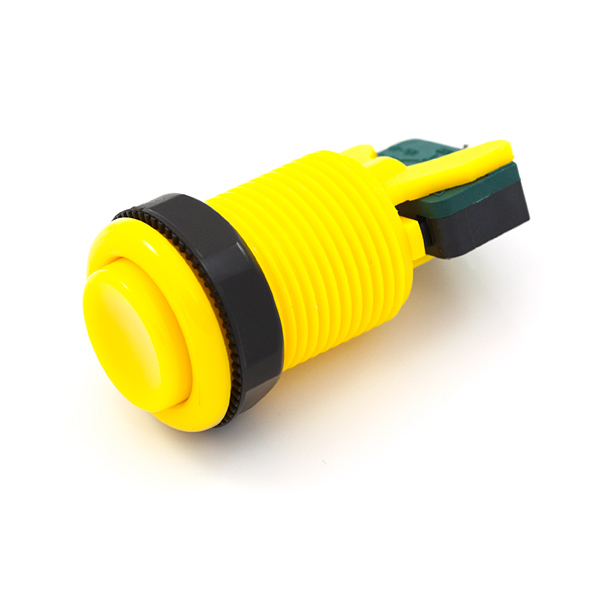
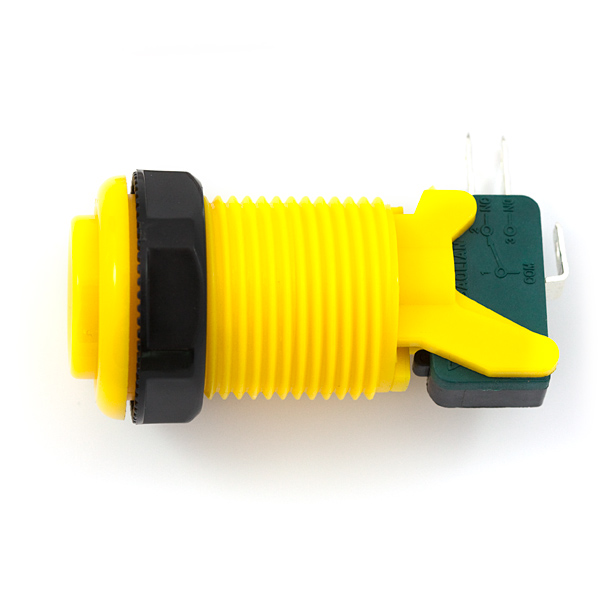
- Concave Button - Yellow

This is a 35mm concave momentary push button similar to the ones you find on arcade games. Simple screw in design. Perfect for mashing. This button has a great tactile, 'clicky' feel.
- Concave plunger design
- Durable nylon material
- Microswitch: max 3A @ 120 VAC
- Microswitch reliability tested to 10,000,000 cycles
- Includes 3 terminal microswitch
- Net weight: 25g* Cap diameter: 35mm
- Overall height: 65mm
- Mounting hole: 1 1/8th inch paddle bit (1.125" / 28mm)
Concave Button - Yellow Product Help and Resources
micro:arcade Kit Experiment Guide
July 21, 2017
We love games! We love writing games, building games and yes, even building game consoles. So we want to introduce to you the micro:arcade kit for the micro:bit!
PiRetrocade Assembly Guide
October 28, 2016
Build your very own retro gaming controller with a Raspberry Pi using the SparkFun PiRetrocade Kit!
Button and Switch Basics
May 7, 2013
A tutorial on electronics' most overlooked and underappreciated component: the switch! Here we explain the difference between momentary and maintained switches and what all those acronyms (NO, NC, SPDT, SPST, ...) stand for.
Dimension
Rough dimensional drawing can be found here => [ https://drive.google.com/a/sparkfun.com/file/d/0B0jwgLkjMWzDOHV4ZDBqQVFXZm8/view?usp=sharing ].
Core Skill: DIY
Whether it's for assembling a kit, hacking an enclosure, or creating your own parts; the DIY skill is all about knowing how to use tools and the techniques associated with them.
Skill Level: Noob - Basic assembly is required. You may need to provide your own basic tools like a screwdriver, hammer or scissors. Power tools or custom parts are not required. Instructions will be included and easy to follow. Sewing may be required, but only with included patterns.
See all skill levels
Core Skill: Electrical Prototyping
If it requires power, you need to know how much, what all the pins do, and how to hook it up. You may need to reference datasheets, schematics, and know the ins and outs of electronics.
Skill Level: Noob - You don't need to reference a datasheet, but you will need to know basic power requirements.
See all skill levels
Comments
Looking for answers to technical questions?
We welcome your comments and suggestions below. However, if you are looking for solutions to technical questions please see our Technical Assistance page.
Customer Reviews
5 out of 5
Based on 1 ratings:
Just look at it!
Boldly go where no uber-satisfying-yellow-clicky-clickity-click button has gone before. Adds some flair to my camera trigger project. The terminals are easy to solder and the button can be removed should the locking nut be required. When in doubt add two, the other doubles up as a fidget spinner 2.0 for your desk.
This is a knockoff of the Happ competition button. I have found that plunger doesn't always hit the microswitch when pressed on the edge opposite the switch contact.
What size quick disconnect cables would you recommend using with these? OR do you recommend soldering a wire directly to the terminals?
I believe these use the same 0.25" quick disconnect that the Happ buttons do.
Does any one know the impedance of the PB and if there is a built in capacitor?
It is totally useless as the locking nut can not be removed over the switch so it can be inserted in a panel hole
You can remove the switch. This guy demonstrates it at the start of this instructable:
http://www.instructables.com/id/HackMod-a-concave-arcade-style-button/
For those who don't like to follow links, the process is simple. You simply pry away the longer tab (quite visible from the second pic) and rotate the switch along the other tab. You should be able to then simply remove the microswitch, giving enough room for the button to fit through holes, and to get off the nut.
While these guys are a bit more expensive then the 33mm convex ones sold here, they're actually a pretty good deal when you consider the fact that the microswitch included with them is over 3/4 the price. You're only paying $0.45 more for the nifty arcade button.