- Home
- Product Categories
- Robotics
- Robotic Claw (Sale)

Robotic Claw (Sale)
Replacement:ROB-11524. This claw got an upgrade! It's now geared with a spring-loaded clutch. This page is for reference only.
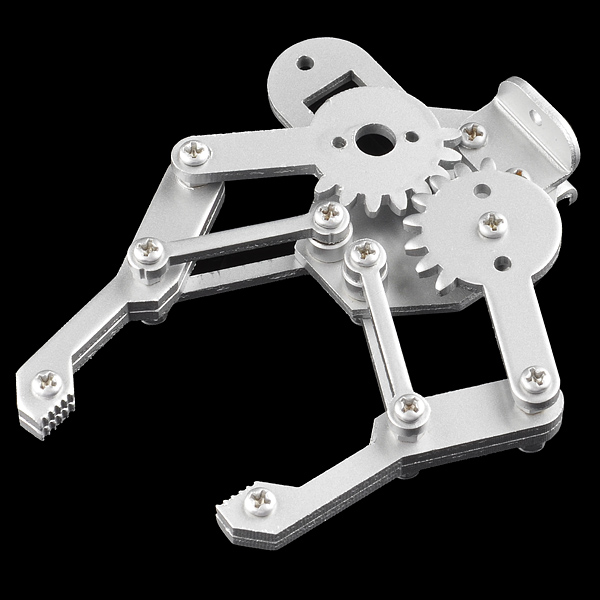
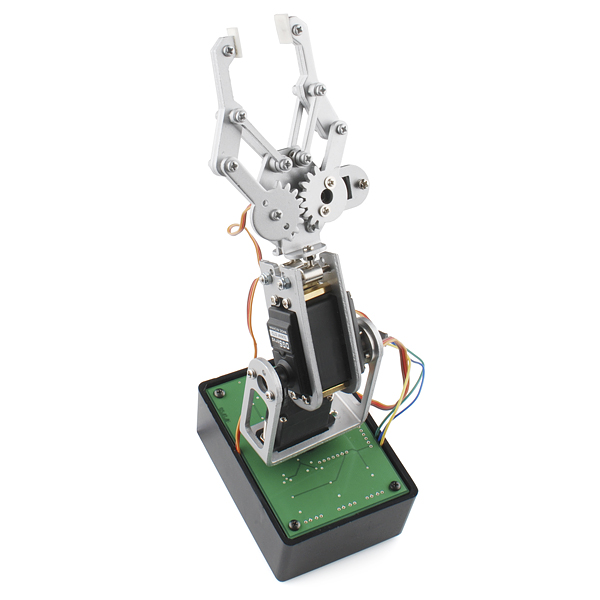
This robotic claw arm is great for all your gripping needs. They are made from metal and are pretty heavy-duty. The claw opens to about 2" and depending on the servo motor used, it can pick up some relatively heavy objects. Because the arms move parallel to each other, you get a better grip.
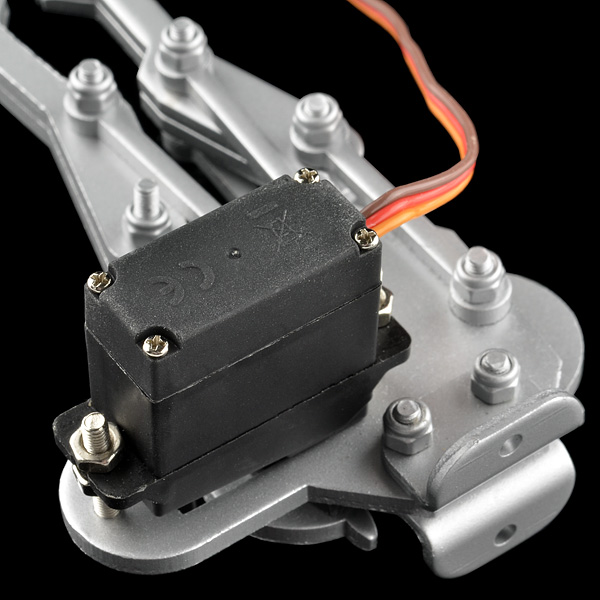
These also have a mounting plate on the bottom which accepts standard spacing found on servo mounts (the extra bits that come with our servo motors). These do not come with a servo motor, so check below, the 'medium servo' is the one that works well.
Robotic Claw (Sale) Product Help and Resources
Comments
Looking for answers to technical questions?
We welcome your comments and suggestions below. However, if you are looking for solutions to technical questions please see our Technical Assistance page.
Customer Reviews
No reviews yet.
Anyone know if the Servo - Large (ROB-09064) will work with this? The Medium Servo is back ordered.
I just received two of these along with two of the medium servos. Quite a nice claw for the price! But I'm not so sure the claw and the servo are such a match made in heaven. Though I can assemble things to generally resemble the stills and the video, everything seems twitchy at best.
The servo does not really fit the existing hole in the assembly as I would expect it to. The long screws holding the servo in place are not quite straight, and it seems that a good bit of screw re-tightening would be required to keep everything working for very long.
Perhaps someone with more experience using servos can say if this kind of spec mismatch is the norm, or just me worrying. This isn't a criticism of the arm, it just doesn't seem to be such a perfect fit to the servo as is indicated.
Had the same issue. Broke out the dremel and drilled and cut. I think these are not actually metal but whatever it is that Ponoko calls metal( metal bonded with resin? ). Took some tinkering, but i guess that's part of the fun too. There are some clearance issues with some of the screws too.
Yeah, the mounting holes are about 1/32" out of place. 5/16" spacers are an exact match. If you look closely at the photos the mounting screws are using two nuts, no spacers, and bowed out a bit. If you mount the servo in place straight there's no room for the control horn between the shaft and the round end of the slot. Time to get out a small carbide bit and the dremel to elongate the mounting holes a wee bit.
As far as the servo shaft mount goes, you want the control horn, not the disk. The two inner holes on the hor match the proved holes exactly.
Follow-on--even though I was able to get the claw on the servo by omitting the spacers, the servo stalled out because of the misaligned gears.
I also just received 2 of these arms with 2 medium servos. I am experiencing the same problem. I've spent 30 minutes trying to attach 1 servo to 1 arm. The face of the servo does not fit in the semi-rectangular hole and the mounting holes do not line up with the arm. Also, the holes in the black circular disk do not match the arm's mounting holes. Even with some washers and tightening the screws, it's not holding together. Can someone from SparkFun please describe how they used the provided hardware to connect these pieces together? The prototype in the video looks great and my son and I can't wait to build it and go from there.
I'm in the same boat as you and Member8770. I was expecting a little better alignment when attaching the servo to the claws. From an engineering standpoint, this is a little dicey.
Im having the same issue, so any mounting instructions would be appreciated. Are you using the rounded plastic wheel that came with the servo? I recon thats the one you have to use, but yeah ... the holes dont fit though. Anyone got any toughts?
The holes in the claw gear do not line up with any pair of the holes on the round disk. I solved this by drilling 2 more tiny holes in the round disk, using the claw gear as a template. (Drill and attach disk to claw before screwing disk to servo.)
The screws provided with the serve are a tad too long, so for each I put a washer on top of the claw gear before inserting the screw.
Also as mentioned earlier by c148 the claw's servo mounting holes are slightly off. I'm also not delighted that the servo needs to be mounted with four nuts because the face is not flat. I plan to partly remedy this by cutting a pair of exactly measured stand-offs.
Still, for $10, a good value IMHO, these would be very difficult to fabricate in the average workshop and costly to make custom.
The real question is: Is the servo you are recommending with it powerful enough to cause pain when gripping a human? I am not sure I would be too interested otherwise.
That depends on your servo's torque. If you get a really powerful servo, things can get dangerous to you pinky.
And this is where Ivan's design for a tele-robotic sex therapist went oh so horribly wrong.
i dont recall these being comments for the claw
It especially depends on what part of the human it is gripping...
I think the servo head would strip before it could do any really damage.
Sweet now I can build a robot to choke the crap out of solicitors when they ring the doorbell...I mean...to pick stuff up.
you made a small mistake in the desciption:
"there do not come with a servo motor"
it should be they.
its about time i see a Servo claw here and its cheap to.
definitly getting one wih my next order
You made a small mistake on your reply.
It should be "it's" instead of "its." x2
It should be "too" intead of "to."
It should be "definitely" instead of "definitly."
:-) Just playing. Obviously the spelling/grammar of the product page is more important than the comments section.
He also typed "wih" instead of "with". :-)
I believe the Associated Press writing style guide forbids the use of smiley faces at the ends of sentences. It's considered improper grammar.
True OG Geeks use the carrot:
:^)
in dutch it should be .. doesnt matter.. :P
Actually, I'm glad to know there are other people in this world who still cling to the old ways. We will rise again!
"You made a small mistake on your reply." should be "You made a few mistakes in your reply."
I'll shut up now.
Thanks, fixed.
how much is it
Will these be restocking soon? Robot season is upon us.
When will there be the next shipment? I need one soon for an invention for science fair
Not available for back-order? Does this mean they're EOL (end of life)?
The recommended servo (DGServo S05NF STD) is horrible, read the reviews on it. We replaced it with a better quality servo (Hitec HS82-MG). Some fabrication of the was necessary to get the servo to seat properly, the mounting screw holes were out, and the screws for attaching the servo head are too long. So we got the servo seated much better, used the correct length screws and everything was looking good. BUT the jaw's gears don't meet now as the distance between the centre point of the servo gear head and its mounting screw is too big (by about 3-4mm).
So using a crappy servo and some brute force it kinda works. Using a decent quality servo and making some improvements it doesn't work. It's cheap yes, but this is void with the amount of fabrication required to make it useful.
I don't know if I just got a dud, but the claw I received is incredibly poor quality with a LOT of play in the joints. It doesn't close parallel, it closes all over the place. Shouldn't expect much at this price, but I'd rather have had it cost more and work better.
they do vary a bit, but with a bit of adjusting, it can be pretty accurate. just tighten the joints a bit.
Just out of curiosity, what servo was this claw designed to fit? Because it sure isn't your medium servo (at least I hope for the designer's sake it's not). To get it mounted at all, the screws have to be totally cock-eyed, and even then the servo is crammed over so tight it gets bogged down and continually clicks and buzzes when it should simply be holding position silently.
The shape of the opening, rectangular at one end and round at the other, matches the general shape of many servos I have lying around, but it's too small for any of them to actually fit through to where the mounting tabs could sit flush. I realize this is more of a toy than a piece of precision equipment, but it goes together so badly that it leaves a pretty bad impression of the whole thing.
I bought this claw months ago, but I never found a perfect gear that fits both the claw and the recomended servo. Anyone could point me one?
For anybody about to purchase this robotic claw with the 'medium servo,' it does not fit very well. You will have to do some grinding to make the servo fit, so if you don't have access to some tools, try to find a different gripper.
Hello I ordered this arm along with three pan/tilt brackets for a robot arm I am constructing for a science Olympiad contest, and am very satisfied as to the product; although, I was curious of the attachment of the claw to the servo mini as the machined holes on the claw do not coincide with the position of the pilot holes on the motor as there are two on either side of the motor opposed to the two holes per side drilled in the claw. Any help would be much appreciated.
The servo's to drive the claw have been out of stock for a while now is there any word on when they will be back in stock or what we could use as a replacement?
Would it be possible to open and close this with SparkFun's 12v stepper motor (http://www.sparkfun.com/products/9238)? What would I need to interface? I want to control width of opening with ~1mm precision.
For those having problems getting the claw assembled, I put together a description (with pictures) of how I got mine to go together here: http://blasphemousbits.wordpress.com/2011/11/05/sparkfun-robot-claw/
I don't know about anybody else, but the code in this tutorial didn't actually work. It sets the servo to 170 all the time. Also, the piece he recommends using to attach the servo to the claw runs into a screw when the servo turns.
I can assure you it does indeed work. If you look at the code, it's very, very simple. If your servo is is going to 170 every time, I would suggest you look at your inputs. My best guess would be that one of your buttons is stuck in the on position or something is pulling the input high.
Also, unless Sparkfun has changed the build of the claw from the one I have, I'm honestly not sure what screw you could possibly be talking about. Mine is assembled exactly as presented in the pictures on my blog, and works great.
Your last two if statements always evaluate as true. It works if you switch the numbers assigned to openLimit with closeLimit and vice versa.
i can use the hs-311 for mount in the claw????
I wish they made one twice this size. This one is too small for using with more normal size objects.
can i use it with a large servo? your mediums are sold out unfortunatley...
Check also these, from a Chinese e-shop:
http://item.taobao.com/item.htm?id=6271167806&
http://item.taobao.com/item.htm?id=6764996788&
http://item.taobao.com/item.htm?id=5163207178&
I admit that I'm pretty new at this stuff, but I had a lot of trouble mounting the medium servo to the claw. The round plastic part that attaches to the servo is very difficult to mount on the claw. The holes do not align well. I'd really appreciate if spark fun would provide mounting instructions.
Greetings.
Which servo fits this claw?... thanks
Did you read the description?
"These do not come with a servo motor, so check below, the 'medium servo' is the one that works well."
Nice stuff. Got it a week ago. Was able to fit it with ease. But what I don't how does the second grip (the one that is not connected to servo)suppose to move? Please if someone can give me some idea as to how the second grip suppose to move,I would appreciate it.
It's pretty lame that the servo they recommend and sell for this won't bolt right up without grinding aluminum. Sparkfun should add that to the description, as well as the fact that the servo required is an extremely odd size and mounting configuration, so you are unlikely to find another servo that's even close to fitting.
Can you provide some step by step instructions as to how you modified the claw and medium servo to work as shown in your Claw video?
Thanks in advance for your help!
Fun little claw, with a fun assembly too... As others have stated, the holes are not aligned, but with a Dremel & drill press I was able to redrill the holes in just a minute or two.
The claw itself is very wobbly and therefore not very precise, but for $20 total, it's a fun little mini-project, and I look forward to making a place for it in my next full project.
I discovered that to make the claws more stable the best way to go is to reduce every double-layer piece of metal to single layer (they're just held together with screws). Since the mounting L-shaped brackets then start getting in the way of the gear mechanism, they have to be repositioned and the servo has to be lowered also, but that's an easy fix. Well worth the effort.
Servos don't fit and to make matters worse, the mounting holes are less than a full diameter off where they're supposed to be, making re-drilling difficult. You're likely to end up with ovals.
Dremel is a must-have for taming this mechanical beast.
The joints are quite loose, so forget about doing precision work with these claws. Tighten the screws too much and friction will overpower the servo. Make'em too loose, and the parts will wobble. I was hoping to use these with a custom made pick-n-place machine, but they're just too clumsy. Not suitable for anything smaller than a Lego brick.
Mine didnt work with the knob command the servo got hot the claw didnt move and it messed up my arduino software
Sounds like you didn't have the servo adjusted right. Make sure the servo is at the end of its range when closed.
It would be cool to see several of these with the maker beam on a rover platform attacking someone for the begining of a product post video...
Robotic Claw with a Red Bull's can: http://www.youtube.com/watch?v=DI8Unifggms
I'm new to hardware in general, can someone tell me the specs on the screws used in this? Width and threads. I have no frame of reference for this, and don't know the terminology.
For adjusting the holes in the plastic I found that heating a paper clip with a lighter made a quick clean drill.
Good day, have they sending to mexico? All that is the sending and all that serious the total in the purchase of one
Would this work with an hs322 or 422?
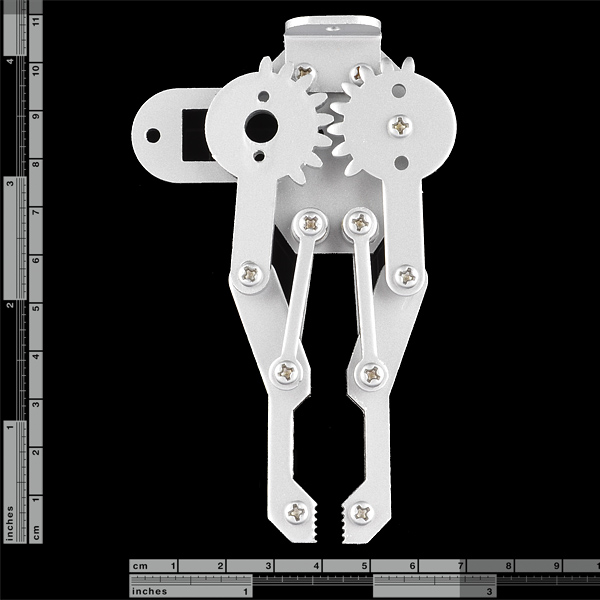
Both of those motors are too large. Check the dimensions of the servo listed below. You will want to stay in that range. The mounting holes are roughly 34.5mm apart and the holes for the servo head and mounting hole are about 9.5mm apart.
I'm having a hard time finding an answer to this through Google, but I'm hoping someone here has tried it: Do you think using a Traxxas waterproof servo on one of these would result in a gripper that could be used on a shallow-depth ROV?
Failing that, any good pointers to how to waterproof a servo that doesn't involve filling the case with oil? Most ROV competitions have rules against oil-filled components because of the risk of leaks.
Thanks,
Tom
To waterproof my servos, I usually use hot glue to seal any cracks, I put a rubber o ring around the area where my servo head connects to the servo arm, and I also like to put them in water balloons for a safe measure.
Success on the "hack it to work" front. I elongated the holes using a cylindrical carbide burr, maybe 3/32" dia, in a dremel tool. After 5 minutes or so, the holes were about 1/16" longer and the servo fit perfectly using 5/16" spacers.
WEAR SAFETY GLASSES IF YOU TRY THIS!!
You start the tool, carefully bring the bit into the hole, and then pull it against the side of the hole away from the claw. Hold it tightly or it will chatter and get away from you, and potentially shatter the bit.
Come on SparkFun...You failed to mention that the claw and servo do not match. We have to modify the metal to fit the claw. Disappointed with your quality control right now. I hope you staff these new products better vice let your customers provide negative feedback. Still a great company though – you help me spend my money.
They do work together. The holes line up, but not perfectly. I was using that exact combo in the video and have in other projects. They do work, it's just not a perfect fit.
Do you have any information on this claw? I would like to know if it is compatible with the hitec standard servo head.
never mind
I got my claws today pretty cool.. once again the fedex guy didn't even knock and just dropped them off at the apartment office.
Cool claw though now arduinoing it up.
Do the large servos have the same mounting dimensions as the medium?
I'm thinking grind the teeth down, glue the small force sensor on one jaw, and then glue little rubber pads for grip and you can tell your robot to grip something no matter the size of the object. Then screw this thing to the front of the new Rover 5. Add mecanum wheels for awesomeness and then modify the chassis so the front wheels may be servo adjusted to raise and lower the claw. Now go take stuff from people. Just throwing ideas out there to inspire.
You could also incorporate the new Pan Tilt bracket (very nice by the way) and add a linear actuator of some sort, I don't know if one hacked out of a disk drive wold be strong enough, to raise and lower the whole assembly.
How much does it weigh? I'm just thinking if it was at the end of an arm it would factor into torque reqs.
I'm thinking robot scorpion.
about 2.4 ounces, without the motor.
Nice little claws! (Now I just need to think of a project...) But some units on the "Dimensional Drawing" would be nice.
it's all in mm, this can be verified by looking at the scales in the pictures.
It's clearly not in inches (48" opening width?) so that pretty much leaves mm.
I guess you could think cm but even that would be huge!
I am with the guy above me that needs 4". This would be great. I am currently looking at a $200 angular gripper that I still have to put arms on. This $10 solution would rock if it were bigger!
This looks like a really great product. Unfortunately I need to be moving 2 liter bottles which have a 4" diameter. Oh well, I might get one anyway!
Almost looks perfect to pick them up by the neck of the bottle for transport from place to place vertically, not so much for pouring or placing horizontally.
Awsome! im just getting into robotics ad this is great, im really glad that it's so cheap too! thanks sparkfun for another great product!
1) Is it steel or alluminum?
2) What is the max weight capacity?
3) If you could provide a datasheet on it, that would be awesome.
I think it's aluminum. Max weight is dependent on the servo you use, and what you see is what you get, there's no datasheet. You can't easily determine max weight, as it depends on the object you're picking up, how it's held, static friction of the gripping surface, etc, etc, etc.
It's a $10 toy robotic arm :-)
The gripper is made from aluminium with steel nuts/bolts.
If you stretch some silicon rubber tubing over the tips you can improve the grip quite easily.
hmm. the arms in the first photo appear to be out of position - "off by one"
Yep, without the servo attached, they are just 'loose'. For the photo, it was off a notch.
Er, sorry, I forgot my salesman-speak...
"It's fully adjustable!"
Will this product become a full kit (something like picture #5)?