- Home
- Product Categories
- Arduino Boards
- SparkFun ProtoSnap - Pro Mini

SparkFun ProtoSnap - Pro Mini
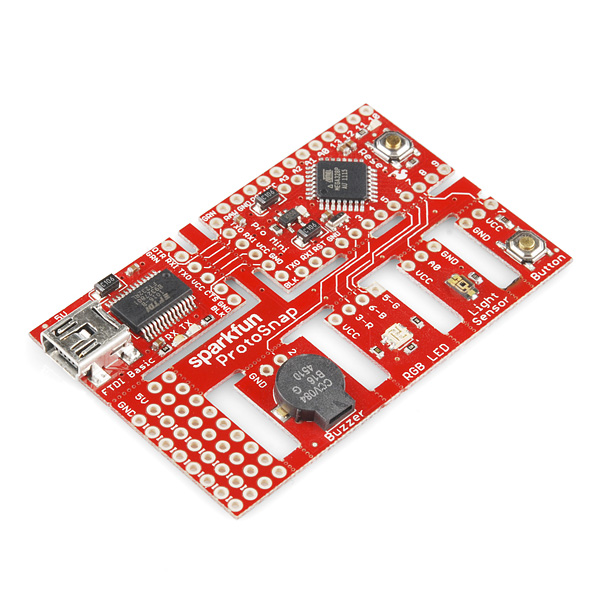
The SparkFun ProtoSnap is an Arduino-compatible development platform aimed at teaching the basics of Arduino programming as efficiently as possible. It requires zero assembly, wiring, or soldering, so you can jump right into programming the ProtoSnap to control LEDs, buzzers, light sensors, and more. There's even a small prototyping space so you can add your own parts!
Once you’ve gotten a firm grasp of the programming, you can snap off the individual components of the ProtoSnap for use in future projects. Those components include an Arduino Pro Mini microcontroller platform and an FTDI Basic Breakout to program it.
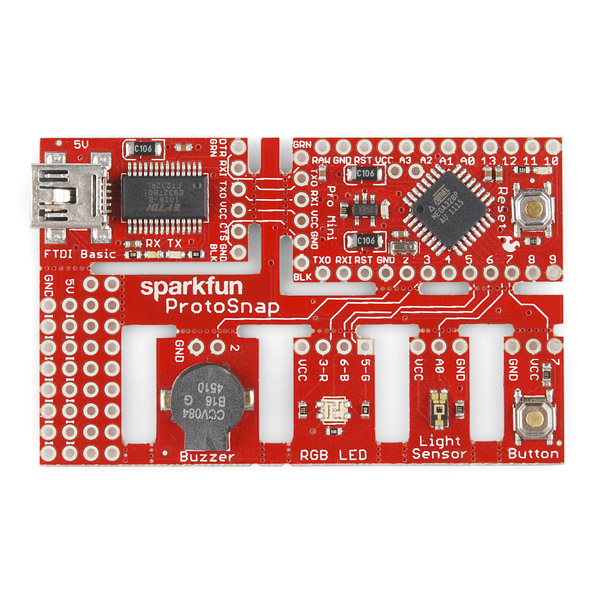
In the latest revision, we've added some helpful silkscreen to show you how everything is connected.
Included on the Board:
- 1 x Arduino Pro Mini 5V/16MHz
- 1 x FTDI Basic Breakout 5V
- 1 x Buzzer
- 1 x RGB LED
- 1 x Light Sensor
- 1 x Push Button
- 1 x Protoboard
- Schematic
- Eagle Files
- Getting Started Guide
- Example Code
- GitHub (Design Files)
SparkFun ProtoSnap - Pro Mini Product Help and Resources
LED Cloud-Connected Cloud
February 22, 2016
Make an RGB colored cloud light! You can also control it from your phone, or hook up to the weather!
Core Skill: Soldering
This skill defines how difficult the soldering is on a particular product. It might be a couple simple solder joints, or require special reflow tools.
Skill Level: Rookie - The number of pins increases, and you will have to determine polarity of components and some of the components might be a bit trickier or close together. You might need solder wick or flux.
See all skill levels
Core Skill: Programming
If a board needs code or communicates somehow, you're going to need to know how to program or interface with it. The programming skill is all about communication and code.
Skill Level: Rookie - You will need a better fundamental understand of what code is, and how it works. You will be using beginner-level software and development tools like Arduino. You will be dealing directly with code, but numerous examples and libraries are available. Sensors or shields will communicate with serial or TTL.
See all skill levels
Core Skill: Electrical Prototyping
If it requires power, you need to know how much, what all the pins do, and how to hook it up. You may need to reference datasheets, schematics, and know the ins and outs of electronics.
Skill Level: Competent - You will be required to reference a datasheet or schematic to know how to use a component. Your knowledge of a datasheet will only require basic features like power requirements, pinouts, or communications type. Also, you may need a power supply that?s greater than 12V or more than 1A worth of current.
See all skill levels
Comments
Looking for answers to technical questions?
We welcome your comments and suggestions below. However, if you are looking for solutions to technical questions please see our Technical Assistance page.
Customer Reviews
No reviews yet.
Hey, guys! Why did you retire this? It's a great way to introduce new folks to our world, without having to invest a lot of money in (or keep track of!) lots of "accessories" to make it usable. Once they run "blink", they're usually hooked, and wanting bigger and better hardware. It seems you could almost give these away, for the amount of repeat business they generate. Please let me know if you decide to introduce something similar.
I think they weren't selling well. We actually sold a lot more of our Lilypad Protosnap boards which functionally were very similar. We also came out with the Digital Sandbox which is designed for those teaching applications where you don't want things broken apart.
I love my protosnap, it is a great way to quickly test a chuck of code without having to lug out the Uno, breadboards, jumpers, and shields.
Probably ought to put the info from the RETIRED DEV-10817 on this 10889 page.
Also, telling the software under Tools/Board that a Pro-Mini(whether 3.3 or 5V) is on the end of the cable won't work. It's not just UNO-"compatible", you must say that it IS an UNO, and NOT "PRO", "MINI", "PROTO", or any other thing that is intuitive to a person who bought a ProtoSnap-Pro Mini :P
This fuax-pas caused me to question my hardware on my laptop and/or driver installation, port settings, etc, til the cows came home. I went from a Win7 laptop, to an XP laptop, to an XP desktop machine. Pissed away a week. Then, for the heck of it, I told it that it was simply an UNO, and everything's right as rain now.
"Compatible with Uno", and "you MUST tell the software it IS an UNO", are two different things. ALL of these guys are SOME kind of UNO, LOL.
All that said, I do like the product!
The UNO uses a Atmel interface instead of a FTDI. How can you call this an UNO? Duemilanove would be the closest I can see.
It's all about the bootloader.
Just found this. http://www.sparkfun.com/tutorials/303 Would have saved me a lot of trouble. My bad.
You guys should add perforation holes in the stem next to the Sparkfun Protosnap Label (Top) in between the FTDI "GND" pin and the Arduino "BLK" pin on your next revision. The reason is because if you try to snap all of the parts off but the FTDI and the Arduino, it won't sync. This forces me to have to connect them with jumper wires.
When trying to upload a sketch to the board I get the following error message: avrdude: stk500_getsync(): not in sync: resp=0x00 This happens on both my Mac and Windows PC. On both I'm able to upload sketches to my Arduino Uno with no issue. The suggestion at http://www.arduino.cc/en/Guide/Troubleshooting#upload all don't seem to apply. I have the correct Board Type selected (Uno) The correct Com port is selected The drivers work, since the Arduino Uno works with no issues. Any idea?
If you snapped off the components before trying to upload the program to the arduino, it may be that some of the traces were messed up in some way. That's my guess, but I was able to fix this problem by snapping the usb side off from the arduino side and connecting them using jumper wires.
Its an Arduino Pro Mini platform, not an UNO. Arduino Pro should be in the boards list.
I am using the ProtoSnap and have a question. After uploading a sketch, if I apply power to the board though the RAW pin (7 - 8 Volts) the board does not execute the loaded sketch. If I cycle power (turn off, then back on quickly) the board initializes and runs the loaded sketch. Only power cycling works - using reset button does not get it to work.
Has anyone else observed this behavior? Is there a solution / workaround?
Thanks!
Can you power this with a 9v battery after its snapped apart?
As long as 'this' is the Arduino Pro Mini-variant part, yes. Check the schematic - there's a voltage regulator on that sub-board that accepts up to 16VDC and gives the appropriate output voltage for the board. The pins you'd want to connect the battery to are GND for the negative/- pole, and RAW for the positive/+ pole.
It would have been nice if the pushbutton had been put on pin 2 or 3. It would have allowed people to easily demonstrate an interrupt program. Other than breaking the board apart, is there a way around this?
What would be the best header pins or connectors to buy for the ProtoSnap after they have been snapped apart?
Really depends on your use case. I'm partial to female headers (e.g. Female Headers, you'll need 2 to cover all pins, though only 1 for the pro mini + usb-ftdi), but you could just as well use regular male headers, stackable headers, right angle headers or indeed specific connector headers if you need the wiring between boards to be a bit more secure without being permanent.
What buzzer does this come with? Is it available separately?
It comes with the CCV-084B16 module. Unfortunately, we do not currently sell it separately, but we do have a different buzzer available here.