- Home
- Product Categories
- LilyPad
- LilyPad ProtoSnap Development Simple

LilyPad ProtoSnap Development Simple
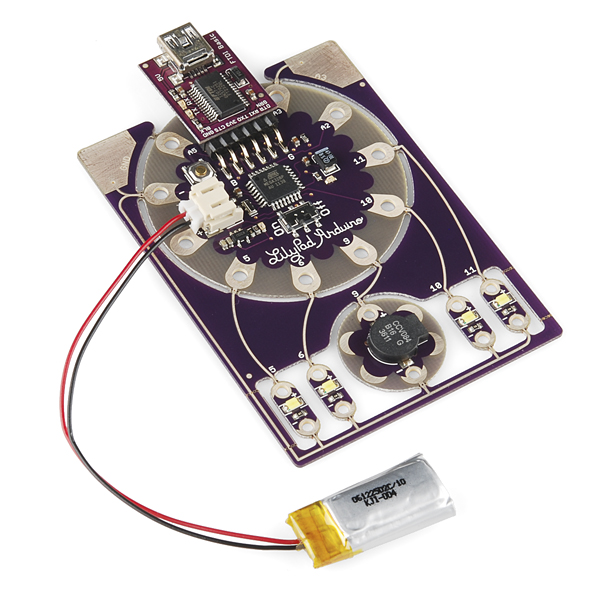
The ProtoSnap series is a new way to prototype your project without a breadboard. Everything is wired together on a single board, which makes it easy to explore the possibilities of the components before snapping them apart and building them into your project.
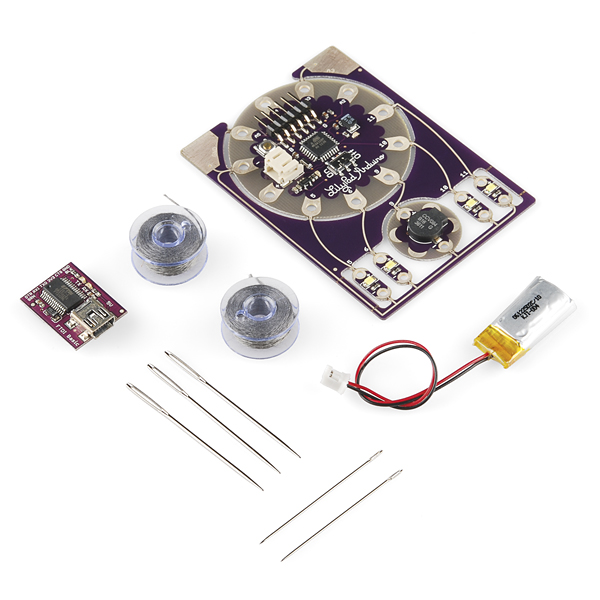
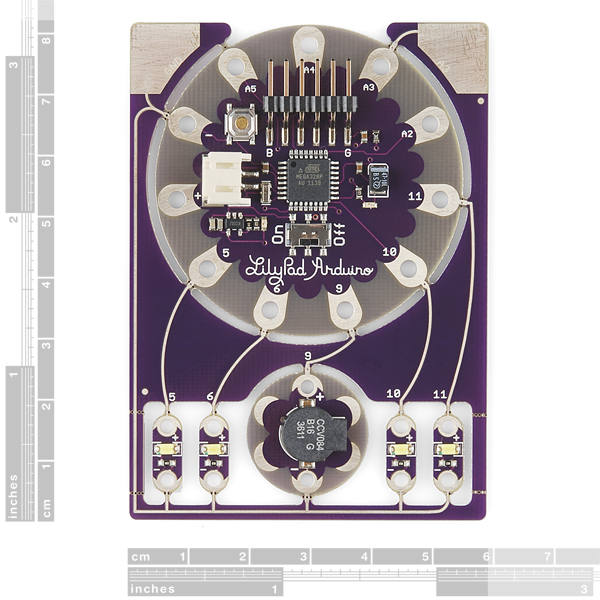
The ProtoSnap LilyPad Simple Development board is a great way to get started in programmable e-textiles. By combining a LilyPad Simple board with 4 LED boards and a buzzer, the ProtoSnap LilyPad Simple Development board gives you everything you need to learn the basics. The kit also includes our LilyPad FTDI basic for programming the Simple board, conductive thread and needles and a Li-Po battery pack to power everything. The LiPo battery is rechargeable through the board; no more special external LiPo chargers required! The board also includes two pads to connect sensors using alligator clips (or use as a nifty touch-sensor).
This kit does not include a USB cable. You will need a USB mini-B for the FTDI basic. Check below for an appropriate cable if you don't already have one.
Note: A portion of this sale is given back to Dr. Leah Buechley for continued development and education of e-textiles and also to Arduino LLC to help fund continued development of new tools and new IDE features.
Note: Because of the added battery charging circuitry the Simple is unable to power a device from the FTDI header meaning that the Bluetooth Mate, for instance, is no longer plug'n'play compatible. Please use caution when using this battery in wearable projects. When using conductive thread, a short in the thread can create sparks and heat. We recommend using coin cell batteries for beginners.
Note: Due to the requirements of shipping the battery in this kit, orders may take longer to process and therefore do not qualify for same-day shipping. Additionally, these batteries can not be shipped via Ground or Economy methods to Alaska or Hawaii. Sorry for any inconvenience this may cause.
Included on the Board:
- 1 x LilyPad Simple Board
- 4 x LilyPad White LED
- 1 x LilyPad Buzzer
Kit Also Includes:
- 1 x LilyPad FTDI Basic
- 2 x Conductive Thread Bobbin
- 1 x Needle Set
- 1 x 110mAh LiPo Battery
LilyPad ProtoSnap Development Simple Product Help and Resources
ProtoSnap LilyPad Development Simple Hookup Guide
September 5, 2013
Interested in getting into LilyPad? Or maybe it's Arduino that tickles your fancy? Just want to add a little white-blinky-LED zest to your vest? All of the above? The ProtoSnap LilyPad Simple is a great tool to explore any of these subjects.
Choosing a LilyPad Arduino for Your Project
October 27, 2015
Not sure which LilyPad Arduino is right for you? We'll discuss the features of each and help you decide.
Powering Bluetooth with Battery Applications
It looks like in the board layout and the schematic that the application circuit for the charger IC does not power the bluetooth through the FTDI header pins. To get the bluetooth mate working with the LilyPad Simple board in the development board, you would need to reroute the pins so that you can provide power to the bluetooth mates https://www.sparkfun.com/search/results?term=bluetooth+mate .
Assuming that you are soldering a 6 pin female right angle https://www.sparkfun.com/products/9429 to the bluetooth plated through holes, you would need to connect the m/f jumper wires https://www.sparkfun.com/products/9140 between the two boards (Tx, Rx, and GND).
For the Vcc pin of the bluetooth mate, you would need to connect it to a power source. Assuming you are using a nominal 3.7V LiPo battery (like the batteries with the silver and yellow packaging - https://www.sparkfun.com/products/339 ), you would just need to connect the Vcc pin to the + pin of the LilyPad Simple. There are a few methods to do this. You could us a m/m jumper wire https://www.sparkfun.com/products/8431 , bend one end to make a sequin, and sew the terminal end to the + pin of the LilyPad . Here is one example of making a sequin using non-standard LilyPad components https://www.sparkfun.com/tutorials/281 .
You can also cut the m/f jumper wire in half, use wire strippers to remove the insulation, and then make an additional sequin out of the wire with the male terminal.
Core Skill: DIY
Whether it's for assembling a kit, hacking an enclosure, or creating your own parts; the DIY skill is all about knowing how to use tools and the techniques associated with them.
Skill Level: Noob - Basic assembly is required. You may need to provide your own basic tools like a screwdriver, hammer or scissors. Power tools or custom parts are not required. Instructions will be included and easy to follow. Sewing may be required, but only with included patterns.
See all skill levels
Core Skill: Programming
If a board needs code or communicates somehow, you're going to need to know how to program or interface with it. The programming skill is all about communication and code.
Skill Level: Rookie - You will need a better fundamental understand of what code is, and how it works. You will be using beginner-level software and development tools like Arduino. You will be dealing directly with code, but numerous examples and libraries are available. Sensors or shields will communicate with serial or TTL.
See all skill levels
Core Skill: Electrical Prototyping
If it requires power, you need to know how much, what all the pins do, and how to hook it up. You may need to reference datasheets, schematics, and know the ins and outs of electronics.
Skill Level: Noob - You don't need to reference a datasheet, but you will need to know basic power requirements.
See all skill levels
Comments
Looking for answers to technical questions?
We welcome your comments and suggestions below. However, if you are looking for solutions to technical questions please see our Technical Assistance page.
Customer Reviews
No reviews yet.
-------------------- Tech Support Tips/Troubleshooting/Common Issues --------------------
Application Note About Header Pin's Power?
It looks like in the board layout and the schematic that the application circuit for the charger IC does not power the bluetooth through the FTDI header pins. To get the bluetooth mate working with the LilyPad Simple board in the development board, you would need to reroute the pins so that you can provide power to the bluetooth mates https://www.sparkfun.com/search/results?term=bluetooth+mate .
Assuming that you are soldering a 6 pin female right angle https://www.sparkfun.com/products/9429 to the bluetooth plated through holes, you would need to connect the m/f jumper wires https://www.sparkfun.com/products/9140 between the two boards (Tx, Rx, and GND).
For the Vcc pin of the bluetooth mate, you would need to connect it to a power source. Assuming you are using a nominal 3.7V LiPo battery (like the batteries with the silver and yellow packaging - https://www.sparkfun.com/products/339 ), you would just need to connect the Vcc pin to the + pin of the LilyPad Simple. There are a few methods to do this. You could us a m/m jumper wire https://www.sparkfun.com/products/8431 , bend one end to make a sequin, and sew the terminal end to the + pin of the LilyPad . Here is one example of making a sequin using non-standard LilyPad components https://www.sparkfun.com/tutorials/281 .
You can also cut the m/f jumper wire in half, use wire strippers to remove the insulation, and then make an additional sequin out of the wire with the male terminal.
how would you recharge the lipo battery that comes with this kit.?
or is it a function that is built into the board
Doesn't look like the request to add this information was acted upon:
https://www.sparkfun.com/products/10274#comment-4eaad859757b7fd35100becd
In short: The board will charge the LiPo when powered over USB. The tiny LED next to the battery connector, next to the 'ON' label for the switch, should display charging status as well (if I'm not mistaken).
A little late coming but I updated the description. Thanks Kamiquasi!