- Home
- Product Categories
- Arduino Boards
- Arduino Mini 05

Arduino Mini 05
Arduino is an open-source physical computing platform based on a simple i/o board and a development environment that implements the Processing/Wiring language. Arduino can be used to develop stand-alone interactive objects or can be connected to software on your computer (e.g. Flash, Processing, MaxMSP). The open-source IDE can be downloaded for free (currently for Mac OS X, Windows, and Linux).
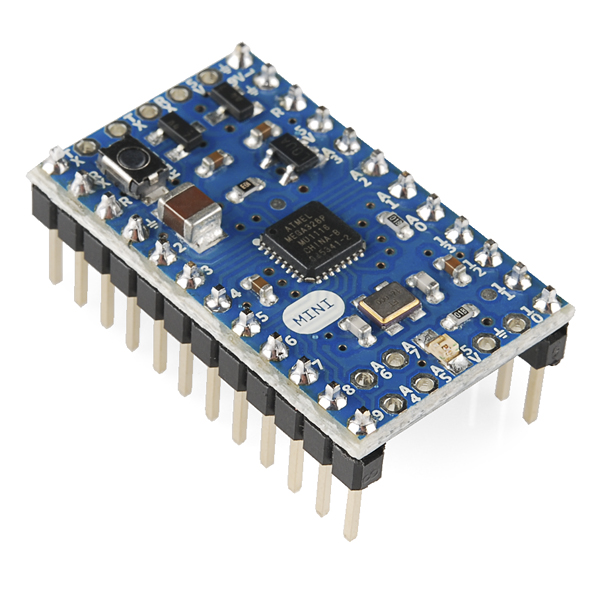
This is the new, smaller, Arduino Mini 05 with ATmega328. The latest version of this board is built around a smaller ATmega328 package, allowing all of the parts to be populated on the top side of the board. Of course, it still requires an external serial connection for programming.
The Arduino Mini 05 is a great development module for building compact devices that need to interact with the world around them.
Not sure which Arduino or Arduino-compatible board is right for you? Check out our Arduino Buying Guide!
Replaces:DEV-08164
Arduino Mini 05 Product Help and Resources
Core Skill: Programming
If a board needs code or communicates somehow, you're going to need to know how to program or interface with it. The programming skill is all about communication and code.
Skill Level: Rookie - You will need a better fundamental understand of what code is, and how it works. You will be using beginner-level software and development tools like Arduino. You will be dealing directly with code, but numerous examples and libraries are available. Sensors or shields will communicate with serial or TTL.
See all skill levels
Core Skill: Electrical Prototyping
If it requires power, you need to know how much, what all the pins do, and how to hook it up. You may need to reference datasheets, schematics, and know the ins and outs of electronics.
Skill Level: Competent - You will be required to reference a datasheet or schematic to know how to use a component. Your knowledge of a datasheet will only require basic features like power requirements, pinouts, or communications type. Also, you may need a power supply that?s greater than 12V or more than 1A worth of current.
See all skill levels
Comments
Looking for answers to technical questions?
We welcome your comments and suggestions below. However, if you are looking for solutions to technical questions please see our Technical Assistance page.
Customer Reviews
No reviews yet.
Why is this about four times as expensive (still three times as expensive on clearance, which is how I found it) as the Arduino Pro Mini 328 for what's effectively the same thing?
You know what be perfect for this? A socket to plug it into. Something that could be soldered to strip board. That way you can take right from the breadboard to the strip board.
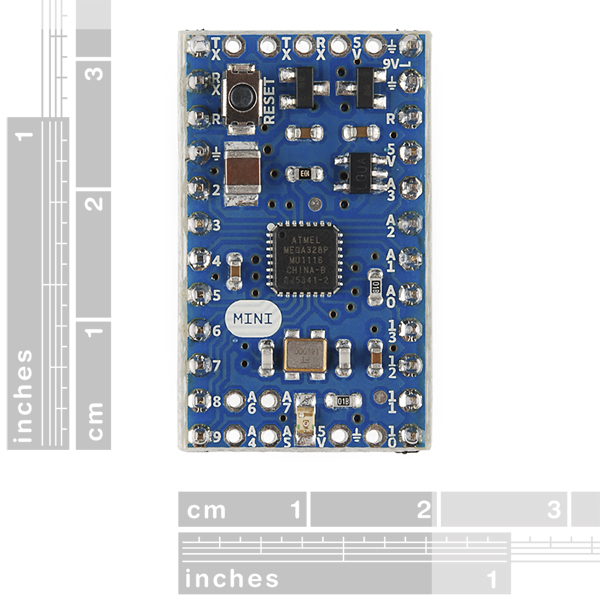
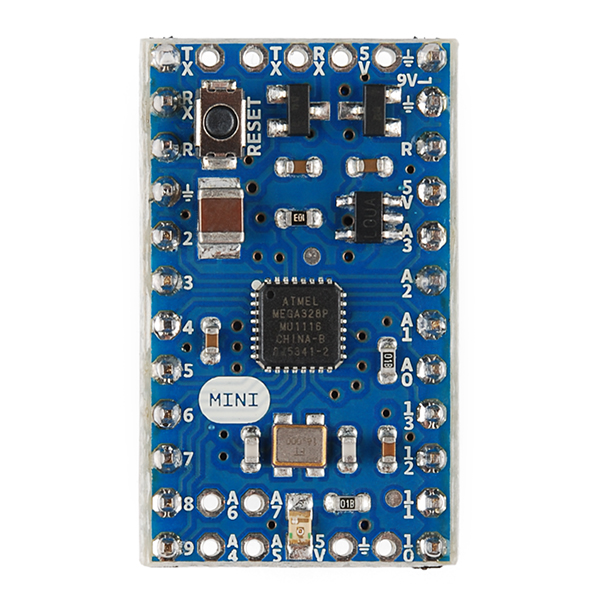
By the top and bottom rows of pads, you can see this is a 0.6" width board, so I guess a 24-pin DIP socket is compatible with it. I don't have one but I assume those rows (TX RX 5V & A4 A5 5V ground) are spaced 0.1"
What I wonder is how close Arduino/Sparkfun are to having a DIP sized arduino.
The capacitors required for decoupling are too big to fit inside a DIP package - this product is probably the closest you'll get. Though you could just use an ATMega DIP or similar microcontroller if you can live without USB.
Not that it matters to me... Ill stick to the PIC line. A DIP package is "0.600 in width or ".300 . So we would be shooting for the "0.600 . I guess all they could do is mount things on both sides. Or really tighten things up, so that you could cut off that extra ".1. But the cost may not be worth it... Its still very small.
The Arduino Mini was orginally called the Arduino stamp because it takes the same format as the Basic Stamp, a double wide DIP, this was a intentional to make Basic Stamp equipment compatible with arduino equipment, more or less.
Hi, is the mini 5 supplied with a crystal or with a resonator?
Crystal ( Crystal + 2 external caps).
In the images, check out the silverish component with a golden outline, with two white parts to the left and right of it. That's the crystal + caps).
Does this run at 5v and 3.3v or is it one or the other?
It's actually only one: 5V. It uses the LP2985aim5-5.0 as its voltage regulator, which has a fixed 5V output.
I am a bit confused with the differences between the "Mini 05" and the "Pro Mini". The Mini is rated only at 9V input. The schematic shows that the "Pro Mini" has a 10uf cap on the raw line that the "Mini 05" does not. The regulators are similar in specification and both have up to 16V input as their operating range. If I feed the "Mini 05" 12V, will it smoke? Should I use a 9v zener to clamp the input voltage? Should I add a 10uf cap to the raw line? How can I power this safely without using another 9V supply in the project? The placement of the A4-8 pins on the 0.1 grid makes the Mini more useful to me. The other difference is a pit puzzling, though... Why is IO7 on the serial port connection end and on the side? Why not reset?
This board was designed by Arduino and not by SparkFun, so we can't say for sure why they made certain design decisions (you can ask them directly on the Arduino website).
I can say that for these small regulators, you can run into thermal problems when the difference between the input and output voltage gets too high. This is why even though the maximum input is listed as 16V in the datasheet, if you try to regulate 16V down to 5V or 3.3V, the difference has to turn into heat, and the small chip will not be able to reject that much heat (the regulator has a built-in thermal shutdown, so it shouldn't permanently damage it). You should be able to run this off 12V if you're not pulling too much power through the I/O pins, but in general, keep the input voltage at least a half-volt above the output voltage (5V), but otherwise as low as practical.
Does this board come with PWMs?
Yes, all Arduinos have PWM outputs.
So, how is this different from the Sparkfun branded Pro Mini (DEV-11113)?
The Mini has voltage regulators and stuff built into it (the Pro doesn't). The Mini would be much easier to run off batteries (for example).
It also has the header pins built in so it's much easier to stick it into a breadboard (or attach it to some perfboard).
Is it worth the extra money? That's up to you...
I just wanted to point out that SparkFun's Pro Minis do indeed have voltage regulators.
As far as I can tell, the only differences are the footprint by .1" and the Mini Pro has the OSHW logo on it.
This pinout is actually very close to directly connecting to Basic Stamp 2 boards. You would need to fiddle with the programming pins to get it to work though.
And the Pro Mini comes in a 3.3V version.
Are the headers soldered to the PCB?
They do come soldered to the PCB, as shown in the picture.