- Home
- Product Categories
- Other LEDs
- LED Matrix Kit


LED Matrix Kit
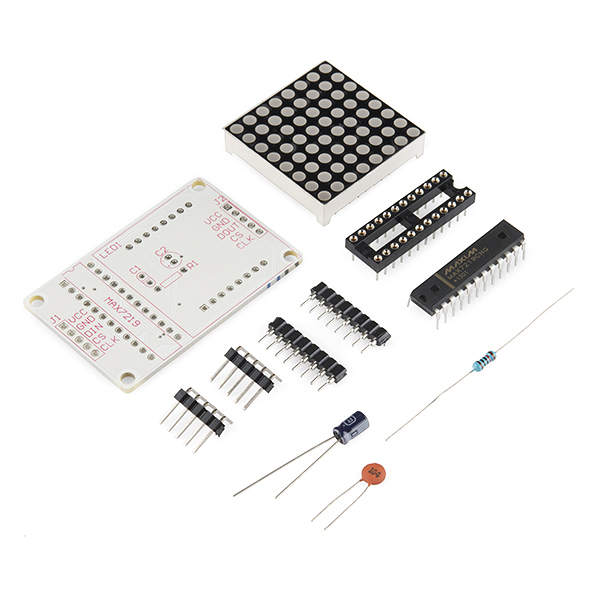
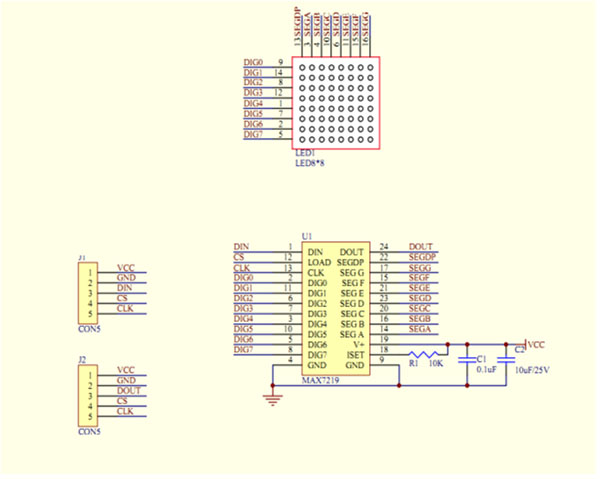
Do you like LED matrices? We do! Now we are giving you the power to make your own with minimal soldering any beginner can perform and give you a great introduction to programming an LED Matrix. This kit will show you how to use the MAX7219 to interface Arduino to easily drive an 8X8 LED matrix.
See the links below for assembly instructions, example code, and other information.
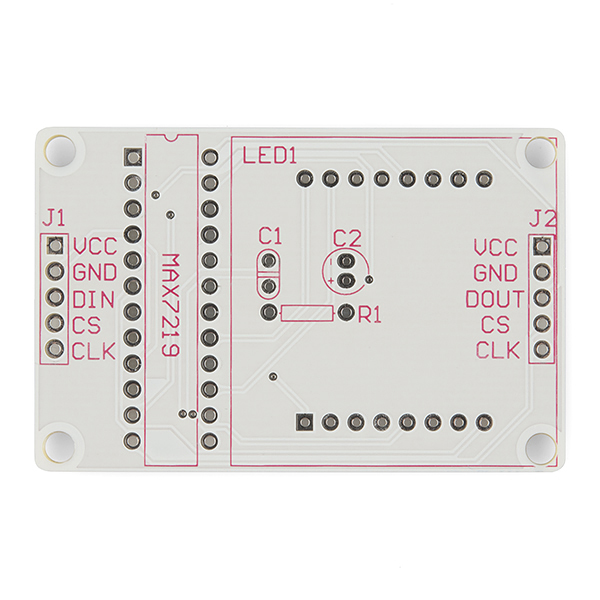
- 1 x LED Matrix PCB
- 1 x 8x8 Red LED Matrix
- 1 x MAX7219CNG
- 1 x 10uF/25V Electrolytic Decoupling Capacitors
- 1 x 10k Resistor
- 1 x 0.1uF Capacitor
- 1 x 28-Pin IC Socket
- 2 x 8-Pin Machine Pin Header
- 2 x 5-Pin Right Angle Header
LED Matrix Kit Product Help and Resources
Core Skill: Soldering
This skill defines how difficult the soldering is on a particular product. It might be a couple simple solder joints, or require special reflow tools.
Skill Level: Rookie - The number of pins increases, and you will have to determine polarity of components and some of the components might be a bit trickier or close together. You might need solder wick or flux.
See all skill levels
Core Skill: Programming
If a board needs code or communicates somehow, you're going to need to know how to program or interface with it. The programming skill is all about communication and code.
Skill Level: Rookie - You will need a better fundamental understand of what code is, and how it works. You will be using beginner-level software and development tools like Arduino. You will be dealing directly with code, but numerous examples and libraries are available. Sensors or shields will communicate with serial or TTL.
See all skill levels
Core Skill: Electrical Prototyping
If it requires power, you need to know how much, what all the pins do, and how to hook it up. You may need to reference datasheets, schematics, and know the ins and outs of electronics.
Skill Level: Rookie - You may be required to know a bit more about the component, such as orientation, or how to hook it up, in addition to power requirements. You will need to understand polarized components.
See all skill levels
Comments
Looking for answers to technical questions?
We welcome your comments and suggestions below. However, if you are looking for solutions to technical questions please see our Technical Assistance page.
Customer Reviews
4.5 out of 5
Based on 4 ratings:
1 of 1 found this helpful:
Great Kit
Easy to assemble and use. It would be nice if they could be daisy-chained more seamlessly, but one could just buy a larger matrix. Overall good product.
Nice package for starting with LEDs
It's a neat little package that's easy to solder and prepare. So far works great!
Goodie
Easy to use matrix kit, good build quality.
This kit is being sold for $9.95 while the MAX7219CNG (included in this kit) ALONE is being sold for the same price in the related products... How can this kit cost so little?
The bare chip is now $5.95.
Volume? A MAX7219CNG runs about $5 in quantity >100 from Mouser/DigiKey. For one kit, this is a really great deal!
This uses a pretty standard 32mm (1.2") square LED array, so if you want a different color this board should work with the green, yellow, and blue displays at Adafruit (but not the white one).
could Sparkfun Crew add the same chaining system as shown here : https://www.sparkfun.com/products/759 With the (fake, anyway) maxim chip on the back ??
These are awesome modules, but I ran into a speed limitation while trying to run them with a Teensy 3.0. I was getting random LEDs lighting on the end modules when I had 9 daisy chained together. I ended up swapping out the Teensy with a standard Arduino Uno which fixed almost all of the noise problems. Probably could have avoided the noise issue if I soldered all of the modules together instead of using jumpers but wanted to be able to replace a module in the field if necessary.
In the end the project was a huge success, a programmable countdown timer with real-time clock set for a particular date and time, accurate to the milli-second!
Countdown to Launch Clock
Hardware BOM:
9 x LED Matrix Kit
1 x Arduino Uno - R3
1 x SparkFun DeadOn RTC Breakout - DS3234
11 x Jumper Wire - 0.1", 5-pin, 4"
1 x DC Barrel Jack - Panel Mount
1 x Wall Adapter Power Supply - 5V DC 2A
4 x 3mm Orange LEDs
1 x Custom Aluminum case with silk screened faceplate
I received a couple of these kits today, and I was somewhat surprised to see what appears to be counterfit MAX7219CNG IC's. They look exactly like the fake one's that are mentioned in http://presentminded.wordpress.com/2013/05/02/max7219-a-comparison-between-genuine-and-counterfeit/ .. I have a couple of the original one's from my local electronic supplier, and the difference is very clear.
Ok so I bought this thing and put it together in about two minutes and it works great. It'd be great to find a different LED matrix to put into it maybe green or blue but this is a great easy little project for beginners.
Anyone interested in a library that makes scrolling text easy and has a lot of flexible options for special effects, see http://parola.codeplex.com/
This thing is pretty cool as a single board. They give you two sets of male headers so you might have to buy female headers to daisy chain them. My display looked garbled at first but flipping it corrected the problem (thank god it has a socket!!!). Also, the number 1 is backwards in the arduino sketch. Replace line 10 with this: {0x08,0x18,0x28,0x08,0x08,0x08,0x08,0x08}, //1 which will flip the 1 around.
Thanks for the digit reversal info. This drove me nuts.
I have completed the kit and uploaded the sample code but my leds are just flashing random ones on and off. Doesn't look close to [0-9] or [A-Z] I think my led matrix is shot right from the start. When I plug it in at first only a few rows light up with a blank row or two (one vertical and one horizontal) then a few led are out here and there. I wish I could show you a picture or video of how it looks. I have checked the wires to make sure they are all correct more than once cant find a fix. Do you think its a faulty matrix?
I had the same problem. I just popped the LED display and flipped it around. Worked great!
I commend Sparkfun on exceptional build quality and a decent price but I have one complaint. The width of the board does not allow for seamless, edge to edge arrangement, at least on the dozen I ordered. The LED matrix supplied measures 31.9mm but the board is 33.8mm. The gap won't effect my project but if I was anticipating building a scrolling LED sign it would have been an issue. Another manufacturer's board measures 32mm so it was much easier to eliminate the gap or at least make it not as noticeable. I decided to go with the Sparkfun board because the MAX7219 was an original part, the other board supplied a knockoff and I had a hard time eliminating flicker and random dots (not a power supply issue).
is there any good sites for me to learn to serial interface with an led matrix because i don't understand how to.
The product site has some information, but you may also want to google for 'Arduino MAX7219' - there's dozens of pages that deal with that driver IC :)
I'm tech-illiterate and looking to buy a gift for my techie boyfriend. Is this Matrix compatible with an Arduni Uno? If so, are any additional components required to hook the Uno up to the Matrix?
It'll work fine with the Uno as well.
It's a complete kit. However, you may want to pick up one of the 'jumper wire' offerings (see 'related products' below the comments section, or just search for 'jumper wire' for more options) so that it's easier to connect this board to the Uno. This board has a male connector and the Uno has female headers, so you have to go from female to male (either directly, or through the nice 5-pin female/female jumper wire, and then loose male/male ones to connect that wire to the Uno). If your boyfriend already has a collection of jumper wires, then he should be good to go :)
this looks clumsy to connect multiple together to make a seamless sign. The Parola design fixes that in one direction. Also the Parola's library would probably work for this module as well
Would someone be able to get code for an arduino pong game?
Btw this is $3 on ebay with free shipping
ok, so I'll be the dumb guy to ask the question. Why 2 caps? (I see that the datasheet says to minimize power supply ripples, but I don't understand why 2 different caps helps more than just a single decoupling cap.)
Electrolytic caps are more effective at low frequencies and ceramic caps are better for high frequencies. Neither makes a good filter by itself.
I find Elecrow has a Led matrix kit assembled module with same price. But it's green PCB Not the white one.
It would have been nicer if the PCBs were laid out such that you could chain them together on all sides, ie PCBs don't extend past LED matrix on all sides. With this design you can put the LCDs side by side but not top to bottom-- can't tell if PCB is fully within borders of LED or whether a small gap would remain. Regardless, even if you did line up two or more side by side, you would have to route wires from the top of the first to the bottom of the next. Lining up top to bottom (input to output) would leave a huge gap between the LED matrices.
Have you seen these?
https://www.tindie.com/products/FriedCircuits/led-matrix-link/
Their design looks much better for multiple displays
Looks like you could go two high and an unlimited number side-by-side if you invert the top row. It's no giant grid, but it's a start.