- Home
- Product Categories
- Arduino Shields
- SparkFun Weather Shield


SparkFun Weather Shield
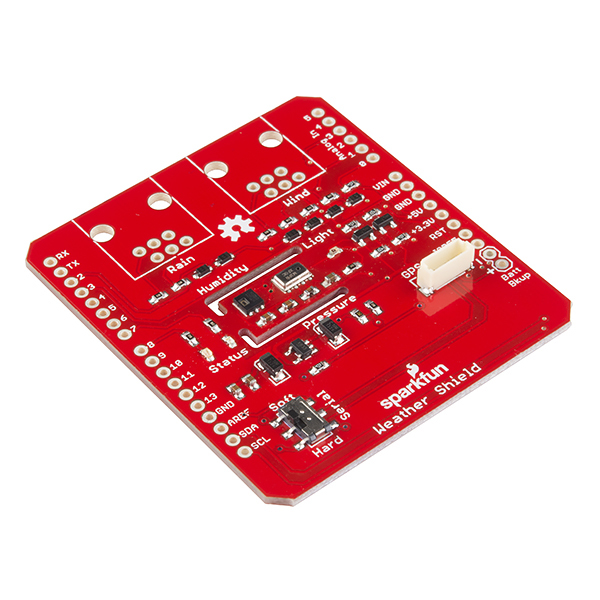
The Weather Shield is an easy to use Arduino shield that grants you access to barometric pressure, relative humidity, luminosity and temperature. There are also connections on this shield to optional sensors such as wind speed, direction, rain gauge and GPS for location and super accurate timing.
These Weather Shields utilize the HTU21D humidity, MPL3115A2 barometric pressure, and ALS-PT19 light sensors and relies on the HTU21D and MPL3115A2 Arduino libraries. Each shield comes with two unpopulated RJ11 connector spaces (for optional hook up of rain and wind sensors) and a 6-pin GPS connector (for optional hook up of a GP635T GPS module). Finally, each Weather Shield can operate from 3.3V up to 16V and has built in voltage regulators and signal translators.
Note: The Weather Shield comes as a stand-alone board. Headers, connectors, and additional sensors will need to be purchased separately, check the related items or wish list below!
Note: This shield was designed for the SparkFun Redboard and Arduino Uno and will not work with other boards (like the Arduino Yun, for example) without modification.
- Humidity/Temperature Sensor - HTU21D
- Barometric Pressure - MPL3115A2
- Light Sensor - ALS-PT19
- [Schematic](http://cdn.sparkfun.com/datasheets/Dev/Arduino/Shields/Weather Shield.pdf)
- [Eagle Files](http://cdn.sparkfun.com/datasheets/Dev/Arduino/Shields/Weather Shield.zip)
- Hookup Guide
- Weather Station Tutorial
- Hands-on-Lab IoT Weather Station
- Datasheets
- Wish List
- GitHub
- Product Video
SparkFun Weather Shield Product Help and Resources
Arduino Weather Shield Hookup Guide V12
March 2, 2017
Read humidity, pressure and luminosity quickly and easily. Add wind speed, direction and rain gauge for full weather station capabilities.
Core Skill: Soldering
This skill defines how difficult the soldering is on a particular product. It might be a couple simple solder joints, or require special reflow tools.
Skill Level: Rookie - The number of pins increases, and you will have to determine polarity of components and some of the components might be a bit trickier or close together. You might need solder wick or flux.
See all skill levels
Core Skill: Programming
If a board needs code or communicates somehow, you're going to need to know how to program or interface with it. The programming skill is all about communication and code.
Skill Level: Competent - The toolchain for programming is a bit more complex and will examples may not be explicitly provided for you. You will be required to have a fundamental knowledge of programming and be required to provide your own code. You may need to modify existing libraries or code to work with your specific hardware. Sensor and hardware interfaces will be SPI or I2C.
See all skill levels
Core Skill: Electrical Prototyping
If it requires power, you need to know how much, what all the pins do, and how to hook it up. You may need to reference datasheets, schematics, and know the ins and outs of electronics.
Skill Level: Rookie - You may be required to know a bit more about the component, such as orientation, or how to hook it up, in addition to power requirements. You will need to understand polarized components.
See all skill levels
Comments
Looking for answers to technical questions?
We welcome your comments and suggestions below. However, if you are looking for solutions to technical questions please see our Technical Assistance page.
Customer Reviews
4.4 out of 5
Based on 18 ratings:
7 of 7 found this helpful:
XBee compatibility
Note that if you plan to use this in conjunction with the XBee Shield there are some pin conflicts. The XBee Shield uses pins 2 and 3 for serial communication and the Weather Shield uses pins 2 and 3 for the rain and wind gauges. If you don't plan to use the rain and wind gauges then it "just works", but if you install the rain or wind gauges then you'll have to move the serial communication of the XBee to different unused pins.
2 of 2 found this helpful:
Having fun!
Building a weather station is my first foray into building products. I am amazed at how consuming the process has become. I am using a Raspberry Pi 2 B as the front end and developing off the Windows 10 Weather Station project. So much to learn and experience.
1 of 1 found this helpful:
Using Weather Shield with Arduino Yun
The first part I ordered had a defective humidity sensor. Sparkfun promptly sent me a replacement weather shield, and it works great! I am amazed at the resolution and accuracy of the pressure, temperature, and humidity sensor. Be aware, though, that heat generated from other Arduino boards/shields can cause false temperature readings. Using the software I2C sensor libraries, I was able to get the weather shield working with an Arduino Yun board. However, mounting the shield directly to the Yun resulted in false temperature readings due to the heat generated by the Yun board. The Yun will not be in my solar powered, wireless weather station due to the Yun's excessive power draw.
5 of 5 found this helpful:
Bug in Example Code
Nice board. Easy to use. Bug in example code calls "get_wind_speed()" twice per 1 second loop - should only call once, as it needs the 1 second period to calc the wind speed. Called from both main loop and calcWeather.
1 of 2 found this helpful:
Why GPS instead of ESP8266?
Not sure I see the win with having a GPS module designed in: when is this thing going to be environments that move about? A much more practical add-on would be a header for the ESP8266 Wifi, which would make this cloud-connected out of the gate. Especially with Wunderground which requires only a simple HTTP POST.
I'm considering my options on bolting one on myself. I could either tap into the JST connector, which brings out the UART, or I could stack a simple shield. Would like to avoid the latter as it seems overkill and thickens an otherwise svelt device (esp if you just use male header pins between an Arduino Pro and this shield).
The problem with using the JST connector is it brings out the UART (soft or hard) directly without level-shifting. The GPS module might be ok with that, but not so sure about the ESP8266. One option is to use a 3.3V Arduino Pro, but I happen to have only 5V units in the bin. I could add level-shifting myself on the piggyback board, but then I need access to 5V, where the JST only brings up VBATT in addition to VCC. I suppose I could jumper VBATT to 5V and I'd have what I need.
Or I could just sandwich another shield in there and have 5V accessible directly. Decisions, decisions.
But again, I'm not sure who would bother adding GPS to this. I'd think that adding cheap and easy Wifi would be quite popular.
Very cool thing!
Works fine! Easy to install and use.
Awesome little shield
Easy to assemble and code for. Also tastes delicious. 10/10, would eat another one.
Fantastic!
Great little shield
I have it running on Arduino MEGA, logging to and SD card... Power comes form a couple of 6000Mah Lipos
I may build in WIFI connectivity to Wundergound...
As member #6619 mentioned, theres a bug in the sample code. Simple enough to fix!!
Seems good, but skeptical on accuracy
I bought this along with the weather sensors (wind speed, direction and rainfall). Got them all mounted to my roof and this shield attaches to an Uno which reports serially to a raspi, which it turn posts data to weather underground.
Pressure seems to read about 5 inhg low (after converting the raw pascal measurement using: reading / 1000 * 0.29529980164712). Perhaps my conversion is flawed?
Other measurements seem to be close to reality, but I'm not currently conducting a controlled experiment to find out.
I am using the example firmware code provided in the product description page.
Super fun for the weather enthusiast
I bought one of these for use in an outdoor weather station uploading to Wunderground.com (as described in the tutorial). I am currently operating and uploading to wunderground using the 6Ah Lipo battery pack, a Sparkfun Arduino redboard, an Electric Imp, and the Sparkfun 'huge' solar cell as described in the tutorial. As a bonus, I also upload the data to data.sparkfun.com as you might also be able to figure out from the code. So far, it has been operating flawlessly inside a protected enclosure buried in a solar radiation shield. I liked this board so much, I bought another to monitor the 'weather' inside my house, or wherever else I want to place it. I even used this information to tweak my winter furnace settings to perfection using the output uploaded to the Sparkfun Phant server and plotting the results in excel.
As far as accuracy, I compared the outside temperature, humidity and pressure readings to the nearest official readings and they are amazingly close. Much better than I even hoped for (don't forget to correct the pressure for your local altitude, by the way, as you should see in the code).
I suspect you will learn a lot if you buy this board and make your own wunderground station. I know I did. I also expect to apply this learning on my own (future) IoT projects. Bravo, Sparkfun!
EDIT: I'm still having a lot of fun with this board, and it's been online and uploading to Wunderground for a couple of months now. A couple of improvements I made: I was not getting good feedback on the battery level with the example code so I added a "fuel guage" battery charge status board and upload the data to my data.sparkfun.com stream so I have good feedback on current battery status. It is pretty interesting to monitor the solar powered charge level given variation in sunshine and interfacing with the "Sunny Buddy" solar charge circuit.
I decided to package all the electronics in a weather proof box, which means I needed to have remote temperature sense capability (since reading temperature inside the housing would not be correct). To accomplish that, I added a DS18B20 temperature chip that I mount remotely in my solar radiation shield. That has also been working really well. This is much easier than trying to stuff all the electronics inside the solar radiation shield.
Temperature/Humidity sensor problems
A number of reports of bad data from the Temperature/Humidity sensor reported on the Github site. I experienced this problem, so I installed a DHT22 on it.
Example code is not so great either. Took a lot to clean up.
Still, it's been running outside for six months.
Works great
Using the sample code, I had this unpacked, soldered and sending data within 30 minutes. I have it logging to a Raspberry Pi, which is then sending the data to the Internet.
I've had it running continuously for about 30 days with no problems. I've not tried the wind or rain gauges.
Weather shield not suitable for outside environment
I have just completed interfacing the WS to a chipKIT Pro MX7 mostly because I wanted to look at the sensor performance. The pressure sensor requires some tuning of the I2C register read function in that there is a delay between when the pressure sensor is commended to take a measurement and when the data is available. The Hold mode doesn't appear to work at all. To use the No Hold mode, I needed to inset a 50 ms delay between writing the command and reading the measurement. The barometer reads about 2.56 in Hg low. The humidity sensor reads about 3% RH low The temperature measurements between the pressure sensor and the humidity sensor differ by 1 degree F and both read about 6 degrees F high. This may be due to my hardware configuration. These sensor measurements were compared to a General Eastern Model 900 Thermal-Hygrometer.
The light sensor doesn't appear to have much functionality since the WS circuit board cannot be exposed to the outside environment.
The bottom line is that I believe I will bet better results using sensors packaged individually but it was fun to play with.
Hi, Thanks for the feedback. We have used these in long term outdoor projects (https://learn.sparkfun.com/tutorials/weather-station-wirelessly-connected-to-wunderground?_ga=1.22051570.833401513.1365169143) however, you do need to take specific consideration to how the device is housed outdoors. You could certainly build a system using individual components as well if that's feels more user friendly. Happy hacking!
Excellent way to concentrate the weather meter
I had created my own board to accept the RJ45 connectors from the Weather Meter using discrete components. However it was much more bulky than this device as I also had an external SHT22 (humidity/temp) and a light intensity board.
This makes a much more compact weather device and even has slots in the board for arc'ing protection.
Wonderful product.
I recently bought this shield and weather meters to build my own weather station due to damage to my old system. Setup and programming was easy thanks to Nate's tutorial. Recommend this product for those weather enthusiasts that want to build their own station,
Not a good idea except to debug code
There is no way to mount the shield properly on the Mega or UNO since the USB shield gets in the way. Secondly, in order to be useful, you have to mount the entire shield in such a way that it is exposed to the raw elements all the time.That becomes problematic with the mega underneath it. So use it to make sure you can interface all the sensors and use the sensors themselves outdoors.
HI, The best way to mount these outdoors would be in a weather meter box like these. http://www.weatherforschools.me.uk/html/weatherboxes.html They protect the sensors from the elements while still allowing access to air for sensor readings.
Great start for a weatherstation
It's a great starter for a weather station having a collection of basic environmental sensors and interfaces.
It can be challenging to get the code needed to handle all the sensors, GPS, and connect to the cloud on an Arduino Uno (Redboard). I did!, but resorted to streaming NMEA 0183 standard sentences to another board providing cloud gateway functions.
Some improvements would be to allow remoting of the light/temp/humidity sensors to allow the main board to be protected from the weather and just the essential sensors exposed.
Not sure if it will interface directly with 3.3V powered Arduino's such as the Due, but with the Photon version I will likely build my next solar powered, cloud connected weather station on the Photon just due to code space.
Works well
I have two of these, in two different locations, mounted on Arduinos with Ethernet Shields. By remixing code from SFE and code from Xively, I have them uploading all the data to the Xively service. From there, I access the data in a custom iOS App (but the same info is available in a browser). The set up has been working over a year now.
-------------------- Tech Support Tips/Troubleshooting/Common Issues --------------------
Error in Weather_Shield_Weather_Station.ino where "windspeedmph" reads "0.0"
If your code is reading "windspeedmph=0.0", this is due to an error in the code not updating "windspeedmph". For more information, try reading the issue https://github.com/sparkfun/Weather_Shield/issues/24. There is a Pull Request to fix this issue. By downloading the Weather_Shield_Weather_Station.ino code, it will update windspeedmph.
Humidity, Temperature, and Barometric Pressure Not Reading?
If you are seeing this as the output in your serial monitor, make sure that you are connected sufficiently to the shield:
This is due to the connection to one of the sensors that is using I2C. I2C is sensitive to loose connections and it will not function correctly if the connections are not secure. Keep in mind this setup did not include the wind meter and rain gauge.
Issues using the Software Serial with GPS?
Having issues connecting to the weather shield but you are not using the ATmega328P microcontroller with an Arduino bootloader? The issue is probably due to your connections. There are two ways to connect to your GPS using the UARTs looking at the Eagle files. There is either the hardware UART pins (pin 0 or 1) or the software serial UART pins (pins 4 and 5). The weather shield was designed with the Arduino Uno footprint. There can be some compatibility issues if you move to other packages like the Arduino Mega. You would need to reroute the pins for the GPS if you were using software serial. Not all the pins are compatible for software serial on the Arduino Mega => https://www.arduino.cc/en/Reference/SoftwareSerial . If you redefine the software serial pins and reroute the location of the pins that the shield is using, you shouldn’t have any issues when using the software serial pins. You can also use the hardware serial UART pins on the Arduino Mega but I don’t recommend doing that. You can have issues when uploading code to the Arduino Mega since it uses the same serial UART pins.
Try looking at this comment to reroute the pins and redefine the pins https://learn.sparkfun.com/tutorials/arduino-shields/discuss#comment-54cc220cce395ff2068b4568 .
BAS16 Diodes
If anyone is wondering why the two BAS16 diodes are connected in series with the respective power supply terminals and an I/O pin between the diodes, the circuit was placed on the board for static protection by an engineer. This was just in case static electricity built up with the weather meter when it is out in the field or if long wires were used between the sensors and Arduino. This would safely protect the Arduino's I/O pins in case there was discharge.
If you search online for "static protection diode," you will find a few application circuits and an explanation. There are even packages manufactured for static protection. We just happen to use diodes already in our shelves for the application circuit.
i tried to hook this with si1145 sensor for measuring potential evaporation. the barometric pressure and temperature get negative readings at the moment when sda and scl of si1145 get inserted. the problem is completely reproducible as i have two weather shields and four si1145 for trying.
How does the light sensor work if you put the shield in a box?
If you use a solar shield there's enough scattering of light to detect sun up / sun down and rough overall light levels (clear vs. very overcast). This can be helpful if you're calculating charging rates.
looking for one that already have the headers so I don't have to do any soldering.
im using it with raspberry pi2 with win10. rain pin works fine (reports immediately) but wind speed is weird, it reports nothing for 10-20 secs and then starts reporting and stops, wind sensor can spin all the time but events arent registering or registering occasionally (not continualsy). how does it work with arduino? any ideas? thank you
Why would my weather shield stop working after 20 minutes of readings?
Any suggestion how to connect this shields Analog pins to Pi2 via MCP3008? Thank you.
Hi everyone,
I am planning to use Arduino Pro Mini board with this shield and couldn't find information relating pin description of the shield.
Any pointer is much appreciated.
Jami
All the pin information should be on the schematic for the shield. If you have any other questions feel free to email techsupport@sparkfun.com.
As I implement the my server-side software, I'm staring at the fields dailyrainin and windgustmph/windgustdir, trying to determine their use in reporting observations.
As written, the sample driver merely accumulates data in both fields, never resetting them to zero.
My main thought is to discard these fields. A reliable method of resetting them at (say) midnight local time would require a bit more programming.
Any thoughts? To discard or reimplement?
I've now located the source for the Electric Imp version detailing the method for performing a midnight reset. Problem solved.
My temperature will only show up as "tempf=-1766.2". The humidity is working however. Anyone know what could be the issue here? Any help would be fantastic.
I have the same problem. Temp = -1766.2 and Humidity shows 998.
Humidity is fine for me, it's just the temperature. Hmm, I may have to call support and see what I can do.
Try external power instead of USB power. Mine is working now.
Folks, I wonder if someone has used this shield with the Intel Edison board. I connected this shield to the Edison and the the 2 IC2 addresses (0x40 & 0x60) are not recognised by the board. The same shield work quite well with the UNO and MEGA boards. I want to build a robust weather information server and this shield could fit quite well if I am make it to work. Thanks. AC/.
BTW: The shield works perfectly with the Arduino Galileo, so it is not related to the hardware architecture
I am about done with my weather station. I added Xbee Wifi, Sparkfun Data, RTC and most importantly, support for the AS3935 lightning sensor located here: https://github.com/THP-JOE/AS3935_Wire which Joe rewrote to use Wire.h
Next weeks build should include 6) UV sensor added (I2C) 7) Cloud sensor (this is a tad experimental but it uses non-contact temperaure measures to read the cloud )I2C
Quick question - where did you get your AS3935 lightning sensor from? I've been looking but always seem to find one that's too expensive or sold out :/
a company called embedded adventuers out of new york sells the product about $ 27.00 not including s/h...
dude wanna ask if ur using all the said devices in its wishlist?... cause im planning to use arduino that directs it to pc rather than wifi
Does your station use the rain and win meters as well?
If so, how did you get this to work, since XBee shield wants the same pins (2,3) as they use?
If it's the same UV sensor I'll be using, it's not I2C...
I have spent the last two days on that exact set up and I cannot figure out what I'm doing wrong. I have the weather shield and the XBee shield and I can either get the weather stuff to work (displaying on the serial console) or the wifi to work (sending some dummy data to Sparkfun Data) but it I try to get them both working it seems like the communication with the XBee gets trashed. The hardware in all cases remains the same (Arduino + XBee + Weather) - all I am doing is changing the sketch. I even have a version of s sketch that has the XBee working and all I have to do is just include wire.h and it break; don't even do anything with it just add that one line and the communication dies. Would love to see how you've managed to do this...any hints would be appreciated!
my email is B504now@yahoo.com - if you send me an email, i will send you the code tomorrow when I get home. I presume you have softwareserial for the xbee. I had all sorts of problems with memory. I had to put the program on big diet to get down to a spot it would run.
But drop me a note and tomorrow I'll send you the code.
Thanks
Many thanks for helping me get past my issues with this shield. I was using this in conjunction with the XBee WiFi along with, essentially, the sample code from the weather shield hookup guide and the Internet Datalogging with XBee WiFi guide. And while this all makes complete sense and each is a great resource on their own it tends to put a little stress on the memory of an Uno R3. Once we trimmed the fat on memory usage (specifically RAM usage) the stack has been running great!
One last note...I found that stacking the two shields (Uno then XBee then Weather - if you put Weather before XBee the light sensor is kinda pointless) causes the temperature sensor to give higher than actual readings. Its amazing how much heat the XBee gives off. I "solved" this by simply moving the XBee to an Explorer Regulated breakout.
This all works fine on my duemilanove/328 but when I try it on my Mega/ADK with the same sketch and same shield, the humidity, temperature and pressure are wacky. Do I need to change something in the i2C setup in the sketch for the Mega? These readings are what I get and they don't change: humidity=998.0,tempf=-1766.2,pressure=-999.00
The suggestion below on using separate power makes no difference in my case. Any thoughts?
Ah, figured it out. SDA and SDC can be accessed directly on the Mega with pins 20 and 21. Just needed some short leads and it works perfectly on both boards now.
would you be so kind as to elaborate on this issue & fix? I think I have the same problem but don't fully understand your answer. thanks.
I am having the same problem with the MegaADK. I would really like to know how to fix it also
What the purpose of the milled out channels in the middle of the board near Humidity and Pressure?
Maybe isolation for the temperature sensor? This may keep the heat generated by other components on the board away.
Close - it's isolation specifically for the HTU21D humidity sensor, but I'm sure the temp. sensor benefits too. The HTU21D datasheet recommends this pattern for ventilation slits, along with clearing copper layers (which has been done, based on the picture of rear of this pcb).
Btw, its not 100% clear based on the pcb picture, but it seems D6 may not be grounded (due to the gnd fill being pinched off by the through-hole connector). However, D6 is for neg. volt. protection on 'RAIN' and not critical to operation.
I've been considering putting together a weather station - this is a nice collection of sensors on one convenient card, may finally give it a try.
You had me a little worried about your 'D6 not grounded' comment. I double checked the layout and the diodes are correctly grounded. It's a bit hard to explain but the ground pour does go underneath the 2nd diode.
Cool!
How exactly do I use this PCB? Do I just use it as an extension to a PC motherboard? This is my first time here and I'm still learning about PCBs.
The short answer is this shield is designed to mate the the Arduino Uno (or SparkFun Redboard) microcontroller. You will need to solder pins to the shield and then connect it the the board. All programming is done on the Arduino over USB. Check out the hook up guide as well for a walk through on how to assemble this.
The long answer is try emailing techsupport@sparkfun.com. They are great at helping people get started and should help you find what will work best for your situation and what specifically you will need.
The link above for the Hands-on-Lab IoT Weather Station no longer works. Looks like hackster changed the URL from https://www.hackster.io/windows-iot-maker2/build-hands-on-lab-iot-weather-station-using-windows-10 to https://www.hackster.io/windowsiot/build-hands-on-lab-iot-weather-station-using-windows-10
Anyone else have an issue getting this onto the latest Redboard with the ISP header populated? On the Redboard I received, the ISP header is taller than the pin connectors so when I try to stack my shield onto my redboard, I hit the ISP header before I can get the shield down flush with the top of the pin connectors.
Arduino shields are not meant to sit flush with the top of the pin connectors. You should have a bit of space between the top of the headers and the board. If you are still having problems try emailing techsupport@sparkfun.com and include a picture of your setup if possible.
Hey all. I am new to Arduino and lost some hours with the light sensor on the weather shield. I had strange readings when I put on a LED-headlight for testing purposes. The value on A1 went up but came down again to initial low light value without a reason. You guess what happend.. the sensor is so fast, it reacts on the fast flashing of the 1W LED headlight. After putting a 10uF tantalum condensator from A1 to ground, everything works fine. I guess you may encounter wrong values also from flashing of 50Hz or 60Hz lighting. So it turned out, the board is fine, all the sensors seem to deliver correct values. Hope that helps, have fun!
Hey all. I am new to Arduino and lost some hours with the light sensor on the weather shield. I had strange readings when I put on a LED-headlight for testing purposes. The value on A1 went up but came down again to initial low light value without a reason. You guess what happend.. the sensor is so fast, it reacts on the fast flashing of the 1W LED headlight. After putting a 10uF tantalum condensator from A1 to ground, everything works fine. I guess you may encounter wrong values also from flashing of 50Hz or 60Hz lighting. So it turned out, the board is fine, all the sensors seem to deliver correct values. Hope that helps, have fun!
Is there a timeline as to when these will be produced? I could really use one for a project I want to do.
What is the lifetime of one of these, a connected arduino and an xbee transmitter? Someone mentioned their's lasted six months, but that seems short for the cost of the boards. I am a complete noobie though so what do I know
i just want to ask if i will order this, what is the estimated time of arrival.? my location is philippines.
Well, after 6 month of operation, my Weather Shield finally quit working. The MIC5219 died and now there is a short somewhere on the 3.3V supply. It could be anything... The shield was outside, in a waterproof enclosure. Time for a new one or move on to something else?
I have spent past few week doing set up and I cannot figure out what I’m doing wrong. im using (Arduino + XBee + Weather) as my hardware. I have the weather shield and the XBee shield and I can only get the weather stuff to work with (displaying on the serial console). plug in Xbee the wifi cant find the Xbee or the wifi to work (sending some data to Sparkfun Data) but it I try to get them both working it seems like the communication with the XBee gets trashed. i put Xbee on top on weather shield and weather shield on top on arduino Uno. Would love to see how you’ve managed to do this…any hints would be appreciated!
Any chance this can be used on a 3.3V Arduino Due with some mods ?
Is this easy to integrate with a Beaglebone or Beaglebone Black using a Proto Cape and mini breadboard? Sounds like a good first weather project.
Is this easy to integrate with Beaglebone and Beaglebone Black with a BeagleBone Black Proto Capem and mini breadboard? This looks like a good first weather project,
I am building a weather station using the wimp weather tutorial and I'm a little confused by how this is being powered. I didn't see a good explanation in the tutorial but it looks like it is supplied power through the electric imp from the Sunny Buddy and wired to the 5V pin? I am currently supplying power through the barrel jack on the Uno which works with a wall plug / 9 volt battery but doesn't work with the power from the Sunny Buddy, when connected this way it appears to not gather info from the weather shield and reports no data to send then goes to sleep.
I am pretty new at this so any help would be greatly appreciated.
Weather Shield and pcDuino I have had mixed success using the Weather Shield on a pcDuino 3s. I have loaded the latest kernel (20140721) and the latest lUbuntu (20140430). I also have loaded the pcDuino with Qt version 4.8.6 and Qwt 6.1.0.
My first attempts to duplicate the output of the Weather_Shield_with_GPS sketch running on an Arduino Uno resulted in many discrepancies. * I could not get the serial output to work. Several web queries leads me to believe that the SoftwareSerial library does not work on the pcDuino. So, I turned the switch on the Weather Shield to route the GPS output to UART2. This did not work at first until I obtained a copy of the setuart2 program that can be used to turn the UART on or off. Now, I was able to receive and process the GPS data.
While the HTU21D module's humidity and temperature seem to be working properly, the same could not be said for the MPL3115A2 pressure and temperature. I have not yet determined why this the case. It should be noted that the HTU21D readings returned are skewed by the heat given off by the pcDuino board.
The readings returned for battery level and light level were wrong. The light level never seemed to change. I finally determined that there were two problems. First, the value of /proc/adc1 which should be the light level always seems to be 63 no matter how much light is shining on the light sensor. However, I discovered that if the unused AD0 pin is grounded (I don't have the optional wind and rain sensors), then the value of adc1 (/proc/adc1) would change. However, the program still didn't display a good value for light_lvl. This turned out to be because the ad0 and AD01 pins are only 6 bits resolution instead of 12 like the others. So, the value returned has to be shifted: change the get_light_level function line where the light sensor is read from: float light_sensor = analogRead(LIGHT); to float light_sensor = (analogRead(LIGHT)<<6) | 0x37;
I have developed a Qt graphical application using the Weather Shield and would be glad to share my code. And if anybody knows why the MPL3115A2 doesn't work, I'd appreciate it.
I may have come up with a solution to the MPL3115A2 pressure reading. Unfortunately the fix is probably curing the symptoms and not the real cause. To get it to work, I had it read an extra byte, i.e. 4 instead of 3 and then discarded the first byte. Now the pressure is calculated properly.
In addition, the temperature appears to be read correctly if you read 6 bytes and throw away the first 4. The conclusion is that the TwoWIre class is ignoring which byte to read and always starts at byte 0.
I'm using a Minnow board, and the I2C isn't working. Specifically, the ACK bit is oscillating. Looking with a scope, I see the start, an address (C0, write to pressure sensor, then a bit time of oscillating levels (alternating ones and zeros at a much higher frequency) when there should be an ACK (low level). Any suggestions?
Can you confirm which pins are not used ? If I read the schematic correctly ( a bit of a leap) it looks like 9-13 are unused.
I have successfully gotten the XBee Wifi and the weather station to post to sparkfun.data and I am (with help) integrating the lightning detector into the software. I need one more pin to create a custom interrupt.
Thanks
Lightning working with some major help from a friend. Cleanup in progress
Yep! D9/10/11/12/13 are available to be used. You can even cut the traces to status LEDs and use them if you need.
I am having a problem with the humidity sensor. When I power up the board, the humidity data is negative. The data eventually switches to positive (example: switching from about -68% to 56%), although this can take less than a minute to almost 10 minutes. The Temperature data is fine, and I am using the HTU21D_Arduino_Example program. Does any one know what's going on? Update: the humidity sensor is bad - returning to sparkfun.
Anyone tacked on a lightning sensor yet ?
In progress :-)
I just bought the weather shield and weather meters and I am trying to make it work with Arduino UNO R3.
I connect everything like in the hook up Guide.
But when I run the example you provide, I get this wrong values.
$,winddir=113,windspeedmph=0.0,windgustmph=0.0,windgustdir=0,windspdmph_avg2m=0.0,winddir_avg2m=26,windgustmph_10m=0.0,windgustdir_10m=0,humidity=998.0,tempf=-1766.2,rainin=0.00,dailyrainin=0.00,pressure=-999.00,batt_lvl=17.18,light_lvl=3.00,#
Arduino is connected with the shield through stackable headers like the example and the meter is attached with 2 x RJ-11 6 pin coonectors.
I am running this on a retina mac with 10.9.4 OS and 1.05 Version of Arduino
Could anyone help? cheers
Hie guys, does this module work with the netduino plus? does anyone have any pointers to code, instructions? thanks
Hi, I cannot find this shield in the Fritzing software, could someone help? Thanks
Hi, I don't believe this is a default part in the Fritzing software. It also doesn't look like we have added this part to our Fritzing library. You can check online to see if someone else has made this part for Fritzing, otherwise you might need to make it yourself.
I have some problems with the shield. First the temperature from the HTU21D seems to be a bit to high. Second the MPL3115A2 was working fine for the first few days. But now both pressure and temperature is way off (and not changing): 481.27hPa and 34.94C (it really is 1017.9hPa and 25.6C). Also the "Who_Am_I" register is supposed to return 0xC4, but now I get 0x2E for some reason.
How do i use Arduino Yun with the SparkFun weather shield?
I am using weather shield with my arduino yun. im getting 998 for my temperature ,humidity and pressure sensors. how do i solve this problem?
How do you use the Weather Shield with a Mega R3. If not as a shield then what pins do you use? Also can you use it with a Due?
Because the I2C lines are broken out to the R3 this should work on the Mega. Keep in mind there are also things like interrupts which might not line up right though. As for the Due, that's a bit trickier. All the sensors seem to be running at 3.3V so it might work, but the interrupts are going to be even harder to get working on the Due. For more information email techsupport@sparkfun.com
Hi guys, I have an issue with the software. The generated results from my humidity and temperature sensors while connected to an arduino hardware gives a constant 5volts. The sensors a4 and a5 are HV_SDA and HV_SCL respectively. I am unsure if there are coding required to activate these sensors, or would any resistors be required to enable the sensors to work? Any assistance is greatly appreciated! Thanks!
Are you running the example software? Also make sure that you're using the latest libraries. And check your headers.
example & libs
i keep getting "temperature:998.0C Humidity:998.0%" for my readings. Whats the problem?
And remove any pull-up's on your I2C lines.
Hmm, are the header pins soldered correctly? 998 is an error code that indicates the I2C is timing out. Double check that the I2C pins are connected. If you continue to run into problems feel free to contact tech support.
So I have both the old weather board and the new weather shield and while my opinion is unencumbered by the thought process, here it is.
I know Sparkfun is updating the weather board but I like the shield better. Having an Uno underneath is less of a burden and it does make the whole process of development simpler. My suggestion would be to add a second shield. Take the current Xbee shield (which I love) and add LIPO charging circuit, an I2C RTC, and an SD slot. This would take the current shield and make it easily standalone. Xbee for wireless, LIPO for remote power, the clock and shield to store data if the wireless link drops. The Weather board will end up pretty dense pretty fast and having 3 boards isn't a big deal.
Just my thought
Can the GS407 gps unit be used with this, in place of the GP635T?
Sparkfun, What is the minimum number of pins required to use this shield and get all of the data from it? I am looking at locating this away from my Arduino in a separate enclosure and connecting it via an 8 conductor cable and RJ-45 connectors. Will 8 conductors be enough or will I need more? Thanks.
A sensor that measures Solar Radiation in W/m2
A sensor that measures Solar Radiation in W/m2
Is there something for Solar Radiation Sensor?
How accurate does this read the temperature? I thought I remembered reading + or - 0.3 C, but that seems like a big error.
Im looking to connect this to your weather meter (so far so good) and transmit wirelessly to a raspberry pi. However, I would like to connect this straight to an Xbee, without the Arduino. Basically keeping it even simpler. Is that possible?
I got the idea from the Wired (http://www.wired.com/design/wp-content/uploads/2012/10/Sparkfun-Weather-Board.jpg) but that's using your old board.
Of course, otherwise I would simply have to go with an Arduino, but it's another thing to program and maintain that could break when the -20c winter comes :)
Just got my weather shield, but forgot to order headers. (In my impatience) I slapped on what I had, forgoing VIN, and pins 8 and 9. It took me a visit to the schematic to figure out why I was getting bogus values without VIN connected, but now that it's working I've still run into some interesting issues with the example sketch on the Leonardo:
Any suggestions?
Edit: Guessing that this is an interrupt problem, further inspection of the datasheet reveals that the anaeometer is supposed to close a switch once per revoluion, but checking it on a multimeter it's actually a normally closed contact that opens when the magnet passes. Did I get a deffective/different anaeometer, or is this just an interrupt issue?
Edit 2: I isolated the issue to interrutps being fired whenever working with the I²C bus to read the barometer, etc. The Leonardo uses pins 2 & 3 for I²C, so an interrupt gets fired every time data is sent. As a work around in software, you can detach the interrupts for the weather sensors before using I²C data, and reattach them when done.
I am using this with the weather sensor kit. Mostly working, but I noticed that with the rain sensor, i'm getting some false readings. It seems to be worse when the units are outside, but I get them inside as well. I left it running indoors for 12 hours today and measured .03 inches of rain, yet the house was quite dry. :-) When the sensors and arduino were outside (arduino was under an enclosure and on a covered patio) the number of false readings was much greater - every few minutes at some times. Any clues?
I managed to catch some of these interrupts on the logic analyzer. Very short duration drops, like less than 100 nanoseconds. Changed the interrupt handler in the sample code to confirm the pin is low. Seems to work better now. Maybe the pull-up just isn't enough at times? I found the same problem with the wind speed by the way. Taped it in position and still saw occasional clicks. Much less of an issue there I think since it takes so many to get even 1 mph of wind speed.
Hmm, this is very interesting. Thanks for coming back to tell us what you found. I have seen one or two rain gauge 'measurements' on the station on top my house that don't quite match to conditions. I'll see if I can replicate the short pulses you're seeing.
I have a La Crosse WS2310 that periodically tells me wind is 100+ mph (When dead calm) - it looks like this uses the same sensors. There are some things you can do to reduce sensitivity to noise. The long wires pick up noise from lightening etc. Took a while to find the link again. http://www.lissproductions.org/wuhu_manual/2011/11/26/lacrosse-23xx-wind-sensor-modification/ Reminds me that I still need to do this.
The status LEDs should be labeled "Blinding Blue" and "Is It On? Green" since the mcd ratings are not matched. =P Or is that so the light sensor can measure the dark? I feel the ambient light sensor circuit needs some work... Mine reads 0.00 right now sitting above my monitor in very softly lit room. I'll probably grab a few to experiment with an op-amp.
I wish I looked at the schematic closer before purchasing; the Wind pin-out is not compatible with the Davis anemometer I already had lying around.
hi, i am interseted in using the weather station (and the weather board)with the arduino ethernet shield.Is that possible to happen and how it will be the best to put together the three boards (arduino+ethernet shield+weather board) I mean which comes first is it of any importance?if you know any tutorial regarding that I would be grateful too thank you in advance!
I suggest putting it top most so it is more exposed to the environment. I used these longer non-stacking pins on my boards: https://www.sparkfun.com/products/10158
How can I get the sensor library files that are needed to run the example program for the Sparkfun weather shield? Looks like I need 3 libraries, HTU21D, MPL3115A2 and maybe ALS-PT19.
Have you had a chance to look at the hook up guide? All the software is over there. If you just need the two humidity and pressure libraries you can grab them here.
I tried to use the libraries in mpide because i use chipkit of digilent, when i compile the program show me problems about wire.h can you help me please to solve this problem?
Below freezing I got some strange results using the example code. It appears that MPL3115A2.cpp does not take into account the 2’s complement nature of negative numbers used by the device; (see Application Note). The following shows additions to readTemp() which appear to fix this:
…
This affects pressures also, if there is a negative value.
Note that -999 results indicate a timeout. In the cpp, the timeout values have been increased versus other examples.
Also, there was question about the Ethernet shield. It’s fairly easy to combine this code with the Arduino BarometriPressureWebServer example. But, keep in mind that the Wiznet W5100 is quite hot and very close. It added about 10F at room temperature.
It’s 1.1 degrees Fahrenheit right now. Sorry about not knowing how to use GitHub…
(headsmack) Thanks D.D.G.! I forgot to test the sensor in the freezer. I've pushed your fix to github and the tutorial. It compiles but I haven't been able to get the sensor to negative temps yet. Please double check my work and thanks for helping out!
Nate, I think the library is over with the breakout board on github. I added it to the shield example and it's working fine... in my freezer.
Got this board and ordered the anemometer/rain gauge. I'm trying to make this wireless, but I'm somewhat of a newbie. I was hoping to use XBee (series 1), and I have the parts needed, just having trouble on the software/comms side. The Xbee tutorials seem to use a much older version of the X-CTU, and I can't find how to set up the XBees to my network. Is there a better way to do this, or someone willing to help dumb-down the XBee comms for a newbie? Thanks!
It sounds like you've had a look at our two XBee Quickstart and Getting Started tutorials. I didn't realize there was a new version of XCTU (133MB, really Digi?). We'll try to get the tutorials updated soon. If you're just looking to get weather data out to the world you may want to checkout the XBee Wifi Guide or the Electric Imp.
Brain freeze the units are good. I mistook psi for in" of HG when comparing. (I wish we would just move on to SI units like the rest of the world) Ken
Cool Board, I am having fun with it so far. Working to make it solar powered and log to a SD card to "duct-tape" to a hang glider.
I am getting a nonsensical value out from the pressure sensor. 94967.75 What units are these? The data sheet claims Pascals. I am at about 610m. The altitude reported is 548m (in altitude mode). This is much closer than the pressure value reported yet is not corrected to known weather pressure conditions. Raw pressure would be more useful to me in my application.
The values change with altitude with sensitivity that seems to be within the 30cm.
Thanks for any comments or ideas Ken
Sounds like you got it figured out. The pressure sensor outputs readings in Pascals. Check the example sketches and let us know if you run into any other problems.
I'm using this shield with the freetronics EtherTen Aurdino clone and it came right up using the provided libraries. I have noticed that the HTU21D always reads 1°C higher than the MPL3115A2, and both seem to read a bit warm. I guess I need to calibrate them and adjust the readings in software...
For anybody else using this with the EtherTen, you can cut out a slot in the weather shield where the RJ45 jack protrudes. This cuts the traces to the dedicated I2C pins (for R3 arduinos) and the serial wires (for GPS). You don't need the I2C pins with the EtherTen, and if you need to use GPS, you can add the serial lines back with a couple wires. This allows the weather shield to seat onto the EtherTen without extra spacers. The only negative is that it places the sensors about 1cm closer to the warm chips on the EtherTen. Also, it voids your warranty and removes the SparkFun logo, so I guess those are negatives too ;)
Sorry, I don't have a good reason why one sensor may be higher than the other. Calibration is really going to be required if you need to get 1°C accuracy.
Unfortunately, no. I'm just using the MPL temperature, since it seems to agree with other thermometers.
Will this work with the ethernet shield too ?
I am using this board with the Ethernet Arduino (not shield, https://www.sparkfun.com/products/11229). The SS for the SD card on pin#4 conflicts with the GPS TX. So I pulled out the header pin and hardwired #4 to #9 on the Weather Shield. Works fine.
Will this work with the Yun?
Just got a Yun and the weather shield this week. Out of the box they will not work but with some simple changes you can get most of the features working.
I was looking to record temperature, and humidity, and I now have this working with the Yun and the weather shield.
As noted here the two wire interface on the Yun is on D2&D3 as opposed to the UNO which is on A4&A5. The temperature, humidity and pressure sensors on the shield are wired to A4/A5. So for now I have jumped A4 to D2 and A5 to D3.
Second, the weather shield wants power via VIN which it regulates to 3.3V for the pressure, temperature humidity sensors etc. Unloaded there is 5V present on VIN on the Yun but as soon as you plug in the shield it goes away. Simple solution is to jump 5V to VIN (I am powering Yun via USB). Note there is a warning about VIN on the YUN spec sheet.
I now have the example code running, but I removed all of the code related to wind, and rain because of the jumps I made above (Wind and Rain are on D2 and D3).
Thanks your post gave me the key piece of information that I needed to get the Yun working with the wind, rain, pressure and humidity sensors. I used a soft I2C library( https://code.google.com/p/rtoslibs/downloads/detail?name=DigitalIO20130221.zip ) so interrupts are no longer an issue and ported the libraries that Sparkfun provide for each of the sensors. Anyway incase someone finds this useful I have posted the code here: https://bitbucket.org/craigspry/weatherstation/ This has only had a very quick test, 5 minutes on my bench, so there are probably lots of bugs lurking in the code. To get this to send back weather information you need to send a W over the serial line.
I started testing this unit, and I was able to get the Yun to output data from the example code. But, you can't use the rain or wind sensors. The rain and wind sensors are on D2 and D3 because those are the interrupt pins on the ATMega328. While they are also the interrupt pins on the ATMega32U4, they are also the I2C pins on the ATMega32U4. Because the sensors on the board are I2C, this means there is conflict with the Rain/Wind sensors. The logical resolution would be to connect the rain/wind sensors to the ATMega32U4s interrupts, but, the ATMega32U4 only has them on D2, D3, and D7 (and the hardware serial lines which are not available on the YUN). In other words there just aren't enough free interrupt pins to use the rain/wind sensors. If you aren't using them it should work though. Keep in mind that the shield will short A4/A5 and D2/D3. Also with the Yun the Ethernet jack is tall enough that no shield will fit on it well. I would just get an extra set of stackable headers.
I'm attempting to use a soft I2C library(https://code.google.com/p/rtoslibs/downloads/list) to get this shield to work with the Yun, but I'm noticing some odd behaviour. Here what I have tried so far. Firstly I got the the MPL3115A2 breakout board working with this library, basically converted the sample sketch with an Arduino Duemilanove. Then once that worked I got the humidity sensor to work and did a simple sketch that read from both sensors and plugged in the weather shield and it worked, much to my surprise. I also tested this with a Uno.
Then I repeated the same process with the Yun, the MPL3115A2 breakout board worked but the weather shield did not, with Simple humidity/pressure sketch or the weather shield sketch. The other odd thing I noticed that the rain and the wind interrupt had to be swapped to read correctly.
So can anyone here shed some light on why this may be so?
I can share the code if anyone is interested, once I've tidied it up.
*UPDATE: I got the Soft I2C to work with the weather shield and Yun when I plugged the 5V pin from the Yun to the Vin pin on the Yun, not too sure why this works because when I measured it they were about the same voltage. I will wire up the wind and rain sensors when I have time and report back if they work.
Thanks for the research...much appreciated.
I would also like to know if it works with a Yun. Or what I would need to adapt the weather shield to the Yun. Thanks in advance for any help or tips! (no guesses please, I am interested if someone has actually done it, I know you guys can make anything work :-) but I would like to have a little head start and know the Yun and weather shield really play well together :-).
PS: FYI I noticed today (Dec. 11) the GPS module and the rain/wind sensor package are on backorder :-(.
I haven't tested the weather shield on a Yun but it should work.
From Arduino's site: The Yún's 32U4 functions in the same way as the Leonardo, except you cannot use Serial1.
The weather shield works swimmingly with the Leonardo so it should work just fine with the Yun. The major interface pins are the I2C bus. Everything else is just GPIO. The ATmega32U4 on the Yun should work well.
Hardware wise it might work then, but what about conflicts with the bridge library. Can it please be tested and let us know if it actually works?
Any feedback yet? I know the I2C pins are different on the YUN/Leonardo vs Uno etc. Sparkfun have you guys tested this on the YUN? If it work I want to order a few!
Does this require a 3.3V Regulator on the Arduino Board?
Nope. The weather shield has a 3.3V regulator on board.
Temperature sensor?
Oh nevermind. :).
Yep :) Both humidity and pressure sensors have a built in temp sensor.
Let's see now - The light sensor is buried on the board. So if we are in an enclosure (ventilated) there is no way to determine the light outside the enclosure. Is there any way to remote the Light sensor? Other than that it looks like a great board. I will be ordering one soon.
I agree, many of the sensors are directly on the board. I was planning on using this in an environmentally stable enclosure (no light, controlled temp, weather proof, dust proof, etc). It would be great if this board had the sensor connect via connectors, so that I can locate the sensors outside, while the shield, arduino and other electronics are safely inside. Looks like I'll have to build my own version and use this board to prototype the software with.
Another thing that I noticed, the weather shield and the ProtoShield (DEV-07914) both do not fit on the Arduino Uno, Arduino Ethernet Shield, or the Arduino Yun. They all make contact with either the ethernet connector metal case, the USB-A port, or the USB-B port (on the Uno) and cannot be fully seated on the headers. I presume metal around the ports are all grounded and would therefor ground this shield and the ProtoShield (leds, resistors, and switches). Not sure which Arduinos the shields will fit on.
EDIT: (SOLVED) I inserted an additional set of stackable headers (PRT-11417) between the Arduino Board and the Weather Shield. Additionally, I'm going to use the weather shield as is, since it has the pressure sensor, rain and wind connectors, etc already, and they will work within the enclosure. The on board humidity and temp will give me data for temp within the enclosure. Then, I'm going to add an additional board on top that will have a RJ-11 connector that I'll connect additional temp and humidity (for inside and outside of my greenhouse) via I2C to multiple HTU21D Humidity Sensor Breakout (SEN-12064) boards.
I was about to set out on the project building comparable functionality out of the Arduino FIO (need XBee to communicate the data points), so this definitely looks like a product that could save me some time. However, like the prior poster, I'm at a loss as to how to weatherproof this board and its enclosure.
I use a weather tight box that opens on the bottom. I cut an opening on the bottom and covered it with a screen. This fits inside my solar shield (from Ambient Weather) which makes it weather proof and alows the temperature and humidity to be read. This way you get double protection.
You could always add a light-pipe ( or possibly fiber optic cabling ) that extends to the outside of your enclosure. You can always handle the variances in software.
That sounds like a good idea. Fiber optic will transmit the light with little loss. A multi fiber bundle would get even more light.
Thanks john
How about a transparent box? - you get the bonus of a cool view of all your gear. This will also help in early detection of moisture issues.
Clear box would be really bad idea since the light source would be the sun and that would obviously cause the temperature sensor to not give accurate results.
While what you say is true, it also applies to any enclosure - a black box with a lightpipe/fiber optic would certainly suffer from solar heat gain as well - at least with a clear enclosure you could add a foil shield to reflect the solar radiation and hopefully mitigate this gain.